Are you getting ready to celebrate your child's first birthday? Or do you want to organize a party for adults and children? Colorful posters, bright garlands and wall newspapers with your photographs will be a wonderful decoration and create a festive atmosphere. And so that you don’t have to quickly master Photoshop in an effort to decorate your apartment for your birthday, this site was created. On our website you can order products for any holiday or just memorable souvenirs. Our designers will create for you a poster, calendar, postcard, wall newspaper or any other souvenir with your photographs. Holiday posters are a wonderful decoration for any holiday or celebration!
We always focus on the customer's deadlines! ATTENTION! We are not an online photo frame site! Our designers will do all the work for you. You just need to send us all the necessary material to our email. However, it is not necessary to place an order. Send us the names of the designs you like by email and we will accept your order without placing it in the online store.
How to get photo souvenirs?
You can purchase the layout in electronic form and print it yourself, or we will order poster printing from an excellent printing house. Our own printing house always works for you!
You can receive your order yourself at one of the delivery points or through a courier service.
Free pickup of finished products is also possible .
To my beloved
A wall newspaper is given as a gift for a birthday, Valentine's Day, or for no reason. The inscriptions include original compliments, declarations of feelings and wishes.
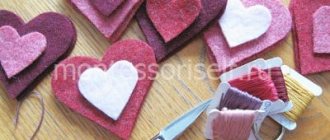
A heart-shaped photo together looks beautiful.
There are several types of paper:
- Matte. Does not shimmer in the light, does not glare, does not reflect. Can be hung on the wall. Posters on matte paper are framed.
- Glossy. The surface is smooth and shiny. Emphasizes the quality of the image, shimmers in the light.
- Semi-gloss. It conveys shades well, image contrast, and does not gather dust.
- Self-adhesive. The image looks like it was on matte paper. Thanks to the adhesive layer, the poster can be glued to any flat surface (stands, sides of vehicles).
The poster can be laminated to increase durability. This will keep the image bright for a long time.
Our company provides professional poster printing. High-performance equipment, print quality, and suitable paper guarantee products that meet all customer requirements and wishes.
Rules for poster design
11 rules for an effective poster:
Rule one. Compliance of text blocks (main and additional headings), as well as artistic design and design style with the theme, idea and purpose of the poster.
For example, a poster with information about a scientific conference or other official event is best done in a business style, discreet colors and discreet design.
Advertising, concert, holiday and greeting posters, on the contrary, should be designed brightly, catchily, creatively, and sometimes with humor.
Rule two
Informative, concise, interesting, attention-grabbing and easy to read text message. The text of the poster must be carefully edited: make sure it is short, clear and easy to understand, correct errors, get rid of unnecessary and insignificant words, unsuccessful phrases
Rule three. The key information contained in the poster should be read and remembered first. That is, the most important text block of the first level (the main heading) is typed in the largest font. More detailed information and details are included in text blocks of the second and third levels (additional headings, or subheadings). Smaller font sizes are used for them.
Rule four. One poster contains no more than two types of fonts that combine in style
When choosing a font, it is important to remember: the size and style of letters and numbers should not be discordant with the format and theme of the poster. It is worth considering that beautiful, but overly pretentious, decorative fonts can actually turn out to be illegible and tiresome for the eyes when reading from a distance
Rule five. Fonts should be visible and clearly visible from afar
To do this, it is important to choose the optimal line and letter spacing. Words, lines and headings of different levels should not merge into a continuous canvas on the poster
Otherwise, it will be difficult to read what is written.
Rule six. Images, backgrounds, frames and other visual elements of the poster should also correspond to the theme and complement the text block. They are selected and placed on the sheet in such a way that the text remains visible and easy to read. Some posters (in particular, diagrammatic posters, posters for visual education in school and kindergarten) may contain only images. Others (for example, educational posters-tables, posters-instructions, diagrams, etc.) may consist only of text blocks.
Rule seven. The sharper the text and images contrast with the background, the more noticeable the poster.
As you add elements to your poster, it is important to ensure that contrast is maintained and that letters, numbers and pictures remain easily visible from a distance.
Rule eight. The most important text elements should be placed at the top and right, and illustrations should be placed primarily on the left. This makes information read and remembered easier and better. This rule is associated with the peculiarities of our brain’s perception of verbal (verbal) and non-verbal (visual) images.
Rule nine. All elements of a proper poster must be made in a harmonious color scheme. It is advisable not to combine the colors of warm and cold palettes in one poster. If you know where the poster will be placed, it is better to select the shades of the background, symbols and images in accordance with the design of the room. Graphic designers use special color wheels and palettes to find optimal color combinations.
Rule ten
When designing a poster, regardless of its purpose and theme, it is important to observe moderation. Ideally, this is only an expressive contrasting background, laconic (at the same time maximally informative) text elements and images that harmoniously complement them
Rule eleven. You should not try to fill the entire space of the sheet. The poster can end up cluttered with details, tiring to the eye and difficult to read. When planning the arrangement of elements, it is worthwhile, as designers say, to “leave some air” - to provide areas of free space. This is one of the effective ways to increase the effectiveness of a poster.
The main stages of creating a poster:
- Stage 1. Determine the theme, purpose and style of the poster design.
- Stage 2. Writing headings and text blocks. Editing. Selecting suitable fonts.
- Stage 3. Search for poster design ideas. Selecting backgrounds and images. Choosing a harmonious palette of colors and shades.
- Stage 4. Creating a rough poster layout in a graphics editor. If the poster is drawn by hand, create a pencil sketch on paper.
- Stage 5. Making edits, adjusting combinations of font colors and images, line and letter spacing.
- Stage 6. Printing a test sample.
- Stage 7. Creating a final version of the poster.
Types of posters
As a printing object, a poster must meet certain requirements and be produced by specialists using professional equipment.
Posters can be of several types
- Informational. Includes instructions, announcements, event information, and warning notices.
- Propaganda. The topic can be any (politics, religion, ecology, for peace and friendship, against alcoholism, smoking, drug addiction).
- Advertising. You can post any information about the product, brand, discounts and company contacts.
- Image. Contains a picture of a product or service, a logo with minimal text.
- With photographs of famous rock bands.
- Prohibiting (do not swim, do not light a fire, do not cut down the forest).
Posters can be printed in any format from A6 to A0. For example, on A4 format you can:
- Announce a film or performance.
- Inform about an event or promotion.
- Posters customized for a client's special occasion (anniversary, wedding, birth of a child).
Such advertising is placed at train stations and airports, in store windows, and in office centers.
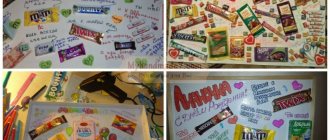
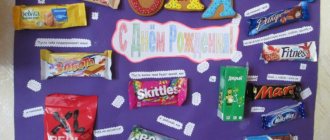
How to make a poster out of sweets: design procedure
Once you have purchased everything you need, you can start making. Depending on the size of the base, you need to choose the appropriate place to work. It is not always possible to fit on the table. More often you have to sit on the floor. Whatman paper, although dense, can sag on carpeting. It can be accidentally dented or pierced by writing objects. Therefore, choose a solid base.
Large formats of paper are rolled into a “tube” in the store. To prevent them from curling while working, place them with the “rolled” edges down. And press in the corners with additional weight.
- First of all, mark the contours with a simple pencil. Place treats over the entire surface of the paper. Using light movements, complete the necessary inscriptions. At the same time, the treats can still be moved. At the end, circle them and remove the excess from the poster.
- Make the necessary inscriptions, decorate the background and glue magazine clippings if you need them. This is much more convenient when you don’t have anything at hand yet.
- Glue the sweets themselves and other voluminous design details. Before gluing, use an eraser to erase the outline you outlined at the very beginning. Do not erase all the markings at once. So you can get confused. Remove excess exactly in the place where you plan to glue something.
Depending on the weight of the treat, select the method of attachment. Lightweight parts will also withstand office glue. It is better to glue very heavy ones with sanitary silicone sealant. It's transparent and will hold up even to a box of chocolates.
Types of printing and paper
Posters are printed in different ways and on different types of paper. The printing method is selected depending on the format, circulation and urgency of the order. There are several types of printing:
- Offset. This method is used for runs of 500 pieces or more. For a small order, offset printing is unprofitable; printing plates must be made and colors adjusted.
- Digital. Allows you to print a poster on a modern printing device quickly and with good quality. Paper size no larger than A3.
- Widescreen. Thermal inkjet or piezoelectric printers (plotters) are used.
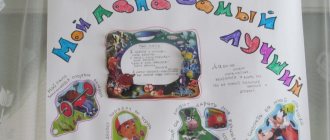
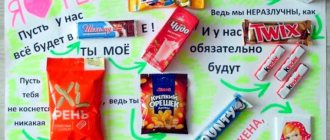
An original, beautiful birthday poster for mother and grandmother from her daughter: ideas, photos
A poster of photographs is one of the effective ways to surprise and congratulate your mother. No extra words are required: everything will be said with the help of photographs.
To make a photo collage you will need:
- best family photos
- mother's or grandmother's (if you decide to make a photo collage as a gift for your grandmother) the most successful portrait
Stages of creating a photo collage:
- We place a portrait of the hero of the occasion in the center. We glue the rest of the photos in a circle.
- You can draw the outlines of a bird, a heart, or a cat's paw on a piece of whatman paper. Cut and paste photographs inside the resulting shape. Photos can simply be pasted onto a piece of Whatman paper in the shape of a heart or birthday cake.
- Attach a garland along the contour of the photo collage. This way you will make an ordinary day truly festive.
- You can use several people to create a photo collage. Ask people close to the birthday girl to take a photo with the sheets on which congratulations are written.
- By collecting one whole from many pictures, you will make a collage filled with sincere emotions and warm words, which the birthday girl will admire even after her holiday.
Photo collage for mom
Photo collage in the shape of a heart
How to make a mosaic poster?
To give an original gift to the birthday girl, you can make a quest game out of an ordinary poster.
To make a mosaic poster:
- We are figuring out where we will hide the gift.
- On the poster we depict the place where the gift will be located.
- We cut the poster into several parts. These will be puzzle pieces that need to be put together.
- We write on each of the cut pieces vague clues about the location of the poster presentation. We hide them in the house.
- The birthday girl needs to collect a whole poster and find out where to look for the gift.
How to make a “flying” poster
How to make a “flying poster”?
- You can surprise your mother or grandmother by giving a flying poster that will fly around the room on large bright balloons.
- For such a gift you will need 15-20 gel balloons, but you need to take them with a reserve. Some may burst or deflate.
- You can make another version of the greeting poster: hang letters attached to each other from balloons. You can write a congratulation for the birthday girl in letters.
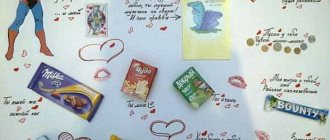
Ideas for inscriptions for sweet gifts
- “Twix” is a “sweet couple” or a wish to find your other half.
- “Snickers” - don’t slow down in life.
- “Mars” - “everything will be in chocolate” or a wish to visit this planet.
- “Bounty” - so that life is a heavenly pleasure. If the poster is made for the other half, then you can write it differently: “Next to you I experience heavenly pleasure.”
- Kinder egg - let life be filled with pleasant surprises. This inscription will fit perfectly into posters with chocolates and inscriptions to a friend or friend. If the recipient is your other half, then with the help of Kinder you can hint at the imminent appearance of children.
- Sweets with cognac - “let happiness intoxicate.”
- Chocolates in the form of money - “let life be prosperous.”
- Skittles are happiness pills (antidepressants).
How to make a birthday poster with your own hands?
It has already become a pleasant tradition to include a postcard with a gift. Sometimes you want to show originality - to give a paper greeting an unusual and memorable look. Therefore, any non-standard ideas that will create a cheerful mood and will be remembered by the guests and the birthday boy for a long time are welcome. A great option is a DIY birthday poster. Everyone will like such a congratulation, and both relatives, friends and guests of the birthday person can take part in its creation.
Catalog of photo souvenirs
| Posters and Wall Newspapers | Holiday posters and wall newspapers for kids: • My first year • Mom, dad and me (Who is the baby like?) • Metric poster • My height and weight in the first year • My family • Happy Birthday! • Posters with numbers poster from us on any background, with any cartoon characters . Send all your wishes for the future layout and we will definitely take them into account and create a poster that you and your child will definitely like! | |
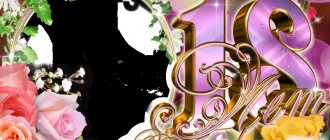
| Anniversary Posters | Beautiful individual posters and wall newspapers for Anniversaries and Birthdays for adults will decorate the holiday and make a lasting impression on the birthday person. Choose the best and favorite photos and we will create for you an unusual and memorable photo poster for the Anniversary , which will remain with the Jubilee for a long memory. | |
| Metrics Poster and Achievement Poster | What is Poster- Metrica ? This is the date and time of birth of the baby, his weight and height. But in addition to the parameters at the birth of a child, the poster can contain information about the baby’s achievements for the year, his favorite toys and food preferences. The metric will be a great gift for a newborn, a one-year-old and his parents! | |
| Calendars with your photos | An excellent gift for family and friends - calendar With Yours photographs! Choose your favorite calendar layout and send us your favorite photos. We will produce an exclusive high-quality photo calendar This calendar will delight you and your loved ones all year long and will definitely remain with you for a long time! | |
| Train and 12 carriages | An original decoration - a train with photographs of your baby from birth to 1 year (or for any other period). Each sheet has a separate month. You can also make additional trailers: “I’m in my mother’s belly”, “I was born”, “I’m going home”, discharge, My christening, My first New Year and so on). | |
| Festive garlands | Garland "Happy birthday!" with photos Your baby is suitable for a child of any age. Each garland flag is printed on a separate sheet. All you have to do is cut out the flags along the contour and fasten them together with ribbon, or simply hang each flag on the wall using double-sided tape. | |
| Games and Competitions | To ensure that guests at your holiday do not get bored, invite them to play a little and hold fun competitions . In this section you will find attributes for holding competitions , a description of each competition and, of course, medals for awarding the winner. Birthday games and competitions will help you make the holiday fun and bright! | |
Where to start creating a poster with chocolates and inscriptions with your own hands
First, decide what the person for whom you are creating a gift likes: what kind of sweets he likes, what kind of character and sense of humor he has, choose the main theme of the congratulations. And then choose the form:
- traditionally a rectangular or square sheet of Whatman paper (cardboard);
- carved in the shape of a heart, a flower with petals, a cloud, a fruit, etc.;
- unusual: in a stationery folder or folded in half like a postcard.
Afterwards, buy all the sweets and start decorating.
Step-by-step description of the creative process
1) Take a sheet of Whatman paper and cut out the shape of a postcard (or leave it rectangular).
2) Decorate the background: draw a frame, decorate with paints.
3) Draw a rough diagram of the location of sweets and inscriptions with a simple pencil.
4) Write congratulations with colored pens, circle with felt-tip pens.
5) Glue or draw pictures, stickers, photos (if so intended).
6) Attach sweets, main gifts (if provided), and other decorations (petals, feathers, sequins, etc.).
7) Sprinkle glitter on top and secure with hairspray.
 If the postcard is folded or made in a stationery folder, then it is necessary to additionally design the outer cover - decorate it or paste it with colored cardboard, pictures cut out from postcards with flowers and gifts.
9) At the end, do not forget to write the main congratulations, addressing the hero of the occasion.
Demobilization album on whatman paper
Parents are waiting for their son to leave the army. They haven't been home for a whole year! The event is very exciting and I would like to congratulate the adult child on his return in a special way. In this case, an army theme is depicted on paper: a soldier taking the oath to the Motherland, a running military man with a weapon, etc.
An interesting idea would be to create a photo collage on which you can place photographs of your son. Here he is in kindergarten, but now he went to first grade, to technical school and to the army (photo from the “seeing off” to the army or from the oath).
DIY demobilization posters for your son are a very touching gift.
What materials are needed to create a poster?
- Chocolates, sweets and other goods (packaged waffles, glazed cheese curds, coffee bags, packaged dragees, etc.).
- Whatman paper (cardboard, thick paper or folder).
- PVA glue (“Moment”, hot gun or double-sided tape).
- A simple pencil.
- Eraser.
- Colored markers (markers, paints). Or the text can be printed on a printer.
- Scissors.
- Other decorative elements as desired (magazine clippings, rhinestones, satin ribbons, etc.)
- Fantasy and desire to please.
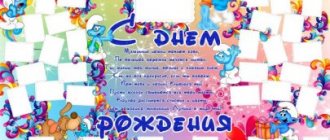
Poster, wall newspaper for a child’s birthday with photographs: ideas, photos, templates
ready-made poster from photos for my daughter’s birthday
An original, hand-made poster with photographs.
If you have knowledge of specialized computer programs, you can easily combine it from photos and bright inscriptions. Then you just need to print the result and give it to the birthday person.
However, wall newspapers with pasted photographs and handwritten words “breathe” with great warmth.
Think about the topic. It will become the idea for the poster. For example:
- in chronological order - from birth to the present day
- about the achievements of the birthday boy - sports, artistic, musical
- dreams of a child with wishes for their fulfillment
- with an emphasis on a loving family of relatives and grandparents
In order not to let archival photographs fall under the scissors, scan them and print duplicates.
Below we add a photo of a number of ready-made children's birthday wall newspapers from photographs.
ready-made wall newspaper from photographs for a child’s birthday, example 1
ready-made wall newspaper from photographs for a child’s birthday, example 2
ready-made wall newspaper from photographs for a child’s birthday, example 3
ready-made wall newspaper from photographs for a child’s birthday, example 4
ready-made wall newspaper from photographs for a child’s birthday, example 5
And a few more ready-made templates for creating your own posters:
template for creating a poster with photos for a child’s birthday, example 1
template for creating a poster with photos for a child’s birthday, example 2
template for creating a poster with photos for a child’s birthday, example 3
template for creating a poster with photos for a child’s birthday, example 4
template for creating a poster with photos for a child’s birthday, example 5
template for creating a poster with photos for a child’s birthday, example 6
template for creating a poster with photos for a child’s birthday, example 7
How to get photo souvenirs?
How it works: Select the souvenirs you are interested in and add them to your cart, or write us a letter indicating the names of the designs you have chosen. You can immediately send us all the necessary material to our email. Do not forget to indicate the desired time frame for receiving the finished order, as well as the desired print sizes, even if you print the order yourself.
Please note that layouts without photographs will not be sent electronically.
Place an order and we will contact you shortly to receive the necessary photographs and material or inform you that your order has been accepted and all photos have been received.
You will only have to wait a little (3-4 days) and you can receive your order electronically or after another 1-5 days you will receive already printed photo products at the pick-up point closest to you or via courier delivery.
We will tell you which order delivery method you should choose so that your order is received by you on time. If you need your order printed in less than 5 days, the cost of preparation will increase by 50%. The cost of printing will remain the same.