How to make a card that grandma will be delighted with? I’ll tell you a little secret!) Such a postcard does not require a lot of time and effort, and you won’t need expensive materials. Only 3 things are needed to please our dear grannies: 1) sincere love for them; 2) desire; and 3) good idea! And it’s the ideas in this article that are complete! There will also be crafts for the little ones who have not yet learned to write/draw. Options for gifts from grandchildren. And also hand-drawn postcards and many, many other interesting ideas!
By the way, you can take ideas from the article with birthday cards for mom.
DIY birthday card for grandma from her granddaughter
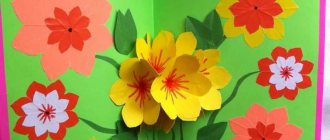
So, what will you need for an original bouquet card: colored sheets of paper, scissors, glue and only 5 minutes of time. This gift looks very cool. As for the inscription, everything is simple! You can make a short dedication: “To my beloved grandmother!” or a longer congratulation: “To grandma on her birthday from her grandson/granddaughter with wishes of goodness and happiness!”
Author
1. From a sheet of green A4 paper, cut off a side section 10cm wide. Starting from the corner, we twist the leaf into a thin tube: we make a flower stem. We fix the edge with glue.
2. Fold a sheet of colored paper for the bud in half twice (if the paper is one-sided, you need to fold it with the colored side inward).
3. We make thin (approx. 0.5 cm) cuts on the workpiece, not reaching the edge by about 2 cm. We unfold the workpiece once and make a cut in the middle.
4. Completely unfold the workpiece. Turn it over so that the fold line is on top. Lubricate the edges of the workpiece with glue and glue them together.
5. We do everything exactly the same with a green sheet of paper.
6. Lubricate the edge of the first piece with glue and glue the stem. We begin to wrap the workpiece around the stem. Glue the edge of the workpiece.
7. Lubricate the edge of the green blank with glue. We apply this blank to the flower. You need to place the green stripe a little lower along the stem than the first piece (literally 0.5 cm).
We twist the green blank onto the first one. It turns out to be a flower.
8. To make a wrapper for the bouquet (bag), cut a strip 12 cm wide from the side of a sheet of paper.
9. We bend the lower left edge of this sheet diagonally: the corner itself should be on the right side, 10 cm higher than the lower right corner.
10. Bend the right corner. Only make a fold line from the bottom.
11. We bend the corner itself again. If at the same time the corner under the workpiece still peeks out, you can cut it off. Glue this corner to secure the bag.
12. Cut off the bottom of the bag so that there is a small hole at the bottom. Straighten the bag and insert a flower into it.
13. Cut out a small strip. It can be cut in the shape of a heart, a circle or a rectangle. We sign this piece of paper and glue it to the bouquet card.
I just had an idea right now! What if you make the flowers a little smaller? Well, for example, not from a whole sheet, but from 1/3 of it or even less... then you can put 3-5 of these flowers in a little bag...! Imagine. What a bouquet for our grandmothers!!!
Origami gift
Often a gift made with one’s own hands is valued much more significantly than the most expensive one bought with money. Using the presented origami schemes, you can create a magnificent masterpiece out of paper yourself and use it as a gift for loved ones.
Flamingo flower or Anthurium as florists would say. An easy and fun diagram of a truly beautiful flower. During the process, you will be interested in repeating these magnificent geometric shapes that nature has endowed this flower with.
This scheme is also very simple to implement. The postcard will be an excellent gift for people who are fascinated by the stars. It will also delight young astronomers.
Origami compliment. A heart with a tie, which already makes it masculine. A great opportunity to give a compliment or confess your love. Would make a great Valentine's Day card.
The theme of love never gets boring. A stylish contrasting heart will be the best way to express your sympathy to both men and women. The scheme is very simple to implement and any paper is suitable for it. It won’t be difficult to take a break from office work and create a small miracle during a break.
This origami tea rose will be a great gift for your loved ones. The process of folding the model is not particularly difficult, but may require creativity in some places.
Photo frame in handmade style. It’s always great to make a frame for your favorite photos with your own hands, giving them your favorite color, texture and even decorating them to your taste. Such a frame, together with your photo, can become a gift for loved ones and give them warmth.
The scheme is easy to implement, just a few minutes and you have such beauty in your hands! Two swans have always been a symbol of good luck in love, hearts beating in unison. This card can also act as a talisman to attract your partner.
A beautiful kirigami postcard with dolphins swimming inside. The postcard is very easy to make and will definitely give you a sea mood.
Very simple instructions for an origami vase. To make a vase, use a square sheet of thick paper at least 25 cm in size.
Wedding carriage in kirigami style. When making this model, use thick paper, otherwise the carriage may turn out flimsy and unstable.
Wedding angels always look very cute and beautiful. By making them from paper in the kirigami style, you will definitely add some zest to a romantic evening.
Square origami box. This model is quite simple and can be made by many craftsmen. The base of the box and the lid are folded according to one instruction. For a complete box with a lid, you will need 8 square sheets of origami paper.
Colorful octagonal origami box. The diagram is illustrated in some detail and contains the necessary explanations. I hope you enjoy your time. Good luck. 3d card with the word Happy. This is a very simple kirigami pattern, perfect for beginners. And it will be able to please your loved ones. Sakuradama is another version of kusudamma. When completed, kusudama looks like it is folded from 12 sakura petals, which is where the name comes from. It is a model of modular origami. To complete it you will need to fold 30 modules. It is better to use medium-weight paper, otherwise the kusudama may turn out quite flimsy.
A very interesting paper box. This craft can be used to wrap a small gift if you make it from beautiful medium weight paper. Assembly instructions are quite simple. To implement it you will need 8 square sheets of origami paper.
Magnificent 3D postcard with a pair of swans. The card is made in the kirigami style and has no complicated steps. It will be a great gift for your loved ones.
A magnificent bouquet in origami style, you can decorate any card with it and please your loved ones. You can make any changes to it that suit you. I want to warn you right away that you will need patience and knowledge of basic techniques to cope with this task.
An original Valentine's card will be a great card to express love to your loved ones. The scheme is very simple and should not cause any trouble.
This origami model can be a wonderful gift for a person who is not indifferent to fishing or fish breeding. Dollar carp is a very complex design model of money origami from the master Won Park.
paper-life.ru
Beautiful birthday card for grandma from her grandson
Boys like to make things. With their creative vision, it is difficult to come up with just one idea. Therefore, I will show several options at once. Each of them is very simple to make, but the postcard looks very cool!
With photo!
The postcard is made very quickly. The only difficulty is inflating such tiny balloons. But if someone helps, it's not a problem! By the way, such tiny balls can be easily made from a ball cut into 2-4 parts. Then you need to stretch the piece slightly, apply it to your mouth and blow on it forcefully. When the balloon is inflated, you need to quickly wrap your fingers around the edges, spin the balloon and tie the tail with thread. Or inflate very small balloons. But for this it is better to use a pump.
- We inflate the balloons.
- We are looking for a suitable photo with our grandson.
- We cut out around the outline of the grandson and glue this part into one of the corners of the card.
- We tie the tails of the balls with thin ribbons.
- Glue the balls onto double-sided tape.
- We collect the ribbons together and tie them with ribbon.
- Glue the ribbons to the card.
All that's left is to sign the postcard!
Flowers
Flowers, leaves, stems and birds are cut out of thin felt. At the same time, the shape of the blanks is very simple: flowers are circles, of different colors and sizes; birds and leaves are droplets, only the droplets for birds have sharp, curled edges.
- Cut out circles.
- We mark on the card where the flowers will be located.
- The first thing we glue to the card is the stems and leaves.
- Above the stems and on top of them, glue the largest circles first.
- Glue smaller circles on top of the larger ones. Glue the smallest circles on top of them.
- Glue buttons in the middle of the small circles. It would be good if the buttons were in the shape of flowers.
- Place the birds on top of the card. We glue the birds’ beaks next to the blanks, and on top of the blanks – eyes, wings, “cheeks”.
- All that remains is to glue a bow on the stems and you can sign the card.
By the way, the signature to the postcard can be quite original. For example, like this:
I think any granny is the best at cuddling and spoiling her grandchildren!)
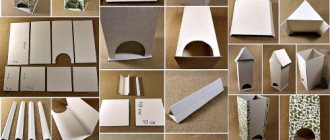
Volumetric letters
Unusual three-dimensional letters will be a good decoration for a birthday. They are made from thick cardboard. To begin with, cut out the base from this material and glue the side parts to it. The resulting blank is painted or pasted over with colored paper. You can put the gifts themselves inside or decorate the surface with artificial flowers and small toys.
How to make a birthday card for grandma from granddaughter
Girls do wonders! This is how a postcard for grandma turns into a fluttering butterfly. And in order to make such an amazing gift for grandma, you need colored paper. By the way, you can choose the color of the postcard!
Author https://www.youtube.com/watch?v=pN1sf7JpObE
Let's make a template!
1. Fold an A4 sheet of paper in half.
2. Then we bend each edge in half, towards the fold line (in the middle).
3. Expand the sheet. We bend only the edges on both sides. This is the base template. To ensure that the base has the desired shape, fold the sheet again, bending it in the middle. Then we bend the workpiece again, lengthwise.
5. On the side where there is no fold line in the middle, cut the corner in an arc.
6. We fold the workpiece, draw 2 arc-shaped lines connected to each other. We unfold the workpiece and fold it so as to bring all the corners together. Cutting corners.
7. Unfold the workpiece. Using the template, cut out a base blank from another sheet of paper.
8. Bend the edges. We place a sheet of colored paper inside the blank, slightly different in shade.
9. Turn the workpiece over and mark the protruding corners with a pencil. We lower the liner down half a centimeter and draw a line on it along the bottom line of the base. In the same way, pull the liner up 0.5 cm and draw a line.
10. Cut off the edges of the liner along these lines and glue it to the inside of the base.
11. Take another sheet. We place it under the side of the workpiece. Draw the outline of the side. We take out the sheet and draw it in parallel, only 0.5 cm less than the contour line. Cut out this part of the card.
12. We will need 2 of these parts. Glue them to the sides of the base.
Making butterflies:
1. Fold 3 small leaves in half. We draw 2 butterfly wings on them. Only on each leaf the wings should be smaller: large, medium, small.
2. Use these butterfly templates to cut out. You need to fold a sheet of dark pink paper and place it in the middle of the template, and then cut it along the contour line of the wings. We make medium-sized wings light pink. Small ones are white. I give you templates to help you.
3. Glue the medium-sized wings onto the large wings folded in half. And on the middle ones we glue the small ones. And we will need 2 such wing blanks.
Making a postcard:
1. Glue tapes to the sides. On top of the tapes, on one and the other side, we glue the wings with double-sided tape.
2. On the inside of the card we make a congratulatory inscription. Glue hearts of different sizes and colors. We draw stripes from the hearts, like ribbons of balloons. We decorate everything with rhinestones.
We tie the edges of the ribbon, trimming the long edges if necessary.
The elegant card is ready! Options for congratulations:
Kids crafts
The little grandchildren also want to congratulate their grandmother. One of the most accessible methods for them is considered to be crafts made from plasticine. When modeling, you shouldn’t limit your child’s imagination.
Let him make various figures. He needs help in combining them into a single composition.
The little grandchildren also want to congratulate their grandmother. One of the most accessible methods for them is plasticine crafts.
At the age of 4-5 years, a child can easily make a flower bed. To do this, a tubercle of green plasticine is formed on a sheet of cardboard. Small multi-colored plasticine balls are stuck on it.
Simple flowers are cut out of colored paper - a circle in the center with rounded petals around the circumference. You will need 3-5 such flowers. They are attached to toothpicks and inserted into a plasticine flowerbed.
At the age of 4-5 years, a child can easily make a flower bed
Crafts for grandma's birthday can be made with your own hands at any age and in various ways. Don't be afraid that the gift may not work out. It is important that the birthday girl feels the love that the child puts into the craft.
Birthday coloring page for grandma
Anyone who has the desire, but is not able to draw a beautiful pattern on a postcard, can use the ideas in this section. Here are coloring pages that can be used to make cards. Even the little ones can color these pictures if adults help them print out the coloring pages.
I made double-sided cards, they need to be printed, cut in half and a picture with a design pasted on the top of the card. And a frame inside the card, write a wish in it.
Pictures can be decorated with paints, felt-tip pens, oil crayons or pencils. The child will choose what is convenient for him to decorate with. And it doesn’t matter if in his vision the colors differ slightly from the real ones. The main thing is that the baby tried to prepare a gift for his beloved granny on his own!
Useful tips
DIY crafts should take into account the interests of their future owners. Therefore, before you start creating, you need to understand what the birthday person is interested in and what he will be happy about.
You cannot start and continue making gifts in a bad mood. Firstly, the craft will turn out crooked and askew, and secondly, negative energy will be transferred as a gift, and instead of useful properties, the souvenir will become a source of anxiety.
To make the process enjoyable, you need to prepare all the materials and tools in advance.
This is quite easy to do, since you don’t need to purchase special equipment to make homemade souvenirs. For the most part, scissors, glue, paper and decorative elements are used.
How to draw a birthday card for grandma (drawing ideas)
In order to draw a postcard yourself, you will not only have to use all your talents and abilities, but also come up with a cool theme and plot. But with this selection, even those who have no artistic talent can prepare a bomb postcard.
Gift
Author
Drawing a gift is not a problem.
And, if you also sign the card with a precise remark that every grandmother will agree with: “Your best gift is me!”, a smile is guaranteed!
!The size of the postcard can be absolutely any!
Cake
Well, what grandmother wouldn’t like a cake prepared personally for her?! We start with the bottom layer, it is the largest.
Author
Each next layer is on top of the previous one, and it is smaller in size. The multi-colored cake looks very beautiful. And let's not forget about the decor of the postcard!
Congratulations
Multi-colored letters, like a festive serpentine. This card looks bright and is easy to draw! Even if children cannot draw yet, you can write congratulations for them in three-dimensional letters, and the children will decorate these letters.
Author
Candles
Incredibly simple solution! We draw multi-colored thick stripes with felt-tip pens. On top, above the stripes, draw small lights. And below we sign: “Make a wish!”
Author
Grandmother
Of course, this is not a portrait, and therefore we cannot achieve a resemblance. We just draw the grandmother: face, hairstyle, glasses. We sign and decorate such a postcard (as an option - with hearts).
Author
Photo frames using quilling technique
Quilling is an amazing technique with which objects take on a completely different look. A good gift would be pictures of the walls of a photo frame using the quilling technique.
Combine colors especially skillfully so that the final gift looks harmonious and does not seem pretentious. A birthday for those closest to you is special; at the holiday it is important that the gift be remembered, so it is advisable to say a few words about your creation that could describe what it means and what benefits it will bring to the birthday person.
If you want your gift to create a fairy-tale atmosphere or a romantic setting, then the best option would be a lamp or night light. In this case, the use of an ordinary glass jar of a non-standard shape, decorated with acrylic paints, rhinestones and small mirrors will become an amazing gift, at the same time decorating the interior and giving benefits.
Read also: How to design a bathroom yourself
Print a free birthday card for grandma
There is another great option for postcards - ready-made ones that you just need to print! Among such postcards there are only pictures that can be supplemented with congratulations and wishes of all the best. And there are also those where there is only text: poems or congratulations.
If you wish, you can “revive” these cards with some simple drawing, photograph, or decoration made of ribbons, sparkles, etc. The third option is pictures with words.
It’s very convenient, you just need to choose a suitable postcard and you can print it.
This set of congratulations, flowers and wishes to our grandmothers is worthy of telling all your friends, subscribers on social networks and relatives about it. Let their gifts be as beautiful as those in this collection!
Edible bouquets
For those with a sweet tooth, sweet bouquets are a good option for congratulations. They can be done in the form:
- traditional bouquet in transparent paper;
- bouquet in a pot or tea cup;
- cars, dolls with full skirts, other toys.
For dads, grandfathers, brothers, sweets can be replaced with more harmful, but very tasty smoked sausages, croutons, chips, salty crackers and other goodies. A can of beer or a bottle of wine will complement such a surprise.
For mothers or grandmothers, high-quality alcohol can be supplemented with expensive chocolate and made into an elegant box made of thick cardboard.
The top of the box is decorated with flowers, ribbons, and embroidery. Using cellophane paper, you can make a transparent window through which the contents of the gift will be visible.
Casket
For the fair sex, you can make a small box where it is convenient to store various little things.
To do this you should prepare:
- Thick cardboard;
- Threads;
- Pencils;
- Toothpicks or small wooden sticks;
- Glue;
- Decorative additions.
The manufacturing technology is as follows:
- A heart is drawn on cardboard, taking into account the planned size of the box.
- The heart is cut out along the outline.
- Toothpicks are installed along the edges of the cardboard; glue is first applied to them.
- The threads are woven into toothpicks to form the sides of the box. For a beautiful weave, the threads must be wound alternately from the outside and the inside. This creates the required number of layers up to the very top of the toothpicks. At the end, the thread must be secured.
- To hide the top of the toothpick, use a suitable size bead.
- At the end, additional decorative additions are glued.