Buying a ready-made postcard in any design is not a problem nowadays.
But how many emotions will your mother receive if you give her a handmade card?
A postcard made by yourself is not just a small bonus to the main gift, but a real testimony of love and gratitude to your dear mother. Such a souvenir will be kept in a visible place by mom for many years.
Always remember! A card on Mother's Day does not have to be perfect and look flawless.
Mom will be glad to receive a card from you, even if it is not perfect in execution, but it will be made by your hands. It is very important for her that her children took care of her, spent their time and energy - this is really important!
Therefore, put all doubts aside, let's get to work! Indeed, today you can find absolutely any master classes, in which it is very popular and accessible, each action is explained step by step. By following clear instructions, everyone will be able to make an original card for mom with their own hands and congratulate a loved one on their birthday!
Materials for creating a postcard
To bring a flight of fancy to life and make a truly original postcard, you will need a standard set of tools:
- scissors, including curly ones;
- stationery glue or glue stick;
- double-sided and simple narrow adhesive tape;
- ruler, including curly ruler, compass;
- markers, felt-tip pens, pencils.
As well as a variety of materials:
- sheets of thin cardboard or thick colored paper;
- multi-colored paper, suitable for gift wrapping;
- various ribbons, scraps of material, laces;
- rhinestones, beads, beads, buttons.
Preparatory stage
In order to make a postcard with your own hands, you need:
- Stop by any retail outlet that specializes in selling goods for creative activities and purchase the required amount of paper and decor, as well as all the necessary tools.
- Develop a sketch of a greeting card, come up with or search the Internet for words of congratulations.
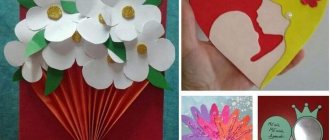
Postcard using quilling technique for mom “Bouquet of flowers”
A “Bouquet of Flowers” postcard made using the quilling technique (paper rolling) will be a wonderful addition to a gift or as a small surprise. To make it you will need a sheet of cardboard, colored paper that matches it in contrast and color, tape, a quilling stick and a standard set of tools.
Now you can get to work:
- Preparations are being made . First, you need to cut out small circles of different diameters from colored paper, then cut each piece in a spiral from the outer edge to the middle. It is better to do this with curly scissors, then future flowers will look more elegant.
- Flowers are formed by twisting the blanks with a special stick in a spiral from the carved edge to the middle. We fix each resulting flower with glue at src=»https://handsmake.ru/wp-content/uploads/2018/03/otkrytku-na-den-rozhdeniya-mame-svoimi-rukami-2.jpg» class=»aligncenter» width=”500″ height=”312″[/img]
- The base of the card is prepared by folding a sheet of cardboard in the middle. The resulting flower heads are placed on its front part and their number and location are determined.
- A flower vase is being formed . To do this, cut out its configuration from thick colored paper or dark-colored cardboard, possibly in the form of an inverted equilateral trapezoid. The blank is attached to the future postcard with double-sided tape.
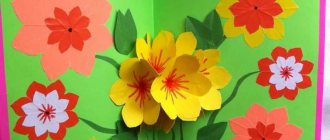
- Creating a background . If necessary, cut out a rectangle from colored paper of a suitable tone, slightly smaller than the field of the postcard itself, and glue it onto this base. A bouquet is then created using the available flowers. It is better to glue flowers in a group to create a lush effect.
- Vase decoration . A bandage with a bow is made and attached from a satin ribbon, and a strip of paper with an inscription is glued in a suitable place. The postcard is ready.
Master class on how to make a card from napkins for a mother with kindergarten children
Even with very young children you can make a beautiful card for Mother's Day. Of course, most likely, the kids will not get along without the help of a teacher. But the result is worth it. Let's see how you can make such a delicate bouquet from, essentially, scrap materials.
Materials:
- Thick openwork napkin;
- Gouache + brush;
- Scissors;
- Glue;
- Landscape sheet;
- Thin colored napkins;
- Colored paper;
- Shaped hole punches.
Stages:
We fold a landscape sheet in half and draw the stem of the future flower on it with green paint.
Add a couple more smaller branches.
Don't forget about the leaves.
Let the drawing dry. Meanwhile, cut light yellow napkins folded in several layers into 4 squares.
Roll each square into a small ball.
And with the help of glue we fix each ball on the card so that we get flowers.
We cut out a small triangle from a decorative napkin, imitating the bouquet wrapper.
Glue it on top of the flower stem.
We complement the composition with a small bow made of a thin strip of pink (or other color) paper.
Finally, using a shaped hole punch, we cut out butterflies or other figures from paper (depending on what kind of hole punch you have).
And glue them to work. Ready!
Making a postcard using this technique is quite simple.
It is extremely convenient because you can post absolutely any image.
So the beauty of your future gift depends only on your imagination.
You can also find other uses for napkins when creating postcards. For example, decorative napkins, which have a higher density than standard options, are perfect for creating a dress like this. It will be an excellent themed decoration for a craft.
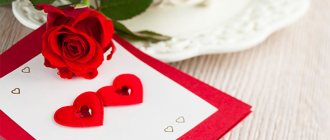
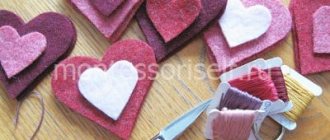
Volumetric card “Hearts”
A DIY birthday card for mom will look especially heartfelt if the central figure on it is a heart. To make it you will need sheets of thick white A4 paper and scarlet paper, glue and scissors.
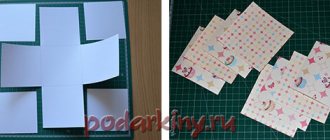
All work consists of 4-5 stages:
- Preparing 2 heart templates. White paper is folded in half, and a large heart appears on it, one side towards the fold. A strip 4-5 cm wide is cut out of colored paper and folded into a square accordion consisting of 6 sections. On the extreme section, half of the figure is drawn so that its middle falls on the fold.
- Getting figures . It is necessary to cut the paper along the contour. From white paper you will get 2 paired hearts - this is the basis of the craft. Made from colored paper - an accordion of 3 small hearts.
- Connecting workpieces . Small 3 hearts are attached using PVC inside the larger ones so that when opened they open up like an accordion.
- Inscription . Warm words and wishes can be written with felt-tip pens in any place you like.
- If the outer sides of the card remain empty, then you can glue glitter and beads on them.
Ideas for simple congratulations on
Balloons are one of the most important attributes of the holidays. And on your birthday they must be present, even if only on a postcard.
Check out a selection of interesting ideas. Perhaps they will inspire you for a creative evening.
An idea with grooved balls arranged in a precise geometric grid.
Such circles can be cut from packaging cardboard if you remove the top layer and get to the stiffeners.
Better yet, give a whole armful of multi-colored balloons so that the birthday boy can fly away to his swords on them.
A more complex design idea.
Unusual color of balls. They are cut out from background images.
Glue the decor onto bulky double-sided tape. Then you get a 3D variation.
Another simple idea.
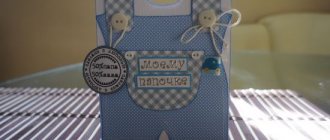
Postcard pendant “Butterflies”
For your mother's birthday, you can make your own card-pendant in the shape of a butterfly.
A gentle and romantic craft, made in the birthday girl’s favorite colors, will require a set of tools:
- thick white paper for the base;
- lace ribbon of 2 varieties;
- scrapbooking paper;
- details in the form of flowers and butterflies;
- lace;
- beads or beads that match the overall tone of the card;
- a ready-made chipboard with pleasant, succinct content (for example, “From the Heart,” “With Love”).
The work takes a little over an hour and is divided into 4 stages:
- A blank for the postcard base is cut out of a sheet of white paper and folded in the middle. On the outside, this part is decorated with a sheet of scrapbooking paper of the same size with an unobtrusive pattern.
- After joining the two sheets, a small hole is made in the upper left corner with a hole punch, which can be fixed and reinforced with a grommet. Now you can thread a beautiful cord through the future postcard and hang the craft in a prominent place.
- The base is ready, all that remains is to decorate the front part of the craft. Pieces of lace are glued just below the middle of the cover, imitating the fencing of a flower bed. 3 flower heads are attached to one of the edges with double-sided tape. A pair of butterflies are glued above them so that their wings remain free. You can make flowers and butterflies yourself, find ready-made ones, or cut them out of postcards.
- The decoration process is completed by randomly gluing beads or seed beads, as well as attaching a small chipboard against the background of flowers.
The birthday card for mom is ready. Now you can decorate the inside of the product with your own hands by writing a couple of warm lines in calligraphy.
Postcard with a surprise: step-by-step production
A surprise in a postcard is something unexpected and extraordinary.
One of the options for such a gift is very simple:
- On a sheet of paper you need to draw 2 circles using a compass, one inside the other, where the inner circle is 2 times smaller than the outer one.
- Petals are drawn between the circles. As a result, the drawing looks like an open daisy.
- A congratulation is written in the middle of the flower.
- The petals are cut, separated from each other, painted over with colored pencil and folded inward. On one of the petals you can write “I bloom in water.” This will be a hint.
- The postcard is ready. Now all that remains is to give a surprise to the birthday girl and watch as a flower with warm words opens in the water before her eyes.
Postcard with a secret inside
A pleasant surprise remains in the memory for a long time, so you can congratulate the birthday girl with a card with a secret. To do this you will need colored paper, glue, scissors and lace.
Preparing a gift consists of several stages:
- The basis will be a sheet of paper equal in size to a double postcard. The workpiece is bent in the middle, where paired cuts of different lengths are made. The number of cuts (future holders) is determined by the overall composition, consisting of 2-3 secret parts.
- The cuts are folded inside the future postcard. Flexion/extension movements are made several times so that the paper takes the required shape.
- Preparation of the actual secret pictures. They can be a bouquet of flowers cut out of colored paper, balloons, an anniversary date, or a chipboard with congratulations. A card with a wish together with a photographic figurine of the artist of the card will look original.
- The outer side of the craft is covered with paper of the same color and size as the base. Glued onto picture holders.
- If it suddenly seems that the outside of the card does not look festive enough, then you can decorate it by gluing lace with beads over the entire surface. The main thing is that all the details are in harmony with each other.
Ideas for congratulating a man (dad or grandfather)
For men, congratulations are needed with a universal design. And it’s even better if there is a special minimalism in decoration.
You can only use a sheet of paper and multi-colored braid, as in this option.
Notice the interesting edges of the leaf. And for the inscription you can use transparent tracing paper. You might have seen this kind of paper in boxes of candy.
Or another very laconic design that is very suitable for a men's holiday.
Here is a diagram for such a composition, you can even print out the template and make an inscription on it.
Look how bright and festive the design looks, but there’s nothing special about it. Just colorful dots placed in a chaotic order.
The scrapbooking technique allows you to create three-dimensional products. Different textures and shades are used for decoration.
Or you can work really hard and make a greeting with origami elements. The entire detailed master class is described in this article.
I also liked the laconic idea with geometry. For example, using strips. It turns out strictly, but very elegant.
Stripes can not only be drawn or pasted from paper. But take a closer look at dark tape or braid for this purpose.
Postcard with two wings
To make a card with 2 leaves you will need 2 sheets of photo paper, ribbon, tape and decorative elements at the discretion of the congratulator.
Just 4 steps and your exclusive gift is ready:
- One of the sheets is cut into 2 parts - they will become flaps. The blanks are glued to the main sheet using tape.
- A piece of ribbon is attached to each sash so that you can tie a bow from it. You can secure the fabric with glue or a stapler.
- It is recommended to decorate the doors on the outside with several small details so as not to end up with an overloaded surface. You can, for example, use beaded edging.
- The inside of the gift should contain the text of congratulations. To make everything look decent, you can use a computer typesetting, decorating the congratulation itself not only with an interesting font, but also with vignettes.
Pictures for printing postcards to congratulate your mother
Well, in conclusion, catch patterns that will become a lifesaver. With their help, children will be able to make cards themselves, paint stencils, and make an applique from the templates. They are suitable for both preschoolers and schoolchildren. Choose.
I hope you enjoyed reading my article. I wish you all creative success! Love your mothers and tell them about it more often! And for now I say goodbye to you. See you again on the expanses of my blog!
Postcard in scrapbooking style
For those who are not very familiar with the technique of making postcards in the scrapbooking style, we can advise you to purchase a ready-made set of materials, which contains:
- several options for cardboard bases;
- colored paper with various patterns;
- lace patches and ribbons;
- beads with a flat base for ease of gluing;
- elements of figurative decor: artificial flowers, various types of figures, frames, templates.
If you already have experience making cards in a similar style, then your imagination may suggest replacing cardboard with photo paper, artificial flowers with dried and covered with a protective layer, factory lace with lace made by yourself.
In addition to the availability of materials, you need a clear understanding of what exactly you want to capture on the postcard:
- traditional birthday greetings,
- a reminder of some pleasant event,
- a hint of a hobby
- humorous collage.
Only after this does the selection of decor begin.
The simplest idea for congratulating your mother is a frame glued to photo paper or special cardboard.
You can put a photo of the birthday girl in it and write a few heartfelt words. The corners of the impromptu portrait are decorated with small bows or flowers, into the core of which beads can be attached. The most important thing is not to overload the surface of the gift and stick all the details so that together they look like a single, holistic composition.
How to draw a postcard with your own hands
My daughter and I also made these watercolor postcards in a marine style.
And also with architecture.
Slowly the cards accumulate, despite the fact that I periodically give them away. I’ll probably have to organize sales soon, because making and drawing cards is very exciting, and the more I do, the more I want!)
I would also like to point out that I try to use only high-quality and professional materials for production.
Winter landscape with Christmas trees - I showed how to draw it in this article. There you can also see other ideas that are drawn with oil pastels.
I would like to say a little about creativity itself: “The process of creation itself gives me great pleasure, although it is not always easy and fast, but I relax and get distracted from all the problems and seem to be immersed in a different atmosphere.”
Share below in the comments which card or style did you like best? Very interesting!)
You can draw on colored paper, but for a postcard you only need thick paper. Look how cute these birds turned out for friends!)
What do you think of this cartoon story? By the way, on our YouTube channel there is a video where I draw it. I'll leave a link to our channel at the end of the article!
There is also such a video on our channel. And of course there are many other interesting and useful videos on various topics.
And here is the promised link to our channel. And of course, you need to subscribe to it!) https://www.youtube.com/c/Bantomania You don’t want to miss new and interesting ideas for creativity, do you? I'm not saying goodbye to you. See you on the channel...
COPYING MATERIALS FROM THE SITE BANTOMANIYA.RU IN WHOLE OR PARTIAL IS PROHIBITED!!!
Original card with flowers embroidered with cord
A DIY birthday card for mom will look original if you embroider flowers on it with a cord.
To complete the work you will need:
- silver-tone and colored lace (thickness 1 mm, can be purchased at a specialty store);
- dark cardboard;
- 2 needles – with a large eye and a small one;
- ordinary white threads;
- simple pencil, colored markers;
- scissors;
- copy paper.
First, you need to bend the cardboard in half with the colored side facing out. The outline of an elegant flower or a beautiful bouquet is drawn on an ordinary white sheet. The drawing should not be complicated, since the trick is not in its sophistication, but in the resulting volume. The finished outline is transferred onto the colored base of the postcard using carbon paper.
The surface is prepared for embroidery with a silver cord, which is threaded through a needle with a large eye (gypsy needle). A white thread is threaded into an ordinary needle, designed to secure the lace in certain positions and places. The flower head can be embroidered with a cord of a different color. You need to pierce the cardboard very carefully so as not to dent it.
It is not recommended to tighten the lace too much; the outline should look voluminous.
The words of congratulations can be written with a marker or printed on a printer and pasted on the gift in a convenient place.
Unusual card with fabric flowers
Flowers made of fabric are like light country, an echo of folk and cozy. This postcard captivates with its apparent simplicity and does not require much time to make.
You can make a DIY birthday card for your mom from scrap materials.
It will require:
- fabric tape;
- buttons;
- needle, silk and regular threads;
- set of paper and cardboard;
- glue.
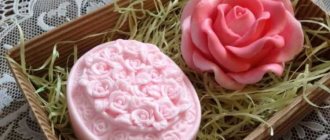
A piece of fabric tape is stitched with zigzag stitches, then it is pulled together and the edges are sewn. The blank looks like a flower. Its core will be a bright, catchy button, which is sewn in the center with silk threads. If a bouquet is planned, then there should be 3 or 5 blanks.
The base of the postcard is formed using cardboard folded in half , onto which slightly smaller colored paper is glued. Now, using glue, you can begin to form a bouquet. It may consist of flower heads only or have stems made from suitable cord.
A small piece of congratulations is pasted below the flowers. Its shape can be played like a leaf, the bark of a tree, or just a handwritten note.
Simple gift ideas for your sister or friend
Girls make cards much more often than boys. Therefore, there are many more feminine ideas.
For your friend, you can make a figured congratulation in the form of a crown.
You can use any template for it.
Also cut out animal shapes.
Prepare letters for congratulations from different textures and make an inscription from them.
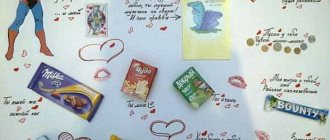
Just stick on a lot of hearts.
Give the gift of a button rainbow! I liked this idea more than all the others. Incredibly simple, but tasteful.
Another idea is to use a bouquet of hearts. By the way, to make this option more interesting. Machine stitch with white thread along the center line of each heart.
Also stylish and laconic design using a contrasting backing and many circles.
Such even circles can be obtained by using a hole punch.
My dears, I have analyzed those options that you yourself can repeat at home and with the simplest materials at hand. I will be happy if you add this article to your bookmarks.
3D postcard from scrap materials
Imagination and diligence will help you make a very interesting 3D postcard for your loved one.
It will require:
- sheet of photo paper;
- sheet of cardboard;
- double-sided adhesive tape and glue;
- ribbons (lace and satin);
- scrap sheet;
- small scissors.
To begin with, a picture depicting different colors is selected from the Internet. It is printed several times on photo paper using a color printer.
Now you can make blanks of 5 colors, cutting out parts for each flower as follows:
- 1st – life-size;
- 2 – slightly less than the first;
- 3 – even less;
- 4 – slightly larger than the center of the flower;
- 5th – almost the center.
Double-sided tape is glued to the back of each piece, after which the flowers are carefully collected.
The base of the postcard will be cardboard folded in half, onto which a slightly smaller scrap sheet is glued. A lace ribbon is attached a few cm from the edge of the latter along the width, and a satin ribbon is attached on top of it. These manipulations are best carried out using double-sided or foam tape.
From the remaining scraps of cardboard and scrap sheet, 2 ovals are cut out - the colored one is slightly smaller than the white one, they need to be glued together and attached to the base of the card. A composition of made flowers is formed on the oval part. All that remains is to write wishes for a loved one either on the card itself or on a figured piece of paper (card), which is then attached to the inside of the craft gift.
Original ideas for making birthday cards for mom from her daughter
How many pleasant memories will flood over a mother’s mind after many years when she comes across a postcard that her daughter once made. Particularly touching are crafts where the main detail is children’s hands outlined on paper with a pencil.
To implement one of these ideas, you need to trace your hand on cream-colored paper with a pencil, cut out the outline and stick it on a postcard base prepared at your discretion so that your fingers remain free. Next, using the quilling technique, make 3-5 flower heads and cut out stems and leaves from green paper.
The flower arrangement is attached with glue so as to create the impression of a hand holding flowers. A couple of good wishes will complete the card. Another idea for a card will require a photograph of the birthday girl (preferably together with the recipient of the gift), which is pasted onto the prepared base of the craft. The photo can be taken in a lace frame.
The second step is cutting out the outline of the right and left hands with the continuation of the wrist. The blanks are glued in such a way that it appears that the children’s hands are crisscrossing or holding the photograph.
You don’t have to waste time making your own cards for your mom for her birthday; you can choose something suitable in ready-made printed abundance. But will a purchased postcard absorb the warmth of loving hands, will the template of congratulatory words reflect the whole gamut of a daughter’s feelings for her mother?