How to make an original card and spectacular gift wrapping at the same time? Nothing could be easier! You just need to cut them out correctly, decorate them tastefully and turn them into a surprise box with your own hands! This small box, also called a magic box, reveals its secrets as soon as you remove the lid. The inner walls of such a postcard are decorated with photographs or simply good wishes for the addressee. How they can be decorated for different holidays, how to fill them and how to decorate them, is more detailed in this article. And also a step-by-step master class on how you can make a surprise box with your own hands, having 2 sheets of scrapbooking paper, some decor and one free evening.
How to make a gift set with your own hands
- First, choose the theme of the gift.
By choosing a specific theme, it will be easier for you to decide on the contents of the box. Most often, the theme is related to an event (such as the birth of a child or New Year), but it can also be chosen based on the person's personality or interests (a box for a gardener or for a cosmetics lover).
- Make or buy all the necessary items for the gift box.
These can be store-bought or home-made items, or a combination of both. For example, if you're shopping for an edible gift, you could fill the box with cheese, wine, and a dish towel.
- Select a container for the gift set.
You can use a box, basket, large jar, bucket, or any other container that can hold whatever you choose to contain.
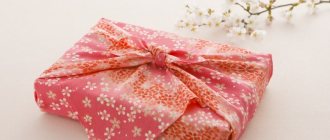
- Decorate the box with wrapping paper
or fabric at your discretion.
Manufacturing instructions
Materials for the master class. 1. Cardboard with a density of at least 180g: - sheet 30x30cm. – for the main template, a sheet of 15x15cm. - for the lid. 2. Paper for scrapbooking 30x30cm. – at least 2 sheets (needed for decoration) 3. Decorative materials – voluminous flowers, ribbons, beads, etc. 4. Tools for scrap – edge and corner hole punches, if available, acrylic paint in gold or bronze color or a stamp pad for tinting paper sections. 5. Scissors, glue stick, pencil with ruler and eraser.
The box can be made of any size, it is only important to draw up the pattern correctly. In this master class we will take a size of 10x10x10 cm. 1. Draw a sheet of 30x30cm. for 9 squares with a side of 10 cm. We press lightly with a pencil, then all the lines will be erased. 2. Cut off four corner squares from the workpiece. We draw along the remaining pencil lines with a scoring stick or any other convenient tool (I use a knitting needle).
3. Remove all traces of the pencil and glue the four remaining squares onto the side walls of the box inside, retreating 1-2 mm. away from the fold lines so as not to touch them. The walls are now reinforced and will look stronger than regular thin cardboard. Advice. It is better to glue all the parts together with a glue stick; PVA may warp the cardboard. 4. Take scrapbooking paper and cut out 4 squares with a side of 9 cm to decorate the outside of the side walls and 4 more squares to decorate the inside. If the paper is double-sided, then it is most convenient to take 4 squares on one side and 4 on the other. 5. We tint each side of each square with a stamp pad or acrylic paint. In each square, we cut out one shaped corner using a Martha Stewart shaped corner punch and glue all the squares in their places on the front and inside sides of the box.
6. At the bottom of our postcard we will build a mount for a monetary gift using paper lace. Cut out a strip of scrapbooking paper using an edge punch on both sides and glue the ends to the bottom of the card. Now you can place rolled banknotes there. 7. Let’s move on to the second part of our master class – making the lid. For it you will need a square of cardboard measuring 14.2x14.2 cm. 2 mm. are needed for reserve so that the card closes neatly and evenly. Take a ruler and draw lines at a distance of 2cm. from each side.
8. Cut 2 cm on both sides along the marked lines as shown in the photo. This will be needed to glue the sides of the lid. All fold lines must be punched so that they bend evenly. 9. To decorate the lid, cut out 2 squares from scrapbooking paper 9x9 cm: glue one inside, the other on the top of the lid. Additionally, we cut out 4 rectangles from the same paper 9x1.5 cm. and glue them to the sides of our lid. Of course, don’t forget to tint the edges of all parts before gluing. This will add depth and texture to the details.
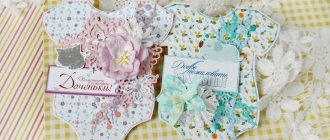
10. Glue the sides of the lid. After drying, put the lid on the box and try on how it fits. Everything is fine. 11. All that remains is to decorate our card with voluminous decor and you can give it away! Flowers can be made from any suitable cardboard: cut them according to the template with a stationery knife and cut them out using a hole punch. To make them look voluminous, the edges of all petals need to be twisted outward with a knitting needle or a toothpick. Using pens you can draw veins on leaves or stamens. Tinting the edges of the petals in the chosen color scheme will enhance the volume effect and make the decor a single part of the overall composition. Flowers for cards can also be made using fabric or ribbons. The master class on making a surprise box with your own hands is completed. Now you can enjoy the result of your work and look forward to the pleasant moment of receiving such an original gift.
Try making a magic box with your own hands, and you will have a lot of fun not only when presenting it, but also during making it! Do yourself a favor and immerse yourself in the wonderful world of creativity, where beauty and harmony reign. With this simple master class, you can learn how to make a simple and elegant gift that will remain in your memory for a long time and will always bring joy!
DIY gift sets for the New Year
Here are some examples of themed gift sets:
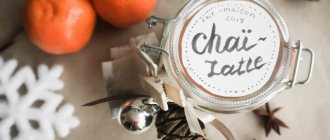
For the coffee lover
Gift Ingredients: A cute or funny mug, a package of coffee, cookies, dark chocolate and cinnamon.
For Bath
Ingredients for a gift: bubble bath, towel, candle, gift certificate for a visit to a salon or massage.
For baking
Ingredients for the gift: baking dish, kitchen towels, tablecloth, kitchen utensils, set of spices (vanilla or cinnamon)
For a newborn:
Gift ingredients: diapers, onesies, teething toys, socks, pacifiers
For the fitness lover
Gift ingredients: water bottle, socks, fitness center membership, dumbbells
For a manicure:
Ingredients for the gift: Hand cream, makeup remover, several polishes of different colors, cuticle cleaner, manicure set
For crafts:
Ingredients for a gift: Markers, pencils, paints, album, brushes, decorative elements, beads, etc.
Set in one color:
You can also create a box consisting of ingredients in one color, such as yellow or pink.
Decorations for the box
After this, you can start decorating. You should stick white squares on the outer sides of the box, and colored paper squares on top of them. The inside should also be decorated. You should stick a square of scrap paper on each side. In this case, it is better to use a glue stick. Otherwise, the sides of the box may become deformed.
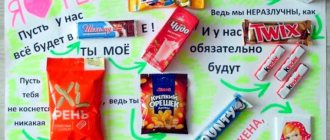
Now it’s time to prepare your wishes. They can be printed on a printer and then cut out using curly scissors. In this case, such wishes as “May all your dreams be forgotten”, “Smiles and kindness”, “May every day bring joy” and so on are suitable. The edges of one piece of paper can be twisted onto a toothpick, and the second one can be slightly torn and folded. This will create an aging effect.
DIY gift sets for women
If you don’t know what a person’s hobbies are and you want to make a gift box for a girl, woman, colleague or relative, try including in your set:
- Lip balm or lip gloss
- Body lotion or cream
- Bath bombs
- Scented candles
- Handmade soap
- washcloth
- Body Scrub
- Socks
- Slippers
- Mask for sleep
- Towel
girl
flashlight box: template
figured boxes: templates
cartoon boxes: templates
boy
box shirt: template
shoe box: template
box for boys: templates
owl box: template
space box: template
pencil box: template
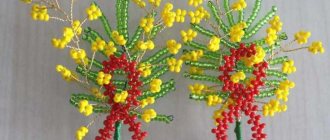
Flower meadow
It is not necessary to put something very valuable inside. You can simply create an interesting decorative composition. For example, in the form of a flower meadow, over which bright butterflies flutter. To make multi-layer voluminous butterflies and flowers, it is best to use a figured hole punch. Glue the flowers together by the core, spreading the petals in different directions. And attach the butterflies to strips of transparent hard plastic or to springs so that when the lid is opened they “fly up” upward.
Box of exotic fruits as a gift, ideas with photos
Have you decided to please your girlfriend or relative with exotic fruits on March 8th? You can also put them beautifully in a box. This will look very impressive, especially in comparison with the opportunity to put treats in a boring bag:
- This is how the fruit will look in a round box:
- Place large fruits and berries in a heart-shaped box. Place a pineapple, for example, and a mango at the bottom, and fill it all with strawberries and grapes:
- You can make a box of exotic fruits funny by signing this box as if it was delivered straight from Thailand to the recipient:
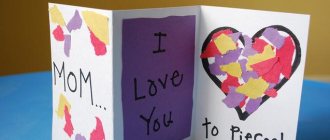
Gift for mom in a box, ideas with photos
It’s very easy for mom to choose a gift, because she will definitely be happy with any attention from you. Here are a few ideas on how you can please your dearest woman:
- You can give mommy a good set of cosmetics. As an example, we can name aromatic soap, shower gel, perfume and dried rose petals so that mom can sometimes relax herself before bed:
- You can order special wrappers for chocolate with inscriptions about love for your mother. These could also be compliments addressed to her:
- Even if your mother doesn’t like any surprises, a banal bouquet and sweets can be presented in a box if you arrange these things beautifully: