There is a wonderful tradition of bringing bags filled with sweets to kindergarten or school on your birthday.
The child makes a ritual round of all his classmates or classmates, presenting each of them with a lot of sweet and tasty candies. Do you want to make this pleasant moment more beautiful and unusual? Then you have to work a little harder.
In this article, the News Portal “Vtemu.by” will offer you several simple, but original options for packaging sweets to make the donation process look festive and beautiful.
How to make packaging for candies, sweet gifts with your own hands: diagram, photo
What could be more symbolic than packaging candy in the form of candy ? So, you need:
- A4 cardboard sheet. Color does not matter - everything is at the request of the master
- A sheet of paper that can be used as decoration - again, the color is not important
- Braid for decoration
- Pencil, eraser, ruler
- Scissors, stationery knife
- Glue – the usual “Moment” may work
IMPORTANT: If you still want to decorate the packaging not with paper, but with colored film, it is recommended to choose glue in the form of a pencil or double-sided tape. This will prevent any noticeable glue stains from appearing on the packaging.
Here's what you need to make packaging for candy.
You can get started:
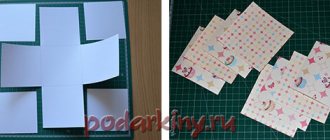
- On the wrong side of the cardboard you need to draw the following diagram . In it, solid lines are cut lines, dotted lines are fold lines.
Scheme for creating packaging for candies
- Now you should cut out the necessary parts , using a stationery knife and a ruler for convenience. It is preferable to place some hard surface under the workpiece, such as thick cardboard.
Cutting out parts during the production of candy packaging
This is what the blank for candy packaging looks like in the end:
- Now step back a centimeter from the cut diamonds on the front side of the cardboard , drawing a line. You also need to retreat the specified distance from the second row of diamonds.
These lines need to be drawn on the candy packaging blank.
- Next, you need to make folds according to the previously drawn dotted lines. It’s worth starting with smaller parts , then it’s better to process the longitudinal lines , and only then the transverse ones.
IMPORTANT: It is preferable to use a ruler to obtain straight fold lines.
Bend parts using a ruler in the process of making candy packaging
Folding the longitudinal lines of the blank for packaging candies
Folding the transverse lines of the candy packaging blank
This is what you get for candy packaging:
- The model is assembled and glued together.
You need to wait for the candy packaging blank to dry.
- Now you need to try on the wrapping paper and cut out the necessary pieces.
It is advisable to first try the wrapping paper on the blank for packaging candies.
- The wrapping paper is glued to the cardboard base.
Gluing wrapping paper to cardboard base for candy packaging
- Next, measure and cut out two pieces of decorative braid. Each of them should be approximately 30 cm.
Preliminary measuring of decorative tape for candy packaging
- All that remains is to tie the braid at the ends of the candy packaging - and the job is completed! Inside such a wonderful package you can put both crumbly candies and some small sweet figurine.
This is what the packaging for sweets looks like in the end:
Making candy
It just seems terribly difficult to make real chocolates with your own hands. In fact, it is no more difficult than cooking cutlets or baking a cake. The simplest option is from prunes with nuts:
- pour washed large prunes with sugar syrup with liqueur or rum and leave for 1-2 hours;
- remove the pits from the swollen prunes;
- Place quarters of walnuts or almond kernels in place of the seeds;
- melt the chocolate in a water bath and dip each prune;
- Allow to cool, placing neatly on a baking sheet or tray lined with baking paper or foil.
Truffles
To prepare this magically delicious delicacy you will need:
- good chocolate, with cocoa content of at least 70% - 250 g;
- cream 30% fat - 200 ml;
- nuts (walnuts, hazelnuts, almonds or pistachios) - 150 g;
- optional - vanilla, rum, cognac, cocoa powder or powdered sugar.
Cooking process:
- Heat half the cream almost to a boil, it is better to do this in a water bath.
- Add half the chocolate, grated or finely chopped with a knife, to the hot cream.
- Stir quite vigorously until the chocolate is completely dissolved, trying to achieve an even, homogeneous creamy mixture. It is at this stage that you can add a little rum or spices for taste: vanilla, cinnamon, coriander, etc.
- Allow the mixture to cool, meanwhile you can chop the nuts.
- When the mixture becomes plastic, put on thin rubber gloves and form approximately identical balls or bars from the chocolate mass with your hands.
- Prepare a chocolate mixture from the second half of cream and chocolate.
- Dip the finished balls into hot chocolate and quickly roll them in chopped nuts, powdered sugar or cocoa powder.
- Let it cool and dry, after which you can pack a wonderful gift.
Here is a detailed video instruction on how to make it:
Filled candies
Making them is not much more difficult than truffles. You will need molds, and ice molds made of silicone, plastic, or metal are perfect. If you want the candies to be glossy, then you need to prepare the chocolate mixture on a thick marble board or countertop.
Anything your heart desires can be used as a filling:
- cream;
- jam;
- chopped nuts or wafers, etc.
Operating procedure:
- Melt the chocolate in a water bath.
- Pour it onto a cold marble board and mix well with a wide knife.
- Fill the molds with slightly cooled chocolate and place them in a cool place for a few minutes.
- Pour the uncured chocolate back onto the table, leaving a thin layer on the sides of the molds.
- The prepared filling is placed in the molds; it is desirable that the amount of filling be approximately the same.
- Pour the remaining chocolate on top and level the surface with a wide knife, removing all excess.
- Place the candies in a cool place until completely hardened.
- Carefully remove the finished treat from the molds and pack.
How to pack candies and sweets in corrugated paper: diagram, photo
To create a cone-bag in which you can put candy, you will need:
- Corrugated paper
- A sheet of regular landscape paper or cardboard
- Scissors, glue
- Ribbon
- Ruler, pencil, compass
IMPORTANT: If the latter is unavailable, you can use something round and hard - for example, a saucer.
Operating procedure:
- A circle is drawn on landscape paper or cardboard
- The circle is divided into 4 sections
- Now you need to leave 2 sections, cutting off the excess . But you must remember to leave a small piece for gluing.
- Next, the workpiece is glued together to form a cone.
- Now you need to glue corrugated paper along the edges of the formed cone.
IMPORTANT: It is recommended to glue it in a slightly folded state.
- All that remains is to decorate the cone, fill it with candies and tie the packaging on top with some fancy ribbon.
This is how the packaging for sweets ends up in the form of small bags.
And you can make the packaging only from corrugated paper. To do this you just need:
- a template in the form of petals of any flower from plain paper
For example, a template for making packaging for candy could look like this
- Corrugated paper needs to be folded in half
- to it . It is preferable to secure it with paper clips
- The workpiece is cut out using a stencil
- Next, the workpiece needs to be unfolded - this mechanism resembles the process of cutting snowflakes
- A candy is placed in the middle of the blank . You can try to fit in a few sweets too
- All that remains is to tie the packaging on top with some tape
IMPORTANT: If you tie the corrugated packaging directly above the candy and straighten the remaining paper, the petals will turn out more voluminous.
As a result, you may end up with a flower-like packaging for sweets.
Packing without box
You can pack a gift in an original way even if it does not have a box. In this case, you can make a special bag out of gift paper that will give the surprise a special look.
How to wrap a gift:
- Cut a strip of gift paper based on the size of the gift, adding 5 cm in length and width.
- Make a fold of 2 cm on top and 1 cm on the side.
- Place double-sided tape on the side fold and connect the edges.
- On the opposite side, move your hand to form a uniform fold.
- Wrap 3-5 cm of paper at the bottom, depending on the width of the gift.
- Straighten the resulting top and bottom sides, and fold the side flaps into the middle.
- Make a 1 cm fold at the bottom edge and apply double-sided adhesive tape.
- Secure the edges together by placing the side with tape on top.
- Reach your hand inside the bag, straightening the bottom and folding the sides inward.
- Use a hole puncher to make holes for the handles on top and make twine through them, securing them with knots at the ends.
How to pack candies and sweets in organza: diagram, photo
Sweets in an organza bag are a rather cute, elegant and at the same time simple gift. To create such a find you need:
- Actually, organza
- Satin ribbons
- Sewing threads, pins
- Scissors
- Sewing machine
- Crochet hook - if you want to make threading ribbons easier
Here's what you need to create packaging for organza sweets.
You can get started:
- A piece of organza needs to be cut lengthwise. You should get two stripes.
This is how you need to cut a piece of organza for candy packaging
- On both cuts you need to smooth the edges.
IMPORTANT: You should retreat at least 4 cm.
This is how you need to smooth the edges on pieces of organza in the process of making candy packaging
- Using a sewing machine, you need to lay the first line on half of the foot. This must be done on both cuts. There is no need to trim the threads.
Processing pieces of organza during the production of candy packaging
- After retreating 1 cm, you need to lay another line.
This is what the final candy packaging looks like:
- Now each strip is cut into equal parts. How many parts - so many bags in the end.
Blanks for candy packaging
- Each piece needs to be folded in half. And so that the front part looks inward. For convenience, you can fasten the fabric with pins.
This is what the candy packaging looks like at this stage:
- Starting from the top edge, the future bag needs to be stitched . At the beginning of each line the thread is secured.
Candy packaging bags
- The bags are turned inside out and ironed.
Now the candy packaging bags look like this
- Next you need to cut the ribbons.
- Now all that remains is to make 4 holes to place the ribbons. You can get a seam ripper from the sewing machine kit. Or you can use small scissors with sharp ends.
IMPORTANT: Holes are made exclusively in the upper layers of the material!
This is how holes are made in the process of making candy packaging
- Next, the ribbons are inserted and tied into a knot. The bag is ready!
The process of threading ribbons into a packaging bag for organza sweets
This is the beauty that comes out in the end, but, of course, you can put more candies in such a package
Sweets in a bouquet
This is a trend in recent years. Specialized companies will provide you with such services. But is it worth overpaying if you can make such a bouquet with your own hands? It is best to purchase candies for a bouquet that already have foil packaging and a round shape. You can easily find these in bulk at your nearest supermarket. We will also need long skewers and corrugated paper. The latter must be two or more colors. The first is green for the stem and leaves, the second is for the design of the petals.
Choose the color of the petals as you wish. You can combine different tones in one bouquet. We cut out several squares from this paper and draw petals on them. To simplify the whole process, it is better that they are connected in the center. Next, we straighten each petal a little and give it the desired shape. We insert one blank into another, and place our candy in the center.
Now let's work on the stem and leaves. We wrap the skewer along its entire length with green paper and fix it with glue, cut out and glue a couple of leaves. Now all that remains is to collect the flower. We pierce the center of the petals with a skewer so that it goes slightly into the candy itself. All that remains is to make the required number of flowers and collect them into a bouquet. It should also be framed in paper or gift wrap.
How to beautifully and originally pack a box of chocolates as a gift?
Candy as a gift for a teacher is a traditional gift. But you can present sweets in an original way! What you will need:
- Box of chocolates that opens like a book
- Several sweets in individual packages - optional
- Corrugated paper. It is preferable to choose several shades
- A small piece of foam
- Satin or nylon ribbon
- Small wooden skewers or toothpicks
- Scissors
- Glue, double-sided tape
- A brand new presentable ruler, pen, pencil - they are needed for decoration
You can start:
- First of all, you should carefully remove the candies from the box.
This is what the box should look like before processing.
- Then the box is covered with the most elegant corrugated paper.
IMPORTANT: The corners and sides must be glued especially carefully and accurately.
- You can return the candies to their place.
And this is what a box of chocolates looks like after covering it with fancy paper
- The box is already quite elegant, but this is just the beginning! Using glue you need to attach two small ribbons.
This is how ribbons are glued to a box of chocolates
- to print the “School Magazine” sign on the printer in advance . Of course, you can add more. The sign is glued to the box.
A sign glued to a box of chocolates
- to the lower left corner . The size is small - approximately 5x5 cm.
A piece of styrofoam on a box of candy
- Small pieces of double-sided tape onto school supplies as shown in the photo.
This is how you should apply tape to school supplies to decorate a candy box.
- Next, all these things are glued to the box.
School supplies need to be glued to a box of candy like this:
- Now you need to stick artificial flowers or flowers created around individually wrapped candies into the foam. How to create such candy flowers will be discussed below in the section on candy bouquets.
IMPORTANT: It is preferable to additionally fix it with glue.
There should not be too many flowers, otherwise the box of chocolates will look overly weighted
- are drawn on colored paper . You can, of course, simply print them out in finished form in advance.
- Leaves are cut out.
These are the leaves that will be useful for decorating a candy box.
- The leaves are then glued onto the box.
Leaves glued to a candy box can be arranged like this:
- You can add a few more ribbons as decoration A rowan twig will come in handy.
Here's a wonderful tasty gift in the form of a box of chocolates for Teacher's Day
Long shaped box
To make a gift in a long box look presentable, you need to follow a certain
procedure:
- Measure the length and width of the box.
- Cut a strip of paper according to the calculations obtained, adding a margin of 3 cm.
- Spread the prepared sheet, wrong side up, on a hard surface.
- Place the box in the center.
- Make a 1 cm bend along the bottom edge and glue double-sided tape to it on top.
- Fold the top side tightly over the edge of the box and secure with a small piece of adhesive tape.
- Place the prepared fold on top and glue it evenly.
- On the remaining sides, you need to bend the side flaps inward to form a triangle.
- Then secure the top edge tightly along the box.
- Make a 1.5 cm bend on the bottom and stick tape on top.
- After this, fix it on top of the previous layer.
How to beautifully and originally pack loose candies as a gift?
How about a whole basket of delicious bunnies ? They can be created according to the scheme proposed below. Each bunny has candy inside.
Using this scheme, you can create a bunny packaging for bulk sweets
Bunnies with candies, in turn, can be placed in some beautiful basket
But the packaging is made from ordinary cardboard rolls , which remain after using toilet paper. You can even use them to create unusual candy packaging! Diagram below:
Scheme for creating packaging for candies from a cardboard roll
IMPORTANT: It is preferable to additionally wrap them in cling film before placing the candies in the package. Of course, if the bulk sweets do not have individual packaging.
You can try to create an original, but at the same time very simple to make shoe packaging. For such work you will need:
- A plastic cup or plastic packaging from some product
- Some material such as fabric or crepe paper
- Waste piece of paper
- Ribbons, ribbons
Operating procedure:
- A piece of material is cut out - paper or fabric
This is the piece of material you need to cut out to make candy packaging
- The paper needs to be crumpled so that it turns into a tight ball.
- Then a paper ball and a cup are placed on the material as indicated in the photograph.
This is how the components of the future packaging for bulk sweets are placed
- Next, the cup and paper need to be wrapped as shown below.
So you need to start wrapping the candy packaging
So you need to continue wrapping the candy packaging
- Now the blank is tied up, decorated - and you get a cute shoe that can be filled with candies.
This is how the candy packaging shoes turn out
How to quickly pack a small gift or candy
If there is a party or children's party planned, then you can prepare treats for little guests. In order not to serve sweets in banal candy bowls, you can pour candies into regular or decorated disposable cups. Then decorate them with openwork paper napkins and satin ribbons.
How to quickly pack a small gift
Gift packaging in a cup
How to beautifully and originally package homemade handmade sweets as a gift?
Handmade sweets look best in small boxes processed using the decoupage technique. Such boxes are created as follows:
- The wooden blank for the box is carefully sanded and coated with primer .
IMPORTANT: This must be done on all sides of the workpiece.
- Then you can apply the background paint.
- After this, the decoupage napkin is separated from the base, applied to the surface and treated with glue on top.
To decorate a box for homemade sweets, for example, this decoupage napkin is ideal
- It's time to tackle the terrain. Experienced crafters recommend applying it with putty using a stencil.
- After the relief has dried, it should be slightly moistened with a damp cloth and then sanded . This step will prevent further chipping.
- Using a sponge, apply a little paint to the relief.
- Now you can apply the antique finish.
IMPORTANT: This coating should be lightly wiped with a cloth for a better effect.
- Next, the edges should be treated with bitumen - it will give a darkening effect.
- Now you need to apply shellac varnish.
- Once again, you can walk a little over the future box with sandpaper.
- All that remains is to decorate the outer part of the box to taste, and sprinkle the inside with coffee and cinnamon. This last step will make the box smell amazing when you open it - just what you need to store your handmade chocolates!
This is how you can make a beautiful handmade candy box
How to pack a bouquet of sweets as a gift?
In order to create a candy bouquet, you should purchase in advance:
- Sweets
- Corrugated paper, organza, foil, ribbons, cords - all this will help to decorate flowers. You can stock up on a few things from this list, or all of them to diversify your crafts.
- Fabric, wrapping paper, mesh - everything you might need to wrap a bouquet
- Toothpicks, barbecue sticks - they are needed if you plan to create stems
- Polystyrene foam, foam rubber or polyurethane foam
- Glue gun
- Pliers
- Wire
- Decorative elements to taste
- Scotch
IMPORTANT: it is recommended to purchase several types of tape - transparent, colored, paper.
You can make a bouquet according to the diagrams below:
You can create such a charming bouquet from sweets
Another scheme for creating a bouquet of sweets
Or you can make a bouquet of such interesting candy flowers
DIY packaging box - it's easy
Candy is a great holiday gift! Everyone loves sweets: both adults and children. On New Year's holidays, we buy candies for children, specially packaged in bright boxes of different shapes and colors. What kind of candy do they contain? How long ago were they made? In addition, I know from my own experience that not all children eat all the candy they buy as a New Year’s gift. Some people don’t eat a certain variety, some don’t eat caramels or jellies, and some can’t eat chocolate treats. I have always believed that the best option is to independently purchase sweets that the child can eat or the child will eat, and package them beautifully yourself. If your child can’t eat store-bought sweets, then you can add gingerbread or homemade sweets or even fruit as a New Year’s gift. We've sorted out the content, now it's worth paying attention to the design. How to pack sweets beautifully ? There are quite a lot of options.
How to pack tea and sweets as a gift?
You can, guided by the previous schemes, create flowers based on sweets . The flowers are artistically decorated, and a tea package is placed in the same composition with them. Examples:
Composition of flowers, sweets and tea A bouquet of sweets and tea can be arranged like this
By the way, not just standard store-bought tea boxes, but carefully made tea bags . You can also put sweets in such a simple, but at the same time interesting bag. The scheme is as follows:
Scheme for creating a bag for tea or sweets
And this is what tea or candy bags look like in the end
IMPORTANT: By the way, it is very good to attach a piece of paper to such bags describing the composition of tea or sweets made with your own hands.
New Year's attributes
You can tie small Christmas tree decorations to the bow on the gift wrapping.
For children, you can make sweet decor from lollipops and sweets.
You can “sew” bright winter mittens from colored paper and attach them to a gift.
You can give a gift with wishes. It could be a chamomile with excerpts from poems, anecdotes and aphorisms. Such packaging will make an impression greater than the gift itself!
You can decorate a gift with threads with “filling” - beads, balls, snowflakes.
How to beautifully pack candy for a kindergarten or school birthday: ideas, photos
Let's consider options for packaging sweets that can be given to children in kindergarten or school, as well as options suitable for Birthdays:
Candies made of corrugated paper with sweets inside - children will be delighted! Such a wonderful cake from several compartments-pieces can be built as a package of candies. A birthday table, including a children's one, can be decorated with such candies in bulk in a beautiful glass bowl
You can build a candy cake like this for children with some kind of toy on top
Boys can build a tank like this out of candy
Children of preschool and primary school age will be delighted with these lollipops
Cute bunnies made of colored cardboard with sweets inside will certainly delight children
Bright candy jars topped with lollipops will delight children.
Candy bouquet cake - an interesting combination of ideas
Packaging sweets in “Bunny” bags
A very unusual and beautiful way to decorate sweets.
You can use decorative paper, cellophane, or even scraps of fabric to make bags.
Fill the finished bags with candies, put them in a beautiful basket and send your child to distribute sweet treats to their friends.
How to beautifully pack candy as a gift for the New Year: ideas, photos
The most long-awaited holiday of the year - how to decorate a sweet gift for this occasion?
Chocolates can be packaged like this in the form of Santa Clauses and snowmen
Bright personalized candy packages for children, each of which contains a sweet surprise
A whole jar of sweets is the dream of not only a child, but also an adult.
It’s so simple, but at the same time interesting, you can wrap a box of chocolates by placing it in wrapping paper and tying it with twine, and sticking a wish on top
It’s easy to pack chocolate for the New Year by wrapping it in colored paper and sticking snowflakes on it.
Snowman made from candies - elegant and delicious!
Making a sleigh from candy is not at all difficult, and the effect will justify the work a hundredfold.
Christmas tree made of candies
It’s great to place crumbly candies in such New Year’s bags Candies inside Christmas balls
Packaging sweets in thick colored paper
From a sheet of thick paper, cut out a blank for future packaging using a template. This paper candy can be used to pack not only sweets, but also small souvenirs.
It looks original and unusual. Paper candies can be personalized; to do this, you just need to sign each of them with a bright marker.
How to beautifully pack candy as a gift on March 8, February 14: ideas, photos
Women's Day and Valentine's Day - maybe it makes sense to prepare something themed?
On February 14, you can simply stick candies on the heart base like this
On February 14, you can beautifully decorate a heart-shaped box, and even add gingerbread letters
But a man will also be delighted with such a sweet and not only gift for February 14th
On February 14, you can wrap each candy individually in red corrugated paper or organza - it will be thematic
Each candy, packaged separately for February 14th plus the corresponding box - labor-intensive, but impressive!
Number 8 made from candies - the simplest and most delicious gift solution for International Women's Day
And this is how you can decorate a box of chocolates or a chocolate bar for March 8th
Mini bouquets of sweets for March 8
Chocolate girls
An original gift - a chocolate bowl. This is a box the size of a chocolate bar, where you put a sweet present and a warm sincere wish. There is an opportunity to put a cash gift - right under the bookmark with a wish.
The chocolate maker can be decorated to match any symbol of the New Year. For example, wrap a chocolate bar in white paper, draw a snowman figure, and put on a small hat. Original and tasteful. Thus, you can decorate any gift that is not bulky.
How to beautifully pack candy as a gift for a teacher, doctor: ideas, photos
We looked at one option for wrapping a gift for a teacher a little earlier. Let's see what else interesting things we can come up with! And also for a doctor, because people in this profession are also often given sweets as a sign of gratitude.
A music teacher will certainly appreciate a piano made from candies
A box of chocolates can be styled as a teacher’s briefcase A pencil made from sweets as a gift for a teacher
You can create a set in which each chocolate bar or candy needs to be signed with a separate wish for the teacher. A geography teacher can pack a box of chocolates into a card
By analogy with the previous example, a music teacher can pack a box of chocolates in sheet music
This is a jar you can put sweets for the doctor in.
You can create such a chest by decorating it with candy flowers and placing candy inside
You can present to the doctor such a set of bird's milk candies, each of which should be labeled with a wish.
Medical bouquet consisting of a beautifully decorated box of chocolates, a bottle of alcohol
A syringe made from sweets for a doctor. Or you can simply stick a personalized thank you letter to the doctor on the package of sweets
New Year and Christmas sweets
In Russia, it is customary to give sweet gifts to children for the New Year. We usually buy them ready-made. But you can approach this issue creatively. Today there is no shortage of sweets, so it is not advisable to give large bags of sweets and gummies. It will be much more original and valuable to pack sweets in a beautiful box with a New Year's theme.
To do this, you will need a regular box, craft packaging paper, and a couple of spruce branches. Carefully arrange the sweets in the box. There may be muffins, chocolate, cupcakes, and marshmallows. Choose for filling those sweets that the recipient likes most. Next, we wrap the box with craft paper. It has a pleasant beige shade and always looks very respectable. To prevent the package from opening, secure the folds with a stapler.
All that remains is to tie a beautiful ribbon and secure the fir branches in the bow area.
If New Year's sweets are familiar to us, then the tradition of giving gingerbread for Christmas was forgotten during the Soviet period, but today it is being revived. Beautiful themed gingerbread cookies can be bought in the store or baked yourself. It’s very touching when children decorate them themselves and then present them to their grandmothers and other relatives.
You can pack each gingerbread or homemade cookie in a separate transparent bag, decorating it with a ribbon or serpentine. Such small gifts can also be given to colleagues. It will be relevant and will not hurt your wallet.
The best design for sweet gifts: photo
We bring to your attention another small selection of creative candy packaging options:
Candy in a cup is both delicious and a lasting memory Candy pineapple is sure to surprise everyone
An alarm clock made of candies is the most pleasant type of alarm clock. It’s so simple, but interesting, you can pack candies, for example, for colleagues. A steering wheel made of candies will delight car enthusiasts
A bat hugs a candy - quite cute and unusual
Coffee candy gift idea
A gift in the form of a candy mug, in which the mug itself consists of candies!
Candy gift for real football fans
Candy ship
Beautifully and originally packaged sweets look completely different. This is definitely a gift that will please both the eyes and the stomach.
Transparent Film and Baskets
Clear film is ideal for packaging homemade cookies, pies and gingerbread houses. In this case, you don’t have to worry about it becoming stale or getting germs on it. Transparent film is also indispensable when you want to place a gift in a basket or bowl. You can buy baskets and trays, or you can make them yourself. It would be more practical to purchase a semicircular transparent bowl. It will not hide all the beauty of the gift; in the future, the hostess will be able to use it in the kitchen.
If you want to diversify a sweet gift, you can also put fruit in a bowl or box. Exotic fruits and berries will look especially original. After filling the bowl or basket with sweets, it must be packed in transparent film and decorated with ribbons and a bow.
But there are no strict restrictions here. You can fully express your imagination and create unique designer packaging for your sweets.