Useful tips
Watch the video if you are too lazy to read
Watch the video if you are too lazy to read
Gifts are always nice not only to receive, but also to give
.
And if you give a gift made with your own hands
, then it is doubly pleasant.
There are a lot of gifts you can make with your own hands, and many of them are not that complicated, despite the fact that they look very beautiful.
.
Find out what gifts you can make yourself.
Sweet DIY birthday gift
Both children and adults will be happy with such a gift. It’s not difficult to make, but the birthday boy’s delight is guaranteed.
© Making a McHome: Pot of Good and Plenty / pinterest
You will need:
- sweets
— gift cards
- Super glue
- pot
— floral foam (can be replaced with polystyrene foam or padding polyester)
- artificial moss or grass
- skewers
© Making a McHome: Pot of Good and Plenty / pinterest
1.
Glue skewers to candy and gift cards.
2.
Place foam, polystyrene foam or padding polyester in the pot.
3.
Cover the foam with artificial moss or grass
4.
Start inserting skewers with sweets into the foam (place the largest gift at the back and then distribute the gifts by size throughout the pot)
DIY gift for a friend. Colorful scarf made from T-shirts.
© Just Something I made
T-shirts for such a scarf can be used as old ones or ones that you don’t wear, or you can buy inexpensive ones in the children’s or teenage clothing department.
You will need:
- thread
- needle
- T-shirts
- scissors
It is advisable to wash the T-shirts before cutting them.
To make a stencil, prepare a business envelope and thick paper or cardboard. Trace the envelope and cut out a stencil from cardboard (see picture).
© Just Something I made
The front of the scarf is made up of designs and patterns, while the back is made up of plain sections.
1.
Place the stencil on the material and, using a white pencil, outline the dark areas on the fabric, and brown or black the light areas.
© Just Something I made
* The front needed about 20 sections.
© Just Something I made
2.
Once you've cut out all the sections you want, fold them the way you like and then simply sew one to the other.
3.
Once you have sewn all the sections, iron your piece.
4.
Now you need to make the back side of the scarf. To do this, you also need to cut out several sections, but in the same color, and sew them together. Sections can be made longer.
© Just Something I made
5.
Sew the front and back of the scarf. If necessary, trim off excess on the scarf.
© Just Something I made
6.
Iron the scarf - it is better to do this through gauze.
Universal gifts for a friend
What else can you buy your girlfriend for her birthday? We offer a list of win-win options for this occasion that any birthday girl will like:
- cute pocket mirror;
Cute pocket mirror
- piggy bank for your own savings;
- a fashionable umbrella is a practical accessory;
- warm fluffy mittens;
- a spectacular strap will successfully diversify the wardrobe of your fashionista friend;
- Photo album;
- monopod What girl doesn't like to be photographed? So, without hesitation, buy it and feel free to give a selfie stick to your friend;
- glowing cute pillow. Do you want to cause amazement with your gift? Then this option is just for you! Delight your girlfriend with this unusual thing.
Important Eleven to twelve years old is a special formative age, so it is necessary to select gifts delicately. To completely please the hero of the occasion, find out as much as possible about her interests and character, dreams and desires.
DIY birthday gift. Silhouette on canvas.
© Tatertots and Jello
You will need:
- canvas
- old magazines
- scissors
- glue (preferably glue for decoupage - in this example it is Mod Podge)
- acrylic paint
1.
To start, cut old magazines into small pieces (you can involve children - they will like it). Of course, the more colorful the magazine page, the better.
© Tatertots and Jello
2.
Once you have a bunch of cut magazine pages, you need to glue them to the canvas. To do this, coat the canvas with glue and start gluing pieces of magazine pages. It is advisable to cover the entire canvas.
© Tatertots and Jello
* Don't worry if something is not glued very smoothly, unevenness is even welcome.
3.
When everything is glued, leave the canvas to dry.
4.
Prepare the desired silhouette (in this example it is a bird on a tree). To make a silhouette, simply draw it on cardboard or thick paper and cut it out.
5.
Place the silhouette on the canvas and trace it with a pencil or felt-tip pen.
© Tatertots and Jello
6.
Now cover everything except the silhouette with acrylic paint.
Ready!
Editorial advice
Before the New Year, think about all your friends and don’t deprive any of them of a gift. It is not necessary to buy expensive gifts and you should not give all the girls the same things. Prepare an individual gift for each friend, taking into account her temperament, worldview, and desires.
Please note that each person has his own attitude towards a gift. Some people believe that only practical things should be given, and some women will harbor resentment if they are given a saucepan or a kitchen apron as a gift.
Is it appropriate to give money?
You shouldn’t mix money with friendship, much less put banknotes under the Christmas tree. This will only show that you didn’t want to spend a little time looking for an interesting gift for your friend. You can only give money if you know that your friend is experiencing financial difficulties and needs additional funds before the holidays.
If you just can’t decide what to give your friend for New Year, instead of money, give her a gift certificate to a women’s clothing, art, and craft store. Or give a gym membership as a gift.
30 Inventive Ways to Give Money as a Gift.
How to wrap a gift beautifully
In a New Year's gift, the packaging is no less important than the contents. Both children and adults happily tear open the wrapping paper to quickly find out what's inside. And the packaging itself creates a feeling of celebration.
You can buy gift wrapping or wrap a regular box in bright paper. Instead of filler, put confetti or loose streamer threads in the box. Consider a New Year's design on top of the packaging.
You can tie an icicle lollipop to a ribbon, or glue a spruce branch decorated with artificial snow to the box. Or dry orange slices in the oven and seal them with a ribbon, like a wax seal.
15 unforgettable gift wrapping ideas.
DIY wedding gift. Heart made of threads.
You will need:
- wooden tablet or board
- thread of any color
- nails
- paper on which you will draw a heart
Optional: spray paint to paint the board
1.
If you decide to paint your wooden tablet, then this should be done first. If you use a bright thread (red, orange, yellow), then it is better to paint the board in dark colors.
2.
Prepare a large sheet of paper or newspaper, place it on the tablet and draw an even heart on it.
3.
Nail nails along the outline of the heart and remove the paper. The distance between the nails is approximately 2.5 cm.
4.
Prepare a thread and tie its end to one of the nails. Start weaving the thread from one nail to another. There are no rules here, you can weave as you like until the entire space between the nails is covered and you have a heart.
Cool DIY gifts. Intertwined hearts.
You will need:
- scissors
- felt (or thick paper or fabric)
Optional: tape.
1.
Start with two ovals as shown in the picture. You can make them from felt or thick colored paper.
2.
Fold the oval in half and make 3 parallel cuts from the fold to the rounded end, not reaching about 2-3 cm.
3.
Start weaving the ovals as shown in the picture - threading one strip into the other and moving them upward. You should get a coloring of a chessboard.
4.
You can add a handle for the heart so you can hang it in your home.
To better understand how to weave ovals, watch the video:
Gifts for beauty - TOP 15 stylish accessories
When deciding what to give your friend on her 11th birthday, you can choose the following things:
- A folding mirror will be a universal gift. In some models, the device is complemented by a compact comb.
- Manicure set in a soft pink case. The kit includes files, tweezers, scissors, and nail and hand care products.
- A purse-handbag is a universal multifunctional present.
- Designer jewelry (bracelets, earrings, chain with pendant, rings).
- Cosmetic bag with applique or original print. The item can be complemented with embroidery and beading.
- An umbrella made of bright fabric, complemented by a stylish appliqué.
- Baubles or bracelets made from ribbons are a good gift for a friend’s 11th birthday.
- Set of headbands.
- Hoodie with name inscriptions and applications.
- Sunglasses in a classic or sporty style.
- Hair accessories (elastic bands, hairpins with original decor).
- Compact city backpack made of genuine leather.
- Knitted gloves, made of lace, satin or genuine leather. Shortened or elongated models are in demand in modern trends.
- A set of belts of different sizes with embossing.
- A stole or silk scarf with a spectacular ornament.
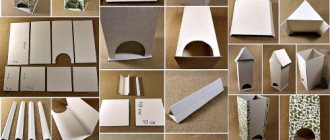
DIY gift for a guy or girl
You will need:
- small envelopes of different colors (bought or made by yourself)
- a thick sheet of paper (A4 cardboard)
- sheet A4
- glue
- details (hearts, stickers and other nice little things)
Everything is very simple:
1.
Carefully glue the envelopes to a piece of thick cardboard.
2.
Prepare a regular sheet of paper (you can use several sheets of different colors) and cut out small cards on which you can write wishes, poems, quotes, etc.
*You don't have to make exactly as many cards as envelopes, as you can put surprises in the form of confetti, hearts, etc. in some envelopes.
You can place the finished craft in a file or a special paper bag and wrap it with ribbon, like a gift.
"New Year's" soap
It doesn’t matter at all that there is soap in every house - as much as you like. “New Year’s” soap is a special soap. It is made with your own hands and looks New Year’s, not like boring store-bought bars. To make this soap, you need to prepare in advance:
- white or transparent soap base - or, more simply, ordinary toilet soap, cut into thin strips or cubes;
- a plastic (silicone) mold in the shape of a Christmas tree, Santa Claus or some other New Year's symbol;
- dyes of any color;
- glitter;
- a little palm oil;
- a little of any essential oil;
- knife;
- skewer
Having prepared all the necessary attributes, we begin to make “New Year’s” soap.
- Melt the finished soap base in the microwave or using a steam bath.
- When the base melts, add a little essential oil to it. This is necessary for the soap to have a pleasant aroma.
- Next, add a little dye and the same amount of glitter.
- Mix everything thoroughly.
- Pour the first layer of liquid soap into the mold. It should take up half of the form.
- Place the mold with the filled soap in the refrigerator for 5-10 minutes so that the soap hardens.
- We take the soap out of the refrigerator and use a skewer to make holes in it. This is necessary so that the second layer of soap adheres better to the first.
- Pour the second layer of soap into the mold. Place it in the refrigerator or some other cool place and wait until it hardens completely.
- Carefully remove the soap from the mold.
That's it, the New Year's present is ready! All that remains is to package it beautifully, wait for the holiday and give it as a gift.