- November 20, 2018
- Crafts
- Natalia Penchkovskaya
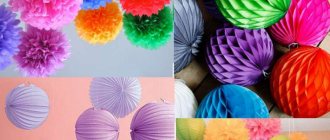
Decorating a room with paper fan circles is quite simple; the main thing is to choose matching shades that match the overall interior of the room. They will decorate any celebration or children's party. You can hang crafts on the walls of the room, on the windows, or under the ceiling on strings. Details look best on a light background.
You can fold paper fans for decoration yourself. Crafts of different colors and sizes, decorated with additional elements, look interesting. This design is perfect for a wedding celebration, even in a restaurant. You can cover the wall space near the table with cake or gifts. It would be interesting to look at a corner for taking photographs with the couple’s guests.
In this article we will tell you how to make fan circles out of paper with your own hands in several ways. We will tell readers what kind of paper is usually used by craftsmen for folding, how to combine parts into a single whole, and how to diversify the craft. You will learn all the secrets of craftsmanship and will be able to review the instructions for making decorative circles and fans for women, that is, you will learn how to make accordion-shaped paper circles so that they are even and beautiful.
Required material
In order for the circles to be clear and hold their shape well, you need to use thick paper. It should be double-sided, especially. if your craft will hang on a thread and be viewed from all sides.
Each sector of the circle is made up of both different and identical colors. The paper is chosen the same size as the diameter of the circle. To connect each sector, use PVA glue or a glue gun.
When making a round fan with your own hands from paper, prepare thin wooden or plastic plates by which you need to hold it in your hands. The most convenient way is to use a disposable spatula, which can be purchased for pennies at any pharmacy.
Silk Chinese
Materials and tools:
- a piece of silk fabric;
- ruler;
- scissors;
- bolt with nut or rivet (diameter 2-3 millimeters);
- fabric glue.
thin plywood or thick cardboard;
Master Class:
Folding a circle from sectors
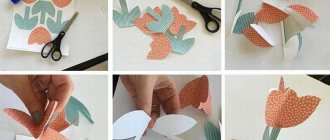
You can collect crafts in several ways, one of which will be described below. How to make accordion-shaped paper circles can be seen in the step-by-step photographs. Take a rectangular sheet of thick paper of the chosen color and carefully fold it, making equal folds back and forth.
When the paper is completely corrugated, you need to fold it in half and smooth the fold lines well with your finger. Next, the planes between the two sectors are smeared with PVA glue and connected to each other for gluing. Hold for a few seconds, pressing the two halves firmly together to allow the glue to set. After releasing, you will get the first sector of the future craft.
Carved edges
To make the circle more effective, use scissors and make cuts at the ends of the accordion and on its edges. You can use a hole punch to punch holes on each part.
Now you know how to make beautiful fan circles with your own hands in several ways. Try decorating your room with such decorative elements and surprise your holiday guests. Good luck!
Source
Working on a craft
How to make accordion paper circles further? It's simple. It remains to collect two more of the same sectors, proceeding similarly to the previous description. To make a circle, all sectors need to be brought together. To do this, the outer strips of the “accordions” need to be smeared with PVA glue and alternately connected to the adjacent sector by pressing down. Before attaching the last part, think about how the fan circle will be attached - to the wall surface or hanging on a thread.
If you are hanging the craft on a thread above a window or on hooks on the ceiling, then at this moment you need to thread the thread into the inner hole between the sectors, and only then glue the last part of the circle. If you don’t do this right away, then you will have to use a needle to pierce the thickness of the “accordions” collected in the center, and this is problematic, since in this place of the craft there is the thickest section of the paper.
If you decide to hang a craft on a thread by punching a hole in the outer circle, then such a fastening will turn out to be unreliable; any wind can tear the paper and the circle will look sloppy, ruining the entire composition.
It's fast!
When folded, forfeits take up very little space and can be stored at home in case of an unexpected holiday. You will have time to create a bright mood in the room while the guests are washing their hands :-).
How to secure forfeits?
Well, it all depends on the circumstances.
- If a special board is intended for the Candy Bar, simply use a “hot” gun or double-sided tape.
- It is easy to attach a fishing line to the forfeits, so it is very easy to attach decorations to cornices, false ceilings and chandeliers.
- We use Command hooks for walls and furniture. They are known to be removed without consequences from any surfaces except paper wallpaper.
The second method of gluing sectors
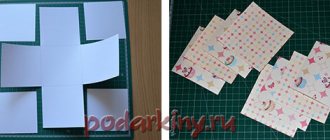
You already understand how to make corrugated paper circles, but there are several options for combining them into a single whole. The photo below clearly shows that gluing the paper occurs a little differently. The first sheet, assembled like an accordion, is laid out on the table surface with the side up. Then the work of folding the strips on the second sheet is done. In the photo they are highlighted in different colors.
The blue paper is laid on the bottom, and the green paper is first glued together with the side surfaces, as in the first option. Then the outer strips of the green sector are attached to the same lower parts. The result is a corrugated semicircle.
Work on the second semicircle of the craft proceeds in a similar way. All that remains is to use PVA glue to glue them together along the center line.
Red calendar day
Now let’s appreciate the rich color range of forfeits with a calendar in hand:
- New Year? - Yes, they are almost like snowflakes! White, with clear lines...
- Christmas? — We buy bright red circles with or without perforation.
- February 23? - We use shades of green - almost camouflage!
- March 8? — Rich colors of spring are always available!
- Graduation days at school and kindergarten? - It will be fresh, I assure you!
- Summer weddings? - How easy it is to support any theme of the celebration with phantoms...
- Autumn holidays? — You just need to buy forfeits in yellow, orange and red. All!
These decorations come in large and small, with and without perforations, with pearls or pictures in the center.
You can order forfeits, pom-poms, tassels, garlands and much more in the “Everything for the Holiday” online store.
Irina, hello! What wonderful work you have here! It’s just a pity that there are no estimated prices... The child’s kindergarten graduation is only in May, and the decoration of the hall needs to be decided as early as possible...
Irina! Thank you so much for your ideas that are so wonderful for any age and company. It's interesting, fun, very cool! I sincerely wish you health, warmth, comfort and further sparkling Creativity.
good afternoon, what kind of paper did you use?
This is where you can find ready-made forfeits from the store. If you do it yourself, it is better to take double-sided colored paper in A4 and A3 format. It is thicker than regular colored paper. Corrugated is also possible, but corrugated does not hold folds with sharp edges. The forfeits will look different, the play of light and shadow will not be as visible.
Another manufacturing option
The next option for creating a circle from accordion-folded paper is slightly different from the previous two. In order for you to understand the work more clearly, take a close look at the photo below. It shows that two papers with a blue pattern are folded like an accordion and laid with their side planes facing each other in the center of the craft. Their edges are connected with glue.
Next, prepare “accordions” from paper with a brown pattern and attach them on two opposite sides of the blue blank. Then you need to determine the central point of the craft and tie a knot with nylon thread around the entire pack. All that remains is to glue the outer strips on one side and the other to each other.
Themed holiday
Our clients sometimes want to make their holiday so special that we constantly have to come up with something. So, forfeits help out quite often, because the fan disk itself can serve as a background for the picture you need. It could be a cute kitten for welcoming a baby back from the hospital, pirates and princesses for a children's party, photos of newlyweds for a wedding, a company logo for a corporate event.
If you're lucky, you can buy sets with themed pictures.
Vertical assembly
The next method of making accordion-style circles from paper is radically different from all the previous ones. The paper should have a size equal to the radius of the future circle. The prepared parts are assembled into a long strip. There must be at least four gluings.
At the end, glue the first part to the last paper. The result is a corrugated pipe. The photo above shows how this cylinder fits onto the table surface. You just need to grab the workpiece with your hands and press on the paper from all sides at once. To keep the circle flat, you need to strengthen it by dripping hot glue into the middle. For reliability, you can stick a cardboard circle in the center on one side and the other.
Merry forfeits
People who have known each other for a long time and who are already slightly drunk at the holiday can take this game to a funnier level, even with a slight sensual twist. You will need props: a sexy costume, bra, pants, mannequin or chair.
- Portray a drunken Santa Claus who has lost the Snow Maiden.
- “Make” a mass sculpture of the painting “Garden and Gomorrah.” This is done from the guests, poses, gestures and so on are exhibited.
- Read the poem “By the Lukomorye there is a green oak tree”, replacing all the verbs with the word “copulate”, changing the endings that suit the meaning (-tsya, -etsya, -etsya, etc.).
- Dress up in a very sexy costume, prepared in advance, praise and sell yourself.
- Loop the champagne out of the saucer and say: “I’m a fat, horny cat” (“I’m a soft, fluffy pussy”).
- Dance a “Jig” on a newspaper, keeping it as intact as possible.
- Approach each participant and tell them in three sentences how you want him or her.
- Inflate a balloon, draw a face and declare your love to the person of your dreams, in at least 10 ways, for example: lying down, on your knees, etc. (2 minutes).
- Draw a drunken symbol of the passing year.
- Show a very well-fed and drunk wild boar.
- Make a riddle with a double meaning.
- Perform an erotic dance to the vocal performance of the guests “Oh Frost-Frost”.
- Shout out the window: “I am a great, but very pugnacious boar!” (“I am a huge, but loving pig”).
- Drink a glass of vodka and say a long tongue twister prepared in advance by the presenter.
- Go out into the street and ask passers-by for alms. (20 minutes are given for the task, if there is no one on the street, then the restaurant employees and guests).
- Unfasten the bra on the mannequin. Women have a fly on their trousers, but this must be done without hands, with lips, teeth, tongue.
- Quickly list what you are wearing, as well as what your neighbor to your right and left is wearing, right down to your underwear, for the entire minute.
How to make a fan
To make a fan out of paper, you need to use the first or second method of connecting corrugated paper to each other, described above in the article.
The remaining unsealed edge strips of the blanks should no longer be connected to each other, but attached to plates made of wood or plastic. As we have already advised, it is best to use medical disposable spatulas. They can be pre-painted with acrylic paints in the desired color. It is more convenient and reliable to attach paper to the plates with a glue gun.
Features of placing decorations
Handmade decor will look great on the wall above the sofa or bed. It is actively used as a decoration for a children's room. Cozy garlands or paper lampshades can decorate a terrace or balcony. It is especially beneficial to decorate areas for receiving guests or relaxing on a personal plot outside the city. Paper lanterns will be organically woven into the ambiance of a beach party. Such a light and original product can be used in any home. It looks stylish and is inexpensive.
Colored paper fan
When placing crafts in the apartment, try not to overload the space with them so that the room does not look like a school labor room. It is appropriate to place paper flowers in a large vase on a table in the living room or hallway. A large fan will decorate a bedroom or recreation area. You can also give your crafts to friends and relatives. Enjoy the process and involve each family member in such pleasant leisure time. The most important thing is that you can always do something new and please your eye with little things that create your mood.
Variety of crafts
Circles made of colored paper with a pattern or stripes are effective. You can also create multilayer forfeits from paper. How to make such beautiful circles with your own hands as in the photo below? It is not difficult. The craft is done in layers. First, the lower large circle is assembled, then the smaller ones. All that remains is to connect them together. It is best to use a glue gun to hold the craft intact.
It will be enough to place just a few drops on the edges of the “accordion” and the workpieces will be firmly connected. The round flat center looks interesting, which can be easily decorated with sparkles and rhinestones, lace and flowers made from satin ribbons.
Before the New Year, you can decorate the room with spectacular snowflakes. Make accordion circles from blue or light blue paper. Cut regular white snowflakes from folded paper several times and stick it on top of the circle.
Original ideas for creating photo zones
To decorate photo zones, you can use scrap materials or even unnecessary things. Here are some unusual ideas that can be suitable for any holiday:
- Stand with an old clock. Symbolizes happy moments spent next to loved ones. Suitable for both birthdays and weddings.
- Open book. It would be appropriate for a photo shoot of newlyweds who are about to start their life together from scratch.
- Open doors. This theme is relevant for weddings, birthdays, and graduations. The slightly open doors represent a meeting with the future.
- In retro style. WITH a shade decorated with old newspapers will be a good addition to a themed party. And a few vintage items placed nearby will help guests “transport” to the past.
- Photo frame. This option can be called universal. Suitable for any celebration, and all you need to make is a large wooden frame.
- Photo zone with vintage furniture. Old restored wooden furniture can be useful as decor for outdoor shooting. It can serve not just as decoration, but also become a convenient element for posing. The main thing is to choose a suitable background that will harmonize well with the theme of the composition.
Making a photo zone with your own hands is quite simple. The main thing is to choose the right decor that matches the theme of the celebration and strictly follow the instructions.