how to make a paper ball
Do you want to know how to make a paper ball with your own hands? He asks why? Because it's beautiful, fun, simple and practically free! It is impossible to think of anything more beautiful for home decor, holiday decoration and mood lifting. Here you will learn how to make it yourself:
- New Year's paper ball
- Paper honeycomb ball
- Origami paper ball
- Paper pom poms
- Origami kusudama ball
- Wicker paper ball
- Paper strip ball
Decorating the hall with balloons without helium: simply decorate
Decorating a room with balloons is a standard type of room decoration. However, it can be made unusual and original. Even simple balloons without helium filling are suitable for this. You can make a large number of different shapes from ordinary balls.
It is important to consider that without decorating experience, the first figures may not turn out very beautiful. However, the more practice, the better the result.
Balloon figures can be used to decorate the walls, ceiling or stage, if you have one. Balloons look beautiful in both small and large quantities. For example, you can fasten balloons into one bouquet of 10 pieces and attach them to the ceiling.
Simple paper ball
For this type of paper balls, you need to cut out circles from multi-colored cardboard. Next, when you have the circles ready, you need to bend them in half and glue them together. The more circles you make, the more voluminous and beautiful your ball will be. When you connect all the circles, glue the first and last element together and close the circle. Now you have a finished paper ball.
Corrugated paper ball
This type of balls resembles everyone’s favorite peony flowers. To make such a ball we will need:
- Corrugated paper;
- Scissors;
- Thread;
- Take a roll of corrugated paper (the more paper you take, the larger the ball will be);
- Bend the paper into an accordion shape;
- Trim the sharp edges, make them rounded, so your ball will look better;
- Fasten the figure in the middle with thread;
- Now straighten the paper, separate the balls of paper one by one;
- Ready!
How to make Christmas balls scrapbooking: step-by-step instructions, description, photos
Scrapbooking is gaining more and more fans of needlework around the world. After all, this technique is suitable for decorating any home, and products made in this style will be an excellent gift, regardless of age and gender. In order to make New Year's decorations yourself, you will need patience, as well as several available materials:
- Acrylic paints
- Glue "Moment"
- Artistic brushes
- Any New Year's balls (color does not matter)
- Satin braid, lace elements, beads
- Foam sponge
- Transparent glue
- Hair coloring spray
Scrapbooking
Next, you must adhere to the following instructions:
- Carefully coat the toys with a layer of white paint.
- Let dry so that the surface of the balls does not come into contact with other
- Beads must be colored using a hair coloring spray or a spray intended for drawings on glass
- Apply 3 different shades of paint in parallel to a foam sponge
- Blot the toy so that the colors are distributed evenly horizontally or vertically
- Once completely dry, apply clear glue to the toy and dip it into the beads
- Also attach the lace
- Tie a bow from a satin ribbon and decorate a loop for hanging the toy with it.
- You can also use sparkles, fresh flowers, beads, sequins, stones or buttons as decorative materials.
Templates for sizing
The simplest template is a lined sheet, but it’s better to spend a little time and make a cardboard stencil. It will give smoother glue lines and neat cells:
- On a sheet of A4 cardboard, you need to draw vertical margins - 3 cm on the right and left, and 7 horizontal lines at a distance of 4 cm from each other, the first 4 cm from the top edge. Number the lines or mark them with different marker colors. This lined sheet can be used to apply glue from a tube, with the layers stacked directly on it, and the glue applied in strips - alternately along even and odd lines.
- To make a stencil with slots, you need to draw the cardboard according to the described scheme, and then cut 7 horizontal slits-slots 0.5 cm wide. The distance between the slits will be 3.5 cm. Number the slits from top to bottom. Then outline all even-numbered slots with a black marker.
Place the finished stencil up with the side where the slots are marked with a marker, and stick it with tape to the table so that it can “open” and “close” like a book cover.
From newspaper tubes
A fairly simple but labor-intensive manufacturing method.
To work you will need:
- foam ball blank;
- polymer glue;
- old newspapers;
- scissors;
- decorative elements (beads, sequins, ribbons).
Operating procedure
The most labor-intensive step is twisting flagella from old newspapers. We try to twist the harnesses tightly. If you need a long harness, then glue several short ones together.
Rolls up a newspaper
Attach the end of the flagellum to the center of the workpiece . Now we begin to tightly lay the tube, securing each new turn with polymer glue. We also securely secure the edge of the tube with a glue gun.
Choose the right size
In this form, the product can be used for holiday decorations. Or you can go further and paint it with spray paints in any color, cover it with sparkles, beads, ribbons, etc.
Glue the bundles in a circle
Rules for packing bouquets
To learn how to beautifully wrap bouquets in packaging, you should know a few simple rules that will help make the appearance of the composition attractive. These universal laws are as follows:
It is necessary to focus on the tastes of the recipient of the bouquet, namely what colors this person likes, and combine them according to the color wheel with flowers; It is necessary to abandon a completely transparent bouquet arrangement, which looks old-fashioned and does not emphasize the beauty of the flowers; It is worth wrapping the bouquet with suitable textured materials that will hide imperfections and emphasize the advantages of the flowers, but will not distract attention from them; There should be enough decorative elements on the packaging to only emphasize the main accents of the bouquet and give it charm; Preference should be given to natural materials that will highlight the natural beauty of flowers.
Having familiarized themselves with the rules, novice florists have a question: What methods can be used to pack a bouquet? This question is not easy, since there is no single classification for it, but it’s worth trying to highlight the main points.
Using kusudama technique
For kusudama you need to make 60 identical origami modules. Using photos and diagrams, it will be easier to assemble the decoration. The operating procedure is as follows:
- Fold the square diagonally.
- Raise the sharp corners of the triangle to the right angle and smooth them out. Unfold the workpiece into a triangle again.
- Using the fold as a guide, fold the bottom of the triangle toward it from the center of the hypotenuse. Expand.
- Using the resulting fold, lift and unfold the small triangles in the corners of the large one. At the same time, they will take on the shape of a rhombus with 2 short sides.
- Bend the edges of the rhombuses protruding beyond the large triangle. Fold the remaining pieces (small triangles) in half.
- Fold the resulting square with 2 triangles diagonally. glue the triangular elements, fixing the petal.
- Glue a flower from 5 such petals, and then connect 12 flowers into a sphere.
Ready-made flowers can be decorated with beads or other decor.
From lace napkins
Openwork balls, reminiscent of weightless snowflakes, will complement any New Year's interior.
New Year's balloons
To work you will need:
- balloon (round);
- wide lace or lace knitted napkins;
- PVA glue;
- brush;
- scissors.
Operating procedure
Inflate to small sizes. Now we cut out a beautiful section of lace or an old lace doily. We apply the openwork to the balloon and coat it thickly with PVA glue (you need to ensure that the entire fabric is saturated with glue). The best porn on the site Lenkino.porn the best porn. Only the best porn.
Unusual solution
Let the product dry until the glue has completely set. Then we carefully pierce the ball and pull it out.
Tip Don't forget to attach a decorative cord or ribbon by attaching a bow made of ribbon in a contrasting color at the base.
Thread color can be chosen as desired
These will look great together with knitted angels and snowflakes against the background of Christmas tree garlands.
Beautiful composition of balls for the Christmas tree
Simple beautiful circle balls for the New Year in kindergarten
The resulting ball is absolutely delicate! I haven't tried using different colored papers yet, but I'm thinking about doing it. I wonder how it will turn out? If you do this before me, share your impressions and photos of the craft!)
Cut out 15 circles.
Fold the circle in half one way and the other. BUT!!! bend ONLY in the middle.
Turn the workpiece over. Fold the circle diagonally to the previous folds. And also, we bend only in the middle.
Now the diagonal “fold” goes inward, between the horizontal and vertical. WE DO NOT BEND ANYTHING!!! Only the very edge.
It’s even better to fasten the corner with a stapler.
We tightly sew all 15 blanks to each other at the corners.
The thread will be our loop for the ball on the Christmas tree.
The diameter of these balls is 13cm. But this is not important. The number of circles is not important either: you can take more. You can use colored paper, it will be even more beautiful!
Another option is to glue the circles together, as in the photo master class.
Ideas for beautiful DIY Christmas balls: photos
There is a huge variety of all kinds of New Year's toys:
- Classic in the form of animals
- Plain
- Transparent
- With decorative painting
Making your own decorations will not only put you in a festive mood, but will also help improve the energy in your home.
With your own hands
Regardless of experience and skills in needlework, every housewife will be able to find the most exciting and interesting method of making toys. The most popular of these techniques are:
- Origami
- Making balls from wool threads and glue
- Decoupage
- Application of applications
- Salt dough modeling
- Gingerbread and gingerbread decorations
- 3D style toys made of paper, cardboard and felt
- Sewing decorative elements in the shape of hearts and animals
- Application of papier-mâché
- Knitting toys
- Plaster modeling
- Making wax figures
Scrapbooking and decoupage
Also, don’t forget about the old toys you have in your home because they can be used in the following ways:
- As crushed crumbs for decorating new products
- In transparent balls, inserting photographs, pictures or New Year's rain
- Painting toys with acrylic paints
- Changing their shape with wax
- Decorated with beads, rhinestones and sequins
The New Year's mood begins not only with a person's inner feelings, but also with a comfortably furnished home. Decorate it with toys, balls, as well as various crafts and happiness will not keep you waiting. After all, in order to celebrate the holiday with dignity, you do not need to spend huge sums of money. It is enough to put in a little effort and also put in some warmth when creating New Year's decorations.
Snow globe on the Christmas tree
When you look at a snow globe, you immediately feel the approach of the New Year, a time of magic and miracles. You can do it yourself. To do this, you will need a glass or plastic Christmas ball, into which small figures will be placed - a Christmas tree, a snowman, Santa Claus, a house or any others.
You can use ready-made ones or make them yourself from polymer clay. Salt, foam chips or glitter are used as snow. This winter magic ball will become a real decoration for the Christmas tree.
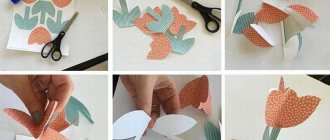
Paper Christmas ball toy
These are very beautiful and unusual balls, it is better to make them from two colors so they look more beautiful.
- First we need to prepare the workpiece. Cut out the main elements from colored cardboard (Figure 1). You should end up with 12 rays of one color and 12 rays of another color. Also cut out two small circles;
- Glue the rays onto the circles as shown in the picture. Also fasten the rays of a different color, but so that they look in the opposite direction;
- Now place the two pieces on top of each other and weave them together;
- You can now attach the ribbon.
Even more diagrams on how to make a paper ball
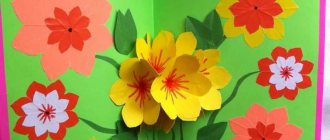
Ball with flowers
1. Take any ball, we have a foam ball.
2. You need to cut out a lot of flower blanks from colored paper, they should be of different sizes.
3. Now we collect the ball. You need to glue the paper blanks onto the base.
4. Glue large flowers first, then smaller and even smaller ones; the centers can be made from beads or seed beads.
5. The ball will be ready when you have completely covered it.
You can also cover the ball with paper roses; we told you how to make paper roses in the article (paper roses).
Kusudama of roses
You will need: 6 red and 12 white paper roses of the same size, white paper, scissors, glue, satin ribbon.
Master Class
- Fold paper roses according to this pattern or make them in another way, for example, twisting them in a spiral.
- Bend the triangular base of the rose; if it is not there, then glue it with a separate element. There should be 4 such corners.
- Prepare a strip of paper - its width should be equal to the triangular base, and its length should be 3.5 times the width.
- Fold the strip in half.
- Wrap the strip around the triangular base.
- Remove the blank from the corner and glue it, then make 23 more fastening elements in the same way.
- Place the fastening element tightly onto the triangular base of the rose and secure with glue.
- Place the fastening elements on the 3 remaining corners and secure with glue.
- Glue the fastening elements to the corners of 6 red roses - they will be the “main ones”.
- Glue 4 white roses onto the red rose fasteners on each side.
- Glue the red roses on top of the white ones.
- Glue 4 white roses between the red ones and set the piece aside.
- Glue 4 white roses onto the fastening elements of the red rose on each side, you get a second blank of 5 roses.
- Glue the blanks together.
- Attach ribbon for hanging.
Shabby chic style
Made in an antique style, in calm soft shades, decorated with lace, Christmas tree balls in the shabby chic style are reminiscent of a distant past, steeped in romance. They are ideal for the New Year, a family holiday, they make you remember traditions and customs, and connections between generations. Such jewelry looks refined and sophisticated, creating an atmosphere of special warmth and comfort, tranquility and magic.
Balls in the shabby chic style are decorated in pastel colors, pink, silver, and ash shades. Ribbons, lace, beads and half-beads, outline and buttons are used for decoration.