Every year, handmade gifts become more and more popular. This is not surprising, because special energy and love are invested in them. Moreover, it is not at all necessary to use any unusual materials to create them. Even plain paper is suitable for this. We have selected interesting master classes with which you will definitely be able to make cute gifts with your own hands.
Materials and methods of their use
Paper is one of the most affordable materials and, in addition, it is presented in stores in a wide variety: colored, velvet, thick, thin, corrugated, etc.
Paper can be used in different ways in creativity - painted, cut, twisted, glued, there are many options.
Postcard
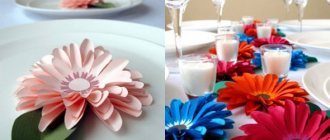
This addition to a gift always evokes positive emotions. You can buy a card in a store, but it’s better to make it yourself, focusing on the taste preferences of the hero of the occasion. A simple piece of paper can make a great holiday message with just a little imagination and patience.
Kids can create their own masterpiece together with mom or dad by gluing pre-prepared flower details onto the base. You can write a few kind words.
Grandma or grandpa, sister or brother will love this gift. You can make an original postcard for any holiday. Experienced craftsmen create incredible masterpieces using various techniques and materials.
What benefits can you get from working with paper?
Working with paper with your hands stimulates the development of imagination, fine motor skills, and teaches you to work with concentration and accuracy.
It’s easy to learn how to make paper crafts with your own hands; all you need is the desire and the necessary materials. Below we will talk about popular creative ideas when working with paper.
Children are taught to make crafts from colored paper in kindergarten. But these are not just activities for preschoolers. There are ideas for adults too. There are complex and labor-intensive ones, using quilling techniques, as well as completely simple ones, where only basic skills are needed.
Bookmarks
This practical and beautiful craft will appeal to children and people who love to read. It's not difficult to make. Take a 15x15 square of double-sided colored paper. The sheet must be folded diagonally.
Be sure to iron the fold well. Then fold the corners down. The resulting triangle is bent in half, while the angle rises upward. The two parts at the bottom along the resulting folds should be tucked into the pocket.
DIY 3D paper painting
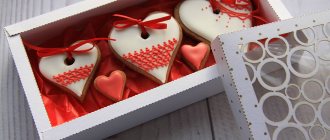
This example is a simple one. It suggests making a cute picture with your own hands, which will be a nice gift for Valentine's Day. It is a sheet of paper decorated with cut out voluminous hearts that look like butterflies wanting to flutter in a split second.
You can place many hearts on one A3 sheet; their size is chosen by the author of the craft. To cut out even hearts, you need to fold a sheet of colored red paper in half. Draw halves of hearts along the fold. Cut, unfold and get a full-fledged heart.
There is no need to smooth out the cut pieces. They shouldn't be flat. Glue the hearts onto a sheet of paper, mixing them. Let one be closed, the other unfolded. In principle, you can choose any color or even replace the shapes with stars, flowers, etc.
Stylish advent calendar
On the eve of Christmas, it is customary in Western countries to give advent calendars. Be sure that every child will receive such a present once.
To create it you will need:
- thick cardboard;
- sheets of paper;
- scissors;
- glue;
- decorative elements;
- sweets to fill the cells.
Fold the sheets of paper in half, then unfold and cut.
Take one sheet, fold it in half and glue the edges.
Fold the edge as shown in the photo.
We open the lower part of the workpiece and fold it.
We fix the lower part with glue and repeat the same with the rest of the blanks.
We fill the resulting bags with various sweets, decorate them at our own discretion and number them.
We attach all the bags to thick cardboard. A beautiful DIY advent calendar is ready!
Paper valley of cacti for the holiday
Today, decorative elements are expensive, but you can make them yourself. In this option, it is proposed to decorate a table for a children's party. Let the theme for the holiday be Mexico. The outfits are appropriate - giant sombreros! And the table should be filled with cacti, not real ones, but paper ones!
Note!
- DIY paper crafts the most interesting: simple origami instructions + master class on creating creative crafts with your own hands (130 photos)
- Paper sword - TOP-120 photos of creative solutions for creating a paper sword + simple instructions and diagrams for children
DIY paper crafts - simple patterns for creating paper crafts step by step + original ideas for beginners with photo reviews
You can create these crafts from paper and cardboard. First you need to draw cacti of different sizes on paper. Let them be big and small, green and fantastically colorful.
You can even make three-dimensional cacti by connecting elements - the trunks of a paper plant - into each other's grooves or by gluing them together. Using pencils, you should paint the blanks with dashes representing spines. Now take small cupcake molds from the shelves and insert paper shapes into them; for stability and beauty, pour sand or small pebbles into the molds.
What to give your brother for his 18th birthday?
You can give your student brother a T-shirt painted with your own hands. This doesn't require much skill. Even if you are not an artist, you can draw some simple design or make a congratulatory inscription on a plain T-shirt. To implement your idea, you need to buy a T-shirt without a pattern and special paints or markers for fabric. Then use your imagination and create! If your birthday brother appreciates a sense of humor, give him such a cool birthday gift with your own hands.
What to give your brother for his 18th birthday from his sister, made with his own hands? A great gift option for an 18-year-old brother: a case for an e-reader or tablet. You will need the following:
- Pieces of genuine leather (you can use an unnecessary bag);
- Thick awl;
- Strong threads;
- Lace;
- Big button.
Sequencing:
- Measure the width and length of the tablet. Cut a strip of leather to leave a small margin.
- Using an awl and strong thread, sew the strip together to create an envelope.
- Make a loop from the lace and sew on a button.
On a note! Instead of leather, you can use old denim, thick fabric, felt. Needlewomen can even knit an original case for a tablet.
Make a loop on the back side
Origami as a way to work with paper
The term "origami" combines two words. The first - “ori” is translated as “folding”, the second - “kami” is translated as “paper”. Literally it is folding paper. This art is more than five centuries old. It originated and developed in mysterious Japan, where they can make from simple paper figurines to complex masterpieces. Today, origami is popular all over the planet, thanks to books and the Internet, everyone can learn how to make paper crafts using the Japanese method.
Interior decoration
Paper creations can easily be turned into real interior decorations. It is enough to try hard when completing your masterpiece. Handicraft panels can easily replace the work of masters. Before starting an activity, be sure to carefully plan the plot and select a color scheme.
The paper can be glued randomly or a template can be pre-drawn. The details of the picture are cut out of paper and glued to the right places. It is better to take thick paper or a sheet of cardboard as a basis.
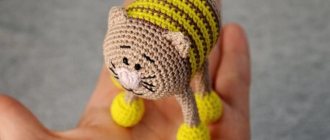
How to make a paper puppy: origami technique
While adults don’t often sit down to make crafts, children are big fans of tinkering with paper. And so that their labors do not involve a lot of cleaning for adults, learn how to create paper crafts for children without using glue. The best option is the ancient art of origami.
In this short master class, an option for creating a paper puppy is presented.
Note!
Paper star - TOP 110 best photo instructions for children. Master class with a full description of the stages of work + reviews of creative craft ideas
Paper craft templates - TOP 100 photos of the best templates. Master class with simple diagrams and drawings for creating with your own hands
- How to make a paper swan: simple instructions with step-by-step guide for beginners. Secrets of craftswomen + photos of finished works
First you need to choose the color of the future puppy. It doesn’t have to be classic, the dog can be anything. The next step is to cut out a square from a piece of paper. Now you need to make a triangle out of the blank. While it doesn’t look much like a puppy, but by turning the side corners down, you get ears!
And if you turn the bottom corner up, you get a chin! So the dog's head appeared. To give her her appearance, you need to draw eyes, a perky black nose, a mustache and a tongue! The puppy is ready!
A cool gift for a student brother or boyfriend
Such a brother needs to be given something amazing . Here are two interesting options - a car table and a gift cup.
Autodesk
It will appeal to those who love cars and interesting unusual things. This is a gift from a man to a man.
You will need:
- a block from a V-shaped eight- or six-cylinder engine without all the filling, which will be the basis;
- three or four pairs of wheels depending on the weight of the block;
- four thin metal pins 20–22 cm each;
- two aluminum tubes with a diameter of 1.5–2 cm;
- plastic bushings;
- glass supports and glue;
- oval glass, slightly larger than the size of the block;
- LED Strip Light.
The first step is to thoroughly clean and polish the engine block itself . Wheels are evenly attached to its lower part, since the block itself is too heavy to simply carry around the room. Then you need to secure the glass. To do this, metal pins are inserted evenly into the existing holes in the upper part of the block, two on each side. They need to be well secured so that they do not wobble. Aluminum tubes are firmly attached to each pair using special plastic fastening sleeves. You need to install plugs at their ends so that the product has a finished look. These tubes are installed exactly parallel to each other at the same height. You need to check this with a level - there must be a strict horizontal line . Next, plastic or silicone supports are placed on top of the tubes, onto which the glass itself is firmly attached using special glue. Now the table is almost finished. All that remains is to glue the LED strip inside and connect it to the wire and plug. You can take a ribbon that changes color using the remote control. Then the table will be colorful and bright. If desired, you can install speakers in the middle so that they are not visible. Then the table will be completely universal.
Right before presenting the gift, you can insert bottles of different drinks into the holes for the cylinders.
Cup
This sweet souvenir gift will suit literally everyone . You will need:
- two plastic bottles with a capacity of 1.5 and 2 liters;
- ordinary polystyrene foam or polystyrene foam (it is a little denser);
- corrugated cardboard;
- metallized corrugated paper in gold or silver color;
- wooden skewers;
- a lot of two types of sweets (round and rectangular) in a metal wrapper;
- ordinary cardboard;
- a small photo of my brother;
- thin ribbon;
- small beads for decoration.
The bottom of about 5 cm is cut off from the larger bottle, and only the top 5–6 cm is left on the smaller one. Two cones are cut out of polystyrene foam so that they fit tightly in the necks and do not fall out. These cones need to be greased with hot glue, allowed to cool slightly and secured in the blanks. Then skewers are inserted into the foam in both bottles through the necks, which are then sharply cut at a distance of 3-4 cm from the neck. With their help, both bottles are firmly connected to each other, and the junction is additionally wrapped with tape. The short part will then become the base of the cup. We paste a pre-cut rectangle of corrugated cardboard around the top part in a circle so that it covers it almost to the very bottom. We do the same with the inside, cutting off a suitable rectangle of cardboard. At the bottom of a cup made of the same material we place and glue a round base. The entire structure (inside too), first coated with glue, is wrapped in metallized corrugated paper. From cardboard and foam plastic we prepare a small base in the shape of a small round loaf, which we also drape with corrugated paper. You can glue braid and beads that match the color to the leg. The lid for the cup is made in the same way. Now we completely cover it with candies: round on top, rectangular on the bottom. Inside, under the lid, you can put the same sweets or notes with wishes. The medal is made of cardboard. A photo of the birthday person is glued to one side of it, and a congratulation inscription is placed on the other. For example, “To the best brother!” or something similar. A ribbon is attached to the medal and hung on the cup.
European art - quilling
Quilling is a technique for working with paper, also called paper rolling. If you master this skill, you can create amazing crafts, both voluminous and flat. But this direction requires a lot of endurance and patience. In order to create interior items or even simple figures, you need to twist not just a single spiral, but dozens, hundreds, sometimes thousands.
The resulting spirals are folded into various shapes that form modules. And you can use them to make photo frames and decorate albums, greeting cards, even beads and necklaces!
This direction came from the Mediterranean. In coastal Europe it was mastered back in the 15th century! And it gained popularity because of its availability and low cost. But even royalty did not disdain this direction; even Queen Elizabeth of England was fond of quilling at one time.
The bow tie
You can make your own bow tie. It is not difficult to sew it by hand. The work process is reminiscent of making origami from paper, only the material for this will be fabric.
To work you will need the following:
- fabric scraps;
- threads;
- a needle;
- fabric glue;
- ribbon.
Since the product is small in size, there is no need to buy special fabric. Scraps of material or old clothes will come in handy. It is worth choosing a thick fabric; if this is not available, then you can fold the thin material into several layers and iron it.
You can make your own bow tie. It's easy to sew by hand
Cut 2 squares from the material with sides of 8 and 16 cm, bend each square in half so that you get a triangle, and then in half again. The edges should be stitched as unnoticeably as possible. After this, fold the triangles together and sew in the middle so that the seam is not visible, cover this area with tape. An elastic band is attached to the finished butterfly, with which you can put the product around your neck.
Tools for quilling
The main thing you have to buy is paper. You need a lot of it. Cut the strips in advance. They shouldn't be short. By the way, stores sell ready-made sets of strips. You can’t do without glue; it is desirable that it is of high quality and does not leave a lot of dirt. The shopping list will also include small scissors, tweezers, and an officer’s ruler. To curl the paper, you still need special rods (they can be replaced with simple toothpicks).
Note!
Paper shuriken: TOP-140 photos of the best DIY origami ideas. Instructions for children step by step with simple diagrams
- How to make paper claws - detailed instructions with simple origami diagrams. Creative creation ideas + photo and video reviews for children
Cardboard crafts - TOP 130 best photo instructions for children. Master class with a clear description of the stages of work + reviews of creative cardboard products
Decorative birdhouse
If you are planning to give a gift to your loved ones, then you probably know all the preferences. Therefore, you can safely make not only useful, but also decorative gifts. This is exactly what a birdhouse is, which will look great in a child’s room.
Let's prepare the following:
- decorative cardboard and wrapping paper that matches the style;
- glue stick;
- ruler;
- scissors;
- compass;
- dry twig;
- decorative bird.
Draw a birdhouse on a sheet of decorative cardboard. It can be of any shape and height. It all depends on your imagination. But remember that the back and front walls must be the same. The same applies to the side ones. It is better to make the roof in a different color so that it stands out visually against the background of the birdhouse itself.
We bend the edges of all parts using a ruler. Due to this they will be clearer. This is necessary so that the parts can be well fixed to each other.
On the facade of the birdhouse we draw a circle, which will be the entrance. Carefully cut it out using scissors.
We connect all the parts together using glue. Leave it for at least an hour to dry.
Make a small hole in the birdhouse and insert a twig. If necessary, we fix it and place a decorative bird. The original present is ready!
Basic Quilling Skills
All large quilling paintings are made up of small patterns. Below is a description of the basic figures. White paper is suitable for learning.
The basis of the basics is spiral winding. You need to arm yourself with a rod or toothpick. Then start winding the strip of paper, doing it very tightly. Then glue the edge of the spiral and remove it from the rod. It's a tight spiral.
You can also make the next element - a “cone”, but adding each new turn like a ladder.
The basic skill for all other figures is called "light spiral". We make it tight, but at the end we loosen our grip and only after that we glue the edge. Then from this you can make an oval, a drop, a triangle, a heart, a flower, etc. They are easy to shape with your fingers because the spiral is not tight and allows you to change shapes.
If you glue such figures together and place them on a sheet of paper, you can get bouquets, butterflies, beautiful meadows of charming sheep. A themed paper craft for summer will be ready if you put in a little effort and use your imagination!
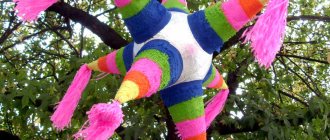
Fairy lights
Garlands are often used as paper decorations for the home. The products will be useful not only during the New Year celebrations. Paper strips perfectly decorate a room for any other holiday.
The easiest way is to glue suitable figures onto a thread. These can be both flat and volumetric objects. Most often, flags or flowers are chosen. For a men's holiday, you can use car figurines.
To decorate the area for photo shoots, hearts or butterflies are often chosen. A garland in the form of a chain of rings is popular.
Paper creativity is the basis of creative thinking
This material describes only a few areas of paper art. In fact, there are many more, you just need to let your imagination run wild. It is useful for people of all ages and professions to engage in such art.
It not only brings aesthetic pleasure, but gives inner harmony, develops thinking and allows you to calm down and forget about the bustle of everyday life.
For lovers of aromatic coffee
If your brother is a coffee lover, then such a gift will come in handy. This is a mug made from coffee beans that will always exude the aroma of coffee.
To work you will need:
- any mug;
- coffee beans;
- cosmetic discs;
- white threads;
- brown acrylic;
- glue that is used for a hot gun;
- other things for decoration.
If your brother is one of the coffee lovers, then such a gift will come in handy.
Stages of work:
- Glue cosmetic discs to the mug using hot glue so that they cover its entire surface. If there are open spaces left, the grains will not stick.
- Then, using a thread, all areas with disks are wrapped, including the handle of the mug.
- Now it’s time to paint the entire surface of the mug.
- Start gluing the grains tightly using glue so that there is no gap visible.
- At the end of the work, you can decorate the mug with ribbon.
This is a mug made from coffee beans that will always exude the aroma of coffee.