Decorating a room with an arch
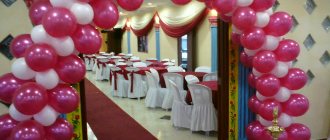
Among the common decorative elements, the arch remains one of the most popular. This decorative element is considered one of the most versatile, because it can be made in any size. For events in an open space, large arches are made, but for a room you can choose a more miniature and elegant option. The arch can be made of balls of a certain color or combine a palette of colors. Heart-shaped balloons are used to create romantic accessories, and arches are often decorated with balloon flowers.
Aerodesign: pros and cons
Decorating a wedding with balloons allows you to create and experiment. These could be arches or airy walls separating the newlyweds’ table from the rest of the space, delicate pastel garlands near the ceiling, weightless floating arches or additional lighting using balls with built-in LEDs.
The variety of shapes and colors, as well as the ability to fill balloons with helium or regular air and change their properties, allows the designer to show all his creative potential, creating truly original solutions.
Aerodesign advantages:
- budget : balloons will cost much less than fresh flowers;
- speed and ease of execution : you can create beautiful compositions yourself;
- a special atmosphere of romance and lightness;
- huge palette of shades;
- the ability to combine different types of balls with each other, as well as combine balls with fabrics or colors.
But there are also disadvantages:
- balloons have the unpleasant property of bursting with a sharp sound : to avoid this, do not inflate them too much;
- not every wedding theme allows for such a design : balloons may not fit into a too luxurious or, on the contrary, natural style;
- the slightest draft can scatter the not very tightly attached beauty throughout the hall.
Decorate a room with balloons without helium
It is unfair to believe that you can decorate a room beautifully only using helium balloons. Compared to regular ones, they are more expensive, so not everyone chooses them. Even ordinary balloons that you can inflate yourself are an excellent option for decorating a room. Speaking about how to decorate a room with balloons without helium, the following common options should be noted:
- balls suspended from the ceiling and compositions made from them;
- bundles of balls attached to pieces of furniture;
- garlands of colorful balls;
- simple figures from balls that you can make yourself.
Finally, for a children's party, you can simply scatter the balloons on the floor; the children will be delighted with them.
Features of handling balls
Latex material, even from the same manufacturer, has different densities. Any ball must first be pulled by the ends. This technique helps make them long.
With the help of such a basis it is easy to embody original ideas. The following creative balls are available on the market:
- pastel colors (very plastic);
- metallic shimmer (shiny surface);
- pearly shade.
When working with balls for modeling, you need to take into account the recommendations of experienced aeromasters. Dusty rooms and direct sunlight should be avoided.
Balls for the ceiling
Helium-filled ceiling balloons are one of the easiest ways to decorate a room. Such balls do not take up important space in the room, but look incredibly impressive. If you tie them with curly ribbons, the decor will turn out simply luxurious. When deciding how to decorate a room with balloons, you should definitely stock up on an armful of multi-colored helium balloons.
Hall decoration
You can decorate a hall for a celebration, creating a light and airy interior, by throwing a light fabric (chiffon, nylon) over a balloon filled with helium and tying it from the bottom. Tie the balls to chairs or weights.
This is how you can decorate a room for Halloween: take a dark fabric and draw scary faces on it. They will look even more impressive if the design is made with fluorescent paint that glows in the dark. In the dimly lit hall, an atmosphere appropriate for the holiday will be created.
How to make a craft with a ball and paper to decorate a children's party:
- prepare small-diameter balls and colored paper;
- Make cones out of paper with a diameter so that the ball partially fits into them, but does not fall through:
- glue the cone, place the ball in it and glue it.
The cone can be further decorated as desired. Make more of the same balls. The result is “ice cream” cones that can be hung from the ceiling or banquet area.
Balloon bouquets
Bright bouquets of balloons in the field of aerodesign remain one of the most popular and widespread figures. They decorate children's parties, weddings, birthdays and halls for corporate events. If you have not yet figured out how to decorate a room with balloons, be sure to pay attention to the variety of bouquets. Among them, you can choose the right ones for any event, including a fun children's party and a romantic evening with your other half.
Cloud
Another decoration option for a baby shower, because in translation “shower” means “shower” or “rain,” which means a cloud with drops will come in handy.
Choose white or light blue balls for the cloud if you want to achieve realism, but no one forbids you to build a bright, fantasy cloud. The main thing is that the color of the “droplets” matches the color of the “cloud”.
Also, such a cloud is suitable for a birthday party in the style of Masha and the Bear or Winnie the Pooh - to recreate the atmosphere of the forest. And the clouds would also be appropriate for a matinee in kindergarten in honor of the autumn holiday.
When decorating the room with balloons, don’t forget
Colorful balloons can become the basis of a unique decor, but you should not limit yourself to their use alone. Many other interesting decorative elements are combined with balloons. For example, compositions made of balloons can be complemented with curly or flowing ribbons. Paper garlands are a very popular design element. Despite their accessibility and apparent simplicity, they can look incredibly impressive. A variety of accessories are combined with the ball design: bows, artificial and fresh flowers, decorations made of paper and fabric. Some decorative elements can be done independently, while others will require skill and professionalism to create.
We sculpt from ball plasticine together with children
Ball plasticine is loved by preschool children. Crafts made from ball plasticine help to reveal the creativity of a little person. This special material consists of small balls with an adhesive base.
For crafts, it is recommended to choose fine-grained plasticine. Children roll small tubes out of it with their fingers and connect them to the base.
It turns out to be a beautiful creative composition. Older children can make three-dimensional toys from ball plasticine.
Balls that can surprise
A good solution for any holiday event dedicated to children. This will not only decorate the room, but will also allow you to make unusual surprises. You can do this in two ways:
- We place candies or small toys inside the large ball. Also, for decoration, you can add additional serpentine or New Year's rain. This option is used for various children's games, fun and competitions. The main goal of the guys is to burst the balloon, after which they will receive a tasty reward;
- The situation is identical, but the only difference is that there will be several of these balls and they will all be slightly smaller. During the holiday, each child will be given a balloon, which they will need to burst and take away their gift, which will be inside the balloon;
For convenience, you can use a funnel or make one from a bottle to make it easier to fill the ball with goodies. It will be more convenient if you inflate the balloon halfway, then pack everything you need there, and then inflate it fully.
What can be added?
The idea of decorating a photo zone with balloons is excellent in itself. But in some cases this is not enough, and the place for a photo shoot looks sluggish and uninteresting. In order to correct this, you can resort to various additional decorations.
- The first thing that comes to mind is to use holiday rain. For example, this material can be used to make a background for filming. Due to the ability of rain to reflect light over its entire area, the background will shimmer, which in many cases looks appropriate and elegant. The option of designing a photo zone with rain is often used by professional filming companies.
- Another idea is to decorate the photo zone with baskets of flowers. This technique - adding colors - is used in a variety of areas. As a rule, flowers in baskets are hung on a ball rim, thereby creating a more cozy atmosphere. Moreover, it is not necessary to use the basket and flowers together. So, artificial specimens can be wrapped around balls without using baskets. On the other hand, the baskets themselves can be used in another way, for example, decorated beautifully and hung in a photo zone.
- Don’t forget about the banal additions that are used everywhere: fabrics, furs, lace, multi-colored paper and cardboard, foil. By using your imagination, you can find suitable places to use them in your photo zone.
- When creating a themed photo zone, you should use various decorative items: various toys and figurines. But this must be done in moderation.
Romantic option
This decoration is ideal for Valentine's Day, wedding anniversary, or simply as a gift for a loved one. All you need for this is:
- Inflate bright balloons with helium;
- Attach decorative ribbons to the ends of the balls;
- Tie an additional gift to the ribbons - for example, some kind of game, or a gift box with a surprise;
Thus, the gift will be on the floor, in a beautiful design, and a balloon will float above it, with the image of the other half, for example. Such a decision will greatly emphasize the significance of the event, surprise your loved one, and just make him happy.
Where can I get a surprise balloon?
The easiest way is to order such a gift from any event agency or company that sells balloons or organizes various events. In their “arsenal” there are products for every color, taste and budget. They may differ in size, color, shape and filling. However, the final price of such a gift is actually greatly inflated. If you consider that its cost, if not a penny, then at least very low, then you will not want to overpay for this service, especially since it is not at all difficult to inflate and fill a surprise balloon with your own hands. To do this, you will need to prepare a few tools, stock up on time and patience. Now let's talk about everything in order.
Balls for a surprise ball
For the craft, you need to buy one large ball, as well as several dozen mini-balls. They are sold in packs of ten or one hundred. These are small products up to 5 cm in diameter (inflated). For one surprise, craftsmen use about 200 mini-balls, but their number may be smaller. The shape of the internal elements can be arbitrary. The easiest way is to put in regular oval balls, but if you want to play around and make the surprise even more amazing, you can change them to hearts.
The large base ball also comes in the shape of an oval or heart. This parameter is not particularly significant; it is much more important to pay attention to the transparency of the latex. If the inner filling is not visible through the rubber after stretching, the surprise ball will not be so impressive.
Auxiliary Tools
Before telling you how to make a surprise ball with your own hands, we recommend watching a video with a master class on making this craft.
To bring your idea to life, you need to prepare several tools and additional materials:
- pump for inflating balloons - manual or compressor;
- a reel of wide tape (preferably without adhesive tape);
- one regular inflatable ball;
- scissors;
- candies, confetti and other filling (based on your idea).
Note that if you do not have a compressor pump, this is not an obstacle to making a surprise. It is needed to inflate the main large balloon, but this can be done the old fashioned way - with your mouth. But you won’t be able to pull off such a trick with a hundred mini-balls. It is better to inflate them using a hand pump. By the way, this will take quite a lot of time. This is the most difficult and time-consuming part of the work.
Those who have already tried to make a surprise balloon once say that when inflating mini-balloons, it is better to first prepare a large box for them. You need to put all the “bubbles” in it so that they don’t scatter throughout the room. This advice will be especially valuable for those people who will make a surprise balloon not at once, but over several days, for example, after work. To prevent the balls from bursting and getting lost, it is best to collect them in one place.
How to make a ball in a ball
This decor looks impressive and is suitable for many holidays; it can also be used as entertainment. Making a ball in a ball is not so difficult with your own hands. To do this, you need one large transparent ball and several small ones, an expander, and a pump. First, slightly inflate the large ball and carefully place the first small ball there (use an expander), which we fill with air. We tie it with braid and do the same actions with the rest of the balls. At the very end, fill the transparent balloon with helium. If desired, the braid can be decorated with serpentine, satin ribbons, garlands, and sequins.
How to make number 1 from balloons
What you need: a set of balloons of two colors, braid, pump. The more balls you take, the larger your unit will be.
Steps to create a 3D figure:
- inflate all the balloons;
- take two balls of the same color and tie them together, do the same with a different color;
- we intertwine four balls with each other, getting a four;
- using braid we fasten the fours in the form of a spiral;
- After you have a straight line, connect two more quads perpendicularly from above, and do the same actions from below on both sides.
How to make 3D flowers
What you need: 5 white and yellow balloons, 1 red, 3 green twist balls, 4 green balloons.
Flower modeling process:
- First we inflate white balloons, followed by yellow ones, only smaller in size, about half the size. Red should be the smallest - this is our middle.
- We connect the white balls together to form petals, and do the same with the yellow ones.
- We put the yellow balls on the white ones and connect them with thread, attaching the red core to the petals.
- In order to make the stems, we inflate the balls for modeling and twist them together like a rope.
- Fill the green round balls with air and connect them in a circle. This is our flowerbed, and at the same time the base of the flower that will hold it.
- We put everything together - we connect the stem with the flower to the flowerbed.
- Additionally, you can decorate it with bows, toys, serpentine, and sparkles. You can create several flowers and collect them in a bouquet.
Color spectrum
You should not use the entire palette of shades. The design will turn out to be too chaotic, which will inevitably destroy the overall atmosphere. It is better to choose two or three primary colors and combine them to your taste.
Another interesting solution is several shades of the same color. For example, at a green wedding, you can create an arch or garland with a gradient from soft mint to rich herbal. Monochrome looks no less worthy, but in this case, try not to overdo it, otherwise the overall picture will turn out to be somewhat boring.
At classical ceremonies, delicate, pastel shades of pink, blue, white or gold are most often used.
A colored wedding invites you to add a palette to the celebration – shades of red, blue and even black. Advice! Remember that a balloon filled with air looks lighter than a deflated one. This can be important when choosing perfectly matching shades, especially bright or dark shades.
DIY fruit balls
It is best to decorate children's and themed parties with improvised fruit. Instead of helium balloons, it is better to take regular ones and hang them on a fishing line in the form of a garland. For example, to create a watermelon, simply draw light lines on a green ball. Bunches of grapes can be made from small purple balloons (fill the balloons not completely and tie them in the form of a pyramid, secure the printed leaves on top). For strawberries, red balls are suitable, on which you draw dots with black paint, and attach paper leaves to the tail. Hang all the fruits in random order on the fishing line.
A big heart
This figure takes a lot of time and also requires several additional hands. Therefore, it would be more rational to prepare it for a wedding, or for some other serious and significant dates.
You can make the design in three different ways:
- Inflated balloons are tied on a fishing line and attached to the wall;
- Inflated balloons are mounted on a wire frame;
- The inflated balloons are secured with double-sided tape and hung on the wall. This method is best used in cases where the surface can be easily cleaned of tape residues;
In addition, to decorate the holiday, you can make several bouquets with flowers from balloons. But these will not be ordinary flowers, but bouquets with hearts. To create them, you will need to purchase miniature heart-shaped balls and other elongated balls, this will be our stem. They need to be connected to each other and the resulting bouquet placed in an artificial basket. Agree, it is very simple and beautiful.
Balloon piñata
In fact, the idea of creating the piñata belongs to the Spaniards, who spread it throughout Latin America. There are several ways to entertain guests with a piñata:
- Place sweets inside a large transparent ball. Organize a competition in which the winner opens the piñata.
- Instead of sweets, you can put interesting tasks for guests. It can also be wishes or jokes.
- Small gifts that guests receive at the end of the evening or as a result of a drawing are also suitable as a filler.
To make it easier to put objects into a ball, use an expander. This could be the neck of a plastic bottle, a watering can, or any other material at hand.
How to make glowing balls at home
Such balls attract not only children. They fit well into the decoration of a wedding hall, prom, romantic evening or youth party. This decor is very simple to make. As a luminous element, you can use an LED tablet or stick, or a stationary LED lamp. In the first two cases, it is enough to simply place a backlight in the ball. However, they will not be as bright as the last option. In order to place it in a balloon, you need to know some subtleties.
How to make an LED ball:
- you will need a stationary LED and a coin cell battery. We install a tablet between the legs of the LED lamp (minus to minus, plus to plus). It should light up immediately;
- Now we wrap the ends with tape so as to firmly secure the tablet and leave no sharp corners;
- We place the luminous element in the balloon and tie it with braid.
The glow period of a stationary LED lasts approximately 22-24 hours until the battery runs out.