The large selection of available materials and various techniques for creative activities amazes the imagination of the master. As consumables, you can use textiles, natural resources, such as pine cones and leaves of shrubs, as well as ordinary knitting yarn.
Today, in addition to classic thread felting, another method of working with knitting yarn is widely used. This technology consists of making original crafts using pom-poms.
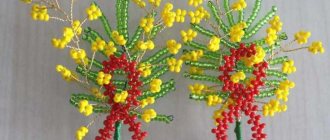
Regardless of the shape, type, purpose of the future toy or interior accessory, the basic element of the craft is a soft pompom.
Twisting and twirling a thread masterpiece
How to make a craft from pompoms? First you need to practice making the pompoms yourself. For this you will need:
- A cardboard circle of the size that the pompom is supposed to be made,
- Scissors,
- Threads of the same or different colors,
- Needle.
You need to cut out a core from a cardboard circle - a round hole large enough to make it convenient to wind threads through it. For convenience, you can take 2 of these blanks. It is better to take acrylic yarn - then the craft will turn out fluffy and fleecy.
The manufacturing process is simple:
- It is necessary to wind the thread around the workpiece, threading it through the hole, in one direction, tightly occupying the entire free surface of the cardboard.
- Then cut the thread and thread the free end. Using scissors, carefully cut the resulting piece of yarn along the outer edge.
- If there are 2 cardboard boxes, quietly move them apart. Take a needle and thread the used thread through it.
- Insert the needle to the inside of the fold of the yarn and pass along the entire inner diameter, so as to “hook” all the rows.
- Then remove the cardboard and tighten the resulting lock.
- You should get a relatively smooth ball of thread.
If desired, it can be trimmed with scissors.
Materials and tools for work
There are several techniques for making pompoms, and the products are assembled in several different ways.
For creative activities with children, it is better to prepare a workplace in advance, which includes a wide table top, a bright table lamp, an organizer for storing small items, and a needle bed. You will also need the following set of tools and consumables:
- Balls of knitting yarn.
- Cardboard and templates for making pompoms.
- Sharp scissors.
- Needles and threads.
- Mesh fabric with large cells for making a soft rug for the bathroom.
For additional decoration of finished products, beads, buttons, beads, paints, and scraps of multi-colored textiles can be useful.
Fluffy balls of thread and their uses
For home
A good solution using large pompoms is a bedside rug. It can be made from multi-colored balls with a diameter of at least 10 cm, sewn together. Suitable for babies and young children who like to go barefoot, as well as for anyone who likes the warmth of family comfort.
- A romantic option is a pendant for the interior. Balls of multi-colored yarn, reinforced in a certain order, connected with long threads, form the desired pattern, inscription, symbol or a whole garland.
- Pompoms make a suitable bedding for a small kitten. You can choose any shape - square or circle / oval, make it flat or with sides. Soft and dense, it will attract the animal.
The photo of crafts made from pompoms shows how harmonious the carefully selected colors of yarn look in the interior. Such balls can be used as decorative elements for finishing frames, lampshades, lampshades, and flower pots.
Fringe for a tapestry tablecloth or pendants instead of traditional tassels at the corners of the tablecloth will not do without small pom-poms.
For clothes
Pompoms knitted into a single fabric make a cute hat for early spring. Made to match the color of a coat or handbag, it will not only warm you up, but become a stylish accessory.
Using the same method, you can make a headband to cover your ears. Pompoms should be small, no more than 1-2 cm in diameter, and merge into one continuous volume.
- An interesting and easy solution for a homemade craft is a necklace made of pompoms. Like natural materials (acorns, row berries), thread balls can also be strung on a thread in a certain order, alternating large and small, multi-colored and plain, including beads, bugles in a row or without them.
- For the tops of children's socks, pompoms will serve as a suitable decoration. They need to be attached to the ends of the braid or elastic band and pulled along the edge of the top. Then, when walking or running, they will begin to sway and knock on their legs in a funny way.
- It is worth remembering a fairly traditional use - for the tops of children's hats. Such balls are made of fur or yarn, attached to the top of the head (1 or 2) or to the ends of the ties (if any).
For children's games
Pom-poms made from threads themselves are perfect for a variety of children's games. In addition, they can be used to make numerous toys. The simplest ones are a caterpillar or a dachshund dog.
- A Christmas tree made from pompoms will make your wildest fantasies come true. Such a tree can be made either in green tones or from multi-colored balls, imitating a magic tree. By connecting pom-poms in the form of a pyramid - more at the bottom, less at the top - you can achieve an effect reminiscent of a Christmas tree.
- Making a pig out of pompoms is generally as easy as shelling pears: one large ball will imitate the body. 4 small balls are attached to it - legs, a button instead of a snout and eyes - ready-made or in the form of beads. Additionally, you can make triangular ears from felt of a color similar to the yarn, and a squiggle tail. A craft like a pig made from pompoms will serve as a wonderful gift for any kid - a neighbor or a classmate.
If you make your own mobile for a crib or a developmental mat for a baby, pompoms will serve as an excellent way not only to decorate the product, but also to diversify the world of touch for the little ones.
How to do
Now let’s look at the process itself, how to make paper pompoms with your own hands.
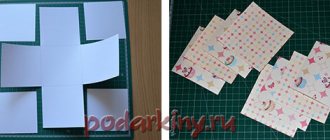
First, divide the roll of corrugated paper into two equal parts. You will get two pieces of 25 cm*200 cm. These two pieces are just enough for two pompoms.
We take one of them and divide it into 8 equal parts. At this stage you can do without a ruler, just fold it in half and cut it. We do this until we have 8 squares with a side of 25 cm.
We fold the squares in a pile and begin to form an accordion out of them - we bend the edge of the paper by about 1-1.5 cm, then turn it over and bend it again, but in the other direction. We press each fold a little and smooth it out with our fingers. This is what the accordion should look like as a result.
Next we need to find the middle of this accordion. Here you can take a ruler to accurately mark the middle. If you try to do this by eye, there is a risk that the pompom will turn out uneven. The middle found using a ruler is tightly tied with thread or thin ribbon. Leave the end of the thread long enough so that you can then hang the pompom from it.
Next we have to work with the edges of our accordion. There are two options here: you can make them sharp, or you can round them. It’s worth noting right away that this is not an easy task, because the paper accordion is quite thick. Therefore, involve the strong hands of dad in the creative process.
When you trim the edges, your pompom is essentially finished. In order for it to have a finished look, it must be carefully straightened, but if you plan to celebrate the holiday away from home and the decor will need to be taken to a restaurant or cafe, then it is better to transport it in this folded form so as not to wrinkle it on the road. Then on the spot you will dissolve it. If the celebration will take place at home, straighten the decorations immediately so that later, on the holiday, you do not waste your precious time on this.
How to straighten the pompom: carefully, one by one, bend each petal and open it. Do not pull too hard, because the corrugated paper will stretch and the ball will lose its appearance. This is what the ball looks like, half of which has already been flattened.
And this is what the finished product looks like.
Unexpected solutions to common crafts
Pompoms can be made not only from yarn, but also from paper (Christmas tree decorations), from sponges (part of a carnival costume - the nose of a mime clown), from garbage bags (those rustling plume balls) and so on.
Crafts made from pompoms with frames
The base frame can be thick plastic canvas or wire. On a Stramin type canvas, you can attach balls of yarn in a certain order, imitating embroidery.
This will create a wall rug or panel, a reusable decorative element with an inscription or a recognizable brand.
Pompoms can be tied together, attached to a wire frame to form recognizable images (for example, insects, butterflies, ladybugs, frogs, turtles) or glued to thick paper.
If you attach balls of yarn to a ribbon, you will get a homemade braid, suitable for decorating the hem of a dress or a kitchen apron.
Plaid
Difficulty level: 1
You will only need the simplest blanket and pre-prepared pompoms in one of two ways. Sew them around the perimeter - done! However, you should pay close attention to the color scheme. To make the resulting product look stylish, it is better if the pompoms match the plaid or are a little darker.
Source
Crafts from pompoms for the holidays
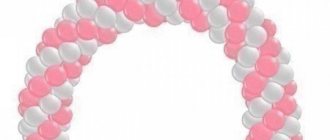
Not a single spectacular event, whether at home or in public, would be complete without balloons. To these you can add pompoms on sticks - elements common in cheerleading.
- You can make a wide variety of crafts from pompoms for the New Year. Using your imagination and sleight of hand, you can easily build a gnome or Santa Claus, a bag of gifts or a decorated Christmas tree, a Christmas wreath or Christmas tree decorations.
- New Year's crafts made from pompoms will help you get rid of the need to buy special gifts for your neighbors or classmates. Original souvenirs can be given from the heart and with pleasure.
Pillow
Difficulty level: 2
And finally, the last idea for decorating with pom poms is a bright, fluffy pillow. You need to take a pillowcase (you can use an old one) and cover it generously with pom-poms. The decor doesn’t have to be complicated; texture and colors take all the attention here. The main thing is ingenuity!
Source
Add to favorites8
- Tags
- with your own hands
- Scandinavian style
- plaid
DIY, Scandinavian style, plaid