For the festive hall, paper flowers made of bright corrugated paper are often used. This decor is becoming increasingly popular.
Compared to live bouquets, decorating a wedding hall with paper flowers is a long and labor-intensive process. But such jewelry is good because of its uniqueness.
Decorating the hall with paper flowers - 13 ideas
Paper flowers are not made in one day, and to make them for the holiday, you need to start a couple of months before the celebration. Flowers can be used to decorate the ceiling, the edges on the sides of the stage on the floor, the festive table, chairs, arches, money trees, as well as the carpet, if one is planned.
Chic floral decoration
Paper colors in the decoration of the hall
Wall decoration with colorful paper flowers
Do-it-yourself voluminous paper flowers for March 8
Beautiful voluminous paper flowers made by yourself for March 8 may turn out so that from afar it will be difficult to distinguish them from real spring flowers.
Moreover, making such beautiful crafts is not so difficult - the main thing is to select all the necessary materials, carefully cut out the details of the future flower and follow the instructions. It is best to make voluminous flowers from corrugated paper, as its uneven texture will make the flowers seem real. And since exquisite and delicate daffodils are very often given to women on March 8, below we will tell you how to make just these flowers out of paper. This craft is more complex and is designed for children from 7 years old, so it can be done by children at school or kindergarten-aged children with the help of a teacher.
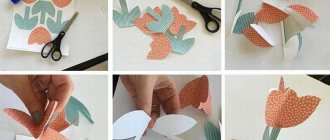
Making daffodils from corrugated paper: master class with step-by-step photos
To make a small bouquet of 3 voluminous daffodils, you need to prepare corrugated paper in white, yellow and green colors, glue, scissors and three strong wires of approximately the same length (they will be used as stems for the flowers).
First you need to make the stems of future daffodils. It is necessary to cut thin strips from green corrugated paper, grease them from the wrong side with glue and wind them in a spiral on a wire so that the edge of each next turn of paper overlaps the previous one. In the same way, you need to wrap and paste over the remaining two pieces of wire with paper, and then put the finished stems aside.
One daffodil flower will have 5 petals, which means you need to cut out 15 beluga petals for 5 daffodils from white paper. To make them all the same shape, it is best to cut 15 rectangles of the same size from a sheet of white corrugated paper and stack them in stacks of 5. Then you need to cut out oblong petals with a pointed upper edge from each stack of rectangles. The resulting petals need to be straightened and slightly stretched vertically so that they turn out weightless and delicate.
Next, all that remains is to make the centers for the daffodils. To do this, you need to cut three thin strips from yellow paper, fold them in half lengthwise and roll them into tubes.
Daffodil flowers need to be glued together from petals and centers. To do this, you first need to glue the white petals together, and then carefully glue the yellow pistils into the center.
To make corrugated paper daffodils more like real ones, you need to cut out leaves from green paper and stick them on the stems.
At the final stage, all that remains is to glue the flowers to the stems
And since real daffodils have heads turned to the side and not up, it is also important to place paper flowers on their stems sideways, especially since they will hold better this way. And to make the craft more neat, the place where the flower is glued to the stem can be additionally sealed with a small circle of green corrugated paper
To make a bouquet of paper daffodils look more festive, you can tie it with a white ribbon or wrap it in brightly colored double-sided paper.
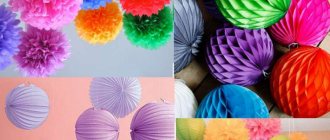
Garlands of carnations
Garlands attached to the ceiling will decorate the wall or become a kind of curtain that zones the room.
The carnations themselves are made according to the same principle as the balls from point two.
For a garland, you can additionally cut out green leaves. Tie it all either to a string or to a wire wrapped in paper.
Paper flowers using quilling technique
Paper flowers made in the quilling style are extremely popular and look impressive and beautiful, especially if made by yourself. They can be used to decorate holiday packaging, boxes, photo frames, and greeting cards. The technique is simple, but it requires patience and time.
This technique can also be called “paper twisting,” since it involves twisting oblong paper strips of different structures. Stripes made from pearlescent, shiny or matte raw materials will look impressive.
The simplest manufacturing technology is as follows:
- Having cut out the strips, you need to twist them in the form of spirals using an awl or a thin rod;
- give the resulting curls the desired shape by pressing or pressing;
- Glue the resulting elements together and secure them to the base.
There are many ways to create compositions using the quilling method. The main thing is to have a diagram that has the contours of the image and the details that fill it. It is better for beginners to gain experience by performing light patterns.
Photo zone options with flowers
There are different types of flower photo zones. To determine the appropriate option, you should familiarize yourself with the main design options:
Banner with flowers
Banner with flowers. A fabric with a pattern and a floral background is stretched over the structure of beams/pipes. Next, all that remains is to decorate the stand with artificial or fresh flowers. You can attach flowers over the entire area of the banner. In the design you can use flowers along with flowing fabrics. They should drape easily. This photo zone looks airier and more tender.
Screen with flowers
A large mesh or screen decorated with flowers. It’s very easy to make such a frame, as well as move it from location to location.
Arches with flowers
Flower arches. Arches can be created in different shapes. Arches are decorated with fresh and artificial flowers and buds
Full size flowers
Growth flowers. Large flowers 2 m high are created from isolon. You can come up with many creative shooting ideas with them.
Volumetric figures from flowers
Volumetric figures made of flowers. First, a three-dimensional frame is created and covered with fabric or other material. And then the entire structure is decorated with flowers.
Master class No. 2 - Large rose made of corrugated paper
Large hand-made flowers are good for decorating photo zones, ceilings and walls at special occasions (for example, at a wedding or birthday). They can also become spectacular props for a photo shoot.
To work you will need:
- A roll of corrugated paper of the desired color 50×200 cm (1 roll/1 flower);
- A roll of green corrugated paper (for the stem and sepals);
- A4 paper (you can use office paper);
- Hot glue gun;
- Scissors.
How to make large paper flowers:
Step 1. First we will make the stem. Take a sheet of white A4 paper, place a pencil on the corner, then roll the paper into a tube.
Step 2: Unroll the crepe paper roll completely. First fold it in half, then double it again, then fold it again... is it a rectangle? Now fold it in half to make a square measuring approximately 25x25cm.
Step 3. Cut the folded paper into a square at all folds using scissors. You will get two identical stacks of square sheets, from which we will then cut out the petals.
Step. 4. Fold each stack in half. From the first rectangular stack, cut out a half-heart shape, as shown in the diagram below. From the second stack, cut the same shape, but smaller.
Unfold the stacks to make petals like this.
Step 5. Twist the ends of the petal with a pencil or pen, and stretch the petal itself a little and bend it inward.
Step 6. Give the petal an even more rounded shape by making two folds at its bottom and securing them with hot glue.
Step 7. Let's start forming the bud. Roll one of the small petals around the stem quite tightly.
Step 8: Start gluing on the remaining small petals, following a staggered pattern. When the small petals run out, continue to grow the bud with larger petals. In total, your rose will “overgrow” 15 petals (+1 petal in the center of the bud).
Step 9. Fold a square sheet of green corrugated paper (25x25 cm) diagonally to form a triangle, then fold the triangle in half 2 more times. From the resulting multi-layered triangle, starting from the fold line (!), cut out the shape as in the picture below. When you straighten the cut out piece, you will get a quatrefoil.
Step 10. Make a small cross-shaped cut in the center of the quatrefoil (see picture above), through the resulting hole, put it on the stem up to the bud, then glue the leaves with hot glue.
Popular articles Decoupage snowflakes for a Christmas tree
Step 11. Hurray, our big rose is almost ready. All that remains is to wrap the stem in green paper. To do this, you need to roll it into a roll, then cut off an approximately 2-centimeter wide piece from the edge (that is, the same as if you cut a piece from a roll). Now unravel the resulting tape and wrap it around the stem, securing the upper and lower ends with glue.
From the following video you will learn how to make large flowers from paper with your own hands.
Application of photo zones with flowers
Photo zones created using different colors are ideal for many holidays and venues:
- weddings;
- corporate events and presentations;
- birthday;
- photoshoot;
- decoration of stages and shop windows;
- themed holidays;
- city events.
DIY paper flowers: master class with step-by-step photos
Paper flowers have a number of advantages that you will not find in living plants. Firstly, they do not fade, do not require special care and do not cause allergies. With the help of multi-colored paper flowers, you can advantageously decorate your interior or clothing; voluminous flowers are attached to the wall or on the door, they are placed in large vases and solemnly presented for the holidays. You can find out how to make flowers from sweets with your own hands in one of our previous articles.
glue the petals according to the suggested instructions Cut out several templates of different sizes
you will need:
- white piece of paper;
- watercolor paints;
- scissors or stationery knife;
- aluminum wire;
- Cork tree;
- paper tape;
- green electrical tape or floral tape.
- Cut a sheet of paper into even strips, not reaching the edge of the sheet.
- Fold the cut leaf into a flower shape.
- Make paper leaves and roll them as in the photo.
- Connect the flower with the leaves and secure with tape.
- Attach a small piece of cork to a wire and twist it in half.
- Insert the wire into the middle of the flower instead of the stem.
- Wrap the stem with tape and then with electrical tape.
- The delicate purple flower is ready.
March 8th or May 9th
Detailed instructions for creating flowers
For other decorative experiments, we offer you a selection of videos for children and adults with detailed instructions on how to make crafts in the form of flowers.
Areas of application
At any holiday, a photo zone is a success, where elegant guests can take photos as a souvenir. Such a zone can be ordered from a designer, but it is better to build it yourself. This is a great opportunity to show your creative imagination. At a children's birthday party, a candy bar is decorated with paper bouquets. This is not as common as balloons, so it is received with a bang by all party participants.
Instagram @papirdeco
Instagram @pf_um
Instagram @luxpeony
You can make the decoration permanent by harmoniously matching the color scheme to the rest of the interior. Most often they decorate bedrooms and children's rooms, but such compositions will also look good in the living room or hallway. They look bright, last a long time and do not crumble, unlike living plants. With the help of this decor you can disguise small cosmetic defects in the walls.
Instagram @_paper_universe
Instagram @ivanka_juzvak
Instagram @paper_decor_oz
- Apartment
14 beautiful DIY wall decor ideas
Flower templates for paper cutting
And in this part of our conversation we will present you flower templates for cutting out of paper. Shapes and sizes of flowers for every taste - from the most delicate color of an apple tree to bright blue cornflower and fiery red poppy.
A few more templates will diversify your flower gallery. Large paper flowers for decorating a room with your own hands: templates and diagrams
Paper flowers are a win-win option when decorating any room.
Pay attention to a short but very detailed master class on making voluminous paper flowers. An applique of such a “pink heart” will decorate gift wrapping or a greeting card
Crepe paper flowers are the most beautiful trend this season. These giant paper roses can be formed into a chic bouquet, or you can decorate the hall of a restaurant, cafe or your own apartment with them.
It’s not difficult to make a flower with your own hands from paper, especially if you have instructions and a manufacturing diagram. Beautiful roses can be made from simple paper templates.
Popular flowers such as carnations can be easily made from a regular napkin. These delicate flowers will certainly not wither soon.
Scrapbooking is another popular form of creativity for both children and adults. From special colored paper you need to cut out simple flowers for cute bouquets or decoration.
Easy ideas for scrapbooking - try cutting roses, leaves and petals from special sheets of paper. And then glue everything onto the card along with bows and decorative embellishments.
Making flowers can captivate you so much that you won’t notice how you transfer your hobbies to other materials, for example, fabric. Such cute flowers can make an extraordinary garland or a delicate flower basket.
Unique full size flowers will decorate your holiday.
The workshop for making life-size flowers will greatly diversify your creative life. Purchase a special frame from the store on which a flower of extraordinary beauty will be attached.
Sakura made of paper, like other spring flowers, will give you a gentle and warm mood.
Try making this flower using the origami technique.
Or cut from a template.
How to decorate a hall with artificial flowers
Design ideas come while working. Imagination can tell you how to decorate any surface. First the walls, windows, curtains and tulle. Then think about the most important place for the heroes of the occasion. And of course, choose flowers for the ceiling, stage, photo zone, floor, etc.
Both separately attached paper flowers and whole garlands look at the top. Large, voluminous jewelry suspended on thin, invisible threads looks impressive, and from below it seems that they are swaying in the wind.
Chopped small flowers or confetti will come in handy on the floor. And for children, make fluffy pompoms or small bouquets.
Hanging white paper flowers in the decoration of the hall
Large red paper flowers in decoration
Bright paper flowers in the decoration of the hall
See alsoWedding hall decoration photo
Materials and components
When making roses from corrugated paper, it is not necessary to follow the instructions 100%. It will be better if you show resourcefulness and ingenuity. Materials can be replaced and forms adjusted at your discretion. And if you want to do something unusual, you can use caramel or cotton candy to form a flower core - children will be delighted with sweet roses with a secret. So, what do you need and how can you replace this or that material:
- Corrugated paper (colored toilet paper, multi-colored paper napkins);
- Wooden skewers (wire, thin twigs, etc.);
- Colored paper (green, red or other colors). You can, of course, get by with white or use paints;
- Concentrated sugar syrup or office glue (imitation dew), small stapler;
- Maximum imagination and additional elements, according to your creative plan. You can’t do without this!
Option 1 “Royal Rose”
Based on the first diagram, prepare corrugated paper in the natural colors of the royal rose - white, delicate pink, juicy purple, poppy red, etc. Then proceed step by step:
- Randomly cut the petals into various shapes (smaller-larger, wider-narrower);
- On the flower “leg”, wrap a strip of corrugated paper (core) with a roller and fix the workpiece (tie it with thread);
- Instead of a corrugated roller for the “heart” of the rose, you can use caramel or wrap a little cotton candy around the stem of the flower - the core will become sweet;
- Holding the petals with your fingers, form a flower by randomly placing leaves on the core, layer by layer. Fix the petals at the base (tie with thread);
- Mask the binding of the petals with a flower corolla cut out of green colored paper (secure the corolla with glue), as in the picture;
- Wrap the peduncle with brown paper (the effect of a woody rose trunk) or use the same green color (paper, gouache, foil - at your discretion);
- Apply drops of glue or thick syrup to the rose petals (dew) and let them dry.
Option 2 “Sudanese Rose”
Do you know how to make a spectacular Sudanese rose in just 5-15 minutes? Everything is even simpler than in the case of the royal sister of the queen of the gardens. In addition to the standard set of materials, you will also need a stationery stapler. The latter, if you show your imagination, you don’t have to use. Looking at the picture below:
Cut two (or more) identical circles from the corrugation and stack them on top of each other; Having grabbed all the mugs, roll them into a single “ball” (as for seeds) - it’s very simple; Retreating 1.5-3 cm
from the top of the cone, secure the workpiece with a stapler, punching the “bag” through with a paper clip; Carefully turning the structure inside out, make the top of the former cone the core of the future flower (it will be more difficult to turn it inside out, the more circles you initially took); Prepare the stem by wrapping a wooden skewer in green construction paper, which can also be used to make stem petals; Insert the stem into the flower and, if necessary, additionally secure the connection (glue, tying a thread from the inside of the rose, etc.); Fluff the petals as desired, give the flower bowl the required shape, decorate the rose with “dew”.. Having made one rose from corrugated paper, proceed to the next one - you will get an impressive bouquet that you won’t be ashamed to give as a gift or place in the living room
And if your royal rose turns out well, make a new one of gigantic size - you will amaze everyone with your decorating skills
Having made one rose from corrugated paper, proceed to the next one - you will get an impressive bouquet that will not be embarrassing to give as a gift or place in the living room. And if your royal rose turns out well, make a new one of gigantic size - you will amaze everyone with your decorating skills.
Popular articles Cool congratulations on March 8, 2021. Wonderful verse on March 8
Gigantomania
From corrugated paper you can make not only standard-sized roses, but also huge ones. They are also used mainly for decoration, but you can also organize a cool photo shoot. We look at the manufacturing process in the video.
If you like making paper flowers, pay attention to our article about a paper tulip using the origami technique
Tropical flowers
To make them, you will need several sheets of corrugated paper in rich, bright colors.
We twist each leaf into a tube and put them inside each other. We tie up all the paper tubes and straighten them layer by layer.
Decorating a room with paper flowers is a great alternative to live plants. It turns out no worse, even more colorful.
This has long been no longer just children’s crafts, but an independent direction of decoration.
If you want to please yourself and your loved ones with a luxurious gift from Colady magazine, a gift certificate for the services of our experts. Hurry up to buy! (the number of certificates is limited) Select a certificate in the store
Simple DIY paper flowers, easy and quick - step-by-step instructions for children
For some reason, many mothers think that children of kindergarten age can only make simple appliques, and teachers make more complex and beautiful crafts instead. However, in reality this is not the case, because making beautiful flowers out of paper with your own hands will be easy for children 4-6 years old if you show them an example of a simple craft. But simple does not mean ugly, since there are many ways to make a very cute three-dimensional spring bouquet from several sheets of colored paper and glue.
Below is a step-by-step description of one of the easiest ways to make paper flowers for March 8 with the hands of children. This method was invented for the youngest, so even kids in kindergarten can handle it. A beautiful bright bouquet of paper flowers will be an excellent gift from a child to a mother or grandmother at a matinee in honor of International Women’s Day in kindergarten.
Easy craft - spring bouquet for mom or grandma
To make a three-dimensional bouquet you will need colored paper (1 whole sheet of green paper and a little of other colors), scissors and glue. First you need to take green paper, fold the sheet in half and make cuts on the fold side, as shown in the photo.
Then the resulting workpiece must be rolled into a not too tight roll and glued so that this roll does not fall apart. Next, you need to straighten the cut strips of paper so that they resemble grass (a step-by-step photo demonstrates exactly how this is done).
Then, when the base of the bouquet is ready, all that remains is to cut out multi-colored flowers from paper of other colors. To make them more beautiful and brighter, you can cut out the center of each flower from white or colored paper of a different color.
All you have to do is glue the finished flowers onto the blades of grass. That's all, a beautiful spring paper bouquet is ready.
Let's talk about materials
When it comes to life-size flowers, you may not immediately believe that this beauty is created from paper. But the corrugated one has unusual properties - in the article on making small flowers we looked at them in detail. Let us remind you that for tall giants, crepe paper with a density of at least 120 g with A and B flute (folds 1.6 and 3.2 mm deep) is most suitable - this will allow the petals to keep their shape.
But! Not all life-size flowers are made from thick corrugated paper. There are models whose petals should bend, curl or fall freely. For these colors, thin paper is used.
These balls do not require thick paper; thin paper for children's creativity or marked fine crepe is also suitable.
To make large flowers, also prepare auxiliary materials and tools:
- thick cardboard for the base;
- scissors or knife for cutting blanks;
- heat gun - large petals are easier to connect with hot glue;
- wire for the stem frame;
- round nose pliers for bending wire;
- fabric, thread, cotton wool for filling the base or for combining materials;
- foam balls or plastic containers as a base.
You will also need: imagination, good mood and a little magic...
Large paper flower
Today, huge colored roses are gaining popularity; they cost a lot, but they are not difficult to make.
We will need:
- Large A4 sheets, take bright colors such as fuchsia or yellow.
- Green paper.
- Thick wire.
- Sharp scissors.
- PVA glue or pencil.
If you don’t have colored paper of this size, you can get by with plain white paper, but then you’ll have to color it. And yet, it won’t work without templates; you can download and print them from the Internet or simply translate them by eye.
If you decide to make huge roses, then you will need several stencils of different sizes, more about roses below. For now, let's look at a simpler way to make flowers, something similar to daisies.
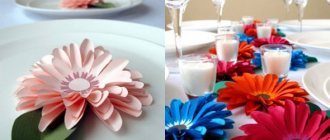
Draw out the sheets, draw a petal on each, the total number is at least 10 pieces. the petals should be of different diameters, some larger, others a third smaller.
Cut out a core from white paper; you will need it a little later. The petals need to be cut out and twisted a little, and glued along the bottom edge, as shown in the picture. And don't forget to give them the shape of a flower. Ready!
Huge colored gerberas are ready. All that remains is to place them on the wire and make a stable base from its lower part.
Big roses
As mentioned earlier, everything is more complicated here, so prepare your stencils and carefully follow the instructions if you want to get an impressive result.
We need to prepare 15 heart-shaped petals and 5 teardrop-shaped ones. This will make the flower look more natural.
Wrap the hearts around pencils and leave for a couple of minutes so that the edges of the petals are slightly curved, like real flowers.
While the petals are preparing, let's work on the stem: wrap a strong wire with green tape or colored paper, be sure to secure it so that the composition does not fall apart after a couple of hours. We separately weave wire into the leaves so that they are more firmly attached to the stem and can be given any shape. Corrugated paper is suitable for the stem and leaves.
Remove the pencils from the petals, carefully fasten several petals together, gluing them along the bottom. When the bud is ready, place it on the wire stem.
Our rose is ready.
Flower Arch Ideas
The arch can be called a solemn wedding accessory; it is called a symbol of the love of the newlyweds. But at any other major holiday this decorative element will be appropriate. Typically, arches are made from fresh flowers - it looks beautiful, elegant, and light.
The main structure of the arch can be made from a flexible metal-plastic pipe. The size of the finished decor should allow it to pass freely under it. Therefore, it is worth making arches two meters high. The shape of the arch can be any, the most common options are. The shape of the arch can be any, the most common options are below.
Photo zone made of flowers “Horseshoe”
Horseshoe. Newlyweds choose to attract good luck. It is draped with white material, and then decorated with flowers. You can use small wooden horseshoes.
Photo zone of flowers “Square”
Square. Symbol of prosperity. Decorate your holiday in country style.
Photo zone of flowers “Circle”
Circle. Suitable for gentle shabby chic. The frame is usually decorated with fresh flowers, for example, roses, peonies. The buds should be delicate colors. Textiles for drapery are selected in pastel colors: pale pink and yellow tones, cream, beige.
Photozone made of flowers “heart”
Heart. The frame is made of metal-plastic to make it easier to give the structure the desired shape. If you don’t have time, then you can simply build a classic heart out of balloons, later securing it on a stand.
Photo zone of flowers "enfilade"
The suite is a symbol of happiness. The most expensive type of arches. These are several structures installed one after another. Can be connected together to create a corridor effect. They go to the registration place. Decorated with living vegetation, it looks impressive in spring. A complex enfilade would be suitable for a celebration in a mansion.
Additionally use
- light fabric (satin, silk, organza);
- strings of beads;
- tables and stands with flowers;
- carpet of petals;
- satin ribbons;
- air balloons;
- LED light bulbs;
- paper lanterns;
- furniture elements.
The option with live plants is suitable for a large celebration, such as a wedding. They will add not only beauty and grace to the celebration, but will also fill the space around them with a magical aroma. You can also choose budget flowers – artificial ones. They are attached to the structure using glue, tape, and bright ribbons. A flower arch is not necessarily a decoration just for a wedding. They are used to mark the entrance to restaurants and parks where they are planning to hold an event.
Tips for organizing a flower arch:
- For a classic celebration, a wooden arch is suitable - natural or snow-white.
- To create a romantic style, arches are decorated with wildflowers: cornflowers, crocuses, small daisies, dandelions. The structure can be supplemented with ferns, straw, and twigs.
- For a winter wedding, the arch can be decorated with ice sculptures, and additionally use snow and spruce branches.
- The arched door represents the beginning of the newlyweds' lives. You can play with such decoration in the ceremony itself: after exchanging rings, the couple enters a new life, holding hands.
- In autumn, in addition to flowers, you can include berries, maple leaves, and bright pumpkins in the composition.
Make peonies out of paper? Easily!
So, paper. Do you know why it’s corrugated? Corrugations are folds (in French), many folds that help the sheet material resist deformation and maintain a stable shape (what we need...). And crepe is the same corrugated paper, only with “softer” characteristics; it is a little denser and more “elastic” than the first.
Let's try to use both types of paper in our master class and describe step by step the entire process of creating a peony flower in different variations.
How to make a peony from corrugated paper
To make a peony, we will use the simplest and most ordinary corrugated paper, which is sold in any craft store or even in stationery stores. To create a peony, you will need to cut out 6 types of blanks - 12 large petals, 6 medium and 10 small. And also make the middle of the peony from a semicircular fringe and a rolled ball. Cut out a round base from cardboard on which the peony elements will be attached. We cut the upper edge of all petals with small “noodles”.
We bend each petal with our fingers so that it takes on a semicircular curved shape.
First we glue large petals onto the base - 2 rows of 6 pieces, and try to give them the shape of a bowl. Then add a row of medium ones followed by 2 rows of small petals.
We glue the previously made center into the resulting flower and get a beautiful and lush peony flower made of corrugated paper, which can be used to decorate the interior of a room or decorate any product.
Crepe paper peonies
Let's look at how to make peonies from crepe paper with your own hands in a flat and volumetric version. The first one will not require much effort and time, but the second one will have to tinker. Let's start with volume.
Peony flower made from crepe paper
We will need crepe paper from soft pink to yellow-white and green. We cut out blanks from paper, as shown in the photo - 10-12 pieces of narrow and wide petals for a flower and 2-3 for making leaves.
We bend the middle of the wide petal with our fingers, straightening the folds, and stretch out the upper edge, while simultaneously bending the top to the outside.
Now we take a wire, a tube or any suitable material (if necessary, it must first be wrapped in a strip of green paper or ribbon) and begin to create the middle of the flower. We wrap a small petal around the rod, securing the lower part with a strip of paper. The inside of the peony flower will consist of two rows of five small petals.
In exactly the same way we attach two more rows of 5 large petals. When applying the next petal, you should try to close the seam from the previous petal so that the flower looks like a real one.
When your flower is ready, try to give the petals the desired position with your fingers so that they look beautiful and have the shape of a peony flower or its bud.
Flat peony made of crepe paper
For this MK we will need the following materials:
- crepe paper;
- scissors:
- stapler;
- ruler;
- compass or circle stencil.
Paper peonies: step-by-step instructions
Step 1. Using a ruler, measure 10 cm of crepe paper. Carefully cut the paper using scissors.
Step 2. Unfold the cut roll and begin folding the paper into an accordion shape. We get the following blank.
Popular articles Bracelet based on a tourniquet using Turkish technology
Step 3. Using a stapler, we fasten all the layers of the “paper accordion” together in the middle. Using a stencil or using a compass, draw a circle.
Step 4. Then carefully cut out the template along the marked lines.
Step 5. Use scissors to cut the outer edge of the round piece. There is no need to make deep cuts, otherwise the petals will turn out fringed.
Step 6. Form a flower bud. We start from the middle, separating each layer of paper separately. Carefully lift the paper up.
Peony flower made from crepe paper is ready! Of course, in this flower you can see a carnation, an aster, and some other flower, but no one can cancel the fantasy, right?
To make your peony more durable, you can use wrapping paper when making a flower; it is much denser and stronger. In addition, the color range of gift wrapping paper is more varied.
A ready-made paper peony flower can be mounted on a stem from a cocktail tube and placed in a vase, or a brooch blank can be attached to it and worn as an original decoration with your favorite dress or suit.
Well, we can already say that you already have practical experience and know exactly how to make paper peonies in different ways. Paper flowers are a beautiful and inexpensive decoration for any holiday that you can easily make with your own hands. Good luck!
Save
Save
Ideas for decorating a hall for a special event
In the life of every family, events occur with significant dates. These could be weddings, anniversaries, parties, presentations. They are held in spacious halls that can accommodate a large number of guests. To ensure that the design elements are harmoniously combined with the interior and the size of the room, you need to try.
Small flowers and appliques are not enough here. It is worth taking into account the geometric dimensions of the hall, height, presence of dead zones, aisles, and arrangement of tables. Be sure to provide a place where guests will take memorable pictures.
This place should have a special background color and decorative elements that match the theme of the event. A combination of huge, human-sized flowers and several separate small bouquets is encouraged.
Paper roses
Paper roses look absolutely gorgeous! At the same time, a lot of flowers can be completed in just one evening. So you can safely buy a bottle of wine and gather a cheerful company - tomorrow you will have a lot of paper roses for your festive decor.
You will need:
- Paper of your choice (standard for a printer is quite suitable, heavier options will complicate the work on the form); - Watercolor paints (optional); - Glue; - Scissors; - Floral wire; - Beads.
As a paper base, you can use notes, wrapping paper, book pages, origami paper, newspaper sheets, and so on. This example uses plain paper with a drop of watercolor in the center.
How to do:1. Cut out 3 paper squares with sides of approximately 10 cm. Fold the square into a triangle 3 times and trim the edges into a semicircle and a sharp tip. Repeat with the remaining squares. 2. Unfold the parts and make sure that the hole in the center is no larger than 0.5 cm.3. Carefully cut off 1 petal from one flower, 2 from the second, and 3 from the third. Do not throw them away.4. Glue the edges of the petals
Carefully turn the edges of the petals back so that the rose appears to bloom.5. Twist the small petals that we cut earlier and secure their edges with glue.6
The rose is ready for assembly. Take the wire and thread the bead through it to the middle. Fold the wire in half and twist it. 7. Carefully thread through the smallest part. Apply glue to the bottom and add the next cone. Hold the place where the elements are glued. Continue in the same manner with the other flowers, rotating them so as to alternate petals and spaces.8. To make the design more secure, you can thread another bead through the bottom of the flower and wrap the stem with wire. If desired, wrap the leg with green ribbon.
Popular furniture for photo zones
A flower screen is a convenient design option, as it is easy to assemble and disassemble. It can be delivered without any problems, for example, to a restaurant where some kind of celebration is planned. And the screen itself can have a floral design. But even an ordinary screen, if desired, can be beautifully decorated with various flowers - either real or artificial.
A sofa or bench is often near a floral background to take a photo while sitting. For a special ambiance, you can place lit candles around. Bouquets add zest - guests can take them in their hands. The colors should match the main background.
In addition, there are many more ideas about what kind of furniture can be used near the flower photo zone:
- table and chairs;
- doors entwined with flower vines;
- piano;
- armchair in the flower garden;
- swing
- banquette, sofa;
- old chests of drawers;
- textiles for furniture: rugs, pillows, bedspreads.
Do-it-yourself large paper flowers: diagrams and templates for making
Voluminous large roses will be an excellent gift for mom on March 8, and children of primary school age can make such flowers out of paper with their own hands using diagrams and templates. To make roses especially beautiful and life-like, you need to use corrugated paper. You will need a lot of it, since the more petals a rose has, the more beautiful and voluminous its bud will be.
Schemes and templates of petals, leaves and sepals for the future rose must either be printed or redrawn on thick paper. These templates are then cut out and all parts of the future paper flower are cut out of corrugated paper. To make the flower itself you will need the following materials:
- Green and pink crepe paper
- 2 pieces of wire for the flower stem
- Thin tape
- Glue
- Green floral ribbon
- Scissors.
Ready-made diagrams and templates for cutting and gluing a large paper rose
To make a large paper rose flower with your own hands using diagrams and templates, first you need to print and cut out the following templates.
Then you need to cut out the petals of the rose bud using the templates - 15 “heart” petals and 5 “droplets” petals.
The cut out petals need to be shaped - twist the corners of the droplets with a pencil, and stretch the hearts a little to the sides. Then 2 pieces of wire must be folded together and wrapped with floral tape to get the stem of the future rose.
The next stage of making a flower is the most critical. You need to form a bud from the petals by gluing first droplets and then hearts to the top of the stem, one petal at a time. To prevent the bud from falling apart, each petal must be additionally secured with tape.
Next, you need to cut out the sepal using the template, wrap it around the base of the bud and secure it with floral tape, as in the photo below. And at the last stage of making a paper rose, all that remains is to cut out the leaves according to the template and glue them to the stem. The rose for a gift to your mother or grandmother on March 8 is ready.
Setting up a place for a photo shoot
Guests and friends of any special event at some point experience an irresistible desire to take a photograph as a souvenir for future generations. It doesn't matter where the event takes place. This could be a banquet hall, a living room in a cottage or apartment.
Depending on the specifics of the room, the number of parishioners and the theme of the event, it is necessary to provide a section of the room where the moment of truth will be captured. It is definitely worth making efforts to ensure that there is a general background of the space.
Asymmetrically located decorative elements should not be bright, but only create the main color. A combination of large paper flowers made of foamiran and small bouquets with a delicate tonality of the shade of the petals would be appropriate.
When setting up a place for photography in an apartment or cottage, you should adhere to other rules. Huge paper flowers would be somewhat inappropriate here. The special atmosphere of the event will be created by garlands of small multi-colored paper flowers.
Creative ideas
The technique for creating flowers differs insignificantly; for work, in addition to napkins and corrugated paper, they use:
- colored thick paper;
- cardboard egg trays;
- toilet paper;
- old postcards.
Small mimosas are made like balambos: long narrow strips are cut, they are wound on a magazine twisted into a tight bundle. It is carefully pulled together, then the edges of the bundle are folded in the middle and secured tightly.
Minecraft from paper - a selection of master classes on creating models from the game
How to make a tank out of paper - simple and clear master classes on creation (65 photos)
The resulting loops are cut, and the resulting petals are fluffed. Another idea is a lot of small bags glued together on the sides. This technique is used to make dahlias that resemble natural flowers. Asters will be made from wide strips, 2/3 of one side cut “into noodles.” They are rolled into rolls. Roses are made in the same way.
Rose from an egg carton
A small master class will awaken your imagination; for work you need to prepare:
- part of a tray with convex pyramids between the cells;
- scissors or stationery knife;
- paper for making leaves;
- paints;
- glue.
Let's get started:
- Pyramids are cut out; this is the future part of the bud;
- Petals are formed: each pyramid is cut along its edges, the upper platform remains intact. The edges of the 4 parts are rounded and unbent.
- The bud blanks are painted and dried.
- A rose is formed: a bud is made inside: the edges of the petals of one piece are glued together on top. Then rows are added along the surface.
When making a large rose, additional individual petals are glued on the outside.
DIY paper crafts - a selection of creative master classes, photo ideas, tips
How to make paper stars with your own hands - step-by-step master classes
Fluffy hyacinth
It is made from colored paper. It is cut into strips 5 cm wide, the length is arbitrary. We cut the strips into fringes 1/3 of the thickness; these are the future petals. The strip is wrapped on top of the sushi stick so that after bending the fringe the wood is not visible.
After this, each petal is wrapped on a pencil. For simplicity, the strip is laid on toilet paper, the entire fringe is immediately twisted, and only after that it is attached. The bottom of the stick is decorated with colored corrugated paper; hyacinth leaves are long, narrow, pointed, and made from thick double-sided paper. The original flower is fixed on a stand or placed in a vase.
General recommendations for making large flowers
Huge flowers will look beautiful on a solid stem. The stem wire is usually wrapped with decorative ribbon in green shades.
When composing a composition of flower buds, it is advisable to maintain harmony of shades. They can have different sizes, but one shade should dominate.
You can use a screen as a home interior. Decorated with roses made of plain paper, it will indicate an individual living space. You can create the illusion of privacy.
Wedding floristry styles
With all the variety of creative ideas, the logic of arranging compositions in the banquet hall is determined by four design styles.
- Parallel style. Compositions in the room are arranged in rows: horizontally, vertically or diagonally. The color palette is based on contrasts or different nuances of the same shade.
Traditional decoration of the newlyweds' table in parallel style
- Decorative style. Arranging flowers in the form of isolated islands of regular geometric shape, the most popular are round, oval and semicircular islands. Large flower “oases” can coexist with small ones: for example, the newlyweds’ table is surrounded by compositions of large flowers, such as heliconia, amaranth, peony, protea, calla lily or sunflower, and small bouquets are placed on the guests’ tables.
Wedding table setting in a decorative style: an island of flowers on a satin tablecloth
- Vegetative style. The geometry resembles a decorative style; At the same time, to create compositions, seasonal, forest and wildflowers, dried flowers, decorative foliage plants and a variety of natural materials are used - branches, cones, berries, fruits, herbs, ears of corn, vines and even vegetables. Vases and stands for bouquets made using the carving method from pumpkins, beets and other garden crops add a special zest to the arrangements. Naturalness, ease and untouched beauty of wild nature are the hallmarks of the vegetative style.
Autumn abundance: tabletop composition with seasonal flowers, leaves and berries in a vegetative style
- Formo-linear style – compositional solutions in the spirit of modern and art-contemporary aesthetics. The emphasis is on one central element - a tall, large flower or plant in a tub, around which a non-standard composition is formed with the help of accessory plants. The arrangement can be either vertical or cascading, asymmetrical or multi-level, with falling and intricately curved branches.
Trendy ultraviolet: composition for the podium in a form-linear style
History of origin
Artificial flowers appeared a long time ago - several centuries BC. In ancient Egypt and China, they were made from porcelain, silk, precious metals, stones, parchment, bird feathers and clay. They were used to decorate palaces, temples, and expensive clothing. Production secrets were passed down from generation to generation. Later, such flowers appeared in Greece, Italy, Spain, where entire unique factories arose that produced these unique handmade jewelry.
In Russia, the fashion for making began to gain popularity at the end of the nineteenth century. They were made from leather, wax, fabrics, and paper. This fine art was taught in women's and art schools. The unique flower of the author's work was quite expensive. In the twentieth century, in the territory of the Soviet Union, artificial flowers were sold only in a few places, and the price was affordable only to party workers.
Now one of the most popular hobbies and ways to earn money is making paper flowers, flower arrangements, and decorating rooms with them. And that's why:
- real flowers quickly wither and lose their visual appeal, while paper flowers look good much longer;
- there are many manufacturing techniques, which makes this activity very interesting and varied;
- the financial costs associated with this hobby are small, since the materials are cheap and the tools are available in every home;
- This is a great way of self-expression for children and adults.
Ideas for home decor, holiday decoration
The variety of methods, models, and types of paper allows you to make products of varying degrees of complexity - some of them can be done even by a child, while others can only be done by experienced craftsmen. With large or small flowers you can quickly and beautifully decorate an apartment, a country house, a banquet hall, or an office space.
What exactly is decorated:
- arches, screens;
- whole wall;
- exit altar for marriage registration;
- banquet tables;
- curtains, curtains;
- podiums, stages;
- photo zones, banners;
- wedding presidium;
- the entire room.