There are many types of special garlands sold in stores, but to make this day truly unique, we suggest making the decorations yourself.
Here we have collected interesting ideas and master classes that will help you make a Happy Birthday garland from paper, fabric or felt!
As well as ready-made templates and layouts for printing!
Paper garlands according to the template
Making a garland with the letters “Happy Birthday” can take 15 minutes, or half an hour, if you don’t rush.
Download and print the template
Of course, if you want, you can sit and come up with templates, and then draw them yourself. But to make this task a little easier for you and speed up the process, we have collected interesting and original “Happy Birthday” garland templates; you can simply download and print them , and then use them to create holiday garlands.
Template #1
Completely finished garland template. You just need to download (click on the red button). Print. And assemble according to the instructions below.
Template No. 2
Letters in two colors: soft green and pink. The letters are the entire alphabet - print and collect the necessary words. How to attach it to a thread or bow - described below
Template No. 3
Flags and bright rectangles. Choose the one you like. Print on a color printer and the letters can be written in with a marker of any color!
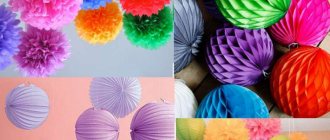
What materials will be needed?
Garlands are always beautiful and festive
In the process of making a garland, you may need the following types of paper:
- colored: thin and dense
- shiny cardboard
- corrugated
- napkins
- sheet music
- glossy press
- unnecessary newspapers
- kraft paper
New Year's garland
Also prepare:
- PVA glue
- spools of thread
- figured hole punch
- clothesline, twine
- ribbons
- stationery scissors
- awl or hole punch
- stapler
- various decorative elements: beads, sparkles, sequins, foil, cotton pompoms
- knife
- ruler
You can use single- or double-sided colored paper for the garland. Beautiful products will be obtained if you use scrapbooking paper, which is colorfully decorated, as opposed to standard colored paper.
How to assemble a garland
Just imagine how many wonderful lettering you can make using these templates! They are suitable for a birthday or any other holiday, or even just to make an unexpected surprise for a loved one.
- The point is that there are stencils of all the letters of the alphabet that can be printed and folded into the desired inscription .
- And you don’t have to print the entire alphabet; select only the individual letters you need .
- If desired, you can add some decorating elements .
- To save ink, the letters are designed in a textured style, and you can also use the printer settings to control ink consumption.
TIP: which will save you from wasting paper: print one letter, turn the paper over and print another one on the other side.
Felt garlands “Happy Birthday”
Here you will have to work harder, but the result will show how much care was put into creating such a garland. We have prepared two master classes that will not leave you indifferent.
You will need:
- Colored felt or felt fabric (the quantity depends on the inscription)
- Self-adhesive paper (or freezer paper, if you find it in our stores)
- Letter stencils
- Scissors or utility knife
- Iron
- Rope, ribbon or thick thread (on which you will attach the letters)
- White thread (for sewing layers of fabric)
- Sewing machine (if you don’t have one, you can do everything by hand)
- Clothespins
Progress:
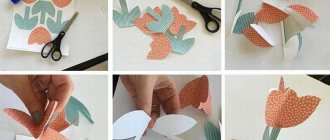
Step 1:
- On self-adhesive paper, print stencils of the letters needed for the inscription . You choose the size of the letters yourself, depending on how you want the inscription to look and how much space you have for it on the wall.
- Cut out rectangles with letters , and then for each of them the same size an empty rectangle of paper and fabric.
- Fold the rectangles described in the previous paragraph so that the fabric is between the paper, the lines of the letter should be towards the top.
- When working with self-adhesive paper, you just need to glue it on both sides of the fabric , but if you find freezer paper, go over the top on both sides with an iron, this will hold the layers together.
Cut out the letters along the outline. Carefully peel off the paper on both sides. We got these pretty letters:
STEP 2:
- Now we will make the letters thicker so that they have a better look and do not curl so much on the rope. To do this, we place the fabric letters on another layer of felt or felt and iron them.
- We sew a machine or hand stitch along the contours of the letters at a distance of approximately 1-2 mm from the edge. We recommend white thread, as it looks good on all colors of fabric, otherwise you will have to select a separate thread for each letter, and this is just an additional unnecessary waste of time and money.
- Cut out each letter along the outline. They are already ready, all that remains is to attach them.
- We hang a long rope , securing its ends to the wall. Using clothespins, we attach each letter to it in the required order to create the selected inscription.
Now the garland is ready to delight the birthday boy and surprise the guests!
How to decorate a wall with photos on clothespins
Sometimes everyone wants to change something in their apartment. And this does not always mean undertaking a major overhaul and spending a lot of money. Sometimes it’s enough just to refresh the space around you with the help of small interior details. And we bring to your attention one of such simple and accessible ways to everyone: decorate the walls with photo cards on a string with clothespins. By the way, this option would be appropriate not only in a teenager’s room, as it might seem at first glance, but also in the bedroom or living room of fully grown people. Also, its undeniable advantage is its affordability and implementation: you are unlikely to have problems finding string or ribbon, clothespins in a store or at home and printing out several photo cards and beautiful pictures.
These could be photographs of different sizes , Polaroids, photo strips from photo booths, regular photo cards, pictures you liked, inspirational ones, or just favorite quotes. Another unconditional advantage of this type of decor is that you can constantly change components. So, for example, in a poster you have printed photographs once and for all, and you can only change it entirely. In the case of photo cards on clothespins, you can remove one boring photo, or move the cards a little closer to each other and add new ones.
You can also change the color of clothespins, their shape, size, literally to suit your mood. Arrange different ones together or choose a single style and color for the entire garland. The string can be regular twine from a hardware store or special colored paper twine.
For those who love eco-style and minimalism, simple twine and wooden clothespins are suitable.
Another option for a photo card garland on a rope is portability. Due to the fact that they weigh little, they can be hung almost anywhere and repositioned at any time. By the way, you can find out how to attach a garland by reading our article ; any of the methods listed in it are also suitable for a rope garland.
Also, the ease of fastening allows you to expand the choice of placement of ropes on the wall: you can place one long garland, two below each other, many rows, symmetrically parallel, in different planes.
And the photos themselves can hang on the rope in different ways: perfectly straight, in a certain sequence, or inconsistently and carelessly.
If just a garland is not enough for you, you can frame the whole thing - you will get a panel with photo cards. This option looks more representative and can be placed in the living room.
For lovers of the Scandi style that is so popular today, you can use ordinary branches as holders. It looks very unusual and stylish. As an additional decoration, you can use spruce branches or, for example, flowers, changing them depending on the time of year.
Another unusual option: hang strings with clothespins and photos vertically, attaching them to a wooden word . This panel will look great in the living room above the sofa.
And finally, the most stylish way, in our opinion, to decorate a wall using photo cards. You will need simple boards. The only difficulty may arise with attaching them to the wall, because... They are heavy and you will have to make holes in the wall with nails or screws. So this panel is suitable for those who are firmly convinced that they will not change its position in the next few years.
So if you are not ready to leave several holes in your wall, then choose the previous methods. They are easy to attach and can be removed almost without a trace if you do everything carefully.
In our catalog you can now add colored clothespins and stylish black rope to your order.
HOW TO ORDER A ROPE GARLAND WITH PHOTO CARDS (with a 5% discount using promotional code GSVIF ):
- Go to the Catalog, section Photo Cards .
- Choose from Square 10x10 cm, Rectangular 10x15 cm or Polaroid style.
- Click the green “Order” button.
- Upload 24 or more photos.
- Select frame color.
- In the package, select the item “Colored clothespins” (black rope is included).
- Click the “Place an order” button.
- Fill in your contact information.
- Wait for a response from the manager who will contact you to agree on the details of the order.
Bonus.
A bonus idea especially for brides and grooms: how to use photo cards with clothespins in wedding decor. You can place your photos or photos of your guests there, which they can take with them as a wedding souvenir.
"Happy Birthday" poster on fabric
Probably each of you at least once in your life, at least once in school, drew a congratulatory poster. The manufacturing method proposed in this master class takes this art to a whole new level. Patchwork quilts have long pleased many with their warmth and comfort and you won’t be surprised by them anymore, but a patchwork poster, I’m sure, will be a complete surprise and an original novelty.
You will need:
- Scraps of felt or felt fabric (in this case 9 pieces)
- Scissors or utility knife
- Letter stencils
- Adhesive padding (for example, dublerin or non-woven fabric)
- Iron
- Ironing iron (or any cotton fabric)
- Wooden stick
- Thick thread for fastening
Progress:
- Lay out scraps of felt or felt fabric to form a rectangle. Consider the combination of colors so that everything together looks harmonious and holistic.
- Adjust the scraps so that they overlap each other by about 1.5 cm.
- Place adhesive tape along the edges of the lower flaps; its width is equal to the width of the fabric overlay, that is, 1.5 cm.
- Iron the fabric carefully. We recommend using an ironing iron so as not to spoil the surface of the fabric itself.
- You can trim the shape of the poster, giving it the desired dimensions.
- The top edge of the poster needs to be processed. To do this, turn it inside out by about 1.5-2 cm, this depends on the thickness of the stick, which you will then insert into the resulting hole. Secure the lapel with hand or machine stitching.
- Place printed and cut out stencil letters on top of the fabric poster to create the desired greeting message.
- Lightly trace the letters with chalk or a thin piece of soap; they can then be easily erased. You can use a pencil, but then you need to cut off these lines too.
- Cut out the letters.
The last thing to do is to insert a wooden stick into the hole in the top of the poster and tie a thick thread or ribbon along its sides. Hang up the poster and enjoy the holiday spirit!
Garlands: Fabric marker
This master class will also have templates, but you no longer need to cut out the letters. Such a garland looks very neat and beautiful, and will certainly please the birthday boy.
And the most important advantage of fabric garlands is that they can be stored for a long time!
You will need:
- fabric, paint or marker,
- letter templates,
- scissors, ruler,
- thick thread, glue.
Progress:
- Find or buy fabric in your home that is similar in type to the one shown in the photo. A fabric like burlap works well. It should be light in color with a discreet pattern that will complement the letters and not draw attention away from them onto itself.
- Cut the fabric into even rectangles. In this case it is 17x12 cm .
- Choose a stencil of letters in the style you like and print. Then place each letter on a separate piece of fabric and trace.
- Paint over the letter and let it dry. A marker will also work.
- The color should be contrasting and stand out well against the background of the fabric, not merge, so that the inscription can be read even from afar.
"Happy Birthday" Garland Ideas
Also look at other options for birthday garlands: with glitter, with balloons! Be inspired, and let this day be truly special and unique for you!
Photographs are not just images, but pieces of life moments. Boring and thick photo albums are a thing of the past; now you can actually enjoy viewing photos. One such option is a garland of photographs. Such a bright and unusual thing as a birthday gift for a baby in the first year of his life will certainly be remembered by all guests and, of course, parents. How you can make one of these garlands with your own hands, as well as some recommendations, is worth considering in this article.
Preparing the desktop
The most common material is colored paper. However, parents can show a little imagination and make the decor truly original. For this you can use the following materials:
- Paper napkins.
- Pieces of multi-colored fabrics.
- Sweet wrappers.
- Food foil.
- Satin ribbons and ribbons.
When creating a banner for a birthday boy, the selected material can be painted, decorated with beads and seed beads, stitched and glued. It all depends on skill and imagination. The following tools must be present on your desktop:
- Scissors.
- Hole puncher.
- Ruler.
- Pencil.
- Glue or tape.
Do-it-yourself cheap tools for cleaning stove handles
Which thread to choose?
You can use thick thread as thread - this is the most common and budget option. Decorative rope thread of medium thickness is best suited. It is inexpensive and relatively accessible, durable and easy to use. The thread can be easily dyed to any color, and it will also easily hold clothespins. Another option would be tape. Every modern sewing store offers a large selection of similar ribbons of different thicknesses, colors and even materials.
The most effective option for attaching photographs is a garland. Glowing lanterns add a sense of weightlessness to images and make the room more comfortable. It is very important to choose the right garland. It should have small yellow lights and preferably with white or transparent connecting wires. The garland should be of good quality, should not overheat too much during prolonged use, and the connecting wires should not stick out.
As a rule, such garlands are hung on the wall, which means they must be attached to it with something. Most often, double-sided tape is used in this case, but there are other options, such as ordinary wall hooks. Small and transparent specimens are best.
However, you should always remember that both can ruin the surface of the walls. From this point of view, it is better to choose hooks with special glue, which, if necessary, can be easily removed from the wall surface.
Photo Shapes
Photos of the same shape will look best. To do this, you can print them in one format. If this is labor-intensive or can distort the quality of the photo, then it is quite possible to “cheat” and paste the photographs onto identical paper frames. To celebrate a baby's birthday, identical frames with rounded shapes in delicate and soft colors are best suited. A garland made from photographs mixed with cut out paper stencils can distinguish itself by its original design.
You can use bears made of red or blue paper as stencils, or simply with purple flowers if you want to give the holiday a brighter atmosphere.
For all of the above options, attaching photographs with ordinary wooden clothespins is perfect. Decorative clothespins can be purchased at any store that specializes in household items. Several rows of garlands will look harmonious.
It's easy to create something cool
To decorate the interior with photographs, you will need a regular rope (1 or 2 m), as well as clothespins with LEDs. With the help of photographs, you can tell the most touching stories: your love story, meeting your future spouse, travel adventures, etc. Attach a thread to the wall and hang the selected images on it. In the dark, the light from the clothespins will beautifully illuminate the frames, which will create a unique and warm atmosphere in the house. You can use New Year's lights as a rope. Let's highlight the main advantages:
- Batteries allow you to use the garland almost anywhere, since you do not need to connect to the network;
- The item itself is ideal for decoration not only for the holidays, but also during normal times;
- There is no open flame, so it is safe;
- LEDs do not use much energy, so the power will last for a long time.
Alternative options
If you have free time, skillful hands, rich imagination and a desire to really make an impression, then you should consider alternative options for photo collages as a gift for a 1-year-old baby.
- The photo ladder is a new invention of the designers, which, however, turned out to be quite good and original. The most unusual thing is that you can make it yourself from several wooden sticks by connecting them together. Next, you only need to mount the photos that were previously inserted into the frames. Three or four photographs are enough to make this element the most memorable decorative detail. If untreated pieces of wood are suitable for wedding photographs, then for a children's gift they need to be sanded and given a more neat and fragile appearance, thereby drawing a parallel with the defenselessness of a newborn.
- Slate frames. Yes, that's right, these are the same ones they write in school. But to be serious, you can buy several of these small boards, stick on photos and sign each of them yourself with crayons. Several boards can be connected with tape both horizontally and vertically. A good option is when each photo shows the baby in different poses, from sleeping to dancing.
- One of the most original birthday gift options is photo wheels . Despite their specific name, they are not made from machine wheels, but only from thick cardboard. Strips are cut out of it, which are later attached in the form of circles, onto which a printed photograph is glued on one side. It turns out something like flat mini-drums, which can then be fastened in a row at your discretion. This option is most suitable for portrait images of a toddler.
Important! Vertical garlands made from photographs will look more impressive than horizontal ones.
Whatever the design, remember that the main thing you should follow when creating a gift photo garland is your instinct.
How to make birthday flags: job description
Calculation of the amount of cardboard
To start, I cut out some letter circles to determine what size flags I would need. The diameter of the circle is 6.5 cm. Accordingly, such a circle fits into a triangular flag (an isosceles triangle with a base of 10 cm). The height of the flag is half the long part of the A4 sheet.
I double-checked the theory on a piece of A5 cardboard and at the same time found out that such a sheet would fit three flags.
Therefore, there will be as many as 6 of them on the A4 sheet.
I made the flags one-sided so that I could hang a garland on the wall. If you want to hang flags from the ceiling, then the flags must be double-sided. There are two options: either use double-sided colored cardboard, or glue the flags in pairs.
So, let's calculate how many flags we need in order to place the intended inscription. We count spaces between words.
KATYUSHA = 6 flags;
HAPPY BIRTHDAY! = 16 flags.
Those. in total you need 22 flags plus a few additional ones - as many as you can - to hang them around the inscriptions. So, let's count. There are 6 flags on one sheet. 22 is not divisible by 6, but 24 is divisible (rounded to the nearest larger number that is divisible by 6). Total: 24:6=4. We will need 4 sheets of A4 cardboard.
I took 4 different colors: yellow, blue, green and pink. They are quite bright and festive - and go well with each other.
How to draw a sheet of cardboard for birthday flags
We place a sheet of A4 cardboard vertically in front of us. We make two marks on the top: at a distance of 10 and 20 cm from the upper left corner. From the lower left corner we also set aside 10 times twice and put marks.
We connect our marks as shown in the next photo.
We connect the marks in pairs in the other direction.
We connect the places where the lines cross.
We also connect the upper and lower marks 20 cm from the left corner, i.e. the line will run parallel to the long part of the sheet.
In this way, we draw out all the prepared sheets, and then cut the cardboard along the drawn lines.
Pay attention to the "clippings".
If you add them two at a time, you get several more multi-colored flags.
Connect the halves of the flags on the reverse side with a piece of tape.
The flags are ready. Let's put them in the order they are supposed to be used. I kept it in order, laid out the colors strictly in order: yellow, blue, green, pink. So I took them in order to stick on the letters of the inscriptions.
We cut out circles with letters, coat each one on the inside with glue stick, liberally and evenly, without lumps, and glue it onto the flag.
Use a hole punch to make two holes.
The flag is almost ready.
We do the rest of the checkboxes in the same way, not forgetting to leave a checkbox for spaces between words.
We lay out the inscriptions in front of us and decorate.
If you have ready-made stickers, then decorating will take just a few minutes.
Assembling a garland of flags for a birthday with your own hands
To distribute the flags evenly throughout the garland, leaving the tails of equal length for fastening, it is best to fold the pendant in half, and also divide the inscription “in half”, defining the middle.
We move the first flag from the middle of the inscription to the center of the ribbon or soutache and string the entire half of the inscription. We do the same with the second part of the garland.
Don’t forget to use our “half” flags.
Before the holiday, it is convenient to store the garlands folded, like this.
An elegant garland of birthday flags made with your own hands is ready!
Tips on the topic
The simplest garlands can bring life to your home
Paper garlands are notable for the fact that they can be used to decorate a living space not only in honor of a holiday, but also for no reason. In this way, you can turn any of your ideas into reality, thereby introducing something new into your environment and lifting the mood of yourself and your loved ones.
Garland of 3D stars
Homemade garland models can be divided into those that are glued and sewn. The latter option is preferable in some cases, since machine stitching does not crumple the paper. In addition, it turns out much faster this way. Of course, you can sew by hand, but it takes a long time and the result does not always live up to expectations.
There are also ribbon and thread garlands
Any type is attractive in its own way, regardless of the complexity of execution. A garland made of threads looks more impressive, but it easily gets tangled during use. And strip displays require the use of high-quality glue, which determines their durability.
New Year's paper bunnies
Some models require preliminary creation of cutting templates or assembly patterns. In order for crafts to fit harmoniously into the interior, you should first study the situation (color and texture of parts). The time of year is also taken into account. In accordance with this, the most suitable models are selected. How to make beautiful paper garlands will be discussed further.
Halloween themed garland
Volumetric New Year's garland
How to make lush snowflakes
Here is the first idea for creating a garland dedicated to the New Year - from snowflakes. This can be a Christmas tree or wall garland. I think everyone remembers how to cut out flat openwork snowflakes from a square of paper (you can use regular napkins).
This option will help out if you need to make garlands in the shortest possible time. If you have the time and desire to do something original, then you should pay attention to a more complex figured version of snowflakes.
Paper snowflakes
Step-by-step master class:
- You should prepare any paper (for example, office paper), pen or pencil, scissors, stapler, glue, double-sided tape and thread
- It is necessary to cut an A4 sheet into two identical strips
- Now fold each strip into an accordion shape.
- Cut one strip from your workpiece along the fold, bend it in half and draw a pattern on it. You will use it to cut out a snowflake
- Now fold the accordion in half and secure it with a stapler
- Attach the template to one of the parts of the workpiece, trace with a pencil and carefully cut along the lines. They continue to do this with regard to the other half.
- Next, fan out each side and glue the ends together
Next, fasten the resulting medallions to the thread and the delicate garland is ready.
Paper Christmas decor - rainbow garland for party decor
DIY paper garland for New Year or Halloween: diagrams, templates and step-by-step instructions | (100+ Photos & Videos)
Garland of 3d balls
3d garland
A garland of paper balls is suitable as a New Year's decoration or can simply transform the interior. It depends on the shades. To work, you will need any paper (for example, colored or for scrapbooking).
Step-by-step instruction:
- To make 1 ball, cut out 6 circles of the same diameter from paper. You can cut out more round blanks, then the ball will come out more voluminous
- Fold each round in half so that the front side is on the inside.
- Now start forming a ball by gluing the bent rounds with the wrong sides together
- Before connecting the last pieces, pass a ribbon through them
- Using this pattern, make the remaining balls and secure them all on a thread or clothesline. Refer to photo instructions
Step-by-step instructions for making a garland
If you have a sewing machine, the process can be made easier. To do this, cut the circles and arrange them in piles, each containing 6 pieces. Sew each group down the middle and then straighten out the half circles. Only double-sided colored paper is better suited for this.
Unusual hearts made of music paper
Using a similar technology, you can make garlands with other figures.
Flower garland made from egg cartons
Transformed LED garland
It turns out that cardboard egg boxes can be useful in decorating an electric garland.
A clear example of producing flowers from egg cartons
Step by step process:
- Prepare egg cartons (6-10 pieces), LED garland, acrylic paint, hot glue gun, scissors and knife
- Cut off the lid of the box and set aside for now. Using a utility knife, cut out egg nests (to make tulips for light bulbs)
- Cut out the walls of the cells like petals
- Having made all the flowers, start painting them. You can dry them on toothpicks stuck in the lid of the box.
- Then make cross-shaped holes at the base of each flower.
- Place buds on light bulbs
Making a decoration from flags
Yew paper flags
A classic of the genre is multi-colored flags on a rope or ribbon. Decorate a room this way for any occasion. But we offer a more interesting version - fringed flags made of tissue or tissue paper.
What to do:
- Fold the sheets of paper into a stack and draw a circle on the top using a plate or a triangular (rectangular) flag
- Using this template, cut out round blanks without disassembling the stack
- Then cut the circles in half. If you make flags, then they are left in their original form
- Now you need fringe, for which you simply cut the bottom of the blanks into strips. At the same time, do not reach the opposite edge by 1.5 centimeters
- Next, you need to glue each flag (semicircle) to the rope or use rainbow ribbons. You can sew them, which will speed up the process
Homemade tinsel
Homemade tinsel
If you have bright candy wrappers in stock, you can use them to make beautiful tinsel. How to proceed:
1 Cut the candy wrappers into many pieces (from 3 to 6, depending on the size of the candy wrapper). You can pre-make a template so that the blanks are the same.
Wrappers
2 Twist tubes from triangles.
Tubes made from candy wrappers
3 Take a needle, thread it and string the tubes on it sequentially.
Stringed tubes
4 When finished, make a knot so that the pieces of paper do not slip off
Ready garland
5 After all the tubes have been secured, turn them in different directions.
Garland for Birthday or New Year 2 in 1
Stencil
It’s easy to create a festive atmosphere by decorating your home with a flower garland. How to make this decor yourself:
1 Using stencils or freehand on colored paper, draw petals and a semicircle of future flowers
2 Cut out all the sketches and staple them together. To do this, twist each piece into a cone. Glue three such funnels together, the result is a bud. Glue a semicircle to the bottom tip.
Cut blanks
3 Cut out a round spiral from green paper - this is the base of the garland.
Garland base
4 Straighten it and stick the flowers along the entire length with the same indentation.
Ready garland
5 It will be great if at the end you coat the garland with glue and sprinkle it with glitter.
It should immediately be noted that attractive Christmas tree shapes will come out of the green spiral. It is enough to attach a loop to the top of the curl and hang the toy.
Second option: Christmas tree on a Christmas tree
Garland of funny roses
Exquisite garland of roses
Another variation of the festive garland is made from cute roses. It's quite simple to do:
- To do this, draw a spiral on paper and cut it out
- Then twist dense flowers from the resulting blanks, fixing them with glue as you go.
- Make as many as you need for the garland (depending on length). Now we attach the buds to the twine
How to make a wavy spiral rose
You can cut the spiral into waves, then more attractive buds will come out.
Attractive hearts
Paper strips
A garland of hearts will look romantic and can be used to decorate a room for any event: a wedding, a birthday, a romantic evening, or just like that.
How this decoration is made:
1 Cut medium-sized paper strips. Make a heart out of two strips using a stapler.
2 Attach two more strips to the lower tip and form the next heart from them in the same way.
Heart
3 Continue moving in this manner until you get a long garland of many links.
Long garland of many links
You can use paper of the same color or different colors during the process. Regardless of this, the craft will turn out expressive.
Multi-colored hearts
Just checkboxes
Universal garland of flags
It will be no less elegant and festive in the house if you hang a garland of flags. This decor is most suitable for any children's party.
Making such a garland is not difficult and the whole process consists of just three steps:
1 Draw flags on colored paper.
Flag drawing
2 Cut them out according to the intended patterns, as in the picture.
Checkbox template
3 Fold the rectangle in half and glue it to the thread at the bend.
Flag on a thread
To make it bright, use paper of several colors to make templates to alternate flags. Can be made from postcards.
If you have the time and desire to create, then you can do something more complicated. For this, in addition to paper, you will also need fabric. So, we’ve already figured out how to make paper flags. At what stage should you add fabric?
Everything in order:
1 Cut many flags (triangles or rectangles) from colored sheets.
Lots of checkboxes
2 Make a pattern from fabric (you can use felt) and cut out similar parts, but smaller in size. Now they can be glued to paper blanks or sewn.
Fabric flags
3 You can add a button on top. We also decorate with sequins, beads or beads.
Decorated flags
4 Sew the prepared flags to the ribbon or braid (by hand or on a machine).
Flags sewn to ribbon
Involve children in this activity, they will love it. For kids, this activity will help develop fine motor skills.
Garland chain
How to make a garland in the form of a chain
The easiest way is to make a garland chain. For it, take multi-colored paper to alternate links.
The execution algorithm is simple:
- Cut strips of different colors, with arbitrary width and length
- Then glue the first ring, thread a new strip through it and fasten again
This continues until you get a long chain of rings.
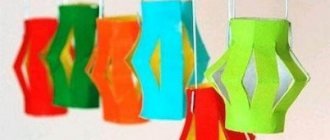
Paper lanterns
Paper lanterns
A decoration that we have known since childhood is lanterns. These can be just toys for decorating a Christmas tree or in the form of a garland. It is preferable to take corrugated paper, then the crafts will look more beautiful.
Master Class:
- Cut out a rectangle measuring 10x7 cm from paper
- Bend it horizontally in half
- Make many cuts vertically from one edge, not reaching the opposite edge 1.5-2 cm
- We roll and glue the lanterns to make them look like cups
- Make holes at the bottom and top using a hole punch
- Insert the wire and secure it with loops on both sides. Then the required number of lanterns is strung on a ribbon of a certain length
This is how easy it is to make garland lanterns that will become a worthy decoration for your Christmas tree and room.
Visual instructions for making lanterns
Paper garlands are sure to bring joy to your home, no matter where you hang them. They can be used to decorate walls, stair railings, a New Year tree, windows, or make a banner under the ceiling. In the case of windows, this will be an original alternative to the notorious curtains.
Of course, paper garlands are not particularly durable and will only be useful for a maximum of 2 uses. But the process of making such crafts is simple, exciting and does not take much time. So, if necessary, you can do something new. Be creative and don't be afraid to imagine. And you can take whatever material is at hand.
Simple and easy paper garland for a party / how to make a paper garland
DIY paper garland for New Year or Halloween: diagrams, templates and step-by-step instructions | (100+ Photos & Videos)