how to make a paper flower for beginners
Here is a selection of the simplest paper flowers for beginners . With a variety of craft options available, there is something for everyone. These step-by-step tutorials are not only simple, but also fun, and believe me, not just for kids.
Try everything, regardless of your skill level, because what matters is not experience, but the desire to do it yourself. There are different ways to make easy paper flowers for beginners and you may learn a lot here. For example, how to make simple three-dimensional paper flowers , use the accordion method, make paper flowers using a template and other techniques and methods. All these examples are wonderful craft ideas for children, so let making easy paper flowers become your family creativity.
Paper tulip according to the template
Here you will find a new template for paper tulips . This craft is unique in that all you need is a printable template, scissors, and glue! No other materials are needed. A paper tulip is easy to make, fun and will look fantastic on a mantel, or as a centerpiece for a dining area, or as a cute gift for a friend. Read below to learn how to make a lightweight paper tulip with your own hands . Prepare scissors, glue and you can start.
- First, download and print the tulip template.
- It is better to print on a thick white sheet. Be sure to print 100%.
- Cut out the tulip parts and fold in half.
- Glue the stem halves together until you have a three-dimensional stem.
- Do the same with the tulip flowers, gluing them together with the stems.
Wait until it is completely dry and the craft is ready.
Photo source: love-the-day.com/diy-paper-tulip-template-tutorial-lindi-haws-love-day
Materials and tools
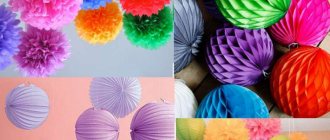
In order to master the basics of paper flower making, you will need a minimum set of materials. In addition to the main raw materials - paper, scissors, glue, a hot glue gun, wire, thread, tape, and a stapler are used. Useful wooden skewers, cocktail tubes, beads, pearls, buttons, rhinestones, lace, ribbons - anything you can use to decorate artificial flowers.
Paper
Paper is a very democratic and variable material. Flowers can be created from almost all varieties, from thin paper, light corrugated paper, to thick colored paper and cardboard.
Everything that is at hand, napkins, newspapers, packaging, can be turned into hand-made masterpieces. Some of them are comparable to works of art, and in the photo they cannot be distinguished from real ones.
Performance techniques
Many paper craft techniques are suitable for making flowers.
The origami style offers several patterns in which flowers are folded. Usually they use thick double-sided paper that holds its shape well. The most famous flowers using the origami technique are voluminous tulips.
Using the quilling technique, even small children can create the simplest flowers from thin rolled strips of paper. And complex floral elements form highly artistic canvases.
Corrugated paper flowers are often used in making candy bouquets. Volumetric buds made from napkins or paper are silently suitable for garlands.
Step-by-step master class
It's super easy to make stunning flowers using napkins or paper towels. We offer a step-by-step master class on creating three-dimensional flowers from materials that are always at hand.
The idea arose from the technology of working with paper silently. This is a very thin, delicate wrapping paper with a rich palette of colors. If you don’t have one at hand, take ordinary napkins.
We will also need threads or thin twine and scissors.
- We take a whole napkin, unfold it and divide it into layers. Napkins come in one, two, and three layers.
- You will need at least eight such layers. The larger its size. The more layers you can take.
- Place all the leaves on top of each other in an even stack.
- We put all the sheets together into one accordion.
- We tie the accordion in the middle with thread.
- We decorate the tips of the petals. To do this, use scissors to shape the edges of the accordion. You can round the corners or, conversely, make a sharp tip by cutting it in the shape of an acute corner. Can be cut into cloves or fringes.
- Now carefully bend each layer of paper upward. Hold the middle with one hand and turn the workpiece. Another - we form a flower.
- The result was a beautiful, lush, unusual flower. By changing the colors of the paper, the number of sheets, the width of the accordion, the shape of the petals, you can make peonies, chrysanthemums, asters, and fancy buds. Each flower will be unique.
Two-color flowers
Two-color flowers are made in the same way. Use napkins of contrasting colors; double-sided ones are also suitable. Prepare two rectangles of different sizes and colors. They are folded separately, and then the accordions are placed on top of each other - the smaller one on the larger one, tied and formed into a flower.
Such crafts are used in bouquets, banquet table decorations, garlands, gift decoration, and room decor.
Roses
Corrugated paper is best for roses. Due to the fact that it is elastic and stretches well, the petals can be given any convex, curved shape.
It is thin, which means that even voluminous flowers will be airy, and bouquets of them will be light.
For the petals, several templates of different sizes are used - heart-shaped for the lower petals, drop-shaped for the bud.
Cut out 15 petals in the shape of a heart and 5 in the shape of a drop.
Lightly stretch each petal in its widest part to give it a bend. The tips of the heart petals are twisted down using a knitting needle or pencil.
Collect on a wire base or skewer sequentially - first the droplets, then the hearts. Each petal is secured with glue or each layer of several petals with tape. Framed with sepals made of green paper. They also wrap the stem with it.
Asters
Even a child can make asters from colored paper. You will need to cut out several circles of different diameters. Fold each circle in half three times, as we all do when cutting out a snowflake. Cut 2-3 petals along the edge opposite the corner.
Unfold all the circles, fold them from large to small, fasten each layer in the center with glue or staple it. Glue the yellow center, bend the petals slightly towards the center.
The flower is ready. Such asters are used for appliques, attached to a wire or skewer and made into bouquets.
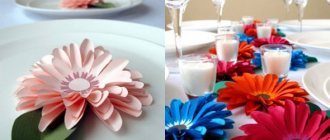
Daisies
You can make daisies or gerberas in a similar way. Cut out three identical circles from white paper for daisies, or red, orange, pink paper for gerberas. The petals are cut out, the blanks are placed on top of each other, the layers are shifted so that each petal is visible, they are glued together, and the core is formed.
The tips of the petals of daisies bend down, not up.
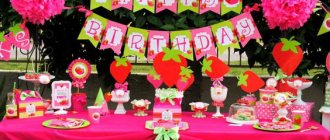
Children's crafts
Working with paper, glue, and scissors develops many useful skills in children. Every mother at least once in her life received from her child a postcard with a floral appliqué or a voluminous bouquet of paper flowers. Is there anything more touching?!
An ordinary lollipop, decorated to look like a flower, will be an original gift for your mother or friend.
Take Chupa Chups on a stick, small pieces of corrugated paper for petals and leaves. Fold the paper for the flower 4 times, cut out petals of any shape - round or oblong. Main. So that they are slightly larger in size than candy. If desired, the number of petals can be increased.
Stretch each petal in the middle so that it can wrap around the lollipop. Wrap the candy in petals and secure with tape. Cut out two leaves from green paper and also attach to the stick.
A cute unusual surprise is ready. If you make several of these flowers and fix them on a piece of plasticine wrapped in colored paper, you will get a flower meadow. This will be the first bouquet of sweets made by hand.
Giant paper flowers
Giant, human-sized paper flowers have become fashionable. They are used for decorating rooms, as a backdrop for photo shoots. They will become an unusual gift that will delight its owner for a long time.
The technology for making them is the same as for ordinary paper flowers. Only the templates will be much larger, and a lot of materials will be required.
The world
Using paper, they create animals, plants, and insects that the child encounters while walking in nature.
Crafts from accordion paper for children in the form of leaves are made by collecting shaped parts into small folds.
The flower is collected from a long strip.
- Start from the narrow side. Make identical folds up to 1 cm wide. I glue the edges.
- The resulting cylinder is placed on its end. The upper edges are directed to the middle.
- A small circle is glued to the center, which represents the core. If you assemble a flower from individual circles using this method, the outer edges will be wavy.
Insects
To make a ladybug:
- Draw a large circle and cut it out. Fold in half and cut.
- Gather narrow folds, starting from the straight side.
- Fold in half.
- Glue the edges of the inner sides and straighten the part.
- Cut out a triangle and glue eyes on it from white circles with black dots.
- Three long black strips are glued to the bottom side. The ends are bent.
- Small black circles are glued onto the back of the insect.
The bee is made by assembling a durable accordion.
- Two strips of the same width are glued together at right angles.
- Fold starting from the corner. Alternate bends. The last fold is glued.
- A round head with pasted eyes and a smile is connected to an accordion.
- Two oval wings are attached to the first fold from the head.
Preparing details for dahlias
Start by cutting out 40 squares measuring 114 x 114 mm and 15 squares measuring 101 x 101 mm.
Roll the squares into cones and secure them with hot glue.
Cut a circle with a diameter of 203 mm, which will become the basis for gluing the cones. If you need different sizes of paper flowers, you can do this by increasing or decreasing the size of the base and adding or subtracting cones accordingly.
If you're going for an ombre effect, choose 3-5 shades of the same color and use them gradually as you get closer to the center.
Paper chrysanthemums
Perhaps these flowers are not as elegant as lilies, but they have a significant advantage - chrysanthemums are much easier to make. In addition, in a nice vase or decorative jar, such a decorative element looks very presentable. You will need:
— Thick colored paper (shades of your choice); — Large scissors; - Scotch; — Green ribbon; — Flower wire; - Hot glue gun.
How to do:
1. Cut the paper into strips about 7 cm wide. Then make cuts on each strip, thus creating a fringe. 2. Roll the strip into a bud. For reliability, you can use double-sided tape. 3. Secure the rolled bud with tape. 4. Insert the floral wire into the base of the bud. 5. Wrap the “peduncle” and “stem” with green ribbon. 6. Now straighten the petals, carefully turning them outward - the cute decoration is complete!
Photo: novamett.ru
Photo: novamett.ru
giant flower
You will need: colored thick paper, a sheet of cardboard, scissors, glue.
Master Class
- Create patterns for the petals: 6 large, 6 medium and 6 small.
- Cut out the petals.
- Make cuts at the base of the petals.
- Curl the ends of the petals away from you.
- Flip the petals over and glue the ends close to the cut, forming a natural petal shape.
- Glue 6 large petals together in a circle.
- Glue the middle petals, and then the small ones.
- Glue a piece of cardboard to the bottom of the flower.
- Fold the sheet in half and cut the “brush” from the fold side. Repeat this process with two more sheets.
- Separate and unfold the cut sheets.
- Roll the first leaf, then add the rest to create a core.
- Glue the core to the center of the flower.
The giant flower is ready! I recommend watching this video!
Paper flowers | DIYideas
Bouquet in a pot - an idea for children
There are unusual ideas for children where you can not only show your imagination, but also decorate the house.
I suggest making an interesting bouquet in a real flowerpot. You can use any store-bought pot, or maybe you have an already used one lying around somewhere.
You can use the bottom of a plastic bottle as a pot and paint it.
A sheet of green paper needs to be drawn in strips 1 centimeter wide and 8 centimeters long.
We cut them to the line and glue the edges.
We place the finished grass in a flowerpot, having previously wrapped it with double-sided tape so that the leaves do not come out.
We cut out the buds and cores ourselves.
Glue the cores in place and go to complete the craft.
I was also impressed by the daffodils that stood on my grandmother’s table during my childhood, only they were made of plastic, but they looked exactly like in the photograph.
Let's start making them. For one flower we will need three levels of petals.
For them, take squares with a side of 6 centimeters.
Fold them in half twice and cut out the petals, not reaching the center 1 centimeter. There should be four petals.
We lay out the flowers and see if all the buds have received petals.
We make a fringe from a strip of corrugated paper, 2.5 centimeters wide and 16 centimeters long. The paper stretches easily, be careful.
We roll up our core and glue it to the bud.
You can stick the finished flowers directly onto the leaves or form a stem from the wire, wrapping it with green paper or ribbon.
cacti
If you consider yourself a fan of minimalism and simple forms, then you will certainly be interested in these original paper cacti. They can be decorated using any patterned paper - from regular green to shiny polka dots.
To create this decor, simply cut out cacti, aloe or succulents from cardboard or very thick paper. Then decorate them with scrapbooking paper or wallpaper. Plant flowers in a pot (use pebbles, polymer clay, sand as soil), or mount them on the wall. Ready!
Photo: riotgroup.ru
Photo: proffstroygroup.ru
DIY paper bookmarks for books: 11 ideas