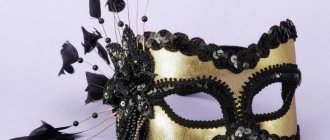
About masks
Masks are three-dimensional products that have holes for the eyes, lips, and nostrils, worn on the face to protect the skin or hide the identity. In ancient times, they were used in various rituals, ceremonies, as totems, to scare away evil spirits. They were made from leather, removing the corresponding part from the animal’s head, and cut from bark and fabric. Decorative options are used as interior decorations, are made of wood, stone, ivory, plaster, ceramics, and can have significant sizes.
In many countries, theatrical ones were widely used, the most famous ones being crying and laughing. In ancient Greek amphitheaters, bronze items were used to help the singer’s voice carry far enough. Masks were no less popular in the circus, ballet, Venice carnival, as well as various modern role-playing games.
Functional masks are divided into medical ones - saving from infection in the air, protective masks - protecting the face, eyes, respiratory organs from external influences. The latter include gas masks, respirators, ski, hockey, scuba diving, masks, anesthetic structures, etc.
In ancient times, “shameful” masks were also used for those who committed minor offenses, preventing identification - for example, an executioner mask, torture masks - iron or bronze, as well as posthumous masks - cast immediately after the death of a person, funeral masks - worn by the deceased already in the coffin.
Making a mask from cardboard, paper
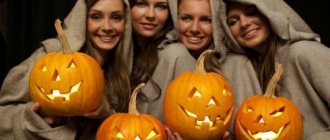
In modern times, masks are made for the New Year, various children's holidays, Halloween is no exception.
To make a simple Halloween mask you will need:
- scissors;
- orange and green paper;
- cardboard;
- ribbon or lace;
- PVA glue.
How to do this step by step:
- the outline of a pumpkin with a “tail” is drawn on the cardboard, slits for the eyes are marked, all this should be cut out;
- a pumpkin is cut out of orange paper, a tail-stalk is cut out of green paper, the details are cut out and glued to cardboard;
- a cord or tape is glued to both sides of the mask;
- on the front side you can outline the “eyes” with a black marker or gouache
Alternatively, ready-made ideas can be downloaded from the Internet and printed at the nearest copy center.
The mask of any movie character - Freddy Krueger, Frankenstein, etc. - is made using the same principle.
Photo master classes
We present to your attention a photo gallery of step-by-step instructions. Choose the best mask in your opinion, carefully read the manufacturing process and start creating a masterpiece. Also check out the article on paper masks by clicking here.
Fox
Tiger
Monkey
Cat
Dog
Bear
Panda
Owl and Fox
Wolf
The Dragon
Felt masks
Felt is a very convenient material for making a mask. It is easy to cut and comes in a variety of colors.
What masks are made from felt:
- bat – use felt in black or any other color. The contour is drawn from the wrong side of the material, the workpiece is cut out. Eye holes are cut, all edges are sewn on a sewing machine with a contrasting thread, and ties are sewn on the sides;
- dragon - consists of two symmetrical parts of light green color and one darker one on the top. All parts are glued or stitched together to create the desired structure. Then the dragon’s nostrils and eyebrows are cut out from black felt and glued on;
- smiley - using a compass, draw a circle on paper a little larger than the face, outline it on yellow felt. Afterwards, the contours of the eyes and a smile expressing a certain emotion are glued onto it.
The mask size for an adult man will be larger than for a small boy or girl.
Baba Yaga's nose as the most important part of the costume
The classic Baba Yaga costume consists of 4 parts:
- long skirt with a torn hem;
- a jacket patched with pieces of fabric of different colors;
- a bright scarf on the head;
- shaggy hair sticking out in all directions.
However, the image cannot be considered complete without a false hooked nose with warts. This detail allows the carnival participant to truly get used to the image of an old and evil witch. The finished nose can be purchased at stores that sell prank and party supplies. However, a DIY nose will be better.
Firstly, it can be created taking into account the features of your own face, so that the overlay holds well and does not cause discomfort. Secondly, a hand-made nose can be painted in any colors you like, and you can also decorate it in a special way to make the carnival look unique.
Volumetric masks
Volumetric structures for the holiday take a little longer to make than flat ones, but the result looks more interesting. For girls, masks of witches, black cats, bats, mummies are suitable, for guys - vampire masks, depicting horned demons, sorcerers, skulls, etc.
Making a gypsum base
To make such a mask, you will need a volunteer, who should be laid horizontally, fatty cream to lubricate the face, paper towels, and glue.
How it's done:
- the cream is thickly applied to the face, special attention is paid to the eyelashes and hairline;
- paper towels are torn into pieces, soaked in glue, placed on the face, avoiding the openings of the nostrils;
- After applying several layers, the product is dried with a hairdryer and carefully removed from the face.
Next, a plaster cast is made, for which you will need:
- alabaster;
- water;
- sand;
- containers;
- fat cream;
- mixer;
- scotch.
Gypsum is mixed in a container to a homogeneous consistency, applied to a paper base with a layer of about two centimeters from the inside. Later, the required mask will be sculpted on such a plaster base.
Alabaster can also be applied directly to the face, protecting the eyes with film overlays and inserting tubes into the nostrils. Then places where it should not go are protected with tape or cardboard limiters. If the negative base is not too smooth, it is lightly sanded, after which the positive base is poured in, and the previous structure is divided into two halves.
From papier-mâché
To make a papier-mâché mask, a plasticine base is required, or less often, the material is applied directly to the face, lubricated with fat.
From plasticine, which will take about a kilogram, a fantasy shape is molded, depicting, for example, a demon with horns. You will also need water, newspaper and toilet paper, PVA glue, and gouache paints of several colors. Afterwards, the structure is pasted over with one or two layers of torn paper moistened with water, with glue soaked on top of it. A total of six to eight layers are made, depending on the thickness of the paper. From larger pieces of thin paper, something that is difficult to sculpt is formed - facial wrinkles, folds on the face, horns and pointed ears are created. The last layer, for greater rigidity, is made of thicker paper. It is important not to forget to leave slits for the eyes, nostrils, and mouth. The structure is dried well, removed from the base, painted in red and black tones, and covered with sparkles.
From polymer clay
It is easy to make a skull mask covering the upper part of the face from white and gray polymer clay. First you need to create a drawing of the desired product. The clay is carefully applied to the face, lubricated with fat or cream, leaving slits for the eyes and a recess for the nose. The layer is made about five millimeters, and the edges of the product are made uneven, as if imitating real bones. All contours are carefully drawn with paints, the necessary irregularities, and the junctions of the “bones” of the skull are drawn with toothpicks or special stacks. The structure is fired in a kiln and varnished. A stick holder is attached to the side of the product, which can be stylized as a skeleton hand, also sculpted from plastic.
From plaster bandages
To work you will need:
- volunteer model;
- Vaseline or cream;
- scissors;
- plaster bandages;
- paper napkins;
- PVA glue;
- various accessories;
- gouache or acrylic paints.
It will take up to 48 hours to make the structure - it must dry well. The bandage is cut into small rectangular pieces. The face is smeared with cream, pieces of napkins are overlapped over it, and then pieces of bandages moistened with water are placed in two layers. After 15 minutes, the mask is removed, the eyes, mouth, and nostrils are carefully cut out, making sure that these parts are symmetrical. The contours are trimmed with scissors. The entire structure is covered with paper napkins, since plaster can cause allergies; horns, ears, voluminous teeth, patterns of threads or lace are glued to it. Afterwards it is painted and decorated with sparkles, rhinestones and beads. Tip: when working with plaster, you should protect your hair and clothes from it with a towel, cap, or cape.
Mask made from masking tape
Painting tape is used to cover a structure made of papier-mâché, cardboard, or other material. Scotch acts here as an original decor, both in its entirety and cut into fragments of any shape. The pre-painted gypsum product is decorated with painting tape - then a second, contrasting layer is used to cover everything that is not covered with tape. The tools you will need are sharp scissors or a stationery knife; the dye is applied with a brush or from a spray can.
Halloween - cupcake templates (free to print)
Now it's time to talk about treats! It’s hard to imagine this holiday without placating guests with sweets. But making a suitable decor for cupcakes is the easiest way. But this is provided that you have thematic templates. Using them you can do:
- Toppers. To do this, select a picture and print it. Attach to a wooden skewer and you are ready to decorate the cupcakes.
- Original sprinkles. Cut out a picture from the printed template. Spread a layer of frosting onto the cupcake. Place the template on the cream and sprinkle cocoa or grated chocolate on top. Remove the template and... done!
- Fashionable design. If you have a food printer, such a template can be printed on wafer or sugar paper. It will turn out mega-cool!
If you know other ways to decorate cakes using these templates, share them in the comments!
And if you know how to cook gingerbread cookies, then I will show you how to decorate them.
We create a mask using makeup and cosmetics
Beautiful “war paint” for Halloween is done using theatrical makeup or bright cosmetics. You can “draw” on the face using:
- long lasting lipstick;
- primer;
- bright eyeliners;
- black liner;
- bright shadows, preferably liquid;
- loose glitters;
- sponges, brushes.
For teenagers and adults, Halloween makeup is replete with dark tones, imitations of cracks, scars, bruises, and “devilish” arrows. For a more dramatic look, apply gel eyeliner or black nail polish to the front teeth. Children are given less scary coloring, and cosmetics are hypoallergenic. Pink and blue shades, a semblance of blue under the eyes, vampire teeth, small scars and hearts are acceptable.