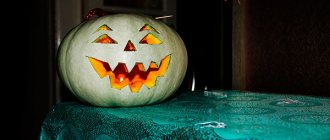
The holiday begins on the night of October 31 to November 1. A traditional Halloween decoration is the jack-o'-lantern. With the help of such decoration you can create the right atmosphere. A decorated pumpkin for this holiday is also called a “Jack-O-Lantern.” According to legend, the drunkard Jack managed to deceive the devil himself twice, and after death he could not go to either hell or heaven, but was left to wander restless on the Earth. It is customary to carve the face with a terrifying smile. But some also carve other designs on the surface. It could be a witch on a broom, ghosts and much more.
How to Make a Jack-O-Lantern for Halloween
The Halloween holiday has acquired many traditions and characteristic attributes. Wanda Wood in the book Halloween. Terribly delicious recipes for All Saints' Day" calls the pumpkin lantern (Jack-o'-lantern) one of the most famous symbols of this day.
How to create a beautiful lantern from an autumn vegetable?
Jack-O-Lantern: YouTube/Ksenia Rush
For manufacturing you will need the following materials and tools:
- large or medium round pumpkin;
- a small sharp knife (can be a stationery knife);
- tablespoon;
- felt-tip pen or marker;
- ominous face pattern;
- scissors;
- scotch.
Here's how to make a Jack-O-Lantern from a pumpkin:
- Wash the pumpkin and dry it with a paper or cloth towel.
- Cut off the top of the pumpkin with the tail. Then carefully remove all the contents of the pumpkin with a spoon or hand - pulp and seeds.
Scraping pumpkin pulp: YouTube/Ksenia Rush
- Apply a design on the front side of the pumpkin - a face with an ominous smile. You can draw it yourself or use a template. In the second case, print the drawing on a sheet of paper, cut out the eyes, mouth, nose and tape the template onto the pumpkin. Trace the design around the edges and remove the stencil.
- Using a sharp knife, cut out all the elements of the face along the marked lines.
Carving a face in a pumpkin: YouTube/Ksenia Rush
- Insert a candle or garland inside and light it.
When working, consider the following nuances:
- Cut out small details and shaped elements with a sharp knife with a thin blade, such as a stationery knife.
- Start cutting with a triangular nose to get some practice: straight lines are easier to cut.
- If the contents of the pumpkin cannot be scraped out, use a knife to cut the insides crosswise, then turn over and tap. The seeds and pulp will fall out.
Raw fruits become unusable within a week. If you want to preserve the created masterpiece longer, dry the fruit. For quick drying, use the oven: place the pumpkin, cleaned of entrails, in the oven at 60°C for 8 hours. Don't forget to turn it periodically or turn on the airflow.
Decorative pumpkins: for those who don't like to carve
To decorate your home for Halloween, you don't have to go through the hassle of cutting out and removing the pulp. You can leave the fruit whole. At the same time, it will be stored much longer.
Multi-colored pumpkins
This collection contains several options. Firstly, you can simply paint the vegetables as you wish (for example, with acrylic paints). You can also glue rhinestones or use markers.
Decorate with a garland
If you have some glue and a solid piece of garland with balls, you can glue it to the pumpkin. To do this, coat the vegetable with glue and attach the garland to it in layers.
Confetti
Grab some confetti or create your own using a hole punch and colorful paper. Coat the pumpkin with glue and sprinkle with the resulting circles. You can add an additional layer of glue on top to prevent the confetti from flying around.
Pumpkin unicorns
Of all the ideas presented, this is the most interesting and unusual (especially if you are creating a surprise for a girl). For it you will need a pumpkin, foamiran for the ears, acrylic paints (you can take a balloon), polymer clay, glue and wooden skewers.
Start by painting the pumpkin and cutting off the stem. After this, glue the ears pre-made from foamiran. Twist the horn and stick a skewer into it, bake the structure (if the clay is baked). After that, stick the structure into the “forehead” of the unicorn. Make a mane from several sausages of polymer clay and also attach it to the creature's head. Color the face.
Halloween pumpkin from a jar
If you don't have a pumpkin, you can make a Halloween lantern from a glass jar.
Prepare for work:
- glass jar of the desired volume;
- orange paper or orange paint (watercolor, gouache);
- PVA glue, brush;
- black marker;
- candle.
Jack-o'-lantern for Halloween from a glass jar: YouTube/Happy Lera
The instructions are simple:
- Wash and dry a glass jar of the desired size.
- Cover the outside with pieces of orange paper. To do this, cut a sheet of paper into small squares and glue one by one onto the surface of the jar. An alternative is to paint the jar orange.
Gluing paper to a jar: YouTube/Happy Lera
- After the glue/paint has dried, draw an evil face with a black marker. Another option is to cut out eyes and a mouth from black paper and glue it to the jar.
Jack-O-Lantern Decoration: YouTube/Happy Lera
- Insert a candle inside and light it.
The craft is very simple, even a small child can do it.
Holiday tradition
The ancient priests of the Irish and English tribes began carving creepy faces on pumpkins. The vegetable was mainly used for harvest festivals. The Jack-o-lantern acquired a look similar to the modern one by 1837. A little later, it began to be associated with Halloween, and they began to create it before the holiday.
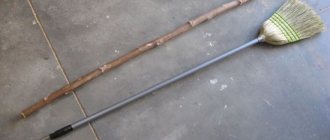
It is not necessary to carve faces on pumpkins - you can, for example, choose an animal or an inscription
The legend associated with the pumpkin is usually told in much the same way everywhere. Once upon a time in Ireland there lived Jack, a greedy merchant who loved to drink. When he had no money to pay for ale in a pub, the devil approached him, taking the form of a man, and offered him an expensive coin in exchange for an immortal soul.
Jack cheated and agreed, and he put the coin in his pocket, where the silver cross lay. The devil was afraid: as long as the money was next to the crucifix, he would not be able to regain his real appearance. In order for the merchant to let him go, Satan was forced to promise that he would not take his soul to hell after death.
When Jack died, his situation was hopeless. He didn’t deserve heaven by his actions, but they didn’t take him to hell either. He had to walk the earth like a restless ghost. The devil gave him a coal to keep him warm and light his way. And so that the fire would not go out and burn his hands, Jack placed it in a pumpkin with a carved face.
According to one variation of the legend, Jack stole a coal from hell after death, and the devil for this turned the thief's head into a turnip.
The legend is, of course, interesting. And very suitable for a mystical holiday. It is believed that if you place a Jack-o-lantern in your house or yard, all the evil spirits that rise from hell on Halloween will bypass your home on a long journey.
Paper Halloween pumpkin
This Halloween pumpkin decoration can be made using the papier-mâché technique. Elena Kaminskaya in her book “Paper Crafts, Toys, Souvenirs and Gifts” explains that the technique is a method of gluing paper in small pieces in 5-7 layers according to a certain shape or model.
Papier-mâché Halloween pumpkin: YouTube/KITCHEN EXPERIMENT
How to create a cute papier-mâché pumpkin? Prepare the following materials:
- paper or newspapers;
- PVA glue;
- flour;
- balloon;
- nylon threads;
- scissors;
- wide brush for applying paper mastic;
- thin brush and paints (orange and black).
Stages of work:
- Prepare the base on which you will apply papier-mâché. A balloon will do: inflate it to the desired volume, then wrap it with string to recreate the grooves characteristic of a pumpkin.
Preparing the Balloon Pumpkin Base: YouTube/KITCHEN EXPERIMENT
- Make a sticky mixture: pour 200 g of warm water into a bowl, add 1 tbsp. l. PVA glue and flour. Mix thoroughly.
- Cut or tear the paper into small pieces and place in the glue mixture.
- Let the paper soften for a few minutes, take it out and glue it to the ball. Cover the entire surface of the ball with paper, then soak a wide brush in the glue mixture and apply to the first layer. Leave to dry for 20 minutes.
Applying adhesive mass to a ball: YouTube/KITCHEN EXPERIMENT
- Make several layers in the same way.
- Dry the product. The author of the book “Crafts from papier-mâché” Svetlana Rashchupkina advises drying the craft on clear days in the open air for 1–2 days, in winter and in rainy weather - in a warm room.
- Paint the finished pumpkin orange and draw a scary face with paint.
Bookmarks in the shape of a pumpkin
Also a great idea for a gift for friends or a craft for school. We have already made such corner bookmarks; a master class on paper bookmarks is here.
All that remains is to decorate this corner like a pumpkin!
If you don’t know how, then watch the video
How to make a Halloween pumpkin from a balloon
A very easy option is a balloon pumpkin. The main condition is to choose the right color of the material.
Cute balloon pumpkin: YouTube/Sergey Leshchanov
For the craft you need:
- balloon (orange or yellow);
- orange ribbon;
- black marker.
Step by step guide:
- Inflate the balloon.
Inflating a pumpkin ball: YouTube/Sergey Leshchanov
- Tie the ball with ribbon, creating the characteristic edges of the pumpkin. Secure the edges and trim off any excess tape.
Wrapping a ball with tape: YouTube/Sergey Leshchanov
- Use a black marker to draw eyes, a nose and a sinister smile.
Make several items and hang them around the house.
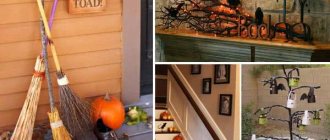
Interior decoration
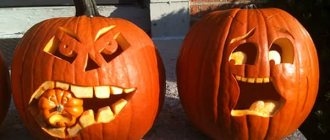
Decorating your home with a single artistically carved pumpkin head isn't enough to get you into the holiday spirit. You can create several interesting images. The ensemble may include painted lanterns of various configurations or pumpkins forming a decorative chain. Halloween allows you to show off your talents by designing a photo zone with pumpkin attributes, where all the details are taken into account, from the background to small accessories.
An interesting method of making a composition is to place one pumpkin inside another. This spectacle is reminiscent of a bloody scene where a monster holds a victim in its teeth. One large pumpkin is connected to a small one using any fastening devices.