He came to us from the West and charmed us with his mystery and unbridled enthusiasm. This is one of those holidays that, without makeup and themed decor, loses its meaning and charm. During Halloween, everyone can feel like a little mystic and wizard, turning their home into an abode of evil spirits and the other world.
Subjects for decoration for All Saints' Day can be very different. But the main themes are almost always the same - the occult, horror, death, mystical characters. The main palette of the holiday consists of black and orange shades with rare inclusions of white, green and red. The original attributes of the celebration were symbols of autumn and harvest: pumpkins, yellowed leaves, garden scarecrows, ripe corn, bare tree branches.
All this is still relevant today. But nowadays the emphasis is increasingly placed on horror and fear: decorations have become more and more creepy, and the colors have become more and more gloomy. But it is always important to know when to stop, avoiding bad taste and unnecessary tragedy. It's a holiday after all! We share with you original ideas for Halloween decor:
Jolly Jack Pumpkin
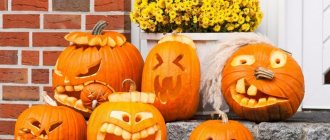
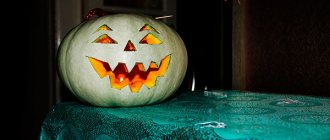
A simple and affordable way to bring the ambience of the famous holiday into the interior is to use its most famous symbol - the “Jack-O-Lantern” made of pumpkin. However, in order to skillfully carve a lantern, you need to practice a little in carving and, as they say, get better at it.
If you don’t want to bother with pulling out and scraping out the pulp, you can simply draw a face on the peel of the vegetable and place a candle on the top of its head.
For added drama and a pop of contrast, some pumpkins can be painted black and mixed with orange ones.
Vampire pumpkins will look original and ominous. It is enough to cut a small hole for the mouth and insert purchased vampire jaws into it. Rowan berries are suitable for red eyes.
A pumpkin walked around the garden... and ended up at a party
The main attribute of Halloween, of course, is the pumpkin, and it has many options to make your wildest fantasies come true: it can be cut out in the shape of a head with a terrifying smile and crooked teeth, dressed up with an elegant hat, painted with paints, wrapped in bright threads or covered with black lace stockings - who cares? that he is capable.
Pumpkins will ripen in the fields in October. And you can bring one such huge fruit into the house, extract all the pulp, cut out the scary face and put a candlestick inside.
In the dark, such a head will look very scary.
Jack-o'-lantern
Now you can make a real work of decorative art from a pumpkin. You can draw intricate shapes and patterns on it, either with paints or with a regular pen, to suit every taste. You can also cut beautiful lines across the entire surface or make fancy-shaped through holes so that the chiaroscuro from the candle creates beautiful patterns.
Pumpkins come in a variety of colors, shapes, and sizes. Large pumpkins should be placed near the entrance to the house. Smaller ones can be placed in rooms. They can be decorated with beads, sequins, rhinestones (suitable for light pumpkins) or fabric, bows and buttons (for bright orange pumpkins). On the surface you can depict drawings of spiders, cobwebs, bats, etc.
See how quickly and easily you can make a bat out of a pumpkin.
You can also cut out funny faces and scary pictures. Pumpkin can also be used as a flower vase. You can put asters, chrysanthemums and any other autumn flowers in it. Here you can also use rowan brushes and autumn leaves. Small pumpkins can be made into candlesticks. It will look very neat and cozy.
How to make a pumpkin from plasticine for Halloween
Perhaps because Halloween occurs in the fall, the pumpkin is the centerpiece of the day. This can be a decor item, a costume, or a children's craft. The main thing is to give a terrifying appearance, to scare everyone.
On our website rukodelielux.ru we offer a craft option for young children, since they are the ones who love to sculpt from plasticine. You can make a pumpkin from an orange block, and not just one, but 3 pieces at once. You can also draw wonderful faces with plasticine and a toothpick on a soft surface. And also then make an unusual pyramid design, so to speak, a snowman out of pumpkins.
To create a Halloween decoration from plasticine, prepare:
- orange and black plasticine;
- toothpick
We will make the autumn fruits themselves from orange plasticine. Black will be needed for the eyes, and you can also put a black witch's cloak on the figure.
Divide the orange block of plasticine into 3 portions, but not equal, but gradually reducing the amount of mass in each of them. Mash each piece individually in your hands. Pumpkins will be made from them, they will become a kind of lumps for creating a snowman. The finished faces will need to be collected into a pyramid.
Roll the prepared pieces into balls. Then press down on top of each one with your palm to make the balls more flattened. It’s convenient to press out the veins with a toothpick.
Now turn each prepared part into a muzzle. It will not be just a vegetable, but a kind of specimen that forms one part of a single structure. The first largest pumpkin has a hard time, because it is located at the foot of the pyramid. Give her a nose, a distorted mouth and pits for the eyes.
Also, stick on a patch for decoration to show that the strongman pumpkin has burst more than once and has been sewn up to be repaired.
The second pumpkin is in the middle. It’s hard for her too, but not as much as the previous one. She is surprised and tries to gather her strength. Come up with a facial expression for her.
For decoration, make a black blot on the side.
Now comes the smallest and most cunning pumpkin, which completes the whole structure. She smiles and winks at everyone around her, her cheeks stand out, it’s not hard for her at all, because she doesn’t hold anyone on her.
When your pumpkin fantasy is ready, assemble your snowman. Glue one piece to another to size.
Mash a large amount of black plasticine in your hands, crush it with your fingers, pulling out a rectangular, very thin cake. From the prepared part we will make a long cloak with a cap. On one side, close the corners and smooth the seam with your fingers, pull out the sharp cap.
Glue the cape onto your head, or rather your face. The cap will be placed on the head and go down in the form of a long cape.
An interesting DIY plasticine craft for Halloween is a unique composition that fits perfectly into the theme of the holiday.
How to make a pumpkin bookmark
The next pumpkin bookmark is made using the origami technique.
The orange sheet is folded as shown in the photo.
Then you need to design the face of the pumpkin.
The bookmark is ready!
Garland of bats
There is no need to specially catch and dry these harmless animals. Mouse figures cut out of colored cardboard are quite suitable. For greater expressiveness, attach button eyes to the figures. In the company of a garland of black mice, a garland of white paper ghosts will look harmonious.
Skeletons
A photo zone with a skeleton looks creative and atmospheric. Such photos are sure to attract attention and get a lot of likes.
The only negative is the price of the issue. A full-length skeleton costs several thousand rubles. Of course, you can build it from scrap materials. But making such a shocking character out of sticks and cloth is not an easy task.
An easier option is to cut a blank from whatman paper or cardboard. This decor will not look so natural, but it will be quite suitable for a photo shoot.
Another option is to turn into a skeleton yourself. Colorful makeup, a little imagination - and the owner of the house will become the main decoration of the photo zone.
In any case, it is worth remembering that the main attribute of any photo shoot is a good mood. After all, photography primarily captures the moment and atmosphere, and any photo zone serves only as a backdrop for positive emotions.
Cocoons with spiders
Cocoons with small spiders hanging from a chandelier or ceiling look funny and beautiful. They are made from thick white threads, which are soaked in PVA glue and wrapped around a small balloon. The next morning, when the glue on the thread is completely dry, the ball base is pierced and removed. Small spiders are attached to different sides of the cocoons - purchased or made independently from cardboard.
Mice on the steps
If the house has a staircase, it is a pity to leave it without decoration. A good option is homemade stickers in the shape of mice with minks. If you have small pumpkins, you can decorate the edge of the steps with them along with candles. Only in this case it is important to remember safety precautions in order to prevent a fire.
Leaves
It's hard to find a person who doesn't have an autumn photo with yellow leaves. This decor is also suitable for Halloween. It suits the occasion and fits perfectly into the color palette. Another plus is that these decorations are completely free. All you have to do is go for a walk in the nearest park or forest - and there it is, ready-made props for a bright photo shoot, literally under your feet.
Foliage will harmoniously dilute the gloomy surroundings of black decor. Orange curly leaves of maple or oak look best in the frame.
Another option is to make an arch of leaves around the fireplace or doorway. But in this case, much more “blanks” will be needed.
But this design has several disadvantages:
- the foliage dries quite quickly and loses its presentation. Therefore, you need to decorate the photo zone immediately before the holiday;
- This kind of decor leaves a lot of garbage. Plus, along with the leaves, uninvited “guests” can come to the house: spiders, beetles, butterflies and other insects. So it is better to arrange a place for a photo shoot using such decorations on the street.
A solution to the problem may be to replace natural leaves with analogues made of colored paper. But cutting out such decorations will take a long time.
Ghosts in banks
LED strips or garlands of different shades are good to use for making creepy-funny jars. Draw some faces on the front of the jar, place an LED garland or strip there and close the container with a lid. These glowing Jacks and ghosts can be placed throughout the house.
White plastic canisters or barrels are also suitable for such an undertaking. Draw creepy faces on their outside, and place LEDs inside. Candles will no longer work in this case.
Templates, diagrams and patterns
In this section you will find all the necessary stencils and patterns to create Halloween crafts. Create your own, unique works. A sense of humor is what will be most useful at the festival of evil spirits. Use it, joke and have fun to the fullest. We wish you a spooky... no wonderful Halloween!
Bats under the ceiling
Mice with wings are the most popular Halloween attribute. What are they made from? But the simpler and more profitable it is, the more your time and budget will be saved. For example, a good solution is to make mice from toilet paper rolls. Paint the material black and bend the cardboard at both ends to give the sleeve a rectangular shape. The sharp corners will serve as ears and paws for mice. Glue cardboard wings to the back and hang the finished product from the ceiling or chandelier.
Witch table
It’s quite easy to turn an ordinary table into a witch’s table by putting striped stockings and worn black pointed-toed shoes on its legs, traditional for Western folklore. Of course, a witch in Russian folk culture does not wear this. Rather, bast shoes and torn onucha (a white strip of fabric for wrapping the leg with a tourniquet) are suitable for her.
Creepy flowers
Floral decor is relevant for any holiday, including Halloween. But the approach to composing bouquets must be special... For example, white roses look terribly beautiful surrounded by small spiders, snakes and midges.
Black or dark purple roses with large pupils instead of a core look no less terrifying. For this craft, artificial flowers and eyes from old dolls, or those purchased at a joke store, are suitable.
Wreaths
A wreath is an exquisite interior decoration for Halloween. You can hang it not only in the children's room. It will look great and invite you to Halloween celebrations if you place it on your front door or window.
The material for wreaths can be very diverse:
- threads, twine, yarn;
- ribbons, lace;
- strips of fabric of a suitable color;
- felt;
- paper, cardboard;
- twigs and flowers (live and artificial);
- even tinsel.
By the way, a great idea is to make a wreath of green tinsel and decorate it according to the holiday: for the New Year with balls, in the fall with pumpkins and fruits, in the spring with flowers and ribbons.
You can buy the base for making a wreath at a craft store or use items you have on hand. For example, take a hanger, glue a semicircle of cardboard to the bottom and wrap it with orange ribbons.
The stores also offer a wide range of decorative elements suitable for Halloween celebrations:
- ready-made plastic orange fruits;
- figurines of bats, ghosts, etc.;
- cardboard silhouettes of spiders, black cats, haunted castles;
- felt elements.
Just use them in your crafts and your Halloween will be the most original and memorable.
Head in a jar
One of the scariest decorating ideas is to trap a head in a glass jar. But first you need to find a suitable creepy photograph of a human head, print it, roll the photo and place it in a jar of water. Because of the water, the image will look three-dimensional and more realistic.
Door-Frankenstein
Decorate the entrance or interior door in an original way in the style of the famous creation of Victor Frankenstein. You don't need a lot of details. The strand of hair will be a black cloth hanging from the top of the door, cut in uneven zigzags. The eyes are circles of white and black paper, and instead of the mouth there is a strip of black paper or fabric and one or two white squares for teeth. Be sure to add the symbolic black scar on the side.
By the way, Frankenstein is far from the only character that can be used to decorate a door. Mummy, monsters, villains, witches... - any of your favorite holiday heroes can have the honor of being symbolically imprinted on your door.
Floating Ghosts
Don't like witches, skeletons and pumpkin faces? Then try letting a flock of cheerful ghosts into your house. Make them from gauze. The easiest way is to take a white balloon, inflate it a little, throw gauze or tulle over it, wrap it at the base of the ball with white thread and hang it from the top.
If you want airy and weightless ghosts, use the ball only for the base. The principle here is the same as when making cocoons - gauze needs to be dipped in PVA glue, cover its ball on a plastic bottle with wires in both directions and let the composition dry. Then all that remains is to get rid of the base and add an eye to the ghost using buttons, fabric or cardboard.
Top tips for decorating your interior for Halloween
- Choose which holiday scenario is closer to you: a party with friends, a family holiday with children or a romantic evening in an unusual setting. This is what the decor will dictate, from horror-movie-worthy furnishings to fun Halloween-inspired accessories or a few stylish accents in the hallway, table setting, or entryway.
- The easiest, cheapest and most effective way to create a scary atmosphere is to decorate your house with cobwebs
Home decor for Halloween doesn't have to be scary. This funny composition can be made from two corrugated pipes and old buckets
- If the first frost killed your flowers, collect the dead stems and use them to create arrangements.
- Decorate your entryway console or holiday table with a Jack-O-Lantern. Try making it with your children and make a treat from the contents of the pumpkin.
Sinister Web
According to legends, evil spirits like to settle in abandoned places where humans rarely set foot. Therefore, dust and cobwebs cannot be avoided in such corners. Use this symbolic attribute in your interior decor. For it you will need balls of white, thin, woolen threads. Thin gauze will also work. You can wrap an artificial web around any part of the room, wrap it around a chandelier, chairs or part of a window.
