Hello, dear guest readers! Today on the blog there is a post about what a pumpkin can be for Halloween and an unusual event - a guest post from Anastasia Kalashnikova, author of the blog rat-felt.ru.
We met on her creative resource during the “I am a Creator!” competition. It turned out that we were similar in many ways, which allowed us to become closer in the future. But we’ll start with the classic options for treating the main symbol of Halloween, which is also called the head or Jack’s lantern.
According to legend, Jack was a heavy drinker and, as a result of his risky disputes with Satan, was forced to wander the world. He was not allowed into heaven and he did not fit in in hell. Therefore, he carries a jack-o-lantern with a smoldering coal with him. Since then, such a composition has become a symbol of a lighthouse helping lost souls to rest.
Every year on October 31, many parts of the world celebrate (sometimes on a grand scale) the wonderful Night of Floating Apples. Of course, such a celebration is more typical for countries like Mexico, but in Russia and the CIS countries the tradition of carving pumpkins at the end of October is gaining momentum. And that's great! Agree, there is nothing even remotely similar in our traditions.
Let's start with the most classic way to create a holiday accessory - carving a pumpkin.
How to make a pumpkin for Halloween: detailed instructions with photos
Carving a pumpkin into a beautiful addition to Halloween is not that difficult. It is enough to prepare the following tools and materials:
- pumpkin,
- scotch,
- sharp knife,
- spoon (choose the size depending on the size of the pumpkin),
- scissors,
- something long and sharp (wooden skewer, awl or knitting needle),
- marker (food grade is best),
- stencil (if you can handle it, you can draw a face or a design on the pumpkin itself),
- one or more candles (you can use a small battery-powered lamp).
Progress
- First, cut off the lid of the pumpkin. To do this, draw an outline with a marker and cut out this element with a knife. You will have to put in a lot of effort, especially if the pumpkin is large. The juice released during this process can be wiped off with a rag. If you stuck the knife deep enough, you can remove the lid without any problems.
- Cut the seeds from the top and remove them from the inside of the pumpkin. If the fruit is large, it will be much easier to do this by hand. Otherwise, use a spoon.
- Don't forget to scoop out the pulp. To do this, make cuts inside the vegetable with a knife and remove the soft contents with a spoon. Cut off pieces of pulp from the lid, leaving a hard layer.
- Now attach a pre-prepared template with the image you like (there will also be several photo options below). Glue it with tape so that the image does not slip.
- Now the image needs to be transferred to the pumpkin. To do this, make small holes along the template with an awl along the entire contour.
- After this, use a sharp knife to connect all the dots to each other, cutting out the pattern. The more complex the chosen composition, the more time it will take to complete this stage.
That's all. All that remains is to put candles or a small lamp inside. For greater safety, you can degrease the pumpkin with alcohol.
For anyone who wants to see all the actions in detail, I advise you to watch the video:
Stencils and templates for the pumpkin head
For pumpkin carving, you will need the following templates:
By the way, these ideas can also be used in makeup.
Other ways to process pumpkin
If you want to do something less traditional, then the following ideas will come in handy.
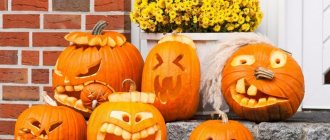
Scary and toothy pumpkin head
Ideal for small pumpkins. For this you will need a pumpkin, a small sharp knife, plastic vampire teeth and a couple of round-tipped pins. You need to cut a hole large enough for the plastic teeth to fit in. After this, they need to be placed in the opening and pin eyes should be inserted.
Cutting out pictures... with a drill
An alternative way to create patterns (if you prefer them rather than faces) can be brought to life by using a drill with drills of different diameters. In this case, at the stage of creating the pattern, mark the places where the pattern should be located and drill holes.
Small pumpkin candles
Pumpkins are usually used as lamps. But why not make an original candle from a small fruit? To do this, you will need to cut off the top (you can use a metal baking dish). After completing all the other steps, you will need to insert a wick inside the cleaned pumpkin and fill it with melted wax. Before the wax hardens, secure the wick in a vertical position.
Advice
Use wax that contrasts with the pumpkin for a pop of color. The vegetable itself can be additionally decorated with rhinestones or painted.
Kasperita and Baby Boo
Since we are talking about a white pumpkin, the miniature Kasperita will keep her black friend company. Ripe fruits, like those of the Midnight Pumpkin, weigh 1.5 kg.
This pumpkin variety has smooth, ivory-colored skin and tender, sweet, pale flesh. It is convenient for children to draw pictures on such a pumpkin or create decorative crafts together with their parents.
Another version of Baby Boo. But these pumpkins are harvested prematurely to produce a chilling, ghostly white color. Baby Boo is widely used for making Christmas and Halloween decorations and even for wedding table settings.
Decorative pumpkins: for those who don't like to carve
To decorate your home for Halloween, you don't have to go through the hassle of cutting out and removing the pulp. You can leave the fruit whole. At the same time, it will be stored much longer.
Multi-colored pumpkins
This collection contains several options. Firstly, you can simply paint the vegetables as you wish (for example, with acrylic paints). You can also glue rhinestones or use markers.
Decorate with a garland
If you have some glue and a solid piece of garland with balls, you can glue it to the pumpkin. To do this, coat the vegetable with glue and attach the garland to it in layers.
Confetti
Grab some confetti or create your own using a hole punch and colorful paper. Coat the pumpkin with glue and sprinkle with the resulting circles. You can add an additional layer of glue on top to prevent the confetti from flying around.
Pumpkin unicorns
Of all the ideas presented, this is the most interesting and unusual (especially if you are creating a surprise for a girl). For it you will need a pumpkin, foamiran for the ears, acrylic paints (you can take a balloon), polymer clay, glue and wooden skewers.
Start by painting the pumpkin and cutting off the stem. After this, glue the ears pre-made from foamiran. Twist the horn and stick a skewer into it, bake the structure (if the clay is baked). After that, stick the structure into the “forehead” of the unicorn. Make a mane from several sausages of polymer clay and also attach it to the creature's head. Color the face.
Pumpkins: easy as pie!
These are the pumpkins! It only takes 20 minutes and no sewing machine.
These pumpkins are made using the yo-yo technique and are tied with jute rope, which gives the pumpkins their shape. The stem is made from the same rope.
What you will need:
Pumpkin-colored fabric, needle, thread, filler, jute rope
Cut a circle twice the size of the future pumpkin, plus allowance for hem. This is an approximate measurement, the final result will depend on how much filler you use and how tightly you tighten the jute ropes.
Fold the fabric and baste it in a circle, giving it the shape of a bag.
Stuff the pumpkin with filling and tighten the thread.
Now you need to secure the thread by making a couple of stitches and sew the filling from top to bottom through, grabbing the fabric at the bottom. This is how the future pumpkin shape is formed - round or flattened. Use strong threads
Now it's time for the jute rope. Cut it into pieces and tie the pumpkin crosswise to form slices.
Several threads tied in the middle will form the stem
And then everything is simple! Watch and repeat:
After all the pumpkin parts of the body are tied, we attach the stem blank to them and tighten it tightly
We collect all the threads together into one bundle and tie it with a slip knot, forming a stem of the required length
Our cute little pumpkin is ready! Shall we make a couple more?
Sources: https://www.diets.ru/post/676023 /https://www.tilda-mania.ru/forum/68-1460-1 https://www.vestnik-cvetovoda.ru/forum/viewtopic .php?f=34&t=1402&start=120 https://gingercake.typepad.com/gingercake/2010/10/scrappy-pumpkin-tutorial-.html
Pumpkins in a variety of interpretations
You don't have to use only live vegetables for Halloween. You can use them in a variety of ways to decorate yourself and your room.
Drawing a pumpkin
Do you think it's difficult? In fact, it is enough to have watercolor paints and this simple master class on hand. Do you agree that everyone can draw such slices?
Halloween costume
You or your child can look like an adorable pumpkin. In the first version presented, you only need a large amount of orange mesh, which can be assembled like a skirt, make a green border and sew on a scary face.
We did the same for the second variation.
But the next suit can easily be turned into a men's one. To do this, you just need to replace the pack with red or green pants.
For even more options for holiday costumes, see this article.
Pumpkin mask
To create one you will need colored cardboard, colored paper or paints and a thin rubber band. Cut out the mask using the template below. Cut out the remaining parts from colored paper or paint with paints. Make holes on the side and thread the rubber band through.
Paper pumpkins
To create such a paper pumpkin, you will need a template (available in the master class), thick decorative paper, a glue gun and scissors. Here it will be enough to cut out the base, glue it along the top pieces and attach all the other elements.
Papier mache
Also paper, but the result is much more realistic. For such a pumpkin you will need a ball, threads, many strips of newspaper, primer and acrylic paints.
To begin, inflate the balloon (not very tightly), tie a tail and tie threads (preferably twine) to it so that the balloon can be divided into several sections. Tie the ends of the threads tightly at the opposite base. After that, start gluing the strips onto the base (more about that here). After applying all the layers and drying, prime the product and leave to dry, then paint.
Thread garland
There is nothing easier than making a garland of many pumpkins from threads. To do this, you only need a couple of colors of thread and a “fluffy” wire for the leg. Each fruit is a skein of thread, fastened with fluffy wire.
From cinnamon sticks and lid rings
Take 22 metal lid rings, twine and a few cinnamon sticks. Connect the rings like bagels on a bunch and place cinnamon sticks inside.
Fabric pumpkin
For it, take a fabric bag and stuff it tightly. Then fasten a knot of thread at one end and pull it out at the opposite end. Distribute the threads as in the papier-mâché master class. You can use a stick as a ponytail.
Pipes in use
A piece of corrugated pipe can easily turn into a festive fruit if you connect it together, paint it and make a stick-tail.
What about acorns?
Have you ever thought that acorns look like little pumpkins? If you paint them accordingly, you will get a bright resemblance to pumpkins.
Jack B Little
This is a classic variety of orange mini-pumpkins with a width of 10 cm and a height of only 5 cm. This pumpkin weighs about 200 g.
Jack-Be-Little pumpkins have an orange rind and a flattened shape with deep ridges on the sides. The flesh inside is delicious, perfect for one-off fall dishes like roasted whole squash. They can also be hollowed out and used as a tiny vase for fall flowers. Due to their high shelf life, these pumpkins can be stored for up to a year.
Kawaii felt pumpkin for Halloween
And here is a guest post from Nastya. Anastasia is a very creative and versatile person - a needlewoman, layout designer, and caring mother. And she brings a piece of herself to every direction, creating something new and magnificent. What wonderful toys she makes from wool and felt! How he optimizes websites (and at the same time creates designs)! I’m generally silent about the role of a young mother and the combination of all this.
So, I give the floor to Anastasia herself, who will tell us how to make a Halloween pumpkin with your own hands from felt - a wonderful cute souvenir for family and friends on the Night of Floating Apples ^^ After all, who said that a pumpkin must be hard?
Hello, dear readers of the blog nyaskory.ru. My name is Anastasia Kalashnikova, and I present to you today this small master class. Halloween is very soon, so I suggest sewing its symbol from felt - a cute pumpkin. The toy consists of simple parts, so it is perfect for creativity with children.
You will need:
- Orange, white and black felt;
- Orange and white floss;
- Needle;
- Scissors;
- A little padding polyester;
- Black beads for eyes;
- Ribbon or magnet optional
You can download the pattern HERE, this is what it looks like:
Batwing
One of the most popular Halloween pumpkins, the Batwing Mini Pumpkin is known for its distinctive appearance that makes these orange pumpkins appear almost submerged in dark green paint.
Each pumpkin has a unique bat wing design and weighs up to one and a half kilos when fully ripe. When cut, they make spooky ghost faces for Halloween, but the pumpkin itself is impressive.
Pumpkinmania
The production of various textile pumpkins for interior decoration, decoration and all kinds of props has become so popular that it is no longer associated with the Halloween holiday. Fairytale houses, bags, kitchen accessories, and pumpkin-style pincushions are common inhabitants of stores and websites that sell handmade products. Textile pumpkins of all possible sizes, colors and shapes are so popular that every housewife considers it a matter of honor to have such beauty at home. A home decoration made with your own hands in the form of a delicious, bright pumpkin will delight the hostess and surprise the guests.