The birth of a child is a special celebration, but the question immediately arises: what to give for this event? You can easily find gift ideas for newborns and how to create them yourself on our blog. We also recommend supplementing any gift with an original postcard or poster with warm and sincere wishes.
DIY baby greeting cards
A worthy reason to give a handmade postcard
Postcards are a classic option for birthday greetings. Children and adults, mothers and grandmothers, classmates and neighbors - everyone will be happy with such a simple surprise.
A postcard can be made specifically for the holiday of February 23 or March 8, for the New Year or Christmas, or for September 1 or Mother's Day.
Handmade has many followers and fans who do not care at all about what to get inspired by. The reason for creativity is the world around us and life itself, flowing smoothly or running without looking back.
Beautiful pictures “With the birth of your daughter”
The birth of a daughter is always a happy moment in the life of parents. And they, in turn, dream that this day will become unforgettable for them. For our part, we propose to make an original surprise for new parents that will not leave them indifferent. Along with the gift, you can give beautiful, elegant, funny cards addressed to the birth of your daughter. On this site you will find a huge collection of images that can be downloaded for free at any time of the day. And then all that remains is to present congratulations along with a gift to the parents of the newborn daughter. Pictures with the inscription “Happy birth of your daughter” will be a wonderful surprise and a reminder of the miracle that has happened - the birth of a baby.
Postcard making techniques
You can make “Happy Birthday” cards with your own hands using the following technique:
- applications,
- cutting,
- quilling,
- decoupage,
- drawing,
- scrapbooking, etc.
The combination of several techniques in one work will give it additional originality. Surely no one else will have such a postcard. You can’t buy it in a store or on a social network. They are exclusive and unique.
Postcard in the form of a baby bodysuit
And this postcard will certainly not leave anyone indifferent. It is made in the form of a children's thing - a bodysuit. Next comes decorations according to your taste, below you can see several of our ideas.
How to make a postcard in the form of a baby bodysuit
Children's card in the form of a bodysuit
Additional materials
As additional materials for making your own birthday cards, you can successfully use:
- - dried herbs,
- - natural materials - beautiful stones, parts of cones, shells,
- - cereals of different textures (rice, buckwheat, millet, beans, peas),
- - foil or gold leaf,
- - magnets,
- - buttons,
- - beads, rhinestones, sequins,
- - crocheted details - flowers, petals, faces.
Basic manufacturing rules and basic materials
Before you start creating a greeting card, think carefully about its theme and future decor. In this matter, it is important who the gift is intended for and how old the birthday person is. In addition, it is worth considering other rules:
- Color spectrum. There are rules according to which certain shades are chosen for boys and girls, men and women. It is also important to consider the reason for which the gift is being prepared.
- Decoration. To make a beautiful and, most importantly, original postcard, you can use one of many techniques. The easiest way is to use a non-traditional foundation. Use, for example, watercolor paper, a bright sheet, a stamped design on the base, etc.
- Measure in everything. It is important not to overdo it with the selection of colors, otherwise the gift will turn out to be too colorful. It is enough to use a couple of shades that will be contrasting or matching.
- Beautiful inscription. Naturally, the more calligraphic the handwriting, the more beautiful the inscriptions look. At the same time, the font should be easy to read. The most suitable colors for signatures are silver or gold.
As for the materials used during work, the set may vary depending on what kind of postcard you want to make. The standard method is to use paper, scissors, and glue. You may also need fabric, napkins, etc. It all depends on your imagination and your capabilities.
Manufacturing stages
You should start making a postcard by choosing an occasion and thinking about the plot. The ideal option to start creativity is to draw a sketch of the future postcard.
It is important to take into account the specifics of the holiday, the age and favorite colors of the recipient, the possibility of delivering it in person or sending it by mail, the need for an inscription, and internal contents.
Thinking through and developing a sketch is a responsible matter; it is better to do it in advance, giving yourself a day or two, or better yet, a week.
The next stage is a practical approach to the matter. You need to choose what exactly will be used in production, what will be needed - glue, colored paper, stapler, tape, additional materials. Preparing everything you need can take from half an hour to a whole day.
Then the creativity itself begins. It requires a workplace free from other things, as well as a sufficient amount of time. To make a postcard neat and similar to a sketch, you need to put in a lot of work, diligence and patience.
Decor with dried flowers
You will need double-sided cardboard in a delicate shade (for example, flesh or gold) and dried wildflowers, a small ribbon and glue. Cut out a rectangle or square and fold it in half.
Inside the resulting card you can write a congratulation by hand. And decorate the outside beautifully with dried flowers. For this we need glue, you can use regular office glue, a glue stick or hot glue in a gun. From dried flowers you need to form a mini bouquet according to the size of your card. Tie a cute ribbon around the bottom to form a bow. Then you need to carefully glue this bouquet to the center of your card.
Complex components that add chic and shine
When making your own “Happy Birthday!” You can use unusual design details that will decorate it with their surprise.
For example, attach a small envelope inside the postcard or on the back so that you can insert a bill there. Or glue another card of a smaller format on the inside, which also includes congratulatory inscriptions.
You can place flowers made of corrugated paper inside the card, so that when you open it you get a 3D card: the flowers will “bloom”! This option is possible for making any other three-dimensional postcards with your own hands.
There is inexhaustible scope for imagination about what kind of paper figure to place inside - a boat or an anchor, a cake with candles or a kitten, the Eiffel Tower or an Egyptian pyramid.
Ideas for simple congratulations on
Balloons are one of the most important attributes of the holidays. And on your birthday they must be present, even if only on a postcard.
Check out a selection of interesting ideas. Perhaps they will inspire you for a creative evening.
An idea with grooved balls arranged in a precise geometric grid.
Such circles can be cut from packaging cardboard if you remove the top layer and get to the stiffeners.
Better yet, give a whole armful of multi-colored balloons so that the birthday boy can fly away to his swords on them.
A more complex design idea.
Unusual color of balls. They are cut out from background images.
Glue the decor onto bulky double-sided tape. Then you get a 3D variation.
Another simple idea.
Notice how nicely simple small translucent buttons fit into this design.
You can download any font for an inscription and install it in the simplest graphics editor, even Paint on your computer.
Write a congratulation in it and translate it by attaching the paper to the monitor. And now you have a template ready.
The background can be taken not only white, but also black. In general, give preference to contrasting, calm options.
I think that absolutely any needlewoman can use balls in her composition.
Postcard-topiary
With your own hands, you can actually make not just a three-dimensional card with flowers or a real panel, but also a topiary card. This “flower on a leg” is perfect for congratulating you on March 8 or the New Year (in the form of a Christmas tree).
If you make the topiary large enough, you can write congratulations and wishes on paper “petals” or on a flowerpot stand.
Made from paper, the topiary will resemble an independent craft. Whereas the author will know that his creation is nothing more than a greeting card for a birthday or other holiday.
LiveInternetLiveInternet
I propose to make a three-dimensional card using the quilling technique for the birth of a child - with the image of a stork carrying a baby. It will take approximately 40-60 minutes to create a postcard.
We will need:
- Strips of white, yellow and beige paper - Quilling tool or toothpick - Pastel colored cardboard in 2 shades - Piece of felt or fabric - Scissors - PVA glue - Double-sided tape (optional) - Ribbon - Bead, black felt-tip pen or a small eye for a stork
1) Cut out and fold the square base of the postcard from cardboard. In the center of the card we glue a square of cardboard of a different shade.
2) Using a quilling tool, roll up a strip of white paper. If the strip is short, glue the next one. The more stripes there are, the more beautiful and delicate the wing will be. We twist the strip tightly, then unravel it to the size of the desired stork body. Glue the end of the strip to the circle. Use your fingers to form a circle, bending the strips on one side. The shape should look like a stork's wing.
3) Make a circle from a yellow strip, unravel it and give it the shape of an elongated beak.
4) From beige strips we make 3 small tight circles - one larger for the baby’s head, and two smaller ones for the legs. Cut out the shape of a bag from felt.
5) Apply PVA glue to the edges of the rolled paper and glue it to the postcard, creating the intended composition.
6) Glue a bag to the resulting stork and insert the baby’s head and legs into it. All that remains is to glue the stork’s eye and tie a ribbon on the card. Ready!
We invite you to make an original 3D postcard - a small three-dimensional scene on which you can place fancy figures and decorations. We will tell you how to make the base of such a card - a frame, and you can choose the decorations to your liking.
We will need:
- Several sheets of cardboard - Utility knife - Ruler - Pencil - Glue - Elements for decoration Step 1
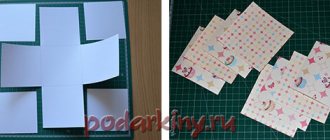
First of all, you need to choose the sheets to work with. We chose 4 shades of orange cardboard. You can choose any color options, as long as your paper is thick enough. If you want to give a card in an envelope or send it by mail, your pieces of paper should be slightly smaller in length and width than the envelope itself. Keep in mind that the diorama will be quite thick and dense, so choose an envelope that will easily fit all three of your sheets of cardboard. If you do not use an envelope, the sheets can be taken in any size. Use a pencil to draw 1 cm wide frames on the pieces of paper, as shown in the picture. There is no need to draw a frame on the sheet of paper that you chose for the back wall of the diorama. We wanted the orange tones on our card to transition from lighter to darker shades, so we left the darkest piece unmarked.
Step 2
Cut the cardboard frames along the lines to create paper “screens.” Put your “screens” aside, we will need them a little later.
Step 3
Using the remaining pieces of paper, cut two strips from each color of paper. Each strip should be 10 by 4 cm. Line each strip as shown in the picture. Also, trim the corners. After this, fold the strips along the lines so that you get a paper zigzag. These pieces will support the fragments of our diorama.
Step 4
Take a frame for the “frame” that will be the front of our card.
From the wrong side, apply glue to the two shorter sides of the rectangle. Step 5
Now take two paper zigzags and glue them to the rectangle. Be careful! The sharp corners of the zigzags should face the inside of the screen, as shown in the picture.
Step 6
Place the first frame face down. Apply glue to the inner zigzag strip.
Step 7
Now carefully glue the next frame clearly along the line, pressing the gluing area tightly so that the edges of the zigzag do not stick out.
Step 8
The upper part of the zigzag “closed” one of the sides of the frame. Repeat the same operation on the opposite side.
Step 9
If you did everything correctly, the first diagram scene is ready!
Repeating steps 4 to 8 will create the remaining frames of the diorama. We strongly advise you to decorate each of the frames in advance, especially the last one. If you glue the decorations on right away, it will be easier than trying to squeeze in and even secure the appliqués onto a ready-made card.
You can cut out any elements or figures from paper to create your own little performance inside the card.
Adviсe:
1) If you plan to give a postcard in an envelope or send it by mail, you should not get carried away and it is better to take fewer frames, otherwise the craft will be too voluminous. If you give a card without an envelope, take as many frames as you want - the more, the more interesting! 2) Decorate not only the “wall” of the diorama, but also each frame. This way your composition will be more voluminous and interesting. 3) The back wall of the diorama does not have to be solid. You can also make a transparent diorama without a back wall. 4) The edges of each edge do not have to be even stripes. If the paper is thick enough, the side edges can be cut into the shape of branches or a curtain. Use more voluminous decorations, such as bows, beads, feathers, to enhance the 3D effect. Our amazing 3D postcard is ready!
Panoramic postcard
You can get an original DIY postcard if you think of it as a panoramic one. In this type, parts of different heights are thought out and drawn separately, and then glued from smallest to largest on the inside. So, when you open a postcard, you can see a three-dimensional image.
Another type of such creativity is a collage postcard. If you draw and cut out the profiles of a tree, bush, hare, you can combine them on the same level by adding several details.
The recognizable outlines of the Bronze Horseman, the Admiralty, and the Rostral Columns will help to recreate the appearance of St. Petersburg. Any tourist visiting Northern Palmyra will be happy to receive such a postcard with parts superimposed on each other.
Greeting card using lace and fabric
To create this original card, you will need a piece of delicate fabric of any color, lace, ribbons, a piece of wire, a sheet of paper, and glue.
Fold the sheet of the size you need in half. Carefully glue a rectangular piece of fabric to the outside so that it completely covers the cardboard from bottom to top, so that five millimeters remain on the left and right edges. Cut out a small dress of any style from lace, and form a hanger from wire. Using glue, carefully attach first the hanger and then the lace to a piece of fabric so that the dress appears to be weighing on the hanger. Using ribbon, form a bow and glue it to the corner of the cardboard.
Postcard with a lock
Such an original thing can be made by analogy with a notepad with a lock. All you need to do is glue a tiny lock to the edge, hang the key on a chain and give it along with the card.
A postcard with a lock serves as an intimate gift. It is intended for those closest to you, not for prying eyes, and can help express your deepest feelings to a person who is very dear to you.
Baby card in the form of a pacifier
Further we will not describe the progress of work and materials in such detail. In principle, everything will depend on your imagination and existing materials.
Baby card in the form of a bottle with a pacifier
Postcard in the form of a baby bottle
We print the pacifier postcard using a template. The title side can be decorated with lace, a beautiful tag and charm decoration, and, of course, a satin ribbon.
Baby bottle postcard template
Glue a sheet of white paper with wishes inside.
Postcard on the computer
Today it costs nothing to master Photoshop. It gives additional opportunities for the flight of creative thought. You can model any landscape and insert a figure or face of the birthday person into it, then print it on thick paper and turn it into a postcard. This approach to business can also be considered the process of making a gift with your own hands.
Postcard with a voluminous bouquet
This craft is made using a stylish and effective quilling technique; it will take about an hour to create a pleasant present.
The donor must prepare:
- paper of different colors;
- satin ribbon 1 cm wide;
- Double-sided tape;
- a simple pencil;
- scissors (can be curly, if available);
- glue stick;
- wooden skewer;
- ruler;
- dark and light cardboard.
Photos of postcards with your own hands
Cover and first pages
Perhaps you went to the sea together with your husband, and the three of you returned - you can paste over the cover with shells brought from vacation. You can wrap the album cover in the flannel diaper in which the baby was taken from the maternity hospital.
The first pages are a kind of prologue to the entire album, an introduction. Therefore, you can perform them in the theme of expecting a baby.
For example, the very first photos –
"pregnant". Here you can write how you waited for the baby to appear, how dad stroked his belly and read bedtime stories; how the mother swam in the pool, and the baby already really liked it. How they decorated the belly, and the baby helped with kicks. If it doesn’t bother you, then you can attach a photo of the test.
the ultrasound photo with a story about how you wanted to see your baby, how you spied on him through his mother’s tummy, but he was shy and did not want to show himself. How did you find out that it was going to be a girl-boy-twins-triplets, and how happy you were about it?
If there are no ultrasound and pregnancy photos (they didn’t take photos at all or the child is adopted), then you can start the album with your wedding photo .
The wedding day is the family's birthday; then there were two of you, but you knew that someday (soon) there would be three, four of you...
A family tree is a very useful thing. The child will then be very interested. You can do the simplest thing: parents, grandparents, great-grandparents. Tell them that, in fact, the baby has very, very many relatives (in what cities and countries do they live), and that when he grows up, he will definitely meet them, go on a visit and invite them to stay with him.
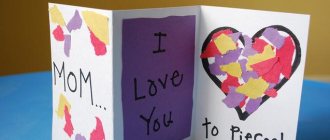
Heart made of threads
On Valentine's Day, people give each other hearts, their own, as well as those made from different materials. A postcard with a heart made of threads will surprise and delight your loved one.
You don't need any special skills to create a heart card, but the results will be excellent.
Master class for beginners:
- Prepare a sheet of thick white papyra measuring 15x22 cm, fold it in half:
- Use a stencil to outline the outline of the heart on the front side of the workpiece;
- Use an awl to make holes at approximately equal distances from each other (3-5 mm);
- Take a needle with red thread and make stitches from one hole to the opposite, choose holes randomly, there should be no unoccupied holes.
- The result of embroidery should be a bunch of red threads in the center, and thin branches from it to the outer points. The card turns out very alive, it seems that the heart is actually beating. Along the contour of the heart you can write words of wishes - happiness, success, love, inspiration.
Ideas for congratulating a man (dad or grandfather)
For men, congratulations are needed with a universal design. And it’s even better if there is a special minimalism in decoration.
You can only use a sheet of paper and multi-colored braid, as in this option.
Notice the interesting edges of the leaf. And for the inscription you can use transparent tracing paper. You might have seen this kind of paper in boxes of candy.
Or another very laconic design that is very suitable for a men's holiday.
Here is a diagram for such a composition, you can even print out the template and make an inscription on it.
Look how bright and festive the design looks, but there’s nothing special about it. Just colorful dots placed in a chaotic order.
The scrapbooking technique allows you to create three-dimensional products. Different textures and shades are used for decoration.
Or you can work really hard and make a greeting with origami elements. The entire detailed master class is described in this article.
I also liked the laconic idea with geometry. For example, using strips. It turns out strictly, but very elegant.
Stripes can not only be drawn or pasted from paper. But take a closer look at dark tape or braid for this purpose.
Spectacular simplicity
You can make an interesting postcard without spending a lot of time, a lot of money, or a lot of effort. It is quite possible to create a masterpiece from what is at hand. What do you always have in the house? Of course, paper and cardboard. So we will work with them. So, let’s turn on our imagination and begin to think about what could touch the strings of a loved one’s soul?
You can make a beautiful card for dad without spending a lot of time and money.