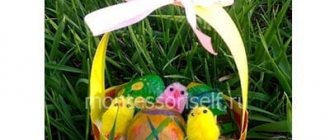
In the West, an indispensable attribute of Easter is a basket in which the Easter bunny hides eggs. But thanks to cartoons and movies, many Western traditions have penetrated into our country, and today our children willingly make Easter baskets with their own hands in the hope that some mythical character will put a colorful egg there.
What can be used as a basis for such a product?
How to make your own Easter basket
Wicker paper Easter basket
The easiest way, of course, is to make your own Easter baskets from paper. And disposable cups or popcorn buckets will help give them the desired shape and stability.
Craft materials
So, before you make an Easter basket, you need to cut the cup at the desired height with your own hands. In fact, we are only interested in the bottom, which will be used as a basis for further work.
Cutting the cup
To get a larger basket, we fasten several cups together - three or four. We use polymer transparent glue for this purpose.
Gluing the cups
Now the most painstaking part of the work begins: you will need to cut sheets of colored paper into strips of the same width.
Strips 1 cm wide
Armed with a ruler, we draw out each sheet and cut it.
Cut the sheet into strips
Now comes the interesting part: let’s start weaving! We create a base for weaving by gluing the ends of several strips onto a piece of paper. Between them we will weave shorter pieces.
Let's start weaving
When the weaving is finished, fix the edges of each fragment with glue.
Finished weaving one strip
We should have two solid pieces of paper.
We weave two stripes
We glue them together to get a canvas of sufficient length.
Glue the strips together
This fabric needs to be wrapped around our design of disposable cups. In our case, it will take the shape of a heart, because we fastened three cups together.
Wrap the cups with stripes
Let's trace this heart on a piece of cardboard.
Circle the heart
And cut out the resulting silhouette. We will get the bottom of the basket, which will need to be glued to its rightful place.
Cut and glue as the bottom
Now let's take double-sided cardboard and cut out a fairly wide strip from it.
Strip 3 cm wide
We will use it to make a handle for the basket - we will simply attach the ends of the cardboard strip to the opposite walls of the basket. You can use a stapler or regular office glue for this purpose.
Fixing the handle of the basket
Let's decorate our craft with a bow and fill it with Easter souvenirs.
Decorate the basket with a bow
Painted eggs and eggs with surprise toys will come in handy.
Easter basket using paper weaving technique
Look at the video - how to make a simple paper basket:
Making a craft from newspaper tubes
I don’t know whether you have ever seen such beauty or not, but I decided to share such work. Of course, in order to create something like this you need to know at least the basics, how to properly roll up newspaper tubes and cover them with paint. For complete beginners, I put together this video.
It’s not difficult to learn how to do this, so if you like this idea, then go ahead and sing.
Well, for those who are in the know, look what the great Internet offers us, to make such a nice chicken.
Or like this. How cool it is, and the main thing is that you can do everything yourself.
Small Easter basket made of paper for eggs
Wrap the muffin tin in pretty colored paper. We secure the paper with adhesive tape.
Wrap the cake pan in colored paper
Glue a paper pen.
Glue a paper pen
Cut out a cube from a floral sponge (you can take a piece of polystyrene foam or even plasticine). Apply glue to one of its parts.
Cut out the cube and apply glue
Glue the cube inside the basket.
Glue the cube
To prevent the cube from dangling, we secure it with colored pebbles. We insert delicious Easter candy into it.
Secure the cube and insert the candy
Place green sisal or strips of paper on the bottom of the basket. We complement the composition with Easter eggs. A little Easter gift - ready!
Small Easter basket made of paper for eggs
Easter baskets made of cardboard
You can make such a cute craft from thin A4 cardboard, scissors, a ruler, a pencil, double-sided tape or PVA, or colored paper.
- Cut out an even square from cardboard.
https://www.youtube.com/watch?v=-9ePKElMofw
- We divide the sides into three equal parts and mark the points with a pencil.
https://www.youtube.com/watch?v=-9ePKElMofw
- We draw stripes with a non-writing pen, scissors or other sharp object, and bend the sheet along them.
https://www.youtube.com/watch?v=-9ePKElMofw
- Using scissors, cut the central square to the center line on opposite sides.
https://www.youtube.com/watch?v=-9ePKElMofw
- We lower the middle parts down, raise the outer ones, connect the two sides together, fixing the upper corners at an angle.
https://www.youtube.com/watch?v=-9ePKElMofw
- We make a handle from the same cardboard, about 2 cm wide, decorate it with a colored stripe (glue it with PVA or tape), fix it on a basket so that the joint can be later covered with a side square.
https://www.youtube.com/watch?v=-9ePKElMofw
- Close the sides.
https://www.youtube.com/watch?v=-9ePKElMofw
- We cut out a strip of green paper slightly wider than the height of the basket, make the edge in the shape of blades of grass, twist the ends with scissors, and fix it inside the craft.
https://www.youtube.com/watch?v=-9ePKElMofw
- We fill it with “straw” from thinly cut colored paper.
https://www.youtube.com/watch?v=-9ePKElMofw
Easter basket made of plasticine
A charming Easter basket can be made from ordinary plasticine. We sculpt the lower part of the basket and a thin plasticine rope from plasticine.
Bottom of the basket
Fold the plasticine rope in half and intertwine it.
We intertwine a plasticine tourniquet
Wrap the braided rope around the bottom. Plasticine basket - ready!
Glue the flagellum
We fill our basket with Easter attributes made from plasticine. This makes a very cute Easter decoration!
Plasticine Easter basket
An Easter basket made of plasticine can be made rectangular.
Rectangular Easter basket made of plasticine
See how to make an Easter basket from polymer clay:
Easter baskets made from salt dough for children
Children love working with salt dough; it is as flexible as plasticine, but can harden, turning into a durable toy. You can create a themed craft for Easter, for this:
https://ya-rukodelnitsa.ru/publ/podelki_iz_solenogo_testa/podelki/korzinka_iz_solenogo_testa_k_paskhe/9-1-0-975
- Make a ball from the dough and flatten it with your palm so that the dough is a little thicker in the center.
- Place a piece of film on the table and place a flatbread on top.
- We cut off the top third of it - this will be the base of the basket.
- We make holes in the dough in stacks, imitating weaving.
- We roll two thin sausages, twist them into a rope, place them near the craft in the shape of a hand, and cut off the excess.
- We fasten the part by lubricating the joints with water; for this it is convenient to use a regular paint brush (if we forget to wet the elements when joining, the finished craft may fall apart).
- We make droplets from small pieces of dough, roll them, draw veins in a stack - these are leaves, glue them to the edge of the basket.
- We sculpt a flower, for this we roll five balls, glue them onto the base, press them with a stack, forming petals.
- Inside the craft we place “eggs” - balls slightly elongated on one side.
- Don't forget to fix all the parts with water!
- We dry the finished product on a radiator or just a flat surface until completely dry at the rate of 1 mm of dough per day, then paint it.
Easter is a holiday symbolizing the rebirth of life, fertility, and spring. These days fly by instantly, but pleasant preparations will help to stretch out the feeling of miracle a little - baking Easter cakes, making Easter eggs, painted eggs, as well as creating a variety of themed crafts.
Easter basket made from a carriage for eggs
An original Easter basket can be made from a cardboard egg tray. It is most convenient to use a tray of six eggs. We put corrugated paper straws in it.
Straws in a tray
Cut out a chicken from paper. Glue on her comb, beard, beak and eyes. Glue the chicken to the back of the egg cell.
Glue the chicken
Color the eggs yellow. Draw black eyes on them. Glue paper beaks. We make funny Easter chicks.
Easter chickens made from eggs
You can decorate the little chicks with red combs. Easter basket made from a carriage made from egg poses - ready!
Carriage Easter basket
Crochet Easter composition
For needlewomen who prefer to find peace of mind while knitting, there are several options for small crocheted compositions.
Knitted Easter
This knitted Easter is 12 cm high.
Easter pattern (brown threads):
- 4 air loops in a ring.
- 12 double crochets (first row).
- 24 double crochets (second row).
- 36 double crochets (third row).
- 47 double crochets (fourth row).
- Knit the next 13 rows with a double crochet without additional loops.
The bottom part of the Easter cake is ready.
Scheme of the upper part of the Easter cake (white threads):
- 4 air loops in a ring.
- 14 double crochets (first row).
- 28 double crochets. There are two columns in each loop (second row).
- Every 4 (third row), 4 (fourth row), 7 (fifth row), 5 (sixth row) knit 2 double crochets.
- Knit row 7-8 without additional loops.
- Row 9 – 7 double crochets + 5 chain stitches and so on around the entire circumference.
- Knit single crochets along the air loops.
- You can decorate with beads, beads or sequins.
Next you need to sew the two parts together, simultaneously filling the cake with padding polyester
Knitted Easter chick
To get these cute Easter trinkets, you just need to knit them according to the pattern below.
Yellow threads:
Row 1 – 6 single crochets in an amigurumi ring.
Row 2 – you need to add 6 more single crochets (12 stitches in total).
3rd row – 1 single crochet (sc) + increase + 2 sc + increase + 1 sc +..., until the end of the row (17 loops).
4th row – 3 sc + increase + 3 sc +... to the end of the row (21 loops).
Row 5 – 6 sc + increase + 6 sc +... to the end of the row (24 loops).
Row 6 – 3 sc + increase + 7 sc + increase + 7 sc + increase + 4 sc (27 loops).
Row 7 – 8 sc + increase +… (30 loops).
Row 8 – 5 sc + increase + 16 sc + increase + 7 sc (32 loops).
Row 9 – 15 sc + increase + 16 sc (33 loops).
Row 10 – 33 sc + increase (34 loops).
11-13 row – 34 sc.
Row 14 – decrease + 15 sc + decrease + 15 sc (32 loops).
Row 15 – 8 sc + decrease + 9 sc + decrease + 9 sc + decrease (29 loops).
Row 16 – 3 sc + decrease + 8 sc + decrease + 7 sc + decrease + 5 sc (26 loops).
Row 17 – 5 sc + decrease + 8 sc + decrease + 7 sc + decrease (23 loops).
Row 18 – 2 sc + decrease + 3 sc + decrease + 4 sc + decrease + 3 sc + decrease + 2 sc (18 loops).
Row 19 – 1 sc + decrease + 1 sc +... to the end of the row (12 loops).
Row 20 – 6 decreases (6 loops).
Next, you need to stuff the body with padding or something soft and sew 6 loops together.
White threads:
1st row – 6 sc in amigurumi ring.
Row 2 – increase (repeat 6 times). The output will be 12 loops
3rd row – 1 sc + increase + 1 sc +... to the end of the row (18 loops).
4th row – 2 sc + increase + 2 sc + increase + 2 sc +... (24 loops).
Row 5 – 3 sc + increase + 3 sc + increase + 3 sc +… (30 loops).
Row 6 – 4 sc + increase + 4 sc + increase +… (36 loops).
Rows 7-10 – 36 sc.
Tie the edge of the shell with a “crawfish step”.
Butterfly bow:
The amigurumi ring is knitted with: 3 chain stitches + 5 double crochets + 3 chain stitches + 1 connecting stitch. This is the front side of the bow. Next you need to do the same thing, using the same amigurumi ring. This will be the wrong side of the bow. You need to tighten the ring, leave a long tip on the thread, wrap it around the middle of the bow, fasten it and sew it to the craft.
Insert the chicken into the shell and sew in a circle, under the “crawfish step”. Sew beads for eyes and use red thread to make a beak. You can sew a loop ribbon into the top of the egg and give it to friends as a keychain. The chicken is ready.
Knitted Easter basket
You can knit an original basket for Easter cake and eggs with your own hands according to the pattern below.
1st row – you need to knit the following combination into the amigurumi ring: two lifting loops + 2 double crochets (Dc) + 2 chain loops + 3 Dc. Repeat the combination 6 times.
Row 2 – 2 chain stitches + 3 chain stitches + 2 chain stitches + 5 chain stitches. Also repeat the combination 6 times.
Row 3 – you need to add 2 double crochets. Air loops remain in the same quantity. That is: 2 air loops + 5Dc + 2 air loops + 7Dc.
Further, according to the principle of the third row, and until the diameter of the product is 32 cm.
Tie with connecting posts along a diameter of 14 cm.
Important! The number of loops must match the loops on the main fabric.
Next you need to raise the columns into the split.
Using beads, you need to fix the base to the edge of the inner basket. All that remains is to tie the handle. Rotary rows can be used. Fix the handle on the basket. This Easter basket can be used with either edibles or decorative eggs.
Easter basket for the little ones (drawing and applique)
This craft and the technique of its execution will delight even our youngest creators. To draw the eggs we will use potatoes cut in half. Using a knife, we cut out patterns on its cut - lines, zigzags and circles. Then we apply paint to the potatoes and make colored prints, which will be very similar in shape to testicles.
Making prints with potatoes
When the paint dries, decorate the egg with glue or glitter. When the glue dries, cut out the eggs.
Apply glitter glue
Glue half of a paper plate onto a piece of paper. Color it brown.
Coloring half a plate
We cut strips of beige paper and place them on the plate lengthwise and crosswise. We should get a pattern that imitates a basket. We glue one strip like a basket handle.
Glue the strips
We put our eggs in a basket. Easter basket applique - ready!
Easter applique basket
Easter compositions made of artificial flowers
The modern DIY market offers so many bright artificial flowers that you want to bring as many of them into your home as possible after a gray winter. They can be used to create Easter crafts.
Easter egg made from artificial flowers
For this craft you will need:
- a large Kinder Surprise egg;
- artificial flowers with small inflorescences;
- glue and scissors.
First you need to prepare the flowers. Cut off the inflorescences from the branches so that there are no extra sticks left. Next, using glue, you need to glue these flowers around the Kinder egg. That's it, the composition is ready. It looks something like this:
Easter branches with flowers made from paper napkins
For this composition you will need:
- white paint and brushes;
- packaging of pink paper napkins;
- branches of any shrub (you can use willow ones);
- white thread and needle;
- glue.
- First you need to prepare the branches. They should be thoroughly dried, cleaned of dirt and remaining leaves, and painted with white gouache. This will make the tree brighter. Next, cut 5-petal flowers, round in shape, from the napkins.
- On average, you can use 6 single ones for one fluffy flower. The more, the fluffier. The blanks need to be sewn in the center with thread; you can additionally string a bead. One by one, starting from the top layer, roll the flowers towards the center and carefully smooth them out to give shape.
- Each branch has up to 15 flowers. Once the flower preparations are completed, you can begin tying them to the tree. To do this, you need to drop a drop of glue into the base of the flower and tie it to the tree with a central thread. Trim the ends of the thread.
Important! You need to take a nylon thread, it will be more convenient for tying knots.
To complete the composition, you can hang decorative eggs.
Easter umbrella-wreath made of artificial flowers
For this composition you will need:
- old umbrella-cane;
- satin ribbon;
- large body sponge;
- artificial flowers.
Release the umbrella from the Velcro fastener and let it open slightly. The next step is to tie a satin ribbon into a beautiful bow in the center of the umbrella. Place a sponge in the upper half-opened part of the umbrella; you may need several of them, depending on the size of the cane. They will serve as the basis. Next, the flowers are placed so that their base fits tightly into the sponge, and the inflorescences themselves look out over the sides of the umbrella. The result is this Easter flower arrangement:
Easter basket made from a plastic bottle (option No. 1)
To make an Easter basket we only need the bottom of a plastic bottle. Let's cut it off.
Bottom of a plastic bottle
We wrap the bottom with thin beautiful paper. We use double-sided adhesive tape for this.
Glue paper to the bottle
Cut the corrugated paper into strips. We put it at the bottom of the basket.
Corrugated paper strips
We tie the basket with a ribbon and a bow. Our Easter basket is ready! You can plant decorative eggs in it - then we will have a very impressive Easter gift!
Easter basket made from a plastic bottle
See how to make another wonderful Easter basket based on a plastic bottle:
How to crochet a basket (description and diagram attached)
Let's move on and make some wonderful souvenirs for Easter from knitting threads, take note for needlewomen. For those who know how and love to knit, this post will also be interesting. From last years I still have such different ideas on my shelves.
I’ll start with perhaps the egg, namely the stand or case, I don’t even know how to put it more correctly. But one thing I can say is that you can crochet such a beauty in literally an hour. And please others too. You only need a little bit of thread.
So, try to create! An approximate diagram is like this.
Or you can make it even more delicate; to do this, take this idea and turn it into reality. If you need a diagram and description of this model, write to me at the bottom of the article, I will send it to you by email.
I can offer another option, it looks a little like a vase.
Honestly, someone might even say that this is such an original box. Although they put mushrooms here, you can bring Easter gifts here.
This is such a wonderful, beautiful cockerel, just wonderful, I once made it out of a magazine description a long time ago.
I also really like this bird family of chickens. You can hide Easter eggs with them.
Or tie potholders on which to place the Easter cakes.
If you are new to knitting, you can use this craft - an egg stand.
Or knit a chick that will decorate your holiday table.
Cool new items this year are, of course, basket bunnies and mother hen.
I also have a detailed description and diagram of this illustration in my piggy bank, if anyone needs it, please contact me.
Either take this blank and create something weird, it’s also a cool version of a bunny, or maybe it’s a rabbit. According to the description, this is a mini crochet basket for Easter eggs.
I also liked this option. A very simple diagram.
And in conclusion, this is a charming miracle, which is also unrealistically beautiful.
It feels like a flower opening.
I was really looking for a description for this model, but unfortunately I couldn’t find it. If anyone has one, please share).
Easter basket made from a plastic bottle (option No. 2)
We make the base for this basket from the bottom of a plastic bottle. Glue or staple the plastic handle.
Cut out the base of the basket and the handle
Cut out a wide strip of corrugated paper and cut it into a fringe on one side.
Cut out a strip and cut it into fringe
We cut out colored butterflies and flowers (you can fold the paper like an accordion and cut it out according to the template).
Cut out colored butterflies and flowers
Glue a corrugated paper tape around the plastic base (wrap it several times). Wrap the handle with paper tape. Next we glue our paper flowers and butterflies onto the basket. Easter basket made from a plastic bottle - ready!
Easter basket made from a plastic bottle
What is “strangled meat” and why you can’t eat it on Easter
We first heard the term “strangled” from Viktor Sergeevich and turned to books. The Bible quotes the words of St. John Chrysostom: “Therefore, I decide not to make it difficult for the pagans who turn to God, but to write to them so that they abstain from what is defiled by idols, from fornication, from strangulation and blood, and so that they do not do to others what they do not want for themselves.” .
It turns out that “strangled” is a biblical term meaning the meat of an animal that has been killed by strangulation. The difference between strangled meat and the meat of a slaughtered animal is the preservation of blood in it. This applies to all wild animals caught in a trap, drowned, suffocated or electrocuted.
Nikolai Kornilievich Pimonenko, “Easter Matins in Little Russia.” Oil on canvas, 1891
It is known that any meat with blood, including strangled meat, is non-kosher in Judaism. After the pagans accepted Christianity, the question arose whether they should keep their old laws (the laws of Moses for the Jews). Around 49, a Council was convened in Jerusalem, at which the rules voiced by John Chrysostom were confirmed. Later, the converted pagans were no longer different from Christians, and the ban on strangulation extended to all believers in Jesus Christ.
If you fully comply with the canons, then you cannot put, for example, blood sausage in the Easter basket for blessing and, accordingly, eat it at the festive table.
Priest Konstantin Maltsev: “The church has a negative attitude towards blood sausage and similar products. On the one hand, blood products are associated with paganism, on the other hand, in animals the soul finds refuge in the blood.”
Vladimir Egorovich Makovsky, “Easter”. Oil on canvas, 1914
Easter basket made of foamiran
When making an Easter basket from foamiran, a hard, flat, round object will be useful. We had a metal ring of a suitable diameter on hand, but it could easily be replaced with a jar lid or an unnecessary CD. We place this item in the center of a large circle cut from foamiran. We make radial cuts along the edges. We bend the foamiran inward and fix the fragments with glue.
Bend and fix the edges of the foamiran
Weave a simple braid from a material of a suitable color.
Braiding a pigtail
Glue it to the main part of the basket, like a handle. If desired, you can decorate the basket with an elegant ribbon or bow.
Easter basket made of foamiran
We make Easter baskets from scrap materials
The most accessible means at hand can become the basis for cute crafts. In our case, you will need thick cardboard, and with it - white paper, a ruler, PVA glue, scissors, a marker, a stapler, white napkins, and ribbon for decoration.
- We cut out blanks from cardboard - a circle and stripes for the rim.
- We fasten the rims with a stapler and fix them to the bottom using PVA.
- We cover the second strip of cardboard and the basket with napkins and decorate with ribbon.
- We cut out a strip of white paper just above the base, cut the fringe with scissors, and fix it around the craft.
- Use a stapler to attach the handle.
- We tie the craft with ribbon and place the eggs inside.
- And may your life be as easy as making this basket!
DIY Easter basket made from pasta
An unusual DIY Easter basket can be made from pasta. As its basis we take pasta in the shape of horns and bows, and a balloon. During the work we use PVA glue and acrylic paints.
Craft materials
Inflate the ball. On one side of it, approximately in the center, draw a small circle.
Inflating the balloon
We fix the “nest” on the stand. In our case, its role is played by a roll of tape. We cover the entire surface of the ball around this circle with horns.
Cover with horns
We wait until the glue dries well and pierce the ball. It turns out to be such a cozy nest.
Pierce the ball
Remove the deflated balloon.
Removing the ball
We paint the basket with acrylic paint.
Painting the basket
We decorate the entrance to the nest with pasta bows and sprinkle them with sparkles. Ready!
Easter pasta basket
Our DIY Easter basket has already been made! The master class is over! You have made a wonderful decoration for the Easter table!
Master class on making a basket with hares
Now I would like to invite you to make an original basket with Easter bunnies from fabric. And I present to your attention the step-by-step manufacturing process.
You will need: fabric of different colors, template, threads, scissors, cardboard, PVA glue, padding polyester, pencil, acrylic paints, brush, ribbons.
Work process:
1. Save and print the template.
2. Along the lobar you need to cut out 4 strips:
- 2 parts for the top of our bunnies (10x73 cm);
- 2 parts for the bottom (7x73 cm);
- 2 parts for the basket handle: 5x55 cm (from “inner” and “outer” fabric).
Allowances for these parts are already included and are 0.5 cm.
3. Take cardboard and cut out a circle with a diameter of 19 cm. This will be the bottom. Place it on the “outer” fabric, trace and cut with an allowance of about 2.5 cm. The edge does not have to be even. And after that, place it on the “inner” fabric, trace and cut out with an allowance of about 1 cm.
4. Glue the padding polyester to the cardboard circle on all sides and place it under a press. And after drying, trim off the excess padding, leaving about 0.3 cm.
5. Now stitch the top parts of the bunnies together with the bottom parts. Allowance 0.5 cm. Smooth the seam.
6. Trace the hares according to the template, retreating 2 mm from each other. There should be 10 animals in total. In this case, draw a “side” for the first and last ones, and only the heads for the rest. Up to the seam line.
7. Sew the heads along the drawn lines. Use curly scissors to trim the excess fabric close to the stitching. In the right places, namely between the ears, between the bunnies and in the places where the ears go into the head, leave notches.
8. Iron everything. Place vertical stitches between the animals: from the horizontal seam to the bottom edge. Use a simple pencil to outline your future nose. Use acrylic paints to paint eyes and nose. Tie knots on the ears with regular thread.
9. Cheeks can be painted with regular eye shadow or blush. Fill the figures tightly with padding polyester. Place a stitch along the bottom edge and overcast the edge.
10. Decorate the top seam with ribbon, braid or lace.
11. Using a hidden seam, connect our bunnies into a circle.
12. Now let's finish the bottom. Take a circle of large diameter and place basting stitches close to the edge, and at the circle of “inner” fabric, fold the seam allowance and secure it.
13. Place a cardboard-synthetic padding blank on the circle of “outer” fabric and pull the thread. Carefully tuck the padding polyester inside, trying to stay free.
14. Place the inner circle and sew it with blind stitches.
15. Sew the bunnies to the bottom using hidden stitches.
16. This is what you should get.
17. Now let's sew the handles. Take the strips cut out for the handles. Fold them in half lengthwise and stitch at a distance of 0.5 cm from the edge. At the same time, also sew one short section on both strips.
18. Turn them inside out and fill them with filling, and then sew them together, braiding them. Tuck the ends inside the edges and sew them up. Attach the finished handle to the basket.
19. Tie bows from satin ribbon on the ears and handle.
Well, how do you like this option?? I think it's incredibly beautiful!! And by the way, if you read the article to the end, you will see more great ideas for Easter baskets made of fabric and felt. So stay until the finale))
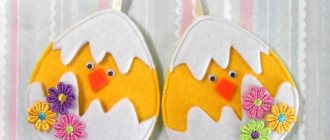
Easter basket made of felt “Chicken”
One of the cutest baskets is the “Hen and Chicken” made from felt. For this craft, cut out the blanks based on the photo.
Blanks for crafts
Between the white parts we sew a comb, beak and beard. Sew on the eye and wing. Leave the upper part of the chicken (back) unsewn.
Sew on the details of the craft
We sew another piece of felt into the lower part, which will allow the chicken to stand.
Lower part of the chicken
To make a chicken we need two felt ovals. We sew the nose onto one of the ovals in advance. Do not sew both ovals at once, leave a small hole through which you will stuff the craft, and also do not forget to “grab” the tuft when sewing. We put the testicles into the hole on the back.
Laying the eggs
You can place a yellow felt chicken on top of the testicles.
Easter basket made of felt “Chicken”
Sacrament of Consecration
Housewives begin the preparatory process long before Easter.
They bake rich Easter cakes, paint handmade Easter eggs, decorate paints and bake sausages.
Every family is preparing for the brightest holiday.
After all, you don’t have to be a deeply religious person to feel the meaning of a Christian holiday.
Easter is, first of all, the triumph of the main human values: love and kindness, justice and forgiveness, the victory of life over death.
On Easter night from Saturday to Sunday at the end of Lent, it is not customary to sleep, because the holiday begins on Saturday evening. Parishioners gather in the church in the evening to listen to the evening service and celebrate a happy day with the news of the resurrection of Christ.
Those people who stay at home on Easter night place lighted candles on the windowsills, announcing to everyone that happy news is approaching for Christians.
The service on this night is one of the longest, as the evening service turns into the morning service.
At the same time, the priests put on festive attire at 12 am to notify parishioners of the resurrection of Christ.
During the solemn service, Christ is glorified and a blessing is given for the consumption of fast food.
For the laity, fasting ends with receiving a blessing.
After the service, the priests bless the Easter baskets that parishioners have prepared for the holiday with holy water.
The illumination takes quite a long time. Therefore, those laity who did not defend the solemn service also approach the church with baskets.
After consecration, it is allowed to eat any modest foods, but it was necessary to begin the festive meal, that is, break the fast, with those that were in the Easter basket.
Easter basket made from cardboard packaging “Cockerel”
The most adorable and simple Easter craft is the “Cockerel” Easter basket for one egg. Cut out a piece from a cardboard cell and paint it yellow.
Cut out and paint part of the cardboard tray
Glue the feathers to the back and sides.
Glue the feathers
Glue the legs, eyes and beak of the cockerel.
Easter basket made from cardboard packaging “Cockerel”
Easter composition with chickens
You can see the next Easter composition with your own hands step by step.
To create this chicken craft you will need the following items:
- opaque plastic bottles in white, yellow, green colors;
- glue;
- scissors.
The first step is to cut the empty bottles into thin strips around the circumference.
Next, form the head, body and tail of the Easter chicken from white stripes using the quilling technique.
All parts are fixed together with hot glue. Next, you need to make the wings.
Advice! There is no need to leave the gun on for a long time. You can get burned by the glue. It is necessary to prepare all the items in advance, and then start gluing.
Next, you need to secure all parts of the chicken.
Using the same method, you can form chickens from yellow stripes.
From colored paper or thick fabric you need to cut out wings and beaks for the chickens, and a comb for the chicken, and also fix it with glue.
Cut the bottom and two strips from a green bottle. This will be the basis of the composition.
Next, cut the grass from green strips and glue all parts of the base.
All that remains is to glue the entire composition and paint the chicken’s beak with nail polish.
A three-dimensional composition with your own hands for Easter is ready.
Easter basket with foam eggs
The first decoration for this Easter basket is flowers. We roll it out of corrugated paper, first forming a yellow core, then white petals, then green leaves. We attach all three layers one after another to the wire.
Flowers on a wire
Easter basket with foam eggs 2 Easter eggs made of foam and beads
Glue paper leaves to the eggs.
Glue paper leaves
Basket
Flowers and eggs
Easter basket with foam eggs
A detailed master class in the article - Easter basket.
DIY composition for Easter from napkins
What could be simpler than a composition of napkins made 5 minutes before guests arrive. A few quick ideas are below.
The easiest craft from paper napkins
In the holiday rush, there is often not enough time. Multi-colored paper napkins and pieces of satin ribbons will come to the rescue in decorating Easter eggs, as shown in the photo below:
Napkin holder “Easter Bunny”
This quick craft can be made from either a paper napkin or a cotton one. You will need: a napkin, an egg and a ribbon for tying. Fold the square napkin into a triangle and roll it with a roller. Wrap the egg and straighten the ears. You can add cute faces on the egg with a simple marker.
Easter bunny made from terry cloth
For this DIY composition for Easter you will need: a terry cloth, an elastic band for money (a ribbon will also work, but with an elastic band it is more convenient), glue and scissors, colored cardboard for the eyes, cotton balls for the nose. You will get a cute bunny, like in the photo below.
You need to take a square napkin and twist it from two corners to the center into a tube. Tie with an elastic band in the middle so that the ends form ears.
All that remains is to glue the eyes (you can use beads instead of paper) and the nose. The rabbit is ready. You can surprise your guests by placing these napkins on plates.
Easter baskets - ideas from the Internet
These two wonderful Easter crafts were made in kindergarten especially for the Easter exhibition. One can only be amazed at the imagination and hard work of parents and children. The first basket is made from a box with a paper pen. It is located on a stand made of a box, which was previously covered with green paper. The eggs are wrapped in foil and decorated with a mesh of thread. The nest is made of green sisal, and the eggs and chicks were purchased from an Easter goods stall.
Easter basket on a stand
Many people will like this basket. It is made of felt, which was cut into teeth and pasted over a cardboard base. Plastic eggs are wrapped with ribbon and decorated with beads.
Easter basket made of felt with plastic eggs wrapped in ribbon
A small Easter basket can be made from a yogurt container. We wrap the top with burlap and ribbon. Inside the basket we place a plastic egg and ribbon flowers. It turns out very touching and sweet.
Easter basket made from yogurt packaging
Ideas for making a crochet basket for Easter
When I was preparing this collection, of course I couldn’t leave out the knitted toys. Indeed, in skillful hands, whole masterpieces can be made from yarn, knitting needles or crochet.
So, you can knit a case for an egg and the egg itself)) Or an excellent chicken.
But what a motley hen!!
Or an idea with interesting Easter bunnies. It looks very original.
How do you like these bunnies?? Well, just lovely!!
Or these delicate baskets with Easter characters.
But here is a similar job to rabbits made of fabric, only here you need to knit them.
And I also selected diagrams for you, it was very difficult to find them of good quality, but I tried, I hope you like it and find it useful.
This option is suitable for storing sweets or can be used as a box.
The yarn makes very cool works, and most importantly original ones; no one will definitely have such crafts.
Paper basket assembly diagram
Some readers might find this diagram for assembling an Easter basket made of paper useful:
Easter basket assembly diagram
Cutting templates will help you create simple Easter baskets. Print, cut out, color and glue the basket.
Easter basket cutting template 1 Easter basket cutting template 2
Templates and diagrams of paper boxes for eggs
Let's start with the most primitive and common form. Take this sample, print it out and color it however you like. Bend where the dotted lines are and then glue them together.
The next option will be more interesting, with a little plot.
Or take this one, you won’t have to paint it at all.
Then you can still build such a wonderful composition. This is a stand in the shape of a chicken for testicles, if you need a sample, write to me.
You can even make it in the form of an applique.
Beautiful names for Easter compositions
One of the most ancient customs was to give Easter eggs to each other. This symbolized the resurrection of Jesus Christ. Nowadays, various decorative compositions can serve as gifts. Here is a sample list of beautiful names for home creative ideas:
- A triumph of goodness.
- Beginning of life.
- Back to life.
- Goodness and light.
- Let there be happiness.
- Let there be life.
- The heart of life.
- Love in the heart.
- Do good.
- Happiness is in everything.
- Easter fantasy.
- Fragrant Easter cake.
- Easter cake of life.
- Pysanka (dye) of resurrection.
- Grace.
- I smile
- Faith in goodness.
You can also give compositions as amulets and come up with the following names: keeper of fire, keeper of peace, amulet of goodness and happiness.
Perhaps this list will serve as inspiration for creating personal, original and beautiful names.