Original collage ideas for a birthday gift
A collage of photographs presented to the birthday person on his birthday helps create a festive atmosphere. Such gifts are always discussed. Guests enjoy looking at photos where the hero of the occasion is small or captured in a funny situation.
From the point of view of the value of the gift, the collage indicates that the gift was thought out, time and effort were spent on it.
Paper photo collage
If the donor has a desire to approach the process creatively, then humorous masterpieces may appear. But even a simple thematic selection of photographs arranged on a white sheet of Whatman paper can be an excellent gift.
A collage of birthday photos will be a pleasant surprise for both a close relative and a loved one
A paper photo collage is the simplest collage option.
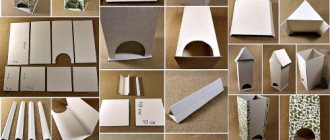
Matchbox collage
An ordinary thing, like an empty matchbox, becomes a good source material in the right hands.
This version of photo collage has many advantages:
- Economical. You can make it from scrap materials. For decoration, remnants of multi-colored paper, postcards, leftover jewelry, ribbons and braids are suitable.
- It's easy to choose the frame size for any photo. In home photo albums, all photos are usually the same size. But the collage looks better when there are a lot of different-sized photos. By experimenting with photos and boxes, you can find the perfect size.
Making a collage from matchboxes is not difficult, but it will require perseverance and accuracy. One evening will be enough.
To work you will need:
- Empty matchboxes – 72 pcs.
- Photos.
- Thick cardboard.
- Glue, scissors, paint, brush.
- Colored or wrapping paper, old postcards.
- Decor.
Stages of making a collage:
- You should start work by preparing the boxes. You will need 12 pieces with lids and 60 without. 12 whole boxes will serve as the top and bottom frames.
- Next, you need to lay out the boxes in the form of a rectangle, where the long side will be formed from 12 boxes laid horizontally. The width of the rectangle fits 6 boxes. The first and last row are made from solid boxes.
- The next step is to select photographs and determine where they will be located. If necessary, adjust their dimensions to the dimensions of the boxes. This is where the most difficult part of the work ends.
- It is necessary to glue the boxes onto a sheet of cardboard. To do this, you should draw the boundaries of the rectangle on the cardboard so that the template does not warp when sticking it on.
- You need to take each box separately and glue it. On some, the sides need to be cut off to accommodate a larger photo.
- After all the boxes are glued, you should align the borders of the cardboard to the borders of the resulting structure.
- Next, paint the inner and outer sides of the boxes , and also completely cover the first and last row of entire boxes with paint.
- When the paint has dried, you need to paste the photographs into the places selected for them, and trim them if necessary.
- Boxes not filled with photographs should be decorated. You can paste colored paper as a background and then decorate the resulting cells with any small things available in the house: unnecessary jewelry, buttons, flowers, herbarium.
A collage of birthday photos can be signed with wishes for the birthday person. To do this you need to use the first and last row of boxes.
DIY 3D postcard effect in a slideshow
Any user, regardless of experience, can use the program for creating slide shows. Select beautiful photos of your mother in advance and put them in one folder for greater convenience. Then launch PhotoSHOW PRO and get started!
Step #1. Create a blank slide
Hover over the row of slides and right-click. Find the "Insert Blank Slide"
and click on it.
The program will automatically set the slide display duration to 5 seconds, but you can adjust the time in the editor. Launch it using the "Edit Slide"
in the preview block.
In the window that appears, set the slide duration to your liking (in our video, the first slide lasts 7 seconds). Next, customize the background design - choose a color, gradient or picture that will be in the background. Give preference to neutral shades so that the backing does not draw attention away from the card and “argue” with it in terms of color scheme.
If you don’t have a suitable background image in mind, refer to the PhotoSHOW PRO image collection. The editor offers dozens of pictures to choose from, both universal and thematic. If you wish, you can select photo frames on the Internet that are suitable for a slide show for your mother’s anniversary, and use them to decorate the title and other slides in the project in an original way.
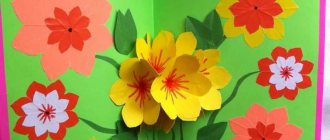
Step #2. Modeling a postcard
First of all, upload an image that will be located on the front side of the postcard. It could just be a beautiful picture with flowers or a portrait of your mother. To do this, click “Add Layer” > “Photo”
and find the folder with the desired file on your computer. Place it on the slide.
Now let's create the back of the card. Use the Add Layer feature again and choose Shapes > Rectangle
. Customize the design of the rectangle - change the color, if necessary, turn off or, conversely, increase the rounding of the corners.
The size and position of the figure must match the front of the card. To place the rectangle under the picture, right-click on it and select the “Move Below”
, you can also do this with a simple keyboard shortcut –
Ctrl+PgDn
. Press them on your keyboard and you're done!
Add a layer with a short congratulation, choose a beautiful font for the text. Position the phrase so that it fits on the rectangle.
Step #3. Setting up animation
To create the effect of a page opening, refer to the Animation
. First select the layer with the front part of the card - all settings will apply only to it. Add a new keyframe to the timeline and 3D rotate the image 85-90 degrees. Next, zoom in on the cover and move it so that its edge matches the edge of the back of the card, forming a fold.
If you wish, you can similarly adjust the postcard's 180-degree rotation by simply adding new keyframes to the timeline and adjusting the position of the image at these moments.
Step #4. Create the effect of a camera zooming in
In-frame animation will help make the effect of the opening page even more impressive. Find the "Camera Control"
and click on the button to switch to another mode: the animation mode.
The editor will provide the ability to adjust the zoom and rotation of the slide's viewpoint. Animation creation follows the same principle - you place key frames on the timeline and change camera parameters. The selected settings are applied immediately to all layers on the slide.
Add a second keyframe when the cover is open 90 degrees and make no changes. This will be the starting point for the camera animation.
At a distance of 1 second, place a third key frame and zoom the camera 80-90 percent so that the lettering on the postcard takes up the entire screen.
The title slide is ready! Using these techniques, you can continue working on creating a unique and heartfelt slideshow of photos for your mom's anniversary. Drag the photos that will make up the video to the slide bar. To combine multiple shots into one frame, create a blank slide. In the editor, add photo layers and set up animation.
The video will look more interesting and brighter if you supplement the composition with clipart. Images with flowers will be a win-win option. You can use pictures from the program catalog or download from the Internet. As in the video at the beginning of the article, you can place one line from a poem or congratulations in prose on each slide.
Add a text layer and choose a location for it. You can animate all decorations and inscriptions using keyframes. For example, configure their smooth appearance and movement on the slide.
Another way to use the camera control mode is to set it to zoom in on pictures that are on the same slide. This will not only allow you to focus attention on each frame, but will also create the illusion of depth and volume. Post photos and go to camera controls.
Add a keyframe and move the viewpoint as close as possible to one of the photos. After 2-3 seconds, add a new keyframe and make no changes - during this period of time the camera will be motionless. After 1-2 seconds, place another key frame and use the arrows to move the camera to another photo without changing the scale.
After that, all you have to do is choose the music according to your mood - and the slideshow of congratulations to your mother on her anniversary is ready to be saved! A video created with your own hands in PhotoSHOW PRO will definitely become a wonderful gift and will fully convey your love and gratitude.
Photo collage in the form of puzzles
It’s easy to make a collage of birthday photos in the form of puzzles. This is an original version of a photo collage, since it can actually be disassembled and assembled. And if you make the parts of the same shape and size, then the photographs can be swapped at your discretion.
To make a collage puzzle you will need:
- Puzzle piece blank form (10 cm * 10 cm).
- 4 photos.
- White and red paper.
- Thick cardboard.
- Glue, scissors, utility knife, tape, rope.
Stages of work:
- Using a blank puzzle piece, transfer its outline onto white and red paper and then cut it out. You need to make 2 puzzles of each color.
- Next, you need to assemble 4 puzzle pieces together and glue them onto a sheet of cardboard.
- The cardboard should be cut along the outer contour of the parts.
- In the center of each puzzle you need to glue a photo.
- If the collage is supposed to hang on the wall, then you need to glue a rope to the back of the cardboard using tape. The work is ready.
- If the photo collage must be disassembled and assembled, then the cardboard should be cut along the contour of the puzzle pieces.
- If you want to place more photos, you can use the back side of the cardboard. To do this, cut out 2 more pieces from white and red paper and glue them to the back of the cardboard.
The final step is to paste 4 more photographs.
How many photos will you need?
The number of photos for a collage depends on the size of the work, the available photos and the chosen design. Even a few photographs in an original design can look interesting. The event for which the collage is being prepared also matters.
For example, if it is a birthday, then often the photographs indicate different periods of life. For a child, this is growing up over the years. For an adult, important events such as school, college, wedding, birth of children and others. Therefore, the number of photographs should be such as to show the “life path” of a person.
Congratulations on the 50th anniversary - poetry, prose, SMS
25 and 25 You are so beautiful again, On your anniversary we wish you to live with your soul, beyond your years! So that they smile more often, stay awake and laugh, so that they certainly wish and fulfill their wishes! After all, fifty dollars is the middle - Only one year in the passport, Only 35 on the face - Time to live, love, dream!
I wish you to enjoy a happy life in these fifty years, look forward, not back, and smile radiantly! Let life flow without fuss, Let love warm your heart, Let all your dreams come true And everything your soul desires!
Congratulations on your golden jubilee - happy 50th anniversary! I wish that your health does not fail, that you have enough energy and optimism for many, many more years, that there is spring in your soul, that joy, happiness and love are always in your home. Let the grandchildren make you happy, the children help, and the friends don’t forget. Live easily and enjoy every minute to the fullest!
More congratulations in prose →
The anniversary has crept up. Unnoticed, it happens. In the series of days that pass, all good things flash. Congratulations from the bottom of our hearts on this milestone anniversary. And live another hundred years joyfully and brightly. Don’t lose your thirst for life, Always be on the move. 50 is just the beginning of new achievements.
Fifty is a cool number, a real anniversary! Only you have become not older, but richer and wiser. With experience comes courage and self-confidence. You are capable of changing everything in the world in your destiny! I wish you health and dreams come true, travel the world as you wish, or just live sweetly!
Who said fifty is middle age? At this age there are no barriers at all! There is still youth in the soul, Beating like a bird, There is already experience in life, There is something to strive for! At this age, you easily clearly realize all your desires and know the solution! The head is full of formulas Life's task, Sometimes an hour is enough to catch luck! Life can only begin at fifty, It’s easy to get up in the morning, It’s easy to go for a run. The body listens to you, like a clockwork one! All your strength is still in your body - you can’t hide it. So we wish you this wonderful age, up to eighty years old, or continue until you are a hundred. The passport may say fifty, but it looks like only thirty! We wish not to count the years, Let youth last!
Fifty is luck, Fifty is an honor, Fifty is a task, Maybe the passport is lying after all? After all, in your soul you are eighteen, On your face you are only twenty-five, You can enjoy life, You don’t know any problems! Congratulations on your anniversary, And I wish you to be yourself, Go out, walk, fall in love, Live in freedom, live your dream!
Today is an important anniversary - you are 50 today! That is why congratulations are heard from everywhere. All relatives congratulate, both colleagues and friends, After all, it is impossible to ignore the round date. With the arrival of this date, may your bank account be rounded off, may you have good health, and may life send you only the best. At this wonderful age there is a lot of wisdom and intelligence. I wish you long life and warmth.
Fifty seems like a lot, but fifty is not much at all. Only halfway, only halfway, Winding routes, schemes. Your anniversary is a good reason to set you as an example to everyone. That both in the heat and in the wild cold - readiness of the “pioneer” type. You always come to the rescue and always smile. And you get in the mood, In the company - a soul, a star. We wish you health, it is not a hindrance to anyone. To do everything with love, Of course, more success. So that the tail is higher, like a pistol, and the chest, of course, like a wheel. So that it’s spring and summer in your soul. May your home be a full cup. In fact, it’s just the beginning, And there’s still the whole world ahead. There are a lot of things to do in life, Take 50! Live.
Congratulations on your anniversary And I want to wish you to appreciate everything you have, And for fifty years. Achievements, mistakes, They contain first love, Joy, pride and children, Partings, meeting again. I wish you happiness in your heart, bold youth in your eyes, warmth, love, care and finances, as in your dreams. May your health be strong for quests and victories, Because this age is only the blossoming of maturity!
At fifty, I wish you success, happiness, inspiration, health, a boost of vigor, and only a colorful mood! Let all your dreams come true, I wish you love, peace, harmony, May you live peacefully, without fuss, Luxuriously, brightly and richly!
Are captions needed?
Inscriptions on the collage allow you to make the gift more personal.
People with humor can come up with funny comments for photos. On the collage you can write your wishes on the occasion of a festive event. If the collage is made for a colleague or on the occasion of graduation from school or college, then the inscriptions after many years will serve as a reminder of past events and people whom we have not seen for a long time.
Calls with pleasant wishes and congratulations on the 50th anniversary to friends, family or loved ones
Congratulate your friends, family or loved ones on their 50th anniversary by ordering them a cool call:
Audio greetings, songs and jokes Listen, select, play online or order a call
Show congratulations
Congratulate your friends, acquaintances or relatives on their 50th anniversary by ordering a pleasant audio congratulation - a phone call :) And in order for the wish to be called to the desired phone number:
- Click on the “Show congratulations” button
- Listen to audio congratulations, songs and jokes
- Choose the one you liked the most
- Specify which number to call and play the congratulations
- The recipient of the congratulation is delighted

How to make a collage using a template: materials and tools
When creating a collage, several issues need to be addressed:
- Subject of work.
- Selecting a base or template.
The value of a collage is that it can be made from scrap materials. Therefore, it is possible to use different bases for the template. For example, wooden surfaces, or plastic. Large or small photo frames will also work. The template can be made from corrugated cardboard. It is suitable if you need to cut out a base of complex shape.
Even an ordinary wall can become a base.
If you glue photos directly to the wall, you need to use double-sided tape. Or you can come up with original ways to attach photos. To make photo collages you will need the following tools: glue, regular and double-sided tape, scissors, a stationery knife (for cutting thick cardboard), and a ruler.
Any things that can be used to make decoration are suitable as materials for a collage. Usually the materials are limited only by the imagination of the performer. However, the main ones include: paper (white and colored), cardboard, paints, photos, various pictures, postcards, beads, buttons, artificial flowers, leftover ribbons and other decor.
Our advantages
- We make posters for you using a professional program and print on high-quality equipment.
- Affordable price - from 500 - 800 rubles for an electronic layout, from 1000 rubles for a large format poster (50 by 70.7 cm), 2248 rubles for a framed photo collage (A3 format - 30 by 40 cm).
- Your order will be securely packaged. Delivery throughout Russia to BoxBerry pick-up point or PickPoint. The address closest to your home is selected.
- We offer a large selection of photo collages and holiday posters.
- Photos can be sent by email or directly from your phone to Viber or WhatsApp.
- You can be confident in the quality of our work; the layout will be previously agreed with you before printing. We provide a check.
AND YOU CAN ORDER:
+7-950-61-79-381 (Maria, call, WhatsApp or Viber); +7-986-76-100-76, +7-904-78-33-55-8 (Lyudmila, call, WhatsApp or Viber);
Master class on creating a paper collage
Making a birthday photo collage is easier than it might seem. Even a person far from creative can cope with a simple collage, where the base is ordinary cardboard or whatman paper, and the photographs are selected in the same size.
To work you will need:
- A sheet of whatman paper, you can use the remains of a roll of wallpaper, both on the clean side and on the side with the pattern.
- Photos are the same size. The quantity can be any, as long as it is a multiple of 4.
- Glue with a brush.
- Double sided tape.
Stages of work:
- It is necessary to place the photographs in even rows. By rearranging them, you should choose the most harmonious option for placing the photo on paper.
- The accuracy of the work depends on how accurately the sizes of the photographs and whatman paper are adjusted and whether the rows are even (for this you can barely noticeably draw guide lines on the paper).
- After all the preparations are made, you need to stick the photographs on double-sided tape or glue.
- The collage will hang on the wall. To prevent dust, sunlight and time from damaging your photographs, it is recommended to use the decoupage technique . Namely, paint the entire surface of the collage with one or two layers of PVA glue or special glue for decoupage. This will add shine to the surface and protect the collage from external adverse influences.
You can attach the collage to the wall with double-sided tape, or thread a rope into the upper corners of the collage and hang it on a nail.
Collage in a wooden frame
As a wooden frame for a collage, you can use any frame available in the house, for example, a photo, painting or mirror, or you can make it yourself. The master class uses a ready-made frame for collages.
Necessary materials:
- Wooden frame.
- Scrapbooking paper, or you can use colored paper, wrapping paper, magazine clippings, and more.
- Rhinestones, flowers, buttons, lace, sparkles and other details that your own imagination suggests.
- Photos.
Video demonstrating the process of creating a collage from photos with frames:
Stages of making a collage
- First of all, you need to decide on the placement of photos. Placement may depend on time stages, on the size of the photograph, on the presence or absence of sufficient materials for decoration.
- If necessary, photographs can be signed.
- The spaces not occupied by photo cards should be filled with colored or other paper. The best result can only be achieved experimentally, trying different placement options.
- Further, also experimenting, you need to try different decor options.
- After the optimal collage option has been found, you need to photograph the resulting project and remove the decor from the photo.
- At the final stage, photographs and colored paper should be glued into a wooden frame.
Lastly, you need to attach the decor to the collage with glue, focusing on the saved photo.
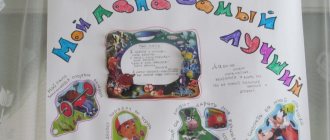
Ideas for designing and decorating a collage for mom
A collage for a gift for mom on Mother's Day is usually made on a family theme. These can be photographs of mother and children separately, or general family photos , photos from family vacations and holidays. These photos should evoke warm feelings. This idea can be used when there are few photos.
The collage benefits from the originality and simplicity of the idea. The photographs in the collage are selected in such a way as to show the mother her achievements in family life. Photos selected in the same style or from the same photo shoot look especially organic.
Collage as a gift for your wife or husband
The simplest idea for a collage for a husband or wife, including for the wedding day, would be to use wedding photographs. These photographs are usually taken in the same style, so you can create a beautiful collage without additional decorations. Other romantic photos will also work.
They can be laid out in the shape of a heart directly on the wall in the room using double-sided tape.
Before attaching photographs, you should make markings on the wall. The lack of free space on the wall is not a reason to abandon the collage idea. The original family tree will allow you to change the foliage from the photo, in accordance with the events taking place in the family and holidays.
Show off your creativity
A photo collage for mom's birthday can be transformed in every possible way.
- 1Change the background. You can make it anything: from a simple monochromatic fill to a colorful picture downloaded from the Internet.
- 2Change design elements. Curls, flowers, abstract figures, backgrounds for text - all this can be selected in accordance with the concept of the project. For example, make a photo collage for mom in a certain color scheme or adhering to a specifically chosen style. Romantic, vintage, old film, etc.
- 3 Change frames. Decorate the borders of your photos using the built-in collections of frames and masks. A program for inserting photos into frames will give you the opportunity not only to use a ready-made frame, but also to create your own unique frame or mask.
- 4 Change the font. At your disposal are 50+ spectacular styles, also subject to flexible transformation.
- 5 Change the clipart. Choose thematic attributes and make your collage even better.
- 6Save in the most popular formats: JPEG, PDF, PNG
Collage for a friend's birthday
On a collage for a friend, you can place joint photos as a souvenir, or photos related to some common events. There are usually secrets between friends, so photographs can be accompanied by inscriptions that will be understandable only to the author and the person for whom the gift is being made.
You should avoid photographs where the birthday person looks bad, or the event may cause a negative reaction in him. A collage of photo cards for a birthday is a simple and original gift that will become the object of attention of all guests at the holiday and will remain in the family archive of the birthday person for life.
Author: Vorobyova Nadezhda
Article design: E. Chaikina
How to make a collage
What's the best way to design a collage? Unfortunately, it is difficult to give a definite answer to this question, so everyone will have to make their own decision. Often, for congratulations on an anniversary, a collage is chosen, where photos are placed illustrating the important life stages of the hero of the day from birth to the present day.
DIY postcard - a touching gift
Also popular are collages in which the main role is given to those who congratulate the hero of the day. When choosing this option, you need to think through the composition in detail and collect material in advance. As a rule, the source materials are photographs of friends and relatives holding sheets of congratulations or individual phrases in their hands. Afterwards, the photos are arranged in the desired sequence on a sheet in the editor.
Let each of your loved ones convey warm words
In both cases, do not forget about decorations - with them the collage will become more interesting and brighter. You can also make room on the sheet for a touching congratulation in poetic form. Then the collage will become a full-fledged postcard.