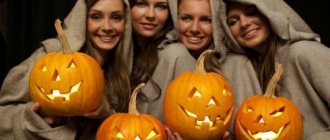
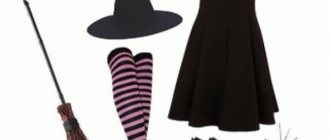
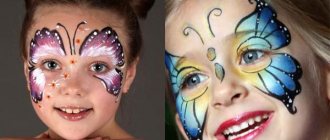
What Halloween masquerade is complete without a charming witch? And what is a sorceress without a symbolic outfit: a pointed hat, a broom under her arm and a strict, tight-fitting floor-length dress? Witches have long been regulars at Halloween parties. The image of an evil sorceress is truly multifaceted: she can be a gray-haired old woman with a hooked nose, a charming young sorceress with a perky look, and even a very little mischievous girl. There are dangerous, dark, mysterious, fairy-tale, charming and cute witches. You can adjust the image with the help of makeup and details of the outfit, but one thing remains unchanged - the signature hat with a sharp tip that seems to rip open the sky above the head of the dark sorceress. The image attribute can be purchased at a ready-made goods store, but it is much more fun to make a headdress with your own hands. For elegant witches - fatal beauties who have turned to the dark side, they choose luxurious outfits made of black velvet or silk, corsets, stylish jewelry and neat Halloween hats, which are crowned with graceful hairstyles. For the image of an old witch, awkwardly large headdresses on disheveled hair, dresses slightly worn down by time, and “horrible” makeup (teeth, long noses, warts) are suitable. Little sorceresses are given outfits for “dolls” that are sewn by mothers at home: neat short dresses are combined with funny striped sleeves and stockings. Let's consider step by step the processes of creating three types of witch hats: from felt, from fabric and from paper.
The witch image and the history of the appearance of pointed hats
The evolution of the image of the sorceress is closely connected with the history of religious fundamentalism. If initially witches were not treated so categorically, then in the era of “witch hunts”, any woman could become a potential “friend of the evil one.” It only took a couple of slander from “well-wishers” and several hours of torture for the unfortunate woman to confess to all her sins. It was believed that witches met with the devil himself, killed children, played dirty tricks on people in every possible way, and periodically flocked to sabbaths to brag about their atrocities and celebrate their impunity. Pointed hats are a mandatory attribute of witches only in Western culture. The domestic Baba Yaga preferred scarves or headbands. Bulgakov's Margarita even flaunted her nudity. Pointed hats have been popular across cultures. Moreover, they did not carry any negative connotations. Elongated headdresses first appeared in Ancient Egypt. They were called atevs and, along with klafts (striped scarves), were considered part of the ritual appearance of the pharaoh. In Europe, pointed hats were universally worn by men. Women preferred ennen - heavy “caps” with a frame made of whalebone, wrapped in silk and decorated with a veil. There were no brims in such “hats”. The hats were already heavy and caused the wearer a lot of trouble while walking.
In the Middle Ages, witches appeared to people naked and with their hair down. Moreover, witches usually had lush red hair. A little later, the witches became more modest and began to disguise themselves more carefully. Their clothes did not differ from the appearance of an ordinary city woman: a dress and a cap. Only in the 17th century, in English books and engravings, witches acquired pointed hats. Many researchers believe that it was with the help of the absurdly sharp tip that it was easy to hint at the connection of the owner of the headdress with evil forces. The image, as they say, “hit the spot.” It began to be used everywhere (in fairy tales and songs) and now, after a couple of centuries, not a single self-respecting witch showed up to the Sabbath without this element of clothing. The image of a sorceress in a pointed hat was finally established after the publication of Frank Baum’s book “The Wonderful Wizard of Oz.” The Wicked Witch of the West had an unhealthy greenish complexion, was dressed in black robes and a hat of the same color, the tip of which rivaled the spire of the tallest tower in terms of sharpness. This look has become classic. It is complemented by a stylish broom, perhaps a skull in hand and a faithful companion - a wolf, raven, bat or black dog. It would seem that the sorceress should look caricatured and ridiculous in this outfit, but the gloomy image of a woman who is on first name terms with otherworldly powers adds color to her appearance. Pointed hats are heavily used during Halloween. They can be called a classic attribute of a witch costume. Hats are often equipped with heavy buckles, like those on belts. This is a Dutch tradition that gradually merged into the English image of the witch and into the symbolism of the Quakers. The combination really turned out to be amazing, because some are representatives of a religious organization, while others are the evil spirits with which they are fighting.
Pointed, brimless hats were part of the image of astrologers (astronomers). It was believed that the space under the hood symbolizes the “temple.” The astrologer could be anywhere, but at the same time he was constantly “in the cathedral,” that is, he maintained contact with the heavens.
LiveInternetLiveInternet
-Always at hand
—Links
—Categories
- Do-it-yourself (knitting, embroidery, crafts (2170)
- Knitting magazines (163)
- Dresses, skirts, sundresses (149)
- Jewelry, decorations. (148)
- Blouses, tops, T-shirts (105)
- Home decor (95)
- Mabel (89)
- Jackets, cardigans, blazers, ponchos (87)
- For your favorite feet (84)
- Pullovers, jumpers, sweaters (78)
- Knitted sets (74)
- Scarves, shrugs, stoles (73)
- Patterns, schemes (70)
- Knitting lessons (57)
- Children's (46)
- Knitted toys (40)
- Leg warmers, socks, stockings (38)
- Capes, stoles, shawls, boleros (34)
- Hats (32)
- Tunics (31)
- Works by Liru needlewomen (when your hands are OWN!) (29)
- Embroidery (26)
- Men's (26)
- Swimwear (25)
- Rare techniques (19)
- Vests (15)
- Creative (11)
- Coats, jackets (8)
- Felted pears (7)
- Knitting terminology, dictionaries, explanations of patterns (7)
- Mittens, gloves, mitts (4)
- For animals) (4)
- Machine knitting (4)
- Pants, shorts, capris, breeches (2)
- Goodies (1257)
- Desserts (136)
- Snacks (111)
- Salads (90)
- Baking (87)
- Meat (70)
- Blanks (67)
- Cakes, pastries, cookies (61)
- Vegetable dishes (47)
- About products (42)
- Drinks (42)
- Sauces, dressings (27)
- Seafood and fish (24)
- Casseroles (23)
- Table setting (19)
- Bread (18)
- Pasta (pasta) (15)
- National cuisine (14)
- Soups (14)
- Homemade (anti-shop) (14)
- Grilled (11)
- Main courses made from dough (10)
- Cookery books (magazines) (7)
- Bread machine recipes (7)
- From the chef (6)
- Videos - recipes (4)
- Lenten dishes (2)
- Flea market (942)
- Animation (211)
- Comments with codes (147)
- Flash (98)
- Watch (33)
- Frames (20)
- Smilies - comments (19)
- Dividers (16)
- Backgrounds (11)
- Author's animation (Nikash) (7)
- Sewing (581)
- Alterations (127)
- Dresses, skirts, sundresses (90)
- Decor (84)
- Toys (33)
- Curtains (27)
- Children's (23)
- Tops, T-shirts, blouses (12)
- Magazines (10)
- Underwear (7)
- Pants, shorts, capris, breeches (6)
- Hats (4)
- Men's (4)
- Hand made. (481)
- hand made for the holidays (97)
- Decor (82)
- Panels, souvenirs, crafts (78)
- Flowers (paper, leather, fabric) (29)
- Packaging (27)
- Decoupage (22)
- Newspaper weaving (21)
- Postcards (16)
- Magazines on crafts (weaving, souvenirs) (11)
- Shabby - chic (9)
- Soap making (9)
- Polymer clay, salt dough and all that) (6)
- Modular origami (6)
- Monigami (4)
- Candy bouquets (1)
- Intarsia (cutting from wood of different species) (1)
- Bags, handbags, bags) (271)
- AZBUKA Li.ru (228)
- Diets (215)
- Photoshop and everything connected with it (204)
- Lessons. (54)
- Brushes (34)
- Animation (lessons) (17)
- Photoshop video tutorials (10)
- My lessons (3)
- My author's translation of lessons (2)
- Beauty! (174)
- Queen's body! (75)
- Hair (32)
- Handles (5)
- Legs (1)
- Interior (165)
- Blogging (147)
- Earning money online, monetization, SEO (41)
- Affiliates (35)
- Video tutorials (1)
- Photos (141)
- Food style and food stylists (8)
- Interesting things (124)
- Tests (41)
- Computer programs, widgets, etc. (117)
- Artists (104)
- Training (101)
- Illustrations and illustrators (98)
- Postcards (20)
- Blah blah blah. (96)
- Fashion (96)
- Required sites (90)
- Clipart (80)
- Tips, tricks, techniques (69)
- Homo Sapiens (64)
- Psycho. (12)
- Fathers and sons (10)
- Design (63)
- Stardust (horoscope) (61)
- Galloping across Europe and beyond (61)
- Garden, vegetable garden, landscape design (53)
- Carving and decoration of dishes (53)
- That's funny! (52)
- Decorations (flowers) (48)
- Photographers (42)
- Great and mighty! (internet) (41)
- Entertainment (32)
- Her Majesty advertisement (31)
- html (30)
- Autopasses and more (30)
- Knitting techniques (22)
- Innovation, technology (22)
- Art (18)
- Be healthy! (17)
- Traditional medicine (1)
- Sothink SWF Easy (14)
- Videos (14)
- Menagerie (13)
- Download. (12)
- Books (5)
- Music (10)
- Gold Rush (9)
- Lingvo (8)
- Fonts (2)
- For friends! (7)
- CorelDRAW and everything connected with it (7)
- CSS (7)
- Infographics (6)
- Kunstkamera (6)
- Drawing (MK, lessons) (5)
- Painting (1)
- Flash - lessons, theory and practice (4)
- Master's corner (2)
- Online games (2)
- WEB (2)
- Adobe illustrator (lessons, articles, tutorials) (1)
Making a hat from paper/cardboard
The easiest way to make a witch hat is from cardboard or paper. The materials are available to everyone. Depending on the size of the finished product, it can be used for different purposes. For example, tiny hats are used to decorate a table for Halloween. Larger hats are suitable for decorating a child's costume. It is worth considering that such a hat will quickly become unusable due to the fragility of the material. Usually it is used only once, and the next year you will have to make a new one.
Required tools and materials
To work you will need:
- Scissors;
- Pencil;
- Cardboard or paper;
- Ruler and compass;
- Paints and brush.
Additionally, satin ribbons, bows, beads, coins, brooches, veils, locks, feathers, and buttons are used to decorate the hat. As a decoration, you can take any detail you like, which will make the witch’s hat more original. Instead of a sheet of cardboard, disposable plates are sometimes used for fields.
Making the crown and brim of a hat
First, a pointed crown is made. It is folded from a pre-prepared pattern. The cone is the same as paper bags for seeds. In the diagram they specially make a reserve, which will be glued. The “rim,” that is, the future brim of the hat consists of circles. Three of them are drawn: the borders of the fields and another one internal. It will be cut into strips, folded and glued to the crown. In another version, the reserves are made on the cap and also glued to the “wrong” side of the hat brim. Then the paper is painted, thereby masking the junction of the two parts.
Decoration and painting of the hat
To avoid subsequent staining, the hat is made from “decorative” cardboard, decorated with a pattern. Models with black brims and a patterned crown will look beautiful. If plain paper was used, then it is painted with gouache using a brush. It is not recommended to use watercolor paints. Due to its liquid consistency, when drying, the composition will cause deformation of the paper and the hat will “crumble.” The top of the still wet paint is covered with glitter.
To fix the layer, spray it with regular hairspray. It will additionally add a glossy shine. You can start drawing and apply an original pattern to the surface of the product. Any trinkets are suitable for decorating a headdress. The more original the hat looks, the more attention its owner will attract. It is covered with organza, veil, lace “rims”, feathers, bows, sequins and even fur. Steampunk hats look luxurious, decorated with locks from old clothes and gears from watches.
Homemade children's Halloween hats with a repeating pattern of spiders or bats will look cute and unusual. Mom's large brooch in a silver frame will complete the image of the mischievous witch.
What you need to make your own Halloween witch hat
Making such an accessory is very simple. This does not require many tools and materials.
You need to prepare:
- scissors;
- transparent tape;
- glue;
- black paint;
- wire;
- decorative elements for decorating a hat;
- fabric or paper.
These are the main things that will be required during the manufacturing process. Of course, some models may require additional accessories. But this basic set is quite enough to create an original accessory for a witch costume with your own hands.
Felt hat
Felt is an ideal material for complex crafts that need to hold their shape. This is a soft, dense natural fabric (felt) obtained by felting. Berets, hats and even felt boots are made from it. For home experiments with Halloween outfits, creativity kits that you can buy in the store are suitable. The package usually includes multi-colored pieces of felt, but you can choose the desired shades yourself. Black, red, orange (yellow) and lilac or blue colors are ideal for the image of a witch.
Required materials and tools
To work with the material you will need:
- Scissors;
- Needle and thread;
- Compasses, pencil, paper sheet (for patterns);
- Glue;
- Several pieces of felt in different shades.
For decoration, choose beads, rhinestones, satin bows and felt bats, which are placed on the brim of the hat.
Operating procedure
A felt hat is created using the same algorithm as a paper model, but here you will have to sew them together instead of gluing the elements together. First you need to draw a pattern for the brim and crown. Be sure to add “reserves”. It is recommended to draw on a piece of paper, after which the pattern is cut out and applied to pieces of felt. You can secure it with pins. Then, using chalk or soap, the pattern is redrawn on the fabric and cut out along the contours. Now you can start sewing. First, the edges of the crown are connected, and then the two hat parts are sewn into one product.
It is worth noting that hats made of felt, like those made of foamiran, are usually made in small sizes. They are best suited for children, dolls and Halloween pumpkins. Often used as room decoration. A large headdress will not hold its shape; you will also have to make a frame for it.
Decor
The decorative headdress is decorated with funny tassels at the ends and a “belt” with a matching buckle. Details can be created from the same felt or use more airy fabrics (mesh, veil). A “fluffy” trim of fur or black feathers is attached to the brim. The junction of the crown and the brim is decorated with bows, imitation cobwebs, miniature skulls, spiders in sparkles, and silk ribbons. Hats with “autumn” decor made from maple leaves, spikelets of grass, tiny pumpkins (made from New Year’s balls) and scarlet rowan tassels will look unusual.
How to make a spider and web
Spiders are one of the main “guests” of Halloween, so let's start with them. Making a web with your own hands is not at all difficult. For a detailed step-by-step photo master class, see the figure below. You can decorate a room for a party with these cobwebs, hanging them on threads, or simply paste them on the walls.
A web can also be made this way, using tree branches and black threads.
Here's how you can decorate your home for the holiday with a web of threads.
The spider itself can also be made in a variety of ways, for example from paper. The simplest option: cut out a circle of the required diameter from colored paper and 8 strips of the same length. Glue the strips to the circle on the sides - these will be the spider's legs, then you need to bend them in several places. All that remains is to glue the eyes and draw the mouth.
Another option: fold the paper in half and draw one half of the spider from the fold side. Cut and unfold.
Or this option is more complicated. You can make a garland or a single spider. Download the template.
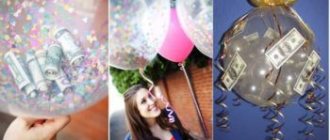
What do you think of the idea of a spider made from a balloon and stripes of black fabric? As an option: the same paws can be made from strips from a garbage bag or satin ribbons. Original, isn't it? Guests will be surprised.
Fabric hat
Fabric hats are the most popular option. They are made for adult Halloween witches from any textile. Since the size of the product is quite large, frames that help maintain the shape of the headdress become a prerequisite for it. Some combine materials. For example, a fabric crown and cardboard fields. A textile hat will last a long time and will be used at many Halloweens, while maintaining its terrifying appearance.
Required materials and tools
To create a textile hat you will need:
- Scissors;
- Thread and needle;
- Textile;
- Wire for frame;
- Wire cutters;
- A sheet of cardboard for a pattern;
- Decor.
Witches' headdresses can have a sharp tip pointing towards the sky, or gently sliding somewhere to the side. The fabric for the brim and crown will have to be starched.
Work technique
First, measure the circumference of the head of the witch for whom the hat is intended. Based on the resulting figure, a pattern is created on a sheet of cardboard with a margin of 1.5 cm. Then frame “circles” are made. Two pieces are cut from a coil of wire. One is equal to the circumference of the head, and the second is the length of the outer brim of the hat. The ends of both pieces are connected, twisting tightly. You can use a soldering iron. Now the crown is sewn together, and a smaller wire circle is attached to the bottom. If the cap should “fall off” gently, then it is straightened out figuratively and the resulting folds are secured in the right places with stitches. For the brim of the hat, two identical parts are cut out. They are applied to each other and stitched. Now the fields can be turned right side out. A wire circle of larger diameter is attached to the rim. Carefully finish the remaining stitch on the outside. If there is no wire at hand, it is replaced with a cardboard circle. It will keep its shape a little worse. Then the fields are sewn to the crown. The place where two elements are fastened is masked with black or purple ribbon.
Decor
A pointed witch's hat made of fabric is decorated with translucent mesh. The veil is sewn to the brim from the inside. A large “dome”, which will hang from all sides of the headdress, is collected under a black inconspicuous elastic band and put on top. Hats are decorated with bright lacing, bats, snakes, buckles, tufts of feathers, spiders, picturesquely sliding along a thread from a sharp tip. Models made of black silk and decorated with bright orange “bouquets” of maple leaves look great. Modest but mysterious hats are decorated with silver threads entangling the cap. They complement the decor with tiny rhinestones or stars. To emphasize the gloomy style, they use skulls, “claws” of small animals, and miniature ravens, which are placed on the brim of the headdress. The original decor can be crocheted. For example, a light cap made of gray yarn (openwork knitting) will imitate a cobweb on a black hat.
Stylish cap
This method is suitable for those who do not have enough time and need to make a hat in one evening. The presented master class on making a witch's hat from paper and plastic will help save valuable time.
You need to prepare for work:
- Large plastic plate;
- Landscape sheet;
- Glue;
- Scissors;
- A large flat brush (you can use a foam sponge);
- Black paint;
- Water-based acrylic varnish;
- Various decorations (for decorating a hat).
The album sheet is rolled in a cone-shaped manner and glued. This should be the shape of a cap.
The plastic plate is positioned bottom up. A point is outlined in its center, from which rays are drawn in different directions. Lines are drawn only along the bottom of the plate.
The marked rays are cut. The resulting triangles are bent upward, as in the photo.
The prepared paper cone is glued to the plate.
The work is left to dry for a short time.
Next, the hat is painted black. If one layer is not enough, then after drying it is advisable to apply a second layer. It will take 30-40 minutes for the paint to dry. The next step is to apply acrylic varnish.
When the base is ready, you can decorate it as you wish.
When decorating such a hat with stars, the accessory is quite suitable for an astrologer’s costume.
The holiday of evil spirits implies not only a carnival, but also stylization of your home with appropriate decorative elements.
Related article: Women's knitted sweater with a description for beginners
Usually for Halloween, a pumpkin with slits resembling eyes and a mouth is used in the interior. It will look unexpected and original if you add a witch’s hat to the pumpkin.
It is best to sew such a hat. This way it can last for more than one year.
The material should be chosen dense so that the headdress holds its shape well. The work can be done from fabric. But felt is most convenient in this case.
Cocktail witch hat
A cocktail hat is a small, elegant headdress. It is usually secured with pins on the side. Such a hat is part of the image of an elegant witch who only hints at her affiliation with the dark forces. The outfit bears little resemblance to caricature masquerade clothing. A sophisticated dress, a corset embroidered with black lace and a tiny hat with a flirty veil - this is the image of a modern witch. You can make such a headdress from fabric with a cardboard frame. The black silk crown is covered with lace and decorated with large beads. At the junction of the brim and the cap, a satin ribbon is attached, which is crowned, like a cherry on the cake, with an elegant brooch instead of rough decorative buckles.
Tips from needlewomen
There are a few little tricks that will help make the job easier:
- The pattern can be transferred to the fabric using a special chalk or a regular bar of soap.
- If the scissors are not sharp enough, you can sharpen them by making several cuts on regular foil.
- It is more convenient to glue decorative elements using a glue gun, and to avoid getting burned, you can put thimbles on your fingers.
- The finished product needs to be checked for the presence of needles and pins remaining in it - a magnet will help with this.
Scheme of work
- An ordinary newspaper, folded in half, will be the basis for the work.
- The edges of the newspaper are folded towards the middle of the sheet and the seams are smoothed out.
- The bottom edges of the newspaper sheet should be folded inward.
- The resulting workpiece must be turned inside out. Bend the ends up.
A simple cocked hat for repair work is ready.
If you want to make a pirate headdress, it is more convenient to use a sheet of A3 paper. The product can be painted and added with an emblem.
We recommend reading:
DIY polymer clay jewelry: review of the best master class with step-by-step instructions for beginners (150 photos of original ideas)DIY polymer clay flowers (120 photos of the best ideas) - simple instructions with full description + master class and video tutorials
Quilling for beginners (200 photos) - step-by-step instructions with description. The best master class on creating quilling crafts with your own hands
Let's make it for Halloween: a witch's hat with a broom. Part 1
It's time to have fun, show off, show off! A carnival hat with a veil is perfect for Halloween, a fun corporate party, and the New Year holidays. And they are just around the corner! Therefore, I offer you a simple master class on making a decorative witch’s hat. MK is suitable for creativity with children. I will try to describe the process in as much detail as possible, so that even a person who has never felted wool before can figure it out.
So, for the first stage (felting the base of the hat) we will need:
- 20 g merino wool (I use 18 micron wool made in Italy)
- a piece of laminate backing or plastic bag for a template
- soap (bar or liquid)
- water container
- a piece of bubble wrap or polyethylene for felting
- stick (or rolling pin, or piece of plastic pipe)
- a tin can or a plastic cup for forming a cap (if desired, you can form it without a “blank” by hand).
Tools for making hats or their analogues can be found in almost every home. You will only have to buy wool for felting (20 g), a veil, an elastic band and feathers.
1. Building a template
First of all, we need to decide on the size of the cap and draw a template.
When calculating the size of the future hat, keep in mind that during felting it will decrease by 1.8-2 times. Therefore, the dimensions you choose (height and width of the crown, width of the margins) will need to be multiplied by 2.
I usually build templates for decorative hats “by eye”, but if you approach the process with all rigor, it should look something like this:
On a sheet of A4 paper, you can build a template in a reduced form, and then transfer it to polyethylene or a laminate backing.
Divide the sheet in half with a straight line. It is more convenient to build half of the template and then cut it out symmetrically. We set aside a segment of 30 cm (in fact, we take half as much so that the drawing fits on the sheet (i.e. 15 cm). This is the middle of the template. From the top point at an angle of about 40 degrees we set aside another segment, the same length as first.
We connect the segments with a smooth line. This is a crown template (half).
Now let's draw the fields. We set aside several 10 cm long sections from our crown and connect them with a smooth line. The angle relative to the crown line is approximately 160 degrees. The result is a “cone with a skirt.”
Fold the sheet in half. Cut it out. And now we have in our hands a template for a wide-brimmed hat. You can draw such a template by hand if you feel the proportions well.
We transfer our template to life-size onto a film or substrate. We slightly round the sharp corner in the upper part - on felting templates there is no need for sharp corners