Greetings, friends! On the eve of the wonderful, good holiday of Mother's Day, I would like to share with you some postcard ideas. Mom, a dear and close person, definitely deserves to spend time on a gift for her. If you still want to give her a gift, there is a list here.
You can also supplement this article with ideas for postcards for women, there are also a lot of interesting things there.
Today we will have many options for creativity. There are easy ones for preschoolers and elementary school students, and there are also difficult ones for adults. Not all of them are included with master classes, but it is also important for us to train our imagination. What if a cute picture inspires you to create a masterpiece? I really hope for it.
By the way, you can simply draw a mother, I’ll tell you about it here.
In addition to the paper and cardboard used, you can take improvised materials, such as dried flowers, ribbons, beads and sparkles. Also pick up thin and sharp scissors and PVA glue.
Simple DIY paper flower card for Mother's Day + diagram
What else can you depict on a greeting card for mom, if not a bouquet of delicate flowers? Considering that Mother's Day takes place in the fall, such a gift will come in handy more than ever: bright spring flowers will definitely bring a smile to your face and awaken joyful memories of warm days.
Materials required for work:
- Scissors;
- Ruler;
- Double-sided colored paper;
- Cutter;
- Toothpicks;
- White album sheet;
- Stationery glue.
Stages:
Take colored paper and cut it into even strips 3 mm thick.
Then we wind each of the resulting strips onto a toothpick, as shown in the photo below.
We fix the end of the spiral with glue so that it does not unwind.
And we flatten the workpiece at one end to make a “drop” like this.
We make flower petals in the same way from strips of other shades.
3 petals make one tulip. We make as many flowers as we want.
Now all that remains is to make leaves and stems for our flowers. To make the latter, we will need two strips of green paper. The thickness is the same.
Glue them to the bud as follows. From an additional strip of paper we make a neat triangle - this will be the cup of the bud.
We repeat the same for the remaining colors.
From two more green stripes we make leaves. The strips must be of different lengths.
We bend them as shown below, “inserting” one into the other.
And glue the resulting leaf to the stem.
Carefully glue our tulips onto a landscape sheet. Don't forget about the congratulation text!
Let's see what else can be done using the same technique. An interesting result is obtained if you use thicker cardboard instead of paper.
Don't be afraid to experiment with the density of your coils. This will also bear fruit.
Timeless classics - postcards with “windows”, inside of which the most interesting part of the composition is located.
The image can be completely simple, even minimalistic. The beauty of the work is not lost from this.
There are quite a lot of design options for the same details. Consider the work of other artists to expand your arsenal of techniques.
What techniques and works of creativity will we get acquainted with today?
Due to the fact that this topic is relevant and extensive, we will work with a huge amount of materials:
- Colored, corrugated and illustrated paper.
- Foil.
- Fabric materials (felt, guipure).
- Fillers for soft toys.
- Decorative elements are a must.
- Threads and needles, paints and brushes, yarn.
This is not a complete list of all the materials we will need.
What models do we have to make today, using step-by-step instructions:
- Basket with flowers made of corrugated paper.
- Heart pillow made of felt with filling and a pillowcase made of guipure.
- Spring bouquet made of colored and corrugated paper.
- Multi-level chamomile with wishes.
A bouquet of children's hands for mom - an easy and beautiful craft
Of course, the most valuable thing for any mother is her child. Therefore, the gift that you and I will learn to make in this MK will definitely touch each of them. We are talking about flowers from children's palms, which we will trace and then cut out of paper. Quite an unusual idea, do you agree with me?
Materials you will need:
- Three pencils (plain and two colored);
- Round handle;
- Glue stick;
- Scissors;
- Stapler;
- Scotch;
- Eraser;
- A square of yellow paper;
- Ruler;
- Rectangle made of green paper;
- Colored paper (1 sheet, A4).
Stages:
We trace a child's palm on colored paper. If we make several flowers, then we will need several leaves. For convenience, we place them on top of each other and fasten them with a stapler in the corners.
We trace the palms with a simple pencil.
We cut them along the contour.
If necessary, remove the traces left by a simple pencil.
We twist each finger around the round handle and then release. It turns out to be a curl.
From the wrist side, we make two small cuts on each palm.
Take a sheet of green paper and cut it in half. Next, we connect two pencils, placing their blunt ends towards each other. We secure everything with tape.
This device will be needed for rolling paper.
Apply glue to the outer edge of one of the green rectangles. And then, at a distance of about 2 cm from the first one, we make another strip of glue.
We wrap a rectangle around the pencils glued to each other. Secure the end again with glue. We take out the pencils from the resulting tube.
Next, take the yellow square and coat its entire surface with glue as thoroughly as possible.
And then we twist it around the stem.
This turns out to be the middle of the flower.
Lubricate the base of the palm with glue. And wrap your palm around the tube. We do the same with the second one.
Finally, take a small green rectangle and coat it with glue. And glue it at the junction of the bud and the stem.
A bouquet of flowers from children's palms is ready for Mother's Day.
You can make a common panel from children’s palms with the guys.
Or these delicate flower postcards.
If you don’t trace your palm, but print it, it will also work out well.
Or you can lay it out from pieces of napkins.
Crafts for kindergarten
Preschool institutions often hold holidays and matinees dedicated to Mother's Day. A very touching memorable gift for this date will be bouquets made by children with the help of teachers from children's handprints, with a photo of the baby glued to each one.
The room can be decorated with festive garlands of leaves cut out of paper. The details of the composition made by the children are then assembled by teachers into a finished decoration.Postcard Heart for mom using quilling technique
At the very beginning, we were already familiar with this style, and I decided to show many other ideas that are beautiful in their own way and may lead you to a new original gift for your mother. The first one will be shown in a video from the YouTube channel. Express your feelings and make this heart out of paper and glue.
Here are a couple more ideas.
Flowers from hearts
A flower made from paper hearts would be an interesting craft. The technology is very simple: hearts are cut out of paper and glued together with wide edges. The resulting cone is filled with paper folded like an accordion, beads or sequins.
The petals gather into a flower. Single wide hearts can become calla lilies. Cotton pads can be used as blanks.
Card with flowers for mom
A flower card is a beautiful craft that can be made from plain paper and given as a Mother's Day gift. At the same time, the flowers are unusual - they open, and inside you can write congratulations and warm words for your mother.
Materials:
- base for a postcard 20 by 15 cm;
- sheets for flowers 10 by 10 cm;
- scissors, glue;
- pen, markers.
Master Class:
- First, we will make a flower from colored paper measuring 10 by 10 cm.
- The flower will be in the shape of a heart, so we fold the piece of paper diagonally in one direction and then in the other direction.
- Afterwards we turn the leaf over and simply bend it in half in one direction and the other.
- We bend the side corners towards the bottom, while holding the corners of the lower diagonal fold with our fingers and pulling them down.
- We turn the resulting figure over so that its open side is at the top.
- Using a simple pencil, draw a heart and cut it along the contour.
- The result is a flower that can be opened and closed. We make two more of these flowers from paper of other colors.
- Now we take the base for a postcard measuring 20 by 15 cm, this is half a sheet of A4 cardboard. We lay out the flowers-hearts, and at the bottom we draw a watering can, a vase or a flower pot.
- From the hearts to the watering can we draw stems with leaves.
- We glue the flowers, outline and color the other elements, and write congratulations inside the hearts. The postcard is ready, all that remains is to sign it.
Heart flowers can be decorated with rhinestones, small beads, or simply draw cute faces on them.
Crafts for mom from little craftsmen
Children at an early age also take great pleasure in creating beautiful crafts for their beloved mother. Crafts for mothers in kindergarten are made in the simplest possible way, but at the same time they are bright and original in appearance.
Among these crafts, the most often made are:
- Applications;
- Postcards;
- Bouquets of flowers.
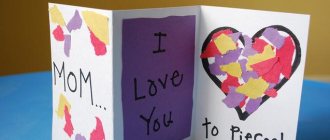
Magic card for mom
If you don’t know how to make not just beautiful paper cards as a gift for Mother’s Day, but magical ones with your own hands, we offer a very interesting master class. The postcard will be “live”.
Materials:
- cardboard of any color;
- strip of paper 22 by 5.5 cm;
- strip of paper 20 by 5 cm;
- a piece of paper for the heart;
- glue, scissors, felt-tip pens.
Master Class:
- On a sheet of cardboard we draw four squares measuring 6 by 6 cm, three side by side and one at the bottom.
- We cut out the element, and bend each square inward under the ruler, ironing the folds well.
- Now we bend the square on the right side to the center and its left side - back in half.
- We also bend the square on the other side towards the center and its right side in half back.
- We lower the top square down and mark the middle with a pencil; a cut will need to be made along it. Therefore, we mark the boundaries of the hole, carefully make punctures with thin scissors and cut out a small strip between them.
- We fold a bright piece of paper in half, mark the borders, draw half a heart and cut it out.
- We cut the resulting heart into two halves, glue each part onto the card and cut each side to the shape of a heart.
- We fold the heart, pull it through the hole and open it again, this will be the lock.
- Now you need to sign the card and make the middle. To do this, take a strip 22 by 5.5 cm, fold it lengthwise, and then fold each side to the other side, also in half.
- Lubricate the center of the card with glue and glue the outer square of the folded strip.
- Then we take another strip, only a light one, also fold it in half, and then each part in half in the opposite direction. Cut into individual squares.
- We round the corners on all the squares and glue them exactly in the center on top of each colored square. If desired, you can make the same squares on the reverse side.
- We outline each square with a gel pen, sketch the word “Mom”, and write the inscription “I love you” on the reverse side.
- Now we circle all the inscriptions and color them as we wish.
On the front of the card, namely on the heart, you can make a dotted outline with a white marker, and you can draw small white hearts around it. Instead of an inscription, you can glue family photos onto the squares.
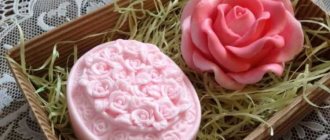
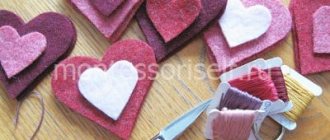
Beautiful felt gifts with patterns
A little about felt. This is a very convenient material for crafts. I advise you to take a closer look at it. And I want to show you a version of such a cute heart with a mother and baby.
Here's the pattern.
Here's another idea, but not a voluminous one. The same pattern is used.
Below is a master class in the photo on making flowers from felt.
Such beauty can be repeated. Sew buttons inside.
Also a worthy option.
This material doesn't even need to be processed on the edges. It also holds its shape well and can be cut.
The best Mother's Day card
Making the best and most beautiful paper card for Mother's Day is very simple. The proposed master class and step-by-step photos of implementation will help. The result is a bright and original gift that can be presented for any occasion.
Materials:
- paper of different colors;
- scissors;
- glue;
- compass;
- any decor;
- marker.
Master Class:
- For the base, take thick dark pink paper and fold it in half.
- For the liner, we also take a sheet of paper of only light pink color, cut it off on all sides by 5 mm and fold it in half.
- On three strips of white paper measuring 15 by 3.5 cm we write an inscription, for example, “To the best mommy.”
- Fold each strip of congratulations in half. On the fold of the insert we make marks where the congratulations will be placed and glue them as shown in the photo.
- Using small scissors, make cuts to the end of all the white stripes.
- We bend the strips with the inscriptions in one direction and then in the other direction; we also bend the thin pink stripes, but only in the opposite direction.
- We fold the insert, turn it over, apply glue to the very edges, but along the entire contour.
- We put the card into the base, press it and wait until the glue sets, and then glue the second side of the insert to the base.
- We cut out large and small hearts from pink paper and use them to decorate the inside of the card.
- Now we decorate the front part of the card, starting with the flower. To do this, cut out 3 squares with sides of 6 cm and 7 cm and 2 squares with sides of 8 cm from white paper.
- Fold the largest square twice diagonally, draw a circle with a diameter of 3 cm and add a leg to it, cut it out and get one flower detail.
- Using a brush, bend each petal. We make another blank from a large square and glue the two blanks together, applying glue exactly in the center.
- From squares with sides 7 cm we also make a flower blank, only we draw a circle with a diameter of 2.6 cm, and from squares 6 cm - a circle with a diameter of 2.2 cm. And from all the details we assemble a bud.
- Glue a light pink sheet of paper onto the front of the card, and a blue one on top, only a little smaller, about 5 cm on each side.
- We apply glue to the blue sheet a little on top, then we also coat the lower part with glue, and then we go up to half of this side.
- We glue the blue sheet, and stretch its un-glued corner with a thick marker so that it is slightly bent.
- Apply glue to the very edge of the corner and glue it onto the postcard to create a bend like the one in the photo.
- We make two more flowers from dark and light pink paper, and also cut out the petals.
- Glue a white flower into the center of the corner, then leaves and two more beautiful flowers.
- On a separate piece of paper we write the congratulation “Happy Mother’s Day”, cut it out and paste it onto the card.
To make the card even more beautiful, we take beads on an adhesive base, glue the curved part and glue it along the entire contour of the front side. The glued corner can be decorated with a large half bead.
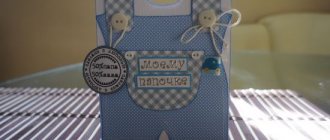
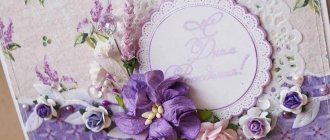
We use scrapbooking when making greeting cards
A rich, beautiful, surprisingly easy-to-make postcard is obtained using the scrapbooking style.
You need to prepare designer cardboard, watercolor paper, die-cutting, sisal, satin ribbon, rhinestones, artificial snow in spray, paper flowers, glitter, contour stickers.
We take designer cardboard of a beautiful color as a basis and fold it in half.
- Glue a slightly smaller piece of watercolor paper onto the right side of the postcard (inner part) - we get a noble border.
- We glue a foil cardboard cutout on top (you will have to use a special machine).
- Under the congratulatory inscription, we cut off a piece of cardboard, the edges of which are decorated with a figured hole punch; this decoration can be replaced with openwork napkins.
- We glue an openwork napkin in the center, attach a bow made from ribbons and folded pieces of sesal to it.
- We cover the imperfections with paper flowers (everything is attached with glue).
- We also place paper flowers along the plane of the craft in the desired quantity.
- We attach the contour stickers using tweezers to the area left for the inscription.
- We decorate with rhinestones, acrylic sparkles and “snow”.
Whatever technology you choose, a hand-made postcard will definitely be more interesting and more soulful than stamped factory cards. Try, express yourself, experiment, bring joy to your mothers!
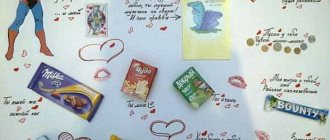
Ideas for Mother's Day Cards
Any handmade crafts given by a son or daughter are especially dear to the mother, since the child spends his time making the gift, makes a surprise with tenderness and diligence (thinking about his mother). Many children, growing up, continue to give their mother cards they made with their own hands. There are many ideas for creating such a present, and each one can be unique. Let's consider several options for Mother's Day cards.
The easiest and fastest option for Mother's Day can be done using:
- colored paper or cardboard in A4 format;
- ½ sheet of white A4 paper;
- felt-tip pens, or ink with paints;
- beautiful buttons of different sizes, rhinestones, ribbons or bows;
- stationery glue, scissors.
Congratulations can be made in a few minutes:
- Colored cardboard (paper) is carefully folded exactly in half, having previously marked the middle with a pencil.
- 0.5-07 mm of ½ sheet of white paper is cut off from all edges, then glued (with glue) to the inside of the “future postcard”. Next they write any congratulations or poems.
- On the outside of the blank you can draw a light thematic design, or glue ribbons, bows, or rhinestones. The design of buttons in the form of a mono composition (one tone) or contrasting colors will look original.
- The outer side of the card will look impressive, cut in the form of a wave, the “skirt” of a dress, with trimmed and decorated corners.
A bright, unusual card will cheer up your dear mother, and her eyes will be filled with happiness.
Volumetric cards
If you have the desire and time to make your congratulations to your beloved mother more memorable, or if it’s difficult to draw something, but cutting it out and pasting it on is easier, then you can use the voluminous option. For production you will need:
- cardboard, colored paper;
- 3 sheets of white paper (A4 format);
- glue and scissors.
The surprise is made step by step:
- A sheet of colored paper or cardboard is folded in half.
- A white sheet of paper is folded several times, 1/3 is cut off from the outer edge, then patterns are cut out, like a snowflake. Straighten and glue in the middle, on the inside of the product. It looks like a “napkin” under a “vase of flowers”.
- The second sheet of white paper (the future vase) is also folded and 1/3 is cut off. Semicircles are cut along the edge in the form of semi-petals. Having unfolded the workpiece, cut off ¼, and glue the base along the edges. Three 0.5 cm holes are cut out at the narrow edge of the triangular element. And the resulting recess is glued to the middle of the “napkin”.
- From the third sheet of white paper (folding the sheet many times, cutting into small squares) flowers with petals are cut out, and round hearts are cut from yellow paper.
- White flower blanks are glued together in groups of three or four (one on top of the other), and the yellow center is glued on top.
- I cut out leaves and stems 10-12 cm from green paper. The latter are glued to the bottom of the flowers.
- The daisies are fixed to the inside of the vase with glue, then the leaves are glued.
On the outside you can write a touching congratulation. When the card opens, a vase of flowers appears, and when it closes, the bouquet folds.
A voluminous heart-shaped card with a pattern will look impressive.
Cool and funny cards
A custom birthday card for mom, with cool and funny elements, will lift your spirits and take away sad thoughts about age. Given the mother's temperament, funny incidents from life may be delicately played out by writing a “family joke.”
You can quickly make a surprise with wishes from the whole family at once. To do this, a sheet of colored cardboard is folded in half. Then, on the inside and outside of the blank, multi-colored envelopes (made of colored paper) are glued into which pieces of paper with wishes are placed. The card can be decorated with beads, rhinestones, buttons, gluing them with glue.
Crafts made from natural materials by the hands of a child
If a child wants to design something on his own, without the help of adults, tell him the option with an applique. Pictures can be created using beautiful autumn leaves. A craft made from natural material by a child will always be distinguished by its individuality, since children do not like to do anything according to a template. Funny bugs, squirrels, fish, hedgehogs - even the smallest can do all this.
Older children will be interested in a do-it-yourself autumn craft made from natural material in the form of a bouquet of maple leaves turned into roses using simple manipulations. Original people and animals can be formed using chestnuts and acorns. Give little craftsmen plasticine to hold the parts together, and older children can use an awl to make holes for legs and arms.
Making a postcard using the cutting technique + congratulation templates
Paper napkins are a great material for Mother's Day crafts. Kids love both the texture of soft paper and the ease of working with it. Such creativity promotes the development of fine motor skills and helps to acquire patience and perseverance. An excellent voluminous option for DIY congratulations for elementary school!
We need materials:
- Paper napkins - two contrasting colors
- Red cardboard
- Yellow paper A4
- White A4 sheet
- Satin ribbon
- Double sided tape
Tools:
- Glue stick
- Scissors
- Simple pencil
We work with the support in the photo.
Draw a heart on the back of the cardboard. Cut it out with scissors. Turn it over and trace a handprint on the back of the heart.
Cut the napkin into 4 strips of equal width. We turn each of them into a set of squares. Roll the squares into small balls, without pressing hard. This way we will maintain the volume of the glomerulus.
Lubricate the palm print with glue. Press light-colored balls onto it. Using scissors, pinch off a piece of ribbon and glue it to the top of the card to make a loop. We cover the entire space of the heart with darker pellets. We try to ensure that the balls fit tightly to each other.
If desired, the final touch is a flower. We will cut out the middle of it from yellow paper, and the petals from plain white paper.
A light, but so wonderfully charming card for Mother's Day! Primary school students can do a lot! We will paste congratulations on the back of the craft.
Or leave a simple white cloud - made from a piece of paper. Let your child write congratulations on it by hand. “I love you, mommy!” and a name - this will be enough to touch mother’s heart.
A voluminous heart card for your beloved mother’s day - let’s make it with our own hands!
Basket of pine cones
In addition to the cones, you will need a small plastic bucket, glue and wire to fasten the cones into a single composition.
How to make a three-dimensional card for mom with a photo - video and template
A cool and very fresh idea from a skillful mother from the USA. Let's grow a flower and stick a photo of the child in the middle. We will write declarations of love under the petals. And we’ll give it to mom: she’ll be happy!
Any adult who knows how to print pictures on a printer can help a child with a craft. One photo of the child must be taken in a small size. For example, in a square with a side of 6-8 cm. Cut out the middle of the postcard from it.
And the flower itself needs to be printed 4 times on A4 sheets. Two white ones are for signatures. Two colored ones - for the front sides. We cut out the stem of the flower, as well as the leaf on it, from cardboard. Much simpler, but no less cute.
Voluminous petals, spectacular design - a wonderful homemade gift to make mother's day unforgettable! Watch video instructions here.What to write for mom? Something sweet, short, from the heart.
My favorite. You are the best! I always love you. Thanks for all! I want to be like you. Be happy!
A few more unique easy DIY cards for Mother’s Day.
Dear teachers, fathers and grandmothers! And also older brothers and sisters!
Take a closer look at our visual master classes. And don’t be lazy to realize these little miracles. Moreover, diagrams and templates can be downloaded. Teach children from kindergarten to love and respect the women who give us life. International holidays are also a good occasion.
Mother's Day cards and surprises are just that: there are countless cute things you can make with your own paper. Our mothers deserve the most heartfelt gifts - both on the official day and on all others!
Summer assignments “Mom’s school” 1st, 2nd, 3rd, 4th grade, summer assignments
Each notebook contains 30 tasks. They are designed for 6 summer weeks (from July 16 to August 26), 5 lessons per week. Assignments include reading and rewriting text, solving examples, and solving a problem. Each work is evaluated by parents.
- Approximate training duration:
- • reading the text three times – 4 minutes • rewriting – 5 minutes • solving an example – 1 minute
- • problem solving – 5 minutes
- Just 15 minutes.
- Please pay attention to the following:
- - is the text meaningful - does the time decrease when reading it three times - is the height and correctness of lowercase letters maintained when rewriting and has the speed of writing increased over the last lessons
- — whether the time spent on calculations and the number of errors have decreased.
- The first exercise is reading.
The text must be read three times, each time measuring how much time it takes. The time spent will decrease as the reading speed will increase. Try not to let your reading speed drop below normal; after the first grade it is 35 - 40 words per minute, after the third - 80 words per minute.
The second exercise is writing (Russian language).
The read text must be carefully and carefully rewritten onto the lined part of the page within five minutes. By counting the number of letters and dividing them by 5, we get the writing speed. Day by day, your writing speed will increase. It must be at least 20 letters per minute after the first grade and at least 60 after the third.
- The third task is mathematics.
- With daily training, the time spent on solving an example and problem will be reduced to three minutes.
- To download assignments, click on the desired link and save the file to your computer.
- Mom's school transition to 2nd grade (microsoft word document)
- Mom's school transition to 3rd grade (microsoft word document)
- Mom's school transition to 4th grade (microsoft word document)
And one more option for summer assignments after third grade for the teaching and learning educational complex School of Russia: Mom’s school, transition to 4th grade, more complex assignments (Word). This option is not suitable for other programs.
In particular, there are several part problems, a speed task, which have not yet been taught, for example, in the Perspective program, there are schemes in the Russian language that are given only at the School of Russia. And in this version there are no equations, so you will also have to study using a mathematical simulator.
Keep in mind that there is not enough space left for writing the text, and if the child has large handwriting, it is better to write the texts in a notebook.
And at the request of visitors, we have made a set of assignments for you for the summer when moving from 4th to 5th grade, it is here at the link>>
This is the minimum, in addition to reading the literature assigned for the summer, that a child needs in order to support his mental activity and not lose over the summer all the knowledge accumulated over the past school year. “Mom’s school,” of course, may not be limited to only these tasks.
The appropriate simulators from our website will help you improve your math skills; you can get serious about Russian by giving your child tasks for a test of cheating or dictation; there are also complex works that combine knowledge in all subjects + logical thinking. Don’t be shy, look through the pages from the elementary school section in the site menu, and you will find a lot of necessary and interesting things for your children.
Rating: 5 / 5
Source: https://7gy.ru/shkola/nachalnaya-shkola/801-zadaniya-na-leto-mamina-shkola-1-2-3-4-klass.html
Required Tools
To make postcards you will need stationery and decorative materials; their list differs depending on the chosen postcard option.
But for all cases you will need:
- Colored and white cardboard;
- Plain colored paper;
- Pearlescent (or coated) colored paper;
- Colored paper with a hologram;
- Double-sided colored paper (for a three-dimensional postcard);
- Glue stick, PVA or heat gun.
For the chosen postcard option, depending on the desired result, you may need materials such as:
- Scrapbooking elements;
- Corrugated paper;
- Pompoms;
- Lace;
- Beads or rhinestones;
- Decorative wire;
- Varnish (art or construction)
It is also acceptable to use natural materials, as well as any available means, including some products - cereals, salt, coffee beans and others.
Corrugated flowers
Corrugated paper is used to create pretty roses or tulips. To do this, petals are cut out of a rectangle of paper, rolled onto a pencil and squeezed a little.
The pencil is taken out, and the blanks are straightened, slightly stretching and giving them a voluminous petal shape. The tip is bent in the opposite direction. The petals are connected into a bud and secured with thread.
Mother's Day card made from cotton pads
Using this inexpensive material you can make a beautiful card.
This will not require much time and effort. Prepare everything you need in advance:
- cotton pads;
- yellow corrugated paper or cotton swabs and yellow paint;
- green paper;
- a piece of cardboard the size of the future postcard;
- PVA glue;
- scissors.
The work consists of the following stages:
Prepare a postcard from colored cardboard, the blank is usually made the size of half an A4 sheet, you can cut it or fold it in half, tightly ironing the bend so that it is perfectly even.
Cut out 2 large leaves from green paper. Select the size according to the postcard blank, usually 2 elements are glued, which are only slightly smaller in height than the base. You need to fix it so that the leaves are connected at the bottom and diverge to the sides at the top.
Cut out a small rectangle from yellow crepe paper. It needs to be rolled up to form an impromptu stamen. Its size is selected according to the situation; if necessary, part is cut off with scissors. Or take a cotton swab and dip one end into yellow paint.
Apply glue liberally to the lower area of the cotton pad. Place the stamen in the middle, fold the edges and press tightly to form a bud. Place it on the card between the leaves and press firmly so it sticks to the surface. Usually there are 3 buds on a card, this looks best.
If you wish, you can decorate the card with other elements or write warm wishes to your mother.
Important! For crafts, choose dense cotton pads; they form into buds much better and stick together faster and more firmly.
You can make improvised calla lilies (and these flowers are made from cotton pads) for other crafts. For example, cut out a basket and fill it with buds or decorate another composition if flowers look appropriate on it.
Fluffy flowers
An unusual paper hyacinth flower will be made from multi-colored paper and cocktail straws.
To make such decoration, paper is cut into strips of approximately 1*5 centimeters and rolled into a spiral onto a pencil or pen.
Glue the resulting spirals to a straw (you can use ice cream sticks or pastry skewers).
The trunk of the plant is wrapped in green paper or colored electrical tape. Several flowers can be tied with ribbon and attached to a card or gift. Or put it in a vase.
A beautiful fluffy flower is made from magazine or corrugated paper. To do this, fold the sheet along the wide side 2 times. The workpiece is cut into small fringes without affecting the main fold. The fringe is glued onto a pastry skewer.
You can use multiple sheets to add fluffiness. It would be better if the magazine had color pictures, although a black and white sheet would be an excellent material for creating crafts.