Bows are one of the most used elements of hairstyles, clothing decor, a necessary accessory for girls' school uniforms, and a table setting attribute.
They serve as the main decorative decoration of gift packaging. Regardless of the shape, size of gift boxes, ways to diversify the packaging, the bow will be an integral element crowning this creation.
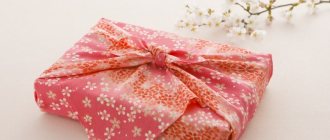
It can be made from a special (decorative) paper or satin ribbon of different sizes and colors, creating all sorts of options. From strict, classic models to curvaceous, unusual shapes.
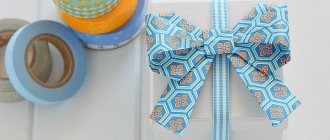
Satin ribbon bow on the box
First, the box is wrapped in gift paper. It can be purchased in various colors in the store.
Simple packing method:
| The required size is cut out (the ends are closed by two-thirds, the main part is closed by three-quarters of the box). |
| The long sides are folded (1 cm) and glued with double-sided tape. |
| The paper is stretched and glued together. |
| The ends are neatly folded and glued with tape. |
The packaging is ready for decoration.
When starting to make a bow, it is advisable that the satin is already starched. This will help the bantu keep its shape well.
Option for a simple classic bow:
|
| A neat, beautiful bow is formed by tightening each loop. |
You can circle the box with tape around the entire perimeter, it will look like this:
To make a decoration from a thin satin ribbon, you will need a couple of multi-colored pieces. The box is wrapped in a circle and an ordinary bow is knitted.
A handmade congratulatory note attached to the top would work well here.
And also the bow itself can possibly be made separately from the binding. Afterwards it is glued to it or attached in another way (tied, pinned). One of the easiest options to make an accessory:
|
|
Calculation of tape length
It is impossible to accurately calculate the length of the ribbon, since there are more than 50 ways to tie a gift box. Much depends on the size of the box: the height of the walls, the width and length of the bottom. The shape of the packaging plays a significant role, because it can be round, square, rectangular, or even have non-standard shapes.
How to calculate the length of ribbon for making a bow
Experts in the field of gift decoration advise calculating the length of the ribbon using the following formula: (length of the box in cm + height in cm) x 6. The result obtained is the approximate length of the ribbon. You need to buy material with a reserve, adding 50-100 cm.
Bow on the corner of the box
You can tie a decoration on the corner of a gift box as follows:
- Select the desired tape size.
- Started as a gift, crossed.
- The ends are brought to the other side.
- The long part is outlined around the box.
- A bow is knitted.
After trimming the ends, tightening and straightening, the accessory is ready.
Another way to make one bow on opposite corners of the package:
- Two ribbons.
- The box is installed on them with corners.
- The places where the ribbons cross are fixed.
- Bows are tied at the ends.
For models with bows with tails, no matter how the ribbon unravels (crumbles), the edges should be scorched with a candle or lighter.
More complex bow options
The presentation of a gift is of great importance. A beautifully wrapped box with a lush or original bow produces a good effect. In this article we will present several options for tying a bow on a box in different ways. To do this, you need to purchase a satin ribbon at a hardware store and wrapping paper at a stationery store.
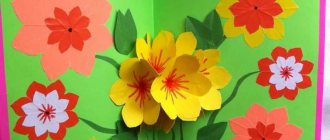
There are many gift design options. This is the simplest single bow, a bow with two rings, a lush multi-layered one. You can make a separate flower or ball from ribbons and then insert it into the tying in finished form. For this you will also need templates made of dense material and scissors. Some people simply plant such a ready-made flower on tape in the middle of the lid, without tying the box itself.
The tape is used in completely different widths. It can be very thin - 5 mm, or you can take it wider - 5 cm. It all depends on the creative idea of the author. If this is your first time trying your hand at this simple art, then look at how to tie a bow on a box in the simplest way.
Adviсe
Some design tips:
- Before registration, familiarize yourself with the color combinations, this will help you create an individual design;
- the bow can be made from any material, but if it is a satin ribbon, it is best to ensure that the final result is made on the front side;
- when decorating a bow, use additional decoration in the form of beads;
- Before purchasing tape, its consumption is calculated in advance.
These are basic tips that will help you decorate a gift.
Regular single bow
The design of such a bow begins by running the ribbon under the bottom of the box. Both ends are crossed from above in the center or shifted to the side, and the long edge of the tape is once again drawn under the bottom of the box, but in a vertical position. Then a knot is tied where the two ends cross. All that remains is to make a simple bow, like on laces.
With this method, there will be no knot on the bottom of the box, the ribbons are positioned evenly, so the gift will have a solid base. The edges of satin ribbons can be cut in different ways: bevel, corner, even. It is advisable to scorch them with a lighter or candle so that the tape does not split.
Satin fan
Wrap silk ribbon (do not cut it from the main spool, you will need a lot of material) around the gift box, but just choose a brighter and wider ribbon. You only need to wrap it once, strictly in the middle through the entire box, as indicated in the picture. Next we need a glue gun, or just glue. Glue the tape to the box, and then form a loop from the free edge of the tape. We glue the free side of the loop to the strip on the box and thus form the remaining loops.
Don't miss: How to sew a tulle skirt
Lush bow
Let's look at another way to tie a bow on a box. The tape is divided into two parts. One is used to tie a gift. The ribbon is passed under the bottom of the box and tied with a knot in the center. Then work begins on laying out another piece. To make the bow magnificent, you need to fold the ribbon in turns one on top of the other, as in photo number 3. Then this bundle is woven into a knot. To do this, place it in the center of the box and tie it with the ends of the first ribbon.
The more turns, the more magnificent the finished decoration. All that remains is to straighten each ring with your fingers and turn it around so that they are arranged in a circle.
Such a lush bow can only be made from a soft and thin ribbon; if the material is denser, it will puff up and the knot will be rough and thick. This can be avoided if you know how to tie a bow on a box using the following method.
Stitching individual elements
This decoration is made separately. Subsequently, it can either be glued to the box with tape, or tied into a ribbon in finished form. Such a flower is made from several strips of different lengths. Since the turns are sewn in pairs, you need to prepare two long segments for the bottom, two medium ones and two short ones for decorating the middle. Let's look at step by step how to tie a bow from a satin ribbon.
1. Prepare segments of the required length. The shortest one is the middle one, it is presented in a single copy.
2. From each segment you need to fold a figure eight and sew the middle with a stitch.
3. Fold the identical eights perpendicular to each other and sew them together. Cross-shaped blanks are obtained.
4 - 5. All parts are fastened together. At the bottom is the largest one, then at the middle one, and at the top is the smallest one. A part represented by a simple ring is inserted into the middle. Place it with the seam down so that it is not visible.
6. The result is a lush and durable bow. It can be made from any material, even thick rep or velvet.
Ways to tie a man's gift
Of course, you can’t treat a man’s gift the same as a woman’s. Options for classic or corner binding are suitable here. The main thing is that everything is strict, simple and concise. No unnecessary elements. A small bow and a small amount of decor.
Advice! An excellent option would be a bow made of dense and hard fabric.
Paper version
You can create a beautiful composition using special paper packaging tape. To do this you will need a template and sharp scissors. Instead of a template, you can make several turns around the palm. Then it is folded in half and one side is cut off from both sides, as in the photo below. This is done so that the central node is not thick. The tape is unrolled so that the cuts are in the center and tied with a thin strip. Let's look further at how to tie a beautiful ribbon bow.
All that remains is to carefully straighten all the coils and turn them in all directions. This is done so that they are distributed throughout the circle. Finally, the bow is attached to the gift wrapping or tied into the weave of stripes around the box.
How to beautifully give symbolic gifts?
When you plan to give symbolic gifts, you need to think about how to do it beautifully. Whatever you come up with to give the opanent, it must be presented in an original way, which means making an original packaging. This is what we will do.
- If people are creative, they will appreciate a gift with this design.
- If you give a bottle of strong drink, make clothes out of ribbons for her. Here are some ideas.
- When decorating a box of chocolates, a ribbon decoration might look like this.
Several similar options
Now you know how to tie a beautiful ribbon bow. But you can design the edges of a lush flower in different ways, and it will look more original.
1. A fluffy paper bow is made, described in the previous section. Next, you need to cut each turn of the ring in half with scissors. If you look at the red sample, all the edges are cut with corners, forming aster petals.
2. The second pink option in the photo has rounded edges with a recess in the middle. To do this, fold each end of the tape in half and cut off a corner on one side and the other.
3. A pale green flower looks interesting. Before tying a bow on a gift, each turn in the middle of the ring is cut with the ends of scissors into several parts, depending on the width of the ribbon. The result is a chrysanthemum that looks very impressive on gift packaging.
You can come up with your own method for cutting the edges. There will be the most unique design solution.
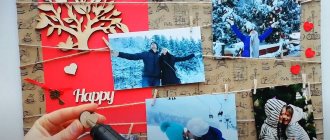
Composition of several elements
Gift packaging made from several ribbons of different quality and color looks beautiful. Let's consider this option, how to tie a bow. Cut two pieces of satin ribbon, wide and narrow. For variety, you can include an element from a different material in the creation of the product, as in the photo below. Then three bows are sewn separately in descending order.
Then you need to attach the finished bow to the packaging.
In the article we introduced you to various basic options for tying bows. These skills will be useful not only to those who do not know how to arrange gifts in a box or bag, but also to mothers who want to learn how to beautifully tie a bow on their daughter’s dress. So try it, and maybe you’ll come up with your own way, the most unique and original. After all, this is a creative and interesting process.
The presentation of a gift is of great importance. A beautifully wrapped box with a lush or original bow produces a good effect. In this article we will present several options for tying a bow on a box in different ways. To do this, you need to purchase a satin ribbon at a hardware store and wrapping paper at a stationery store.
There are many gift design options. This is the simplest single bow, a bow with two rings, a lush multi-layered one. You can make a separate flower or ball from ribbons and then insert it into the tying in finished form. For this you will also need templates made of dense material and scissors. Some people simply plant such a ready-made flower on tape in the middle of the lid, without tying the box itself.
The tape is used in completely different widths. It can be very thin - 5 mm, or you can take it wider - 5 cm. It all depends on the creative idea of the author. If this is your first time trying your hand at this simple art, then look at how to tie a bow on a box in the simplest way.
Two bows
An original way to decorate a gift!
You need two ribbons of different colors and the same width. First, mark diagonal lines on the box to capture a piece of each corner. Place two ribbons on the table and place the box as shown in the picture. Next, we begin to wrap one corner with one ribbon and form a bow from it, and then do the same on the other side.
Regular single bow
The design of such a bow begins by running the ribbon under the bottom of the box. Both ends are crossed from above in the center or shifted to the side, and the long edge of the tape is once again drawn under the bottom of the box, but in a vertical position. Then a knot is tied where the two ends cross. All that remains is to make a simple bow, like on laces.
With this method, there will be no knot on the bottom of the box, the ribbons are positioned evenly, so the gift will have a solid base. The edges of satin ribbons can be cut in different ways: bevel, corner, even. It is advisable to scorch them with a lighter or candle so that the tape does not split.
Lush bow
Let's look at another way to tie a bow on a box. The tape is divided into two parts. One is used to tie a gift. The ribbon is passed under the bottom of the box and tied with a knot in the center. Then work begins on laying out another piece. To make the bow magnificent, you need to fold the ribbon in turns one on top of the other, as in photo number 3. Then this bundle is woven into a knot. To do this, place it in the center of the box and tie it with the ends of the first ribbon.
The more turns, the more magnificent the finished decoration. All that remains is to straighten each ring with your fingers and turn it around so that they are arranged in a circle.
Such a lush bow can only be made from a soft and thin ribbon; if the material is denser, it will puff up and the knot will be rough and thick. This can be avoided if you know how to tie a bow on a box using the following method.
Double bow
Here you will need two ribbons of different colors. The color itself can be chosen whatever you like best, the main thing is that they harmonize beautifully or contrast with each other.
First, take a ribbon of the same color, where you need to take a piece 20 cm wide. Then we form a bow out of it, as indicated in the picture, and fasten it in the middle with a paper clip. Then we do the same with a different color of ribbon, where the width should not exceed 10-15 cm, so that the bow itself is smaller in size than the first bow. Then he fastens the two bows together and be sure to add a long ribbon to the second smaller bow.
Paper version
You can create a beautiful composition using special paper packaging tape. To do this you will need a template and sharp scissors. Instead of a template, you can make several turns around the palm. Then it is folded in half and one side is cut off from both sides, as in the photo below. This is done so that the central node is not thick. The tape is unrolled so that the cuts are in the center and tied with a thin strip. Let's look further at how to tie a beautiful ribbon bow.
All that remains is to carefully straighten all the coils and turn them in all directions. This is done so that they are distributed throughout the circle. Finally, the bow is attached to the gift wrapping or tied into the weave of stripes around the box.
Several similar options
Now you know how to tie a beautiful ribbon bow. But you can design the edges of a lush flower in different ways, and it will look more original.
1. A fluffy paper bow is made, described in the previous section. Next, you need to cut each turn of the ring in half with scissors. If you look at the red sample, all the edges are cut with corners, forming aster petals.
2. The second pink option in the photo has rounded edges with a recess in the middle. To do this, fold each end of the tape in half and cut off a corner on one side and the other.
3. A pale green flower looks interesting. Before tying a bow on a gift, each turn in the middle of the ring is cut with the ends of scissors into several parts, depending on the width of the ribbon. The result is a chrysanthemum that looks very impressive on gift packaging.
You can come up with your own method for cutting the edges. There will be the most unique design solution.
Original decoration
How to tie a bow from a satin ribbon? It’s not difficult, and this method looks unusual. After all, the bow turns out horizontal. It can be done using different methods. The first option is to correctly fold the tape in turns, from the largest to the smallest in the center. It is better to keep the bow from falling apart, fasten it with glue or secure it with stitches.
The second option is to create a composition from individual elements by gluing together segments of different lengths, folded in half. We insert a separately cut piece of strip into the central coil and tie a bow beautifully. You can cut out a larger number of turns from a satin ribbon, then it will be more magnificent. It's a matter of taste and quality of material.
What material is used for a gift bow?
The most common option is to use a satin ribbon for a gift bow. Textile bows are famous for their durability and beauty, but in addition to the usual fabric accessories, the following are used:
- rapeseed tape;
- satin;
- nylon;
- organza;
- tulle;
- paper.
These are the most popular options from which you can make a bow for a gift.