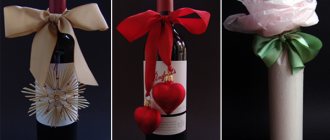
Having learned how to make beautiful gift boxes, you can move on to making equally impressive origami bows to complete the packaging with dignity. These toppers are easy to make and are in no way inferior to store-bought counterparts. There are at least 5 simple models, so we can easily choose the one that suits a particular case. In addition to packaging, a paper bow is suitable for decorating bouquets or cash envelopes, cards, garlands and jewelry.
Paper bow
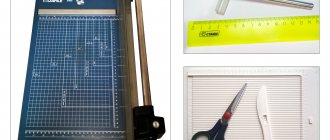
In order to make a paper bow we will need:
- Double-sided colored paper
- PVA glue
- Stationery knife or scissors
First, cut a sheet of A4 colored paper into strips; to do this, fold the sheet in half lengthwise, work out the fold line and cut it with a stationery knife.
We bend each resulting half in half again and cut it with a cutter.
We repeat the same procedure again, making the strips even thinner.
These are the stripes you should get. Moreover, make the last few stripes about 3-4 centimeters shorter than the main ones.
Now we bend each strip of the future bow.
Glue the end together and form a circle.
Now we glue the middle of the circle with PVA glue, we get an infinity sign in shape.
These are the blanks we make to make a paper bow. Please note that the four “eights” are smaller than the main ones.
We will also need a very small circle as in the photo - this will be the final element of the paper bow. Now we begin to form our bow. To do this, we place each element on top of each other in the shape of a snowflake, not forgetting to lubricate the middle of the “eight” with PVA glue.
This is how we apply the second element of the paper bow.
Third. Soon the bow with your own hands will be ready.
Now it’s the turn of the smaller elements - we glue them last, they add additional splendor and form a beautiful paper bow.
After this comes the turn of the smallest part of the bow - a circle of paper, which we will glue last, carefully straightening it with our fingers.
This is such a beauty - we made a paper bow with our own hands.
A gift wrapped in a wrapper and decorated with a paper bow with your own hands will please everyone!
Such bows can be used as a decorative element, as an idea for gift wrapping or DIY cards. Unusual, magnificent, original!
We wish you to give gifts with all our hearts and receive the same! :)
Also watch the video on how to make a bow with your own hands.
How to make a paper bow video
Volumetric bows for decorating cards, panels, appliques and small souvenirs
You can decorate a postcard, book, small framed picture or souvenir beautifully with the help of a small bow. Large voluminous paper bows will look out of place in this case, but medium-sized or small ones will be just right. In addition to beautiful glossy paper, you will need a self-adhesive bead to decorate the middle.
Volumetric bows made from square sheets
On the back of the square sheet, lines are drawn connecting opposite corners. Cuts are made with scissors, not reaching 1 cm from the intersection of the lines. The upper triangle is bent to the lower one. The corners of two opposite ones are collected and fixed in the middle of the product, additionally decorated with small beads. The tips are cut out from the combined triangles, giving them a dovetail outline.
Using templates of different shapes, the following decorations are made:
Templates for voluminous bows
To assemble a bow, the template is first printed on a printer, placed on paper, outlined, cut out and all the parts begin to be connected.
Bows made from just a strip of colorful glitter paper are ideal for decorating a Christmas tree.
How to make a bow out of paper
A bow made using origami technique is perhaps one of the most popular paper figures. They are made with pleasure and effortlessly by both adults and children. A bow made using the origami technique is considered a relatively simple craft, but, nevertheless, it looks quite beautiful and also festive. Alternatively, you can make a postcard with your own hands, or use it to decorate gift wrapping. Any decoration with such a paper bow will be successful. It is also possible to attach it with double-sided tape to a box of cake or sweets.
This is interesting: How to beautifully tie a bow on a dress
How to make a bow out of paper
What do you need to create a paper bow using the origami technique?
All you need is paper. This is a simple method that does not require the use of glue or pencils. To cut the sheet you will need scissors.
Beginning craftswomen will be advised to use special templates, based on which they can easily perform all manipulations related to paper. Then, so that the result is a beautiful and durable product that will not come undone at the most crucial moment.
Making a bow tie according to the diagram and video tutorial
This MK is also not complicated and is intended for beginners. Let's get started.
We will make a bow tie from a paper rectangle using the origami technique. For work, we will take a strip measuring 21.5 by 9 cm. If a longer strip is used, but the same width, then the “ears” of the product will be a little longer. If the sizes are right, then make the bow larger or smaller, but change the sides proportionally. In addition, you can experiment with different pieces of paper; there are no rules here.
For step-by-step instructions for this master class, watch the video provided below:
The finished paper craft origami bow in the shape of a butterfly is colored using paints, pencils or felt-tip pens. Also, as an idea: wrapping paper with all sorts of colorful prints, bright, themed, is used - you get an original thing, and if it is also shiny, then it is elegant.
Bow folding order
To begin with, it’s worth preparing the paper for the future bow. Moreover, it does not have to be specifically designed for origami. It’s quite possible to just take a couple of bright pages from glossy magazines. This will give the design a special charm and color. Even ordinary newspaper pages may well be suitable for this purpose. Plain colored, thin paper is also great for origami crafts. Even if it is one-sided, it will not ruin the bow.
Bow folding order
Take an ordinary sheet of paper, A4 format. All excess is cut off so that the sides of the sheet are equal in size. The resulting square will need to be folded in half, then unfolded, and then folded in half, but in a different direction. After that, everything unfolds again. Then you need to put together 2 opposite corners, and then unfold and combine the remaining two, which are also opposite to each other. As a result, you should have a sheet on which fold lines in the form of an “asterisk” are visible.
Various paper bows
Now you need to bend the sheet into a diamond shape, following the fold lines. It is necessary to connect all four corners of the sheet together so that the front part of the bow looks inward. Next, you need to bend the resulting rum where the center of the square passes. Afterwards, the paper structure can be unfolded - thus creating additional fold lines in the center of the sheet. Now you can begin to bend the sheet along these lines; this must be done very carefully. You will get a square in the center of the sheet and folds diverging from its corners. Then, by analogy with the rhombus made at the previous stage, you need to fold the sheet back, but now the center of the sheet is bent deep into the small square.
How to make a paper bow
Let's try to start simple
Today we will learn how to make bows for gift wrapping using the origami technique. This is what they are like.
They are all made almost the same, only they have different ends and different colors of paper.
Let's move on to the bow assembly diagram:
Let's put it down with the main color if it's not solid. Fold it in half, just so that the design is inside. Now fold it in half again. We lay it back out, and now with the pattern facing outwards, we fold our sheet of paper diagonally, turn it over 90 degrees and fold it again diagonally. And open it back up. Now we need to bend the right and left corners inward as indicated in the diagram. Fold the top corner to form a small triangle. And again we lay out our workpiece, now a small square with folds should remain in the center.
Then we need to straighten the small square that is in the center with our fingers forward so that all sides remain a little behind. Next, we bend the sheet as shown in the photo, only so that this square is inside the workpiece. Now we need to bend the top sides, as in the diagram, and then turn the workpiece over and bend the other top sides in the same way. And again we open our workpiece so that there is a square in the center and smooth out all the folds very well.
Turn the workpiece over so that the colored side is at the bottom. Let's use scissors and make four cuts along the folds. Now you need to fold the top cut fold down, and also fold the two upper corners down to the middle, these will be the tips of our future bow. Next, we bend both rhombuses upward, and again fold only the lower corners to the middle line. Now again we need to lower the double diamond part down. And make a small cut, as done in the photo, and bend these parts.
Popular articles Nylon doll “Spring Girl”
Now turn the bow over to the front side. We bend the two extreme corners to the center and insert them into the small square that is in the middle. Here is our gift bow and it’s ready. It can also be used to decorate a room, a holiday, or decorate a Christmas tree.
You can also make a bow like this. It is done much easier and faster.
Bend the edges
All resulting edges need to be folded. First, this is done on one side, then you should turn it over and fold the remaining ones on the other side. Then you need to unfold the resulting paper part again. What happened should be placed inside out towards you. Carefully, with a stationery knife, you need to cut the folded edges to the fold line in the middle.
Paper bow
Now the fourth part of the sheet is bent. This is necessary to bend the open edges towards the center line. The same is done with the opposite side. It is necessary to bend the opposite edges also towards the center. The result will be corners bent close to edge.
This is interesting: What is needed for keratin hair straightening 2019
Whatever was bent to bend these corners should be left bent in one direction. Their edges should be bent towards each other. Next, the craft is turned over, and the edges of the corners are bent, placing them at the very center of the bow. Then they hide under the center of the bow.
Beautiful paper bows
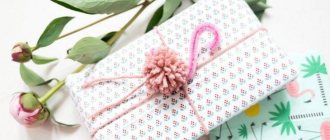
A paper bow can serve as a wonderful decoration for gift wrapping or a bag. It would also make a great craft – it’s a great way to have fun and have a good time.
Paper bow
DIY paper bow
Gift paper bows
Classic decor ideas
You can also use traditional decorations for gifts:
Butterfly. The ribbon is divided into equal halves and crossed with each other. The loops alternately go down and then up. Then you need to pull the decoration together in the middle.
Strict. Two ribbons are cut, smaller and larger. The long one is used as the main blank itself; its edges are dipped in glue and both sides are glued together. The other is grabbed in the middle, at the gluing site.
Multilayer. This type is carried out with three ribbons of different lengths and widths. If desired, they can differ in tone palette. The widest one will be at the bottom, and the narrowest one at the top. The ends are trimmed with a corner and left stretched so that the product can be attached to the packaging. Another piece will be needed to tie the three layers together.
Double layer. To do this, you will need two segments: one wide, the other narrow. They are also connected with a ribbon in the middle. The tips of the primary figures are fastened to each other.
I'M GROWING Website for children and their parents
Latest events
Lotto "Time". Educational game
How to teach a child to tell time using a clock? Not the electronic ones with numbers, but the most ordinary ones - with arrows?
Easter cake. Giant coloring book
I propose to make and color this huge coloring book, consisting of 15 A4 sheets, together with the children. The details of the coloring book need to be printed, glued, attached to the wall and RAS-KRA-SHI-WAAAAAAAAT.
Easter is coming soon. Coloring pages
Easter is coming soon. Get yourself in the holiday spirit with these coloring pages.
Chickens. Egg cups
Coasters for colored eggs for Easter
It’s not enough to color an Easter egg beautifully; you also need to package it beautifully. The easiest way is to make a paper basket in the shape of a chicken.
Egg stand Cockerel
For Easter you can make this funny souvenir - a paint stand in the shape of a Rooster.
Popular
Paper bow for a gift box
Literally a couple of minutes, a piece of paper, scissors and your desire - that’s all you need to create such a bow.
An excellent option for those who want to decorate a holiday gift in a simple and uncomplicated way. Literally a couple of minutes, a piece of paper, scissors and your desire - that’s all you need to create such beautiful bows.
An excellent option for those who want to decorate a holiday gift in a simple and uncomplicated way.
The first thing you need to do is download and print this template. However, you can simply draw something similar yourself using patterns or compasses. The template contains patterns for two bows at once.
We take double-sided glossy paper. colored paper, cut out the details.
And here it is - the result.
And this is an attempt to decorate a gift bag.
How to Make a Paper Bow
Simple paper bows can come in handy in a variety of life situations. You can decorate a gift or a bouquet of flowers with them. Or maybe a New Year tree or a room for a birthday. Small paper bows are suitable for cards and appliqués. This design is in no way inferior to a store-bought one (except in price). Even older preschool children can learn to “tie” such paper bows. The materials you will need are the simplest: glue, scissors and, of course, paper. We offer three ways to make simple voluminous paper bows. Using different types and grades of paper, you will get a huge variety of these charming decorations. After all, you can take any kind of paper – even just colored paper; and packaging that was left over from old gifts; colored or white tracing paper; paper with designs for origami and even rough packaging paper - any, except, perhaps, cardboard. It all depends on what “design” task you set for yourself or your child.
This is interesting: Marinade for Pork Ribs in the Oven
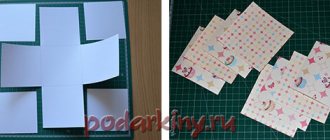
Simple paper bow No. 1
For this voluminous bow, cut out two rectangles from colored paper measuring 3x13.5 and 3x9 cm (the dimensions can be changed proportionally). Cut out another small strip of paper of the same color for the middle of the bow.
We fold these rectangles in half and draw lines as shown in the figure.
We cut along the lines and lay them out - we get two blanks for the bow - the base and the tails.
We fold the base (without bending) from the edges to the center and glue it in the center.
Glue the base of the bow to the tail and wrap it with a strip in the middle.
Option for a simple paper bow
We make the base of the bow in the same way as in the previous version. We cut the tails differently - as shown in the figure. You can make them by symmetrical cutting. We wrap a small strip around the base of the bow.
Then glue the base to the tail and the bow is ready.
Simple paper bow No. 2
For this voluminous bow you need a square of paper.
We fold colored paper on both sides diagonally, marking lines.
We cut out one intended quarter, leaving the crossbar in the center. We cut the opposite quarter of the workpiece only to the crossbar.
We bend this quarter of the bow to the opposite side.
Glue the upper corners of the bow to the middle, while the bow bends slightly forward.
We do the same with the bottom corners - glue them to the middle.
Cut out a triangle from the bottom of the paper to create the tails of the bow.
You can glue a center square of paper to the center of the bow to cover the corners.
This is what the bow looks like from the back.
Bow on the front side.
Master class No. 1
Choose the paper you like and cut the sheet into strips approximately 2 cm wide. To create a bow you will need:
- 6 strips 30 cm long;
- 4 strips 27.5 cm long;
- 1 strip 25 cm long;
- 1 strip 12.5 cm long.
Set the 12.5 cm long strip aside, and mark the middle on all other paper blanks with a pencil.
1: Take one strip, turn it white side up, pinch the middle with your finger, then carefully fold each loose end into a loop. You should now have a paper eight. Secure each end of the strip in the middle with double-sided tape. Of course, you can also use paper clips or glue, but the good thing about duct tape is that it's flat and less noticeable.
Popular articles Congratulations on March 8th. Comic congratulations on March 8thIt is very important not to pull the paper loops too tight! If the loop is too tight or too small, the paper bow will look flat no matter how many layers you glue together. In the same way, fold all the other strips except one (12.5 cm)
In the same way, fold all the other strips except one (12.5 cm).
2: Take three large loops and place them on top of each other as shown in the picture. Fasten them together with a paper clip.
Make another similar “flower” from three other large loops and then fasten both parts together with glue.
Now take 4 shorter loops, fasten them together and glue the resulting part to the middle of the bow. After this, glue the shortest loop.
3: Take a strip of paper 12.5 cm long, roll it into a ring and secure the ends with double-sided tape. Place the ring in the center of the bow and glue. And our bow is ready: