It’s easy to make a beautiful bow from satin or nylon ribbon. This accessory can be used to decorate a gift, piece of clothing or interior design.
- Every woman has her own secrets and tricks to make our lives easier and more beautiful.
- Bows made from ribbon and other materials can add a festive mood and complement an outfit, hairstyle, gift set, table setting and other interior items and clothing.
- Many women think that making a beautiful bow on their own is difficult.
- But this is not true, all people can create a beautiful masterpiece
- You just have to prepare the materials and you can start this interesting type of needlework.
How to make a simple beautiful ribbon bow with your own hands?
How to make a simple beautiful ribbon bow with your own hands?
Previously, bows and long ribbons were woven into girls' braids. Currently, ready-made lush bows made from satin or nylon ribbons are attached to first-graders.
How to make a simple beautiful ribbon bow with your own hands? The simplest and most beautiful bow is made from a two-color satin ribbon.
How to make a simple beautiful bow from a ribbon of two colors with your own hands?
To make such a decoration, you need to complete the following steps:
- Prepare 20 cm of wide tape (5 cm) in a light shade, and 40 cm of tape in a dark shade 2 or 3 cm wide
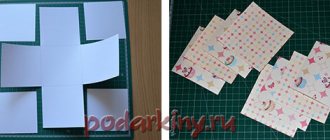
- Fold the wide ribbon and glue the ends together as shown in the picture.
- Apply 20 cm of thin tape on top and also glue the ends. Glue them to the folded ends of the wide ribbon
- Wrap the remaining 20 cm of thin tape in the middle of the resulting “sandwich” and make a loose knot
- Tuck the ends of the ribbon into the knot or leave them loose so you can tie the bow to clothing, hair, or gift wrap.
Here are some more ways to make simple bows:
Simple beautiful DIY ribbon bow
Beautiful DIY ribbon bow
Another way to make a simple bow can be seen in this video.
Twisting the foil
Twisting into long strands (also known as twigs or wires) can be useful for further use as blanks for weaving. To make them, you need to cut long strips about two centimeters wide, and then simply roll them into cylinders. It is not necessary to roll straight across. There may be bends, crumpling, and even weaving of one strip into another if long threads are needed, for example, for weaving a basket out of foil.
Flagellum twisting
Read also: Why you need to learn Spanish
Flagellum twisting
For small children, it is better to prepare the cut strips in advance, since they do not yet know how to handle scissors. Older children who already know how to cut paper can be entrusted with making the strips themselves.
Video: How to make a RIBBON BOW of any size?
You can make a beautiful bow from thin braid by folding its pieces into a figure of eight, and then sewing them in the middle. The more details, the more beautiful the bow will be.
Simple DIY ribbon bow
How to fold a bow from a thin ribbon?
Important: Making a simple bow is not difficult. Show your imagination and in a few minutes the holiday accessory will be ready.
Chain
A chain is made from the above mentioned bundles. It is a simple option for using these blanks. Take the bundles and bend them into rings, twisting the ends.
The advantage of foil is definitely its plasticity, so everything will hold up well. Starting with 4-5 links, lengthen the craft. It’s also not scary to make the links uneven.
How to make a big fluffy bow from ribbon?
How to make a big fluffy bow from ribbon?
How to make a big fluffy ribbon bow with your own hands?
It's easy to make a bow like this:
- Buy a ribbon of the desired width. The length depends on how lush the bow should be - 1 or 2 meters
- Fold the ribbon like an accordion
- Tie in the middle with nylon thread. Leave the ends free so that the product can be tied to a gift or to your hair
- You can make a “sandwich” from individual glued elements, tying them in the middle
Another way to make a fluffy bow. Prepare 2 meters of white ribbon and small beads.
Large fluffy ribbon bow
This “royal” bow is made up of separate small bow parts that are sewn to a white felt base. To make small elements, follow these steps:
- Cut the ribbon into equal sections of 10-20 cm, depending on the size of the bow you need
- Fold in half, inside out
- From the bent line, at a distance of 2 cm, you should drop a drop of glue and press this place with tweezers so that the tape sticks together.
- When the glue dries, turn the bows inside out and make a fold at the ends
- Fasten the ends with thread and sew to the base
- You can decorate such a bow with rhinestones, gluing them to the middle, or with beads of different colors. That's it - the product is ready
You can see how to make such a “royal” bow in the video.
Electric garlands
Electric garlands are an invariable attribute of the New Year holiday. They come in the same or different colors. This festive illumination looks very impressive. They not only decorate the Christmas tree, they are placed along the contour of the window. There are outdoor and indoor garlands; they hang around windows both outside and inside the house. Thanks to them, you can create a rain of light, a waterfall using hanging threads, or a curtain where micro bulbs are attached to the main cord.
How to make a bow from a wide ribbon?
How to make a bow from a wide ribbon?
Often you need to match a suit with a bow tie for an adult or a child. Of course, you can buy it in a store, but they don’t always have the right color in stock. Therefore, you need to make such a tie yourself.
How to make a butterfly bow from a wide ribbon?
Follow these steps:
- Prepare 20 cm ribbons 5 cm wide and 18 cm ribbons 3 cm wide
- Fold the pieces in half and glue the ends together. Fasten them with a needle so that the glue holds the edges together well.
- When the glue dries, place one element on top of the other and make stitches with thread in the middle
- Pull the thread and fasten
- In principle, this is enough, but you can bandage the seam with a thin ribbon to match. "Butterfly" is ready
A wide ribbon makes beautiful “roses”. How to make such an original bow from a wide ribbon? It's simple.
How to make a rose bow from a wide ribbon?
Follow these steps:
- Wrap the tape around your hand as shown in the picture
- Make a knot and remove the product from your hand
- Spread the rose petals, bending them inward
- Do it all down to the last petal
- The more magnificent the rose, the longer the ribbon should be
Basket
This craft is more complex than a flower and is suitable for older children. First, a rectangular frame is assembled from the strands, onto which twisted decorations in the form of spirals, stars, or something else made from flagella are then attached.
Framework of flagella
Decor elements
First, the decorations are attached to the future bottom of the basket, and then to the side walls.
Attach the bottom and side walls
Finally, a handle is attached.
Foil basket
The bottom and side walls can be secured with glue for reliability. Since foil is a non-flammable material, such a basket can be used as a candlestick.
How to make a bow from thin ribbon?
How to make a bow from thin ribbon?
A bow made from a thin ribbon looks stylish and attractive on any piece of furniture or clothing. It adds sophistication and elegance. How to make a bow from thin ribbon?
The Dior bow is often used to decorate gifts, holiday tables and as a clothing accessory.
How to make a Dior bow from thin ribbon?
To make such an accessory, follow these steps:
- Prepare 1 m of tape 1-2 cm wide
- It must be cut into pieces of different lengths. The number of these sections will depend on how fluffy the bow you want to make. Make the length of the turns such that this bow fits along the entire length of the packaging box, the longer the turns, the more beautiful
- Place the finished turns on top of each other, gradually reducing the size of each turn
- The last turn should be no more than 1 cm in diameter
- Secure the resulting bow with a thin matching ribbon, threading it into the last turn
- This accessory can be attached to any surface: flat or round.
Sometimes you need to make a lot of small bows from thin ribbon. A regular fork will help with this. Follow these steps:
- Prepare a satin ribbon 0.6 cm wide and a dinner fork
- Place the tape on the fork, leaving the ends at least 4-5 cm
- Wrap the left edge of the tape around the fork and bring it forward, pushing it between the middle teeth
- The result is a loop. Without tightening this loop, insert the end of the tape, but already on top of the fork between the teeth
- Insert the end of the ribbon into the loop from below and tighten
- Remove the bow from the fork and cut off the excess ribbon around the edges
- Burn the cut ends of the tape with fire (a lighter or a match) so that the tape does not fray. You can make as many of these bows as you need - quickly and easily
More detailed instructions on how to make a bow using a fork and thin ribbon can be seen in the following video.
"Warm" packaging
A gift wrapped in fabric looks unusual and original. You can simply use a piece, wrap it in a thick box, shape it into a knot, or sew a beautiful bag with a clasp. Buttons, felt tags, yarn, and ribbons are used as decoration. A wicker basket wrapped in linen fabric looks beautiful. In this way you can present a gift in the form of vegetable compositions.
There are many techniques for folding textiles beautifully: the basic technique, four knots, for cylindrical objects, flat boxes, with double wrapping. Knitted packaging is very popular. It will come in handy during the cold season. This could be a small cuff with a note, or a soft bag.
How to beautifully design a bottle for a gift
To decorate gift bottles and vases, there are many types of special paper, elongated bags with handles. The standard wrapper can be varied in various ways. The easiest one is to make funny curls at the neck. To do this, you need to cut the free edges and twist them with scissors. The packaging is suitable for gifts for New Year's holidays and Easter wines.
You can pack champagne beautifully using napkins and corrugated paper. We wrap the bottle with material, starting from the neck, and secure it with tape. Leave the bottom open. The gift can be decorated with beads, artificial flowers, and bells. You can hide the outline of the container if you place it in a homemade cardboard tube.
How to make a bow from a narrow ribbon?
How to make a bow from a narrow ribbon?
Such an elegant accessory can decorate a gift, a piece of clothing, a table setting, or even your hair. A thin ribbon makes an elegant and fluffy bow. How to make a bow from a narrow ribbon?
Follow these steps:
- Prepare a narrow ribbon of two colors and cut out a circle with a diameter of 2 cm from cardboard
- It is necessary to cut the tape into pieces of 5-7 cm
- Now use a glue gun to apply a drop of glue to the cardboard circle and glue the edge of one of the pieces of tape. After 0.5 cm, apply a drop of glue again and glue the second end of the tape
- Apply glue again between the glued ends of the tape and glue the end of the tape of a different color. Glue its second edge next to the edge of the tape that was glued before
- Repeat this until several rows of such turns are glued. The last 2-3 rows can be made smaller, and attach a bead or rhinestones to the middle
Important: When you glue pieces of tape, thread each end through the previous turn. Thanks to this technique, the bow will turn out lush and beautiful.
A clear example of how to make such a bow can be seen in the video below.
Painting
The paintings created from foil are distinguished by their beauty and create a brilliant effect. When you look at them, an association with antiquity arises. It will fit perfectly into your home and decorate one of its walls, and most importantly, a minimum of effort and time is put into its creation.
This painting will also serve as a worthy decoration for a box or cabinet. All you need: a printed picture, thick cardboard, foil, glue and shoe polish.
How to make a hair bow?
How to make a hair bow?
A DIY bow for decorating a hairstyle turns out to be original and beautiful. You can be sure that only you will have such decoration.
How to make a hair bow? Follow these steps:
- Prepare 2 pieces of tape 5 cm wide and 25 cm long, and a thin tape for the middle
- Take one piece of tape and fold a corner at one end
- Fold the second edge also with a corner near the first folded end. Then bend the resulting corners towards each other. Fasten the folded coil with a needle
- Now next to the folded corners, make another turn and secure with a needle
- As if turning the resulting product over, make a corner again to create a “diamond”. Do this until there is only one small triangle of tape left.
- Fold the diamond in half, and in half again. Now you need to fold the remaining edge of the tape into a “corner”. The result is a triangle
- Hold it by the center so that everything we fold does not open up. Remove all the needles
- Fold the inner triangle into the center to create an original “petal”
- Fasten with a needle and thread in the place where you hold with your fingers
- You need to make two of these parts
- Sew these parts together and tie them in the middle with a thin ribbon.
- Sew this bow to an elastic band or glue it to a hairpin, and your unique hair accessory is ready.
Detailed instructions are in the video, which will make it easier for you to make a beautiful hair bow.
Necessary materials
In order to understand how and how to beautifully decorate windows for the New Year, you need to start with the simplest paper decorations. You can use templates and stencils, toothpaste, soap, PVA glue and much more. By decorating glass or hanging finished masterpieces by a thread, you can understand how to beautifully decorate windows for the New Year and transform your home for this wonderful holiday.
It is best to create warmth and comfort in your home together with all family members, especially children. First of all, you need to prepare all the materials that will be used, stock up on ideas for beautiful window decorations for the New Year.
- When designing, you should take into account the degree of illumination of the room.
- Windows and window sills must be washed first.
- You should not use many ideas in different styles at the same time.
- The decoration of the window should coincide with the decoration of the main symbol of the New Year's celebration - the Christmas tree.
Knowing how to decorate windows for the New Year, you can start decorating cheerfully and amicably.
How to make a bow from nylon ribbon?
How to make a bow from nylon ribbon?
If your daughter is going to first grade, then she should have the most beautiful and lush bows. How to make a bow from nylon ribbon?
It’s easy to make a lush and beautiful bow. If the store doesn’t have the width of the ribbon you need, you can use a piece of organza instead.
To make a bow, follow these step-by-step steps:
- Prepare two ribbons 7.5 cm wide and 140 cm long
- Fold it in half lengthwise. Now string the folded edge onto a thread and a needle.
- When all the tape has been sewn, pull the thread until the strip turns into a product 40 cm long
- Fasten the thread and straighten the product along the entire length
- Do the same with the second tape.
- Cut a circle from felt or thick tape with a diameter of 7.5 cm
- Make two holes in the circle and insert a thin ribbon or braid into them to match the bow
- Apply glue along the edge of the base and glue the first gathered tape
- We continue to coat the base with glue and glue the tape in a spiral. When the first tape is finished, continue to apply the second tape in this way.
- When there is some space left on the base, cut off the excess tape and secure the thread
- Apply the entire tape, covering the base in the middle. Don't forget to burn the edges of the tape so it doesn't fray.
Watch how to do this in the video.
Children's crafts
Children also love working with foil. The simplest children's crafts made from foil do not require the use of glue. For example, creating a snail figurine. Even kids can handle this kind of work.
- You should also prepare a lid from a plastic drinking bottle and a piece of soft wire.
- The lid should be wrapped in foil so that its edges hang down. This will be the snail's shell.
- The horns are twisted from wire. A piece of foil about five centimeters long is bent so that it has the shape of a narrow tube.
- It is connected to the lid, wrapping the entire structure with foil.
- The final step is to attach the wire horns.
How to make a bow from paper ribbon?
How to make a bow from paper ribbon?
A paper bow can be used to effectively decorate a gift box or table setting. How to make a bow from paper ribbon?
How to make a beautiful bow from paper ribbon?
Making a paper bow step by step:
- Prepare 12 pieces of ribbon 2 cm wide and 25 cm long, and one ribbon 5 cm long for the middle
- Start folding large pieces into a figure eight, as shown in the picture. The edges can be stapled or glued with hot glue. Attach a small ribbon to make a ring
- When all the parts are ready, start assembling the bow, beautifully arranging the turns and gluing them together
- The smallest turn is glued to the middle
- On the reverse side, using a stapler, attach a thin braid or the same ribbon that was used to create the bow.
A master class on making such an accessory can be seen in the video.
Original version
To give to your girlfriend or mother, you want to make a more elegant and original gift. One of the stylish and unusual options is a multi-layer bow.
His chic appearance will impress any representative of the fairer sex. The main thing is to make it correctly; to do this, follow the instructions exactly.
- Cut a long piece of satin ribbon in the color you like. It should be long enough to wrap the box and tie the decoration. It's better to buy with a reserve.
- Tie a matching bow in the center of the box. Trim the ends. Definitely at an angle. Both edges should be the same length.
- Then you need to cut a piece of ribbon of the same type and length (a different color is possible). Make several loops, for convenience, hold the “structure” in the middle.
- Secure the decoration to the box using a thin ribbon. Also cut off the excess at an angle. The ends should hang slightly, you will need them for tying additional layers.
- Take another ribbon and make 3 loops. Trim off the excess again.
- Carefully tie the first bow to the second. Afterwards, you can add more decorations that will harmoniously fit into the style. A non-standard solution will please the eye of the birthday boy and his guests.
When choosing the design of a gift box, do not forget that the most important thing is the love with which you should give your gift. She and your desire will be able to make the perfect gift for any occasion.
Video: Do-it-yourself gift BOW from PAPER
You can make a paper bow in another way, as shown below.
How to make an original bow from paper ribbon?
In this method, the tape is not cut into pieces, but folded into “figure eights” into a single structure. The flower is tied in the middle with a thin paper ribbon.
Tags
Ribbons for handicrafts and handicrafts for handicrafts for handicrafts for handicrafts for handicrafts for handicrafts Product categories Inexpensive goods Product search Digital goods Products for Product check Products for Products for Products for Products for
handicraftsgoodsdecorativesatinbasketordersrepsadvertisingaccessoriestoolsflowerspaperpriceshandstulleshopsdecorationdaymaterialsmanufacturepurchaseRussiayouraccessoriessewingcreativitylacehairmetersdeliveryadditionsnylonnewourelasticclothingstockorganzanetnumberoftoyslinengarmentsaletechniquecatalogsthreadsbasket trading machine news equipment
How to make a ribbon bow for discharge?
How to make a ribbon bow for discharge?
When a newborn is discharged from the hospital , this is an important event, and everything must be perfect. Therefore, you can make a bow for a newborn’s envelope with your own hands. How to make a ribbon bow for discharge?
Tip: Choose a beautiful ribbon, for example, with gold edges, to make the flower look elegant.
Execution step by step:
- Make lengths of pink or blue satin ribbon, ribbon with gold edges in the same colors, regular thin satin ribbon, and patterned braid
- Start collecting the flower with a piece of wide satin ribbon. Fold the ribbon in half and sew with thread and needle. Do the same with all the satin pieces, collecting them together in a circle. When finished, secure the thread
- Collect all the ribbons in the same way. You should get 4 flowers
- Apply hot glue to the felt base and start gluing flowers, first large, then descending
- Make petals in the middle from thin braid with a pattern, first gluing the edges of the pieces of this braid
- The last step is gluing the beads or rhinestones. The bow is ready
Watch how a girl does this in a master class in the video below
New Year's toys using the wrapping method
Foil is better suited than other materials for creating New Year's decorations. You can use any suitable shaped object and wrap it in foil. Decorating with metallic paper always creates a festive effect due to sparkles and silver texture.
Master class on creating a New Year's ball:
3D star
Shot: mama Julietta / YouTube
If you want to decorate your room with stars, don’t rush to the store for souvenirs. Try creating a craft yourself. It's simple.
How to do
Using any method convenient for you, draw two five-pointed stars on the cardboard. Cut out the blanks.
Frame: mama Julietta / YouTube
Take one figure. Make folds in the center of the rays and between them. This will give the part a convex shape.
Frame: mama Julietta / YouTube
Lightly scrunch and then straighten the foil sheet. This will create texture.
Frame: mama Julietta / YouTube
Place the star on the foil. Make cuts on the sheet between the rays.
Frame: mama Julietta / YouTube
Wrap the workpiece in foil.
Frame: mama Julietta / YouTube
Do the same with the second cardboard piece. Place a crumpled piece of paper inside one star.
Frame: mama Julietta / YouTube
Glue the blanks together so that the convex sides remain on the outside.
Frame: mama Julietta / YouTube
To do everything correctly, check the video:
Construction
Making a flower from foil step by step:
- Several strips, two or three centimeters wide, are cut from a sheet of foil.
- These strips are twisted into thin tubes. At the end of the strip it is necessary to leave an untwisted edge for assembling the parts.
- If the foil breaks while rolling, it is easy to put it back together.
- You will need quite a lot of such elements. This activity develops fine motor skills well. Therefore, this type of creativity is perfect even for children.
- To make the frame of the petals you will need three pieces of thin wire of the required length. These sections are wrapped in foil.
- At one end, the ends of the wire are connected and wrapped with thread. For strength, you can use PVA glue. These will be veins in the shape of a trident.
- Next, starting from the place of fastening, the space between the wire is filled with pre-prepared tubes from foil sheets.
- To do this, you need to secure the tube and start weaving in a checkerboard pattern.
- When one tube runs out, a second one is attached to its end, and so on.
- As the work progresses, you need to ensure that the gaps widen towards the middle and narrow towards the end of the wires, creating an oval shape.
- The number of blanks depends on the type of flower. Typically, about six are required.
- The leaves of the future flower are created using the same principle. They should look much narrower than the petals and smaller in size.
- All that remains is to make the stamens. Their number can be any, at the request of the master. For this you will need a toothpick.
- A thin strip of foil is wound around it, after which the spring is carefully removed and slightly stretched.
- The stamens are attached to the end of a wooden skewer or sushi stick using threads.
- After this, the petals and leaves are fixed. All joints are tightly braided with threads and glued.
- Finally, use your hands to give the plant the desired shape.