Tweet
Today we will talk about how to decorate a classroom for Teacher's Day, what decorations to use.
Teachers occupy an important place in the life of every child and on their professional holiday they deserve attention, gratitude and congratulations.
If you decorate your classroom beautifully on this day, you can create a real festive atmosphere.
In our article, we have collected the coolest ideas and tips for classroom design that will be useful for both students and parents.
Garlands for Teacher's Day
Garlands made from natural materials, such as spruce branches with cones, autumn leaves, flowers, bunches of rowan will fill the room with the breath of autumn and natural beauty.
Paper garlands look no less interesting: hanging chains of flags, hearts, flowers, cool photographs, streamers with congratulations. You can place them at the entrance, on the windows, or above the board to attract attention.
School decoration
To make the holiday feel right from the door, it’s better to start decorating right away, from the entrance area and porch. This way, when approaching school, teachers will feel that today is their day. You can put an arch of balloons at the entrance (if your budget allows) or simply decorate the railing and hang a “Happy Teacher’s Day!” banner over the front door.
Every corner and corridor of the school should be saturated with the holiday atmosphere. Various photographs of teachers and other honored employees of the institution are used; in the hall it is logical to place a stand or a large poster with general information about the holiday and the profession of a teacher, its necessity and importance.
You can use autumn leaves as decorations , as well as school paraphernalia , such as pointers, diaries, etc. These elements can be used to decorate the walls of the corridors, and thematic songs can be broadcast over loudspeakers (if available) during breaks. If the school has free premises, a great idea would be to create a museum - a room of memories, where photographs, diplomas and certificates of students and employees of past years will be placed.
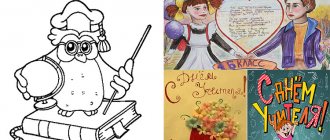
DIY crafts for teachers
Everyone loves to receive surprises and gifts. And if children make them with their own hands, then the work and care will be appreciated. What can you do for Teacher's Day with your own hands? Postcard, painting, vase, panel, etc.
Read about how to make a postcard for Teacher's Day with your own hands here:
DIY postcard for Teacher's Day (master class)
Balloon decorations
Everyone loves balloons - both adults and children. Therefore, they are always used for decoration. Today, the variety of compositions made from balls is simply amazing. In any specialized store it is easy to find and order entire installations of these cute products.
This:
- bouquets of flowers, baskets with flowers and just single flowers made from balloons;
- figures of people and animals;
- balloon fountains;
- inscriptions and simple letters;
- garlands and even entire arches.
But even ordinary multi-colored balloons filled with helium will look very cool in the classroom if you tie them one to each student’s chair, and a whole bunch of them to the teacher’s chair. Balloons are used to decorate photo zones, the chalkboard, the entrance to the classroom, the school foyer, and the assembly hall.
Decoration of a festive photo zone
A photo zone for Teacher's Day is an integral part of the decoration both in the school foyer and in the classroom. Anyone can take photos in the foyer - either individually with a specific teacher or with the whole class. In the classroom, there is usually a photo session of the class teacher with his students and parents who want to take part in this event.
Typically, the photo zone should reflect the appropriate mood. For example, for a photo shoot in the classroom, stands and banners with photographs made in the form of a collage and decorated around the perimeter with balls or garlands of autumn leaves are perfect. A photo zone usually takes up a lot of space, so even if it is the only decoration in the classroom, it will be cool. The main thing is to decorate it beautifully. What is usually used for this?
- Stands decorated with photographs, drawings, wall newspapers, and posters. Against their background, excellent class photos are obtained, where the teacher is sitting surrounded by his students.
- Blackboard. Drawings are drawn on it with chalk, and various wishes for the teacher are written from the students. It is decorated around the perimeter with balloons, garlands or voluminous flowers.
- Cardboard props often include fake textbooks, pencils, globes, class magazines and diaries, school rulers and multi-colored speech “clouds.” The latter are hung on the wall or simply attached to the school board and have inscriptions on them, such as: “The coolest teacher of all times” or “There is no better teacher than Gennady Vasilyevich!” Something like that.
- A frame on a frame with a congratulatory inscription made of paper or foamiran letters as a background for a photo also looks good. Especially if there is not much space in the classroom. The frame is decorated with beautiful paper leaves or balls, a chair and a desk with props (a stack of textbooks, a globe, a bouquet of flowers, a pointer) are placed in front of it. Simple and tasteful, as it should be for such an aesthetic event.
- A banner designed to resemble a chalkboard with children’s doodles, formulas or wise sayings drawn on it is also a good option for a modern photo zone decoration for Teacher’s Day. Don't forget about cardboard attributes - pencils, a protractor, a ruler, or just cubes with letters, formulas or numbers. A robe and a “scientist” cap with tassels would be perfect for such a photo shoot. It is easy to make from cardboard and painted black.
When organizing and decorating a classroom for Teacher's Day or other holiday event, always be guided by the size of the room so as not to clutter the space too much with different decor and attributes. After all, even though it is a holiday, classes on this day will take place as usual.
If you have already decided on the decor and design option, then start preparing an individual congratulations to your teacher. For example, eighth grade students at one school came up with this video greeting for their teachers.
And below, in the video, watch an idea for a gift for your favorite teacher.
DIY gift ideas for Teacher's Day
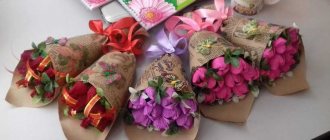
Flowers, compositions and bouquets
What would Teacher's Day be without flowers? For the holiday, the teacher’s desk should be decorated with a flower arrangement or just a bouquet of flowers in a vase. The blackboard, walls and cabinets in the classroom can also be decorated with flowers, but not real ones, but cut out of colored paper or cardboard. You can also use flowers folded using the origami technique for decoration. If we talk about bouquets, they can be different: from leaves, fruits and vegetables, sweets and even from stationery.
Decorating with colored paper
Perhaps this is one of the most common decor options, which is used to elegantly decorate any room for any holiday. And school is no exception. In order for such paper decorations to last for many years, you need to take thick paper or, as an option, stick it on thin cardboard or whatman paper. What is usually made from paper?
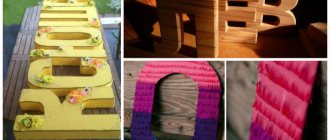
- They cut out the letters from which they make up words of congratulations. They (the words) are often joined together by taping them to wooden slats or strings that are hung on a chalkboard, on a wall, or above the front door. If large letters are cut out, they are used to decorate the foyer and stage in the school assembly hall.
- Garlands and streamers are made from paper, on which words of congratulations are written with paints or ink using stencils. Nowadays, different versions of such decor are often simply downloaded from the Internet.
- Autumn leaves made of colored paper are an indispensable decor for decorating both the classroom and the entire school. They are a symbol of autumn and are used almost everywhere. They decorate photo zones, school halls, and classrooms. Both individual elements and in the form of garlands are used.
- Volumetric flowers are often used to decorate classrooms for Teacher's Day. But here you need to try and organize at least one master class or labor lesson on this topic with your children. There is nothing complicated here, and there are many options for such colors.
- Paper fans and pom-poms look very beautiful when used to decorate a festive photo zone.
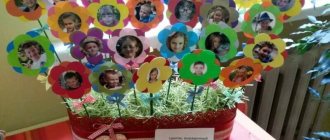
- Colored paper is also used to create various posters and banners, which play the role of a sort of large postcard to congratulate teachers on the holiday. Children will not always risk drawing something on their own, but an applique - for example, in the form of multi-colored palms with photographs of students in them, pasted on whatman paper - will look very original.
Shell crafts
In the summer, many children probably vacationed at the seaside and brought back a lot of beautiful shells. You can use them to make a beautiful gift for your favorite teacher for the holiday. First you need to process the shells for further work. Check to see if there are any shellfish left in the shells. Empty shells are immersed in water with chlorine (1:1 ratio) for about 30 minutes. After this, the top layer of shells must be removed using an old toothbrush with stiff bristles. If necessary, shells are coated with colorless varnish for shine.
What can be decorated with shells:
- candlesticks;
- photo frame;
- wall clock dial;
- ship figurine;
- postcards.
We offer to please the teacher with a frame with a cool photo taken in a nautical style. Prepare the following materials for work:
- small colorful shells;
- wooden frame;
- acrylic paints;
- heat gun;
- clear varnish;
- decor
Let's get to work.
- Cover the prepared frame with acrylic paint.
- Glue the shells to the frame using a heat gun.
- Decorate the composition with beads, a small anchor, and other suitable decor.
- Once the glue is dry, insert a class photo and give a keepsake to the teacher.
Crafts for teachers made from polymer clay
Students are often afraid to use polymer clay, mistakenly believing that it is a difficult material to work with. In fact, anyone who has imagination and a desire to create can make a beautiful craft.
The advantages of polymer clay are obvious:
- If something went wrong in the process, you can always correct the shortcomings.
- The finished craft is fired, and it becomes as strong as stone.
- The modeling compound does not need to be painted. Polymer clay is immediately sold in multi-colored blocks.
- From polymer clay you can make themed figures, entire compositions, refrigerator magnets, interior decorations, photo frames and much more.
- Modeling patterns can be found on the Internet. Sculpt each element of the craft step by step, and then assemble it into a single composition.
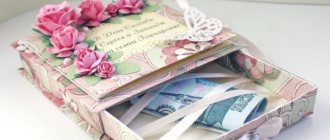
Bouquet of sweets
If you want to surprise and please your teacher on a holiday, give him an unusual sweet bouquet.
Necessary materials:
- round candies in foil;
- a piece of colored organza;
- corrugated shiny paper;
- ribbons;
- wire;
- scotch;
- wrapping paper.
Let's start making an amazing flower bouquet:
- Each candy should be wrapped in a rectangle of shiny paper, leaving a small tail at the bottom.
- We insert the tip of the wire into the ponytail, which will serve as a stem.
- We fix the candy on the wire with tape, and also wrap the wire itself with shiny paper.
- We cut rectangles of organza, wrap each candy with fabric, secure with tape and a shiny ribbon.
- We collect all the stems into a bouquet, secure it with tape, and wrap it with wrapping paper.
- All that remains is to tie the sweet bouquet with a ribbon.
There are many options for how to decorate a bouquet of sweets. For example, you can combine fresh flowers with sweets, or decorate a gift with stationery.
Original topiary for a teacher
Candies and flowers can be combined in an amazing craft - a “tree of happiness”. Various materials are used to make topiary:
- coffee beans;
- autumn leaves;
- fresh or artificial flowers;
- sweets;
- cones, acorns, chestnuts;
- fruits;
- air balloons.
You can use pencils to make a stand for an unusual tree and decorate it with stationery, small apples, bows, ribbons, and rowan berries.
We offer to surprise the teacher with an original autumn tree that will become a worthy decoration for the classroom. You will have to make an effort, but the result will exceed all expectations.
Prepare materials for work:
- jar or flower pot;
- 24 colored pencils;
- twine;
- sisal;
- branch for the trunk;
- shells, chestnuts;
- foam apples;
- plasticine;
- walnut shell halves;
- plastic letters;
- artificial flowers;
- viburnum berries;
- newspaper ball;
- acrylic paints;
- glue gun
Master class on making autumn topiary:
- Wrap the pot with twine. Stick pencils over the entire surface so that there is no gap between them.
- Make a ball out of newspapers and also wrap it with twine. To make a ball, you need to tear the newspaper into small pieces and glue it onto the ball gradually until you get the desired shape. You can use the papier-mâché technique to create a perfectly round ball. It is advisable to insert the wooden trunk in advance so that it holds tightly.
- Place the stem with the ball in a glass or pot, secure with dried chestnuts and shells. Each layer must be properly glued so that the topiary is securely attached to the pot.
- Glue the halves of walnut shells onto the ball with string, starting from the trunk. Leave room for other decor.
- Paint the trunk with milk chocolate acrylic paint and the crown with dark brown. When the acrylic hardens, cover the top of the crown with antique bronze using a sponge.
- Attach the plastic letters to the crown. Decorate the remaining empty spaces with viburnum berries, acorns, and alder cones.
- Tie two small colored pencils with twine and also attach them to the topiary.
- You can add artificial flowers to suit the arrangement.
- Fill the pot with sisal at the base, attach decorative apples, letters, and acorns to the top.
- The final touch is to spray the craft with hairspray and let it dry.
Felt brooch
Crafts made from felt will require effort and accuracy, but no one else will have such decoration. Surely the teacher will be delighted with the exclusive gift and will happily wear it to work.
To make a brooch you will need the following:
- yellow and orange felt;
- thin satin ribbon;
- Super glue;
- pin;
- decor (rhinestones, beads).
Master class on making brooches for a teacher:
- Find an image of leaves on the Internet or draw them yourself. Apply the stencil to the fabric and cut out 3 templates.
- Make decorative embroidery along the contour and center of each leaf.
- Fold the ribbon into several loops, sew in the center, decorate with beads, beads or rhinestones.
- Sew a small pin on the back of the brooch.
To follow the school theme, you can complement the decoration with a small bell, decorative pencil or letter. You can find the decor at a craft store.
Salt dough flower basket
Even primary school students can make an amazing panel with flowers. To prepare the salt dough you will need 200 g of fine salt, 200 g of wheat flour and 125 g of ice water. First mix the salt and flour, then pour in water in a thin stream, while kneading the dough. When it starts to come off your hands and becomes soft and elastic, the modeling mass is ready. Divide the dough into several parts, add food coloring to each part.
Let's start making the basket.
- Print or draw a basket template and cut out along the outline. Place the dough mixture on top and remove the excess mixture. Attach the basket to a piece of thick cardboard.
- Roll 2 sausages, twist them together - you will get a handle for the basket, which needs to be attached to the base.
- Fashion buds and leaves and attach them inside the basket.
- Let the dough dry and then coat the top with clear varnish.
The panel will look beautiful in a frame.