Creating a wireframe
Creating a holiday figure begins with the frame. It is made from thick cardboard. Corrugated packaging cardboard from boxes for large household appliances is perfect for this purpose.
The figure consists of two large parts and several small ones. On a large sheet of cardboard you need to draw a silhouette of a number. If you are good at drawing, do it by hand. You can do it even simpler, download a photo of a birthday number template from the Internet, print a large picture on several A4 sheets and cut it out. All you have to do is attach the finished template to the cardboard and trace it.
Having cut out two parts of the number, you need to cut out a long ribbon from cardboard; it will be located between the front and back of the number and form the volume. If there is not enough material for a long strip, you can cut out several pieces of the same width and connect them with tape. All that remains is to glue all the parts together with wide tape.
Making a number with your own hands can be even easier. You can cut the frame of the decoration from foam or foam rubber. Simply attach the printed template to the material, trace and cut out. Foam rubber can be cut with large scissors; foam plastic can be cut with a stationery knife.
The finished frame can be decorated in several ways.
How to make a voluminous base
Since some skill is required to accurately make three-dimensional numbers from paper, small-sized crafts can be recommended for beginners.
We draw the intended number on cardboard, cut it out, then another one of the same kind. For the walls we cut out strips; their width should be equal to the thickness of the future craft.
We recommend reading:
DIY polymer clay jewelry: review of the best master class with step-by-step instructions for beginners (150 photos of original ideas)DIY polymer clay flowers (120 photos of the best ideas) - simple instructions with full description + master class and video tutorials
Quilling for beginners (200 photos) - step-by-step instructions with description. The best master class on creating quilling crafts with your own hands
Using tape, we attach the strip to one of the blanks in the form of sides, put the second part on top and secure it in the same way. We cover the connection lines with strips of paper intended for decoration.
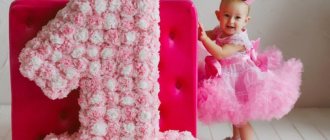
Fluffy figure for a boy
You can get original numbers from corrugated paper if you make it according to the following instructions:
- Cut long strips of small width from corrugated paper of the main color and glue them to all the joints of the cardboard frame. This is necessary so that there are no gaps on the number;
- Cut out many squares of corrugated paper, measuring 5 by 5 cm or slightly larger;
- Each square needs to be wrapped around a pencil or pen; corrugated paper will hold its shape well;
- Immediately glue each piece onto the frame.
At the bottom of the figure, you can glue several pieces of cardboard, stacked on top of each other, to make it heavier and more stable.
What you need for work
The craft can be more or less complex, but in any case you will need the following: thick cardboard of a suitable size; scissors and stationery knife; pencil; ruler; To decorate the surface, any glue that bonds paper well is suitable, but it is preferable to use “Moment” or a glue gun; for the volumetric version you also need adhesive tape.
The rest of the materials depend on the design chosen: paints, napkins, corrugated paper, compasses, stapler, additional decorations.
Fabric bows
You can use more than just paper to create numbers. Excellent decorations also come from fabric. For a girl’s birthday, you can cover the number with fabric bows.
For this purpose, it is better to buy several meters of ready-made smooth braid. The ribbon is cut into pieces 10-15 cm long, each one is tied into a bow and glued to the frame. If the fabric frays at the cut site, gently burn it over the fire to seal the edge.
Dessert
What's a holiday without sweets? If you present the birthday person with a cake in the form of a date, there will definitely be a lot of positive emotions. Such tasty numbers are usually ordered from pastry shops, but if you wish, you can bake them yourself. The main thing is to cut out the desired shape from the finished dough and decorate it as desired.
Any holiday, especially for children, is a sea of joy and positive emotions. Bright numbers will decorate the room and will be a good gift.
You can create this design yourself from inches of ribbon, paper balls or colorful leaves, sweets and flowers, or you can order it from an experienced craftsman. The result will always be excellent!
Ribbon fringe
If you buy thin multi-colored ribbons, you can use them to make fringe. We offer you instructions on how to correctly make a number with fringe:
- Cut the tape into pieces 10 cm long;
- Fold each piece in half and tie a knot at the fold;
- Glue the knot to the cardboard frame;
- Repeat for each ribbon. The knots need to be glued close to each other; for this it is better to use hot melt glue.
Note!
Macrame: diagrams, interesting projects and detailed descriptions of making crafts
- Crochet amigurumi - examples of how to make a beautiful toy with your own hands (75 photos)
Coffee topiary: step-by-step master class on how to make a small decorative tree from coffee beans
Satin flowers
You can make beautiful and very realistic flowers from a wide satin ribbon. For each flower you need to do the following:
- Cut out three circles, different sizes;
- Fire heat all edges;
- Add the circles together from largest to smallest;
- Pierce the center of the piece with a tailor's pin and pin it to the base.
Making numbers with yarn
Another simple way is to wrap the number with thread. Select the yarn of the desired color or colors, firmly glue the end of the thread to the cardboard figure and begin simply wrapping the thread around the frame. The thread must be placed very tightly so that the cardboard is not visible. The direction of the thread can be changed, so the number will look more interesting.
A melange thread or thread with smooth color transitions will look beautiful on a festive number.
Original ideas
Before starting work, we carefully consider how the number should look, what size and thickness it will be, determine the color scheme, and surface texture. A lot of ideas can be gleaned from photographs of finished products.
The color of the craft can be uniform, two-color, or variegated. Colors can be arranged in spots, stripes or as a frame.
An excellent combination for the holiday - red and white. By gluing images, you can reflect a certain theme in the product - Africa, the underwater world...
Humor is appropriate: we put a hat on it, glue on ears, and tie bows. The number can be golden and solemn, or bright green with cheerful daisies, whatever you like, the choice is yours.
Other ideas
In addition to the listed ways to decorate a holiday number, there are many more ways. Here are just some ideas on what you can use to cover a number:
A large piece of fabric. The fabric is glued to hot glue, forming beautiful folds;
- Colored paper or gift wrapping paper. On top of the frame you can make a thematic applique in the theme of the holiday;
- Small photographs;
- Multi-colored buttons;
- Felt;
- Artificial flowers made of plastic;
- Sparkles. The frame should be generously greased with PVA glue and sprinkled with multi-colored glitter;
- Wrap a decorative rope around the number, periodically gluing the rope;
- Small balloons. They need to be attached to a foam plastic frame, piercing the tail of each inflated ball with a tailor's pin. If the frame of your figure is made of cardboard, glue the balls with tape; hot glue will melt the rubber.
A festive number will decorate your home during your child’s birthday celebration, and can also be an excellent gift for an adult birthday boy. It can serve as a decorative item or combine several functions.
You can put a small gift inside the volumetric figure; for convenience, make a “door” in advance through which the birthday person can get the gift. For kids, you can make a festive piñata from a hollow cardboard figure. To do this, just fill the figure with candies and hang it in the yard.
Decorations
The appearance and originality of presentation depend on the imagination of the author or customer. On store shelves you can find special decorating kits, different types of colored, corrugated, wrapping paper, napkins, ribbons, etc. An important condition in creating a composition is the compatibility of the base (if any) and design elements. Which material to choose depends on its properties, ease of use, and availability. Before choosing one or another cheese, you need to find out whether it will stick to the base and what kind of fastening is suitable for this.
Napkins
The most versatile tool for crafts. This is due to the large selection of sizes, palette, density, and structure of napkins. They can be folded into a triangle to make a fluffy flower. There are many examples of exactly how to use material on the Internet. It is possible to arrange different shades, sizes and shapes. The airiness of the finished products is good for decorating both volumetric and flat figures.
Paper
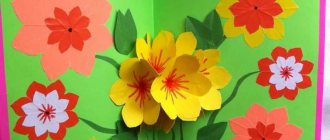
Universal material. Using paper, they make bright gifts that every child will be happy with. The numbers look beautiful, the decoration of which combines velvet and wrapping paper and voluminous products made from corrugated sheets. In decoration, you can use origami, three-dimensional origami, and quilling techniques.
Brilliant gift
Foil of any color will definitely decorate every holiday. It can be used to fully or partially cover the base, create a background, and appliqués.
Ribbons and other beauty
Satin ribbon, tulle, braid, yarn in skillful hands turn into a magnificent decoration for celebrating any date. Original numbers, depending on the color and design, can be given to a child or for a thirty-year anniversary.
Birthday people of all ages will be pleased to receive as a gift a composition of sweets or flowers, made in the form of a significant number.