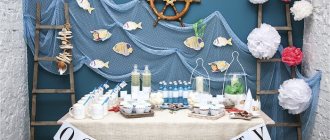
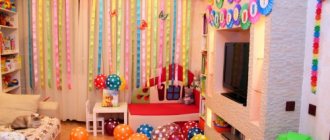
In order for a birthday to feel truly festive, a delicious cake and gifts are not enough. The type of room where the celebration will take place also plays a very important role. Therefore, to make this day truly unforgettable, we offer you several ways to decorate the room for your birthday with your own hands.
These economical decoration options will help you save money and make your birthday unforgettable.
Decorating walls with corrugated paper
This is a fairly quick, simple and original way to decorate walls for a birthday. Materials you will need:
- rolls of colored paper,
- Whatman paper sheets (preferably thick),
- stationery knife, scissors and tape.
Now let's look at the manufacturing steps.
- You must decide on the color scheme. Draw a sketch of the design you want to make.
- Of course, later you can correct or change something, but having a sketch will give you an idea of how it will look in the end and will significantly speed up your work .
- Lay out whatman paper - this is the base on which you will work. Depending on the size of the embroidery you plan to make, you can take one sheet of whatman paper, or glue several together (with the edges to increase the area). It will be much easier to work with thick paper, since it will remain strong when you cut it and weave ribbons.
- Place the base from sheets of whatman paper so that it is convenient for you to work with both sides of the paper. You can place two chairs at a distance from each other so that you place the ends of the Whatman paper on the chairs, weighing them down with books or something heavy so that the Whatman paper does not fall.
- You can also hang whatman paper in the doorway. But do not lay it out on the floor or table, as in this case you will only be able to comfortably reach the front side.
- Using a stationery knife make two cuts in the paper , thread the tape into each of them so that a strip of tape remains on the front side, and both ends are on the back: leave one end small and attach it to the paper (with glue or double-sided tape), the other one is longer if you want to continue this weaving, or fasten it too if this pattern is finished.
- Repeat the previous steps until you fill the entire Whatman paper with paper embroidery patterns. In this case, the cuts do not have to be strictly opposite each other, and the lines do not have to be even. Take ribbons of different widths and make your own design.
- Hang your creation on the wall and enjoy the work done and the festive mood!
For parents who prefer comprehensive solutions
Animators
The simplest option is to call an animator with a ready-made set of bendable balls, from which he will assemble dogs and flowers. This is a festive program, decoration, and surprise in one bottle.
They can decorate the room with light, portable, ready-made decorations and take them with them after the holiday.
Table
Decorating a children's room for a birthday is impossible without a festively decorated table.
Buy a ready-made set of disposable napkins, cups, plates, tablecloths, cards, head caps and a small paper carousel with animals in the same color scheme, and your princess will be enchanted, and you will have time for beautiful photos and videos. Several sets of healthy, age-appropriate treats will make the buffet much more interesting for other children and their parents.
For example, you can arrange cookies and pieces of previously tasted fruit.
And for older children there is complete freedom here; a bowl of multi-colored sweets, filled waffle rolls, and small pieces of pie are allowed here.
The biggest advantage of this design: after the holiday, you can safely collect everything and throw it away without regret, without washing the dishes.
Children's swimming pool
Another interesting option for decorating a nursery. It is quite possible to rent an inflatable pool with plastic balls for one day.
Calculate the size based on the total number of children invited and their age. For example, a one-meter pool with one package of balls will be enough for one one-year-old child.
We recommend wiping them with antibacterial wipes in advance to be sure that the design is safe for a child who tries to bite and lick everything.
Older children no longer need these tricks, and you can take a pool 2/3 of their height, entirely filled with balls, so that they can dive into them together.
Security questions
- Designers love to decorate birthdays with candles, and we recommend paying tribute to tradition in the form of one candle in the form of a number on the cake, it is much easier to trace the source of the fire.
- If there are inedible figures on the cake, they should be removed immediately after the photo shoot to allow the children to enjoy the dessert in peace.
- If the garland or flags are attached to carnations or any other sharp objects, hang it high, out of the reach of children.
- If your furniture has a lot of sharp corners, cover it with blankets or special children's rounded caps.
- Even older children should be checked every half hour; children's imagination is immeasurable. There were cases when children hid pieces of a treasure map in their ears after a story task, and a doctor who had already been invited pulled them out.
We are sure that these tips will help you create a pleasant and relaxed holiday atmosphere on such an important day - your child’s birthday.
Choose your favorite option or several, plan all the moments of decorating the nursery and the little birthday girl will surely remember the holiday not only with gifts.
We decorate a large room for little money
If you need to quickly decorate a large, spacious room, using a minimum of money and effort, this method is just for you. All you need is colored corrugated paper in rolls .
Then everything depends on the room you will decorate. Strips of paper can be pulled from the cornice, pipes, chandeliers, cabinets or shelving, in general, anything that will be there. Moreover, you can pull the paper with different forces so that the sagging is greater in some places and less in others.
TIP: You can also twist the ribbons. Hang colors in a random order.
You will definitely be able to create a joyful and festive atmosphere! Don't forget to make a beautiful cake stand - there are a lot of ideas in the link
Decor elements for men
Choosing a decoration for a holiday for a representative of the stronger sex is not so easy. However, we must not forget that every adult remains a child at heart for a long time and on his birthday he probably wants to return to those carefree times. That is why home decoration for an event can be colorful and bright; multi-colored balloons, collected in a separate composition or simply scattered throughout the house, would be appropriate here.
On this day, you must tell your loved one - father, husband, son - that you appreciate him very much. You should not skimp on warm and sincere words, and if you are planning to create something creative, then spend a few hours drawing a large thematic poster for your loved one.
A very good idea could be a collage with photographs in which the birthday person is presented in different guises, best characterizing him as a person, a man, a friend, a father or a husband.
Idea: walls with balls!
Both children and adults are all crazy about balloons. So, by choosing this method of decorating a room, you will definitely cheer up everyone present!
For this you will need the following materials:
- 160Q latex balloons (use a mix of different colors: orange, yellow, pink, purple, green, light green, blue and white),
- hand pump for inflating balloons,
- scissors, tape, double-sided tape.
Follow these steps and you'll soon be admiring the colored ball powder on your walls:
- Divide the ball into 6 equal parts by tying knots on it.
- Using a pump, inflate the first part of the balloon until you get an inflated sausage, tie a knot at the end. Then trim the inflated part of the balloon as close to the knot as possible. Then do the same with the next part of the ball, and so on until you get six small balls.
- Cover the knots with tape so they don't stick out.
- Repeat the first three steps until you have hundreds of colorful balls.
- Attach the balls to the wall with small pieces of double-sided tape.
This decoration is perfect for an original party or photo shoot. And don’t forget to stock up on enough sweets, since the appearance of the room will definitely encourage you to eat something tasty.
Here are some more great ideas for decorating with balloons.
Table and chair decor
Don’t forget about the design of the table and chairs. There can also be so many ways to decorate these items. Household members can let their imagination run wild and develop any design methods that will harmoniously fit into the festive atmosphere.
Let's consider several suitable options.
- You can decorate the backs of chairs using light and beautiful woven materials. Tulle or organza will do. It is desirable that the fabrics match the color of the surroundings or the tablecloth that is laid on the festive table.
- You can tie a balloon inflated with helium to each of the chairs. In its inner part it is worth placing a piece of paper on which the guest’s name is written. A little surprise will do instead.
- Place soft pillows of different colors on the chairs.
- Complete the chairs with decorations based on the immediate style of the celebration (for example, it could be pirate sabers, space attributes, magic wands and other similar elements).
To decorate the table, you can choose a beautiful and bright tablecloth and place original folded napkins on it. In the evening, you should turn to elegant glowing garlands or combinations made of burning candles.
Decorating the walls with large homemade “lollipops”
Beautiful colored lollipops are not inferior to balls in their ability to create a great mood. With their help, you can decorate a party or birthday and provide an original photo area for those present.
To create a festive atmosphere with your own hands you will need:
- wooden dowels measuring 12" x 1/2" (30 cm x 1.25 cm),
- acrylic paint (must be a wide range of colors: white, purple, dark blue, light blue, green, yellow, orange, red, pink, etc.),
- brush, stand for dowels (a glass or cup will do),
- palette, 4 sheets of A4 paper, scissors, pencil, foam disks measuring 10″ x 1″,
- glue gun, tape (regular or double-sided).
Assembly technique:
- Apply white acrylic paint to the wooden dowels . It's best to paint one half first and let it dry (in a container with the painted side facing up), then paint and dry the other side. While the dowels are drying, start making the candy itself.
- Cut out 8 identical curlicue stencils from paper and place them on a foam disk, as shown in the figure. Next, lightly trace the stencils with a pencil.
- Choose a paint color and use a brush to paint the curls one at a time . First trace the outlines so as not to go beyond the edges. You can do several layers to make the color look more saturated.
- By this time your dowels should be dry. Use a glue gun to apply glue to the end of the dowel and quickly press it onto the foam disc, holding it for a while to secure it.
- Do the same with the other discs, using different colors for painting.
- Glue the finished candies to the wall. You can stick it with tape on the leg, or with double-sided tape on the lollipop itself.
That's all done, enjoy the beautiful background!
Ball with a surprise
A wonderful addition to the festive decoration will be a surprise ball with a diameter of up to one and a half meters, which is suspended from the ceiling.
It may contain:
- small souvenirs;
- cookies with comic fortunes;
- fun lottery tickets;
- small balls or balls;
- small toys;
- flower petals;
- candies;
- everything you can imagine.
This ball is made with your own hands or purchased from organizers of children's parties.
At the end of the celebration, it bursts over the heads of the guests and showers them with its contents. You can burst the ball using a sharp object or a needle, or you can put something like a battery-powered fuse inside.
Attention!
Children may be frightened by the sound of a bursting balloon, so it is better to remove them from the room before doing this.
Make a volumetric figure
The big number will not only remain as a keepsake, but will also become the central photo area of the party. Detailed master classes on how to make numbers for a birthday - 10 lessons
Swing umbrellas
A children's party would not be complete without this seemingly simple, but very unusual decoration. Umbrellas can be hung on the wall, creating an unusual composition for photo shoots. It’s not difficult to make this original decoration yourself; each umbrella is most often made in a different color. Before making it, you should prepare scrapbooking paper, a glue gun, a stapler and napkins.
Step-by-step process for creating a pinwheel umbrella:
- The sheets are folded like a fan.
- The paper is folded in half, and its edges are fastened with a stapler.
- Three fans are alternately connected using a stapler.
Such a budget decoration will look no worse than others at a holiday.
We recommend reading:
How to decorate windows for the New Year: chic DIY decor optionsFireplace from boxes: how to make it yourself
- How to decorate an office for the New Year 2022: photos of original, stylish and creative decoration ideas
Fan garland for birthday
On hot days you crave coolness, and on cold days you crave reminders of warm days. This garland, which consists of many fans, will wonderfully help cope with both of these desires! Having made such a garland for your birthday to decorate your room , you will be transported to a fairy tale! And surprise everyone!
Materials:
- colored paper for scrapbooking,
- scissors, tape,
- colored cardboard, glue stick,
- ruler, stationery knife.
Steps for making a garland:
- If you immediately bought accordion folded decorative paper, you can skip this step. If not, fold the paper into even accordion shapes.
- Form semicircles from accordions.
- Cut out strips, circles, triangles or some other figures from colored cardboard - you will need them to decorate fans.
- Cut out semicircles from cardboard (the size should be smaller than the fans). Attach them to some fans using a glue stick. They will perform two functions at once - decorative and strengthening, that is, they will not allow the fan to curl up.
- Glue shaped cardboard cutters onto the fans , combining colors and creating your own pattern designs. You can take the drawing as an example.
- Connect the fans together to form a garland . To do this, stick them all on tape. You can first fasten the joints of the fans with a stapler to strengthen the structure.
- Hang a garland and cheer up!
DIY photo zone
Surely many would like to leave photo memories of the past holiday. One option is to use the photo zone as a place where everyone can take a unique photo reminiscent of this particular event. In addition, a photo zone is also a stylish decor for a birthday.
At first glance, it seems difficult to set up a photo zone with your own hands. But let's look at this task piece by piece. What do you need?
1 place. The photo zone should not interfere with the passage, but at the same time there should not be anything unnecessary around that could get into the frame. It’s worth taking a closer look at what devices for attaching jewelry are in this place.
2. Background. Here it is worth starting from what is available. There are some curtains, pieces of large plain fabric - we use them after they have been ironed. We hang them slightly higher than human height. If there are no curtains, no problem. They can be replaced by wallpaper remaining after renovation. You can choose a picturesque place, then nature itself will be the background. At the dacha, you can easily use even a fence for these purposes. Perhaps beautiful flowers are already growing next to it, and all that remains is to complement this place with something magical, which will be discussed below.
An excellent option is to build a screen from boards and developing ribbons. Or decorate part of the background with paper fan circles, as in the following video:
3. Decorative elements. And most importantly, decorate the background a little by adding unusual elements.
Making large paper Martenitsas
These decorations are made very simply and quickly with your own hands. You will need two A4 sheets - red and white, scissors and a glue stick. If you want to make a lot of decorations, then take more paper, the main thing is that both colors are in the same quantity.
The products have this color scheme because Martenitsa comes from Bulgaria and there is a ritual there to welcome spring with similar products in exactly these colors, as it is a talisman for good health for the whole family. But if you don’t delve into this folklore, you can take paper in the colors you like.
Let's now look at the manufacturing steps:
- Fold each sheet of paper in half (lengthwise).
- On each sheet, draw 10-12 straight lines, as shown in the picture.
- Make cuts along the marked lines with scissors.
- Unfold the leaves and glue their ends together, there should be glue on both ends.
- Form circles, securing them with glue.
- In the middle of the circles you can also attach strips of paper that differ in color from the circles themselves.
- Hang items around the room.
Posters
Beautifully handmade posters will allow you to decorate the walls in a festive manner. On such bases it will be possible to place absolutely everything that does not fit on a homemade tree. Here you can write down wishes to the hero of the occasion, attach funny photos with him, make original collages - there are a lot of options for execution.
Making a beautiful poster with your own hands is very simple.
To do this, you need to stock up on the usual “tools” that most users have in their homes: a sheet of whatman paper, paints, felt-tip pens. Let us examine in more detail the stages of creating such a decoration:
We recommend reading:
DIY door decoration for the New Year 2022, how to make a Christmas wreath at homeHow to decorate a Christmas tree for New Year 2022 in an unusual and stylish way with your own hands
DIY decorations and decor for the photo zone for the New Year, interesting ideas and master classes
- It’s best to start designing a poster with a catchy phrase that will occupy the central part of the Whatman paper;
- try to brightly decorate the background, but do not overdo it, otherwise the applied inscriptions will be difficult to see;
- The congratulations themselves can be written directly on whatman paper, or you can pre-prepare small cards and fix them on the surface of whatman paper;
- It is advisable to decorate the poster with the most successful and attractive photographs of the birthday boy, his friends and relatives.
Garlands without using glue
Even a child who knows how to use scissors can make such a decoration, since the pattern is very simple. You will need: A4 paper (calculating one sheet of paper for 4 elements of the garland), scissors, pencil.
The order of assembling the garland:
- Cut a sheet of paper into 4 even pieces.
- Take one part, fold it in half (across), and then in half again (also across).
- Draw with a pencil the shape you will use to cut out.
- Cut out the shape and carefully unfold it.
- Connect together the individual elements of the garland (as shown in the picture), alternating colors.
- Hang the garland.
We offer you several alternative designs for this garland.
Aircraft
The “awesome” style will leave a positive impression on the boys and girls who came to visit to congratulate the birthday boy.
The aerial theme will be perfectly complemented by garlands with airplanes and parachutes.
A little holiday in a box
On cold autumn and winter days, such a box of positivity will be just a great gift and will definitely create a sunny mood! You will need: a box, small helium balloons, as well as paints (or ribbons, colored paper) to decorate the box.
How to make it yourself:
- Paint or cover the box with rainbow stripes, flowers, or any other joyful patterns that come to your mind.
- Place small helium balloons in the box (the number depends on the size of the box. The ends of the ribbons tied to the balloons can be attached to the bottom of the box if you want the balloons to jump out to the length of the ribbon when opening the box, or not attached if you want they flew spectacularly to the ceiling or into the sky.
- Close the box.
- Give a gift and watch carefully the surprise recipient's amazement!
IMPORTANT: It is important to remember that small helium balloons lose their ability to fly after about three hours. Keep this in mind when preparing a gift.
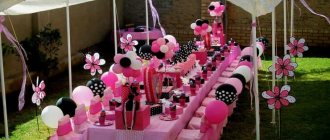
Create a festive atmosphere in nature
If the holiday is organized outdoors, it doesn’t hurt to accompany everything with holiday paraphernalia. You also need to think about lighting, which you cannot do without when evening comes. It would be optimal to use unusual flashlights, bright LED strips, and garlands. They can cover the openings in the gazebo, and the structure itself can be draped with weightless fabric. This way your table will be delicately protected from prying eyes and will turn into a real oriental tent. Balloons, large numbers and photo attributes in the form of signs with funny inscriptions will also be useful for celebrating in the gazebo. Setting the table with plastic dishes is a great idea that will save a lot of time for conversation, competitions and dancing in the fresh air. After all, it is for the sake of fun that such events are organized!
Collective gift for the hero of the day
Guests for the anniversary gather gradually, so I recommend engaging the most punctual ones with one common creative activity. Here are the options (all this can continue until the last minute of the celebration during pauses):
The big picture for the hero of the day
Nowadays we sell ready-made canvases on a stretcher. All you need to do is ask a person with artistic abilities to come up with a funny coloring book about the hero of the occasion. Place jars of paint next to the canvas and invite guests to paint areas of the picture. The end result should be a collective masterpiece that will last for a long time.
Magnetic hearts
It's also simple. Wooden blanks are sold for pennies in craft stores. Magnetic tapes on double-sided tape too. Set up a separate table with paints so your guests can create unique greeting magnets for you.
Collage
If you don’t want guests to use paints, invite them to make a collage about the hero of the day. To do this, you need a large sheet of Whatman paper attached to a wall or some kind of board. And next to it, put lots and lots of clippings from glossy magazines. Beautiful houses, cars, model figures, bright accessories (bags, jewelry, gloves, shoes), perfume, etc. You can take photos of gorgeous islands with palm trees, pictures with bouquets, jewelry. You also need a lot of cut out faces of the birthday boy, which guests will paste along with pictures onto a sheet of paper. Use a glue stick.
If your guests have a good imagination, a cool collage with wishes of “good luck, health, love and wealth” will remain as a keepsake. People sometimes make such “wish cards” for themselves; you can find many examples on the Internet.
World map with labels
It also makes an interesting gift for the hero of the day. This is especially relevant if you have invited guests from different countries to your anniversary. For example, someone specially flew in from America, Israel or a European country. Hang up a map on which guests will mark their city with special stickers. Great!
However, if all your relatives and friends live in the same city, hang up a map of the city. Let guests tag their home or street. It’s also clear!
We emphasize the date
When choosing decorations for the hall or room where the celebration will take place, you need to take into account the date of the hero of the day. For example, for the 20th anniversary, you can use bright white, blue, pink, red, green tones of decor that will emphasize the youth of the birthday person, his love of life and the discovery of a new milestone on the path of life.
And if a 40-year-old person celebrates the holiday, it is worth decorating the hall in a respectable and discreet manner, emphasizing the status of the birthday person and his achievements.
As a rule, by this milestone people have already developed family and professional spheres of life, which can be reflected in the decorations of the banquet.
As for anniversaries in honor of a significant date, for example, 60 or 70 years, it is worth noting not only the professional merits of the birthday person, but also emphasizing the presence of loving loved ones - children and grandchildren.
Depending on the style of the special event, decorations can be restrained and solid, or, on the contrary, bright and a little playful.
Photo zones for the anniversary. please yourself and your guests.
An anniversary is always a significant event that you want to celebrate, if not on a grand scale, then in a way that will be remembered for a long time. Taking photographs for memory is one of the components of the holiday. And in order for the pictures not to look boring and monotonous, it is necessary to prepare a special area where people can relax and take pictures.
The peculiarity of such a photo zone is that its organization requires a background and a certain amount of material for decoration. Photos taken in such an area will be much more interesting and brighter, and the photo session itself will be remembered for a long time.
Key principles
There are several simple principles for proper holiday decor.
See alsoHow to make a paper fan
Focus on the child's age
For small children, it is better to stick to light pastel shades that are not irritating to the eyes, and simple themes without unnecessary sophistication and sophistication.
The baby will love the unusual transparent balls
Older children will like thematic designs in the spirit of their favorite cartoons, fairy tales or computer games. Don't hold back your imagination, use the brightest colors and embody your wildest ideas.
Decorating a children's table based on Winnie the Pooh
With teenagers, on the contrary, you need to be careful in your ideas. This category of birthday people will not want to seem like kids to guests, and birthday decorations should be more restrained. Limit yourself to just beautiful balls and classic decorations. For a themed party, sports, music and movie themes are acceptable.
See also Interior decoration for a kindergarten group.
Divide the room into zones
Concentrate the main decor in the dining table area, where the children will spend a significant part of the entire celebration.
An example of festive table decoration
Leave enough free space in the second zone, which will become a playground for the hero of the occasion and his friends. Remove all unnecessary items from here, use a play hut and lots of pillows as decorative elements.
Another great idea is to organize a special photo zone. So this holiday will remain not only in your hearts, but also on wonderful photo cards.
See alsoDecoration of the festive table
Involve your child in the design
A surprise is, of course, wonderful, but older children will be very interested in taking part in the decoration of the holiday themselves, feeling like a full owner of the holiday and the organizer of the special event.
Children are happy to participate in decorating the room for the holiday
An alternative option is to decorate the room only partially, making a surprise for the child, and then begin the remaining decor together with the child.
See alsoChildren's room in loft style: an interesting solution for a city boy
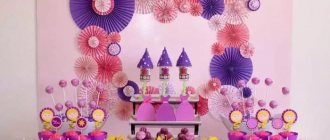
Photo area
Making a cool photo zone where your daughter will take pictures with friends is not that difficult. If the holiday is decorated in the style of princesses, then it is important to create an arch using chiffon. Roses, stars or an inscription with the name of the birthday girl are cut out of cardboard. All these parts are carefully attached to the fabric. The photo zone will be complemented by a cardboard castle and a neat little chair, decorated in the form of a throne. Using a similar scheme, it will be possible to prepare a place for photographs in any other holiday theme.
For superhero lovers
An interesting solution is to hang the inscription “Happy Birthday!” on the wall, the letters of which will be cut out from comic books. Decorate it with colorful balloons. It would be good to buy a costume or parts of your child’s favorite hero - a Spider-Man costume, a Batman mask or a Superman cape. A cake baked yourself can be decorated with colored fondant or icing with themed designs and patterns.
Flashmob
This is some kind of action about which all guests of the holiday are notified, but for the hero of the occasion it remains a secret until the last moment.
We recommend reading:
- How to decorate windows for the New Year: chic DIY decor options
- Fireplace from boxes: how to make it yourself
Decorating the New Year's table: subtleties of serving and decorative features
For example, you could ask everyone to bring a bouquet of only white flowers. Or, in addition to the bouquet, ask to take with you one red helium balloon. It’s a small thing, but all this makes an impression on the hero of the day. Some guests came with balloons, then others, then others... If there are 5 people in the family, everyone should have a balloon! At some point in the middle of the holiday, everyone goes outside to make a wish with the release of balloons.
You can also agree that during the dances all the men will be given indoor firecrackers with rose petals, and on command they will shower the birthday girl from head to toe with silk leaves (a man can be covered with banknotes - there are such firecrackers).
New Year's toys for the Christmas tree made from salt dough: step-by-step master classes with photos
Salt dough can be considered a universal material for making New Year's crafts, Christmas tree decorations, or even garlands. It's easy to prepare it yourself. The dough is considered a completely safe material, so it is ideal for getting creative with your children.
You can make a very interesting garland from salt dough. You will only need materials that are always at hand. This garland looks very unusual.
Materials:
- 2 cups of flour;
- 1 glass of salt;
- 250 ml water;
- tubes;
- tape or rope.
Step-by-step production:
- Mix water, flour, salt and knead the dough. It should turn out very cool, but at the same time flexible. To prevent it from sticking to your hands, you can add 1-2 tsp to it. vegetable oil. But you should not exceed the dosage, as this will lead to a deterioration in the properties of the dough.
- Roll out the mass on a work surface into a layer about 0.5-1 cm thick.
- Cut out the figures using a stencil. You can use cookie cutters. If there are no molds, you should cut out circles using a glass.
- Make holes in the blanks using ordinary plastic tubes.
- Dry the products, thread a rope through them and hang the garland in a visible place.
On a note!
Using this technology, you can make toys for the Christmas tree. It is not necessary to make holes throughout the entire area of the products. You can simply make a hole at the top and thread a thread through it.
There are a lot of options for decorating crafts made from puff pastry. You just need to show your imagination. Christmas tree decorations with satin ribbons threaded through them look unusual. You can make many holes under each other, and then thread the lacing through them. Crafts made from puff pastry with an outer layer decorated using the decoupage technique look very impressive.
You can make a very interesting candle from salt dough. It is permissible to use a paper towel roll as a base.
Materials:
- salted dough (2 cups flour, 1 cup salt, 250 ml water);
- dye;
- cardboard base from a roll of paper towel or toilet paper;
- corrugated paper in red and yellow colors.
Step-by-step production:
- Knead the salt dough by mixing water, salt, flour.
- Divide the dough into 2 parts. Tint one part with red paint, and the second can be left light.
- Roll the dough into ropes and place them on a toilet paper or towel base, alternating light and red rings.
- Make a flame out of crepe paper (roll up red and yellow paper) and insert it into the tube.
On a note!
This craft is suitable for activities with very young children. She perfectly develops fine motor skills.