Do you want to make this pleasant moment more beautiful and unusual? Then you have to work a little harder.
In this article, the News Portal “Vtemu.by” will offer you several simple, but original options for packaging sweets to make the donation process look festive and beautiful.
Packaging sweets in corrugated paper
Girls will especially like this option for packaging sweet treats.
Each candy will look like a luxurious flower. You can pack one large candy at a time, or you can pack several candies and even cookies and marshmallows into one flower.
Fold the corrugated paper in half, attach the stencil, and cut it out. You should end up with a kind of snowflake. Place candies in the middle of this snowflake and tie with a decorative ribbon.
This sweet treat looks elegant and festive. It will be especially relevant for birthday people in the summer and spring.
If the child was born in winter, you can choose white or blue corrugated paper and then the candies will resemble fluffy snowflakes.
Knitted sweets
For needlewomen, we offer another option - knit your own candies. These toys will look amazing on the Christmas tree!
Making original crafts for the New Year is a fun activity. It's even more fun if you create Christmas tree decorations with your kids.
How to cut out voluminous snowflakes: 5 life hacks for 2021 from Joy-pup.
Packaging sweets in thick colored paper
From a sheet of thick paper, cut out a blank for future packaging using a template. This paper candy can be used to pack not only sweets, but also small souvenirs.
It looks original and unusual. Paper candies can be personalized; to do this, you just need to sign each of them with a bright marker.
How to make a New Year's candy out of paper: template, photo
You can decorate your Christmas tree or home for the holidays with the help of a “Christmas candy.” It is very simple to make, by folding two sheets of colored paper - red and white.
Depending on what size lollipop you require, you can prepare a large or small sheet of construction paper. Roll and fold the paper step by step, following the diagram:
- Take two sheets of colored paper
- Paper colors should be on the outside
- Fold two sheets into a triangle (2 pcs.)
- The triangle is superimposed on the triangle (not exactly, but with a slight shift down)
- Start twisting the stick from the wide side
- For ease of twisting, you can put a long wooden kebab skewer or knitting needle inside.
- Continue twisting until you get a nice tube
- Crochet the top of the resulting tube
IMPORTANT: For ease of twisting and bending the candy, you must work with paper napkins (red and white).
Work stage No. 1
Work stage No. 2
Work stage No. 3
Packaging sweets in “Bunny” bags
A very unusual and beautiful way to decorate sweets.
You can use decorative paper, cellophane, or even scraps of fabric to make bags.
Fill the finished bags with candies, put them in a beautiful basket and send your child to distribute sweet treats to their friends.
Champagne decoration
The easiest way to decorate champagne using sweets is presented in the next master class.
- Glue the paper to the size of the champagne. Use PVA, Moment or a special glue gun.
- We trim the edges, fold them and glue them together.
- We glue all the necessary decorations onto this paper only - then the “case” can be easily removed from the bottle.
- First, let's attach the tinsel.
- Between it are large candies. Glue them on paper to help them stick better.
Quick packing of sweets
A quick and easy way to pack candy for kindergarten or school is to put it in disposable cups. Today, in any store you can easily purchase disposable cups of various shapes and colors at an affordable price.
To prevent the candies from falling apart, cover the cups with a square of decorative paper or cellophane and secure with ribbon or an elastic band.
Do you want to surprise everyone? Then show a little imagination. For example, you can make funny shoes with candies inside.
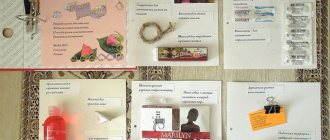
Creating a layout
At the first stage, you need to decide on sweets.
Usually, Bird's Milk candies are used for shockboxes. These candies are rectangular in shape, which makes it easy to create a template for the future chocolate box. These candies also have two wrappers. When you remove the paper wrapper, the candy remains in the foil. Thanks to this, the candy is protected from any impact.
Next, you decide on the size and shape of the shockbox, that is, the number of candies and their location. Most often, shockboxes are made for 4, 6, 8, 9, 12, 16 candies. Here we will create a box of 8 chocolates in Photoshop.
Even if you do not know all the functions and capabilities of Photoshop, you can create a wonderful layout for the shockbox. Here it is enough to know the principles of working with shapes and be able to insert pictures and texts.
But if suddenly you don’t know how to work with the Photoshop program at all, then you can easily learn this thanks to the Photoshop courses for needlewomen and home craftsmen (abbreviated FRDM) from the Academy of Graphics and Design. They explain in an accessible form the basic principles of working in Photoshop.
In the classes you will learn numerous techniques that will help you create wonderful cards, collages, stamps, seals, patterns and much more. The course already has over 5,000 positive reviews and you can access it via this link:
>>> GET ACCESS TO THE PHOTOSHOP COURSE
The box will consist of two parts:
- an inner box with sides where we will put candy;
- external, where the internal box of candies will slide in (similar to a matchbox).
Having placed the candies on the table in two lines of 4 candies, measure the width (A), length (B) and height (C). We add 2 millimeters to these measurements so that the candies easily fit into the finished box. Since our box will have sides, we need to take this into account when creating the template (side width D).
The template for both the inner and outer box for 8 Bird's Milk candies is placed entirely on an A4 sheet.
In Photoshop, using the Rectangle tool, we begin to create a template.
Inner box template
First, draw the base of box 1. Width of rectangle 1 = A+2D+2mm, length – B+2D+2mm.
Next, draw rectangles 2 and 3. The width of rectangles 2 = C + 2mm, length = the length of rectangle 1 (i.e. B + 2D + 2mm). Width of rectangles 3 = width of rectangle 1, length = C+2mm.
Then draw rectangles 4 and 5. Width of rectangle 4 = D, length = length of rectangle 2. Width of rectangle 5 = width of rectangle 3, length = D.
The width of the rectangles is 6 = the width of the rectangles is 2, and the length = B+2mm. The dimensions of rectangles 7 are the same as those of rectangles 3. The side of figures 8, which is adjacent to rectangles 4, is equal to D, and the opposite side of figure 8 should be slightly smaller. This is done to make it easier to assemble the box. The other two sides should be equal to or slightly less than the width of the rectangles 6.
For the remaining figures, one side, which is adjacent to the already drawn figures, corresponds to the size of these figures. The opposite side should be slightly smaller for ease of assembly. And the other two sides can be arbitrary.
On rectangles 5 and 7 we draw stripes for the slot at a distance equal to D from the edge of the rectangles. Figures 8 will be inserted into these slots during assembly.
The inner box template is ready.
Outer box template
To create a template for the outer box, you need to draw two rectangles 1* and 2*. The height of these rectangles is equal to the height of rectangle 1 of the inner box. The width of these rectangles is 1-2mm greater than the width of rectangles 1 and 2 of the inner box, respectively. If you make rectangles 1* and 2* equal to rectangles 1 and 2 respectively, then you will not be able to insert one box into the other.
The remaining figure has one side that is adjacent to rectangle 1*, equal to the height of this rectangle. The opposite side needs to be drawn a little smaller. And the width of this figure should be less than the width of figure 2* by a couple of millimeters. So that when assembled you get a neat box.
Candy wrapper template
To create a wrapper template, you can simply remove the factory wrapper from the candy and measure its dimensions, but you can also create your own. You just need to take into account the size of the candy itself.
When creating a template for the wrapper with your own dimensions, base it on the dimensions of the candy. The width of the template is obtained from the sum of the width and height of the candy, multiplied by two, plus the width of the area for gluing; the height of the template should not exceed the length of the candy.
Design of box and wrapper layout
After creating the templates, you can start designing them.
Here you can give free rein to your imagination and use absolutely any pictures, photographs, texts. To find them, you can use any search engine, or you can use your own photographs and texts.
You can even make a collage, taking a frame from a movie, and instead of the hero, insert a photo of the person for whom you are making this shockbox. This technique was described in detail at FRDM 9.
The main thing when designing layouts is to do everything in the same style and choose high-quality images.
Using the same template and inserting different design elements, background images, photographs, texts, you can create layouts for shockboxes for any holidays or events.
Design is created for the inner and outer boxes, as well as for the wrappers. When creating a layout for wrappers, you need to take into account the number of candies in the shockbox. If you write wishes on wrappers, then you will need to change the inscription for each candy. But you can make one design for all the candies. When preparing wrappers for printing, they all need to be placed on one A4 sheet.
Packaging for candies from cardboard rolls
Yes Yes Yes! It is from the most ordinary cardboard rolls that these amazingly beautiful boxes are made.
If you want your sweet treat to consist of unwrapped candy, then be sure to wrap it in cling film before placing it in the homemade cardboard box.
Casket-box
We will make the box using decoupage technique.
For our work we will need:
- sandpaper;
- decoupage napkin;
- acrylic paints (preferably bright colors);
- shellac;
- bitumen;
- scissors;
- rhinestones;
- sponge;
- tassels;
- cinnamon;
- coffee beans.
Instructions:
- First, carefully sand a small wooden box and cover it with bright paint.
- After this, we take a beautiful decoupage napkin and attach it to the surface of the workpiece.
- We print any design on the printer, cut it out, put it on the box and apply a little paint with a sponge.
- We treat the edges of the box with bitumen (it creates a darkening effect).
- We apply shellac, wait until it dries, and then go over the box with sandpaper.
- If desired, we decorate the outer part of the object with rhinestones, and put coffee beans and cinnamon inside for half an hour so that the box begins to smell pleasant.
- After the time has passed, pour out the food and place the candies in the box. That's it, you can give the box as a gift!
For best results, the relief coating should be lightly rubbed with a damp cloth.