Making a costume
Tool
To make a fairy witch costume, you will need:
Needle
Threads
Sewing machine
Scissors
Materials
| Material | Quantity | Price |
| Black lining fabric or film | Cut: 200 cm x 150 cm | From 300 rub. |
| Thick paper or cardboard | 1 package | 100 rub. |
| Total: 400 rub. |
Headdress
Most often, a witch's headdress is a pointed hat with a brim. You can make such a headdress with your own hands from cardboard. You need to cut out two parts - the cone and the brim of the future hat. To connect the parts together, the cone is bent outward along the wide edge and cuts are made on the bent part at intervals of 1 cm. The parts should be glued together and, after the glue has dried, painted black or purple.
All that remains is to decorate our hat. You can paint stars on the cap with gold or silver paint, and “plant” spiders on the margins, of course, not real ones, but plastic ones. You can decorate the brim of your hat with a wreath of autumn leaves by weaving small plastic pumpkins into it.
If you plan to have a beautiful hairstyle, then, of course, you shouldn’t hide your hair under such a hat. In this case, you can make a very small hat and glue it to a hairpin or hairpin. Such an accessory will only decorate your hairstyle.
If you want to be original, then instead of a hat, you can make a headdress with horns, like Maleficent. The base of the figured horns can be made of cardboard or foil, which will need to be tightly wrapped with black electrical tape. It is convenient to glue the horns to a wide hairband.
Add-ons
Following the instructions below, you will make a simple witch costume consisting of a dress and a hat. It will be missing something, namely a broom! It is better to make a broom with your own hands from a handle and twigs. You should not buy brooms or brooms at a hardware store: a broom will be inconvenient and inappropriate, and a broom is sold in adult size and is unlikely to be suitable for a child.
Broom
You can buy cuttings at a hardware store. Take a thin one, these are usually sold not for brooms, but for mops or similar tools. Shorten it according to the child's height.
The rods can be taken from an old broom, slightly tinted dark with water-based stain and shortened. The stain will help disguise the origin of the rods and create the impression that they are real wooden rods and not straw. After this, attach them to the handle and secure. To secure, you can use steel wire and pliers, or you can use regular rope.
False nose
Another optional attribute is a false nose. Witches are young and old, and if a young witch does not need a false nose, then an old witch simply needs one. Making a false nose is quite difficult; it is better to buy it ready-made in the appropriate stores.
Hat improvement
If you are not satisfied with the cardboard hat, then you can improve it by covering it with the same black lining fabric. This will give the witch hat a more solid look and make it more durable, allowing the costume piece to be reused. Finally, the hat can be sewn together using cardboard elements as a lining, giving the hat rigidity.
Arcane amulets
A good addition to the image of a witch would be all sorts of “magical amulets” on strings or chains, worn around the neck. You can make them yourself from wood or plastic, or buy them in stores selling carnival paraphernalia.
Dress
To make a witch costume for Halloween, you should start by choosing a dress. This piece of clothing can be, in principle, anything, the main requirement for color. The dress should be black or purple, you can use a combination of these two colors.
You can make a suit from ordinary clothes, because the dress can be long or short, fitted or have a straight silhouette. A lot depends on the chosen image. So, an old scary witch may have tattered, worn and not particularly clean clothes. If you are creating the image of an elegant witch, then you should choose a fitted A-line dress with a floor-length skirt.
If the costume is created for girls with an ideal figure, a short, tight-fitting dress or, conversely, a long one, but with a high slit in the skirt, is perfect.
You can decorate the dress with lace or mesh by sewing details from these fabrics on the skirt or sleeves. You can decorate an outfit with a “web”; it can be easily made from gray woolen threads.
If you are sewing a suit for girls, then it is better to choose the option with a fluffy skirt. If you don’t have a suitable dress in your wardrobe, you can easily make a suit at home. To do this, you need to take a wide elastic band and, after taking measurements, make a belt. Sew onto this belt in several layers pieces of colored organza, tulle or, in extreme cases, gauze, starched and tinted in the desired colors. Don't have any suitable fabric or gauze in your house? No problem, this costume can be easily made from improvised materials by sewing triangles cut from plastic bags of suitable colors onto an elastic belt.
All that remains is to put a dark T-shirt and leggings on the girl, and a prepared skirt on top, and the children's witch costume for Halloween is ready.
Making a witch costume
We bring to your attention two completely different, but equally spectacular New Year's witch outfits.
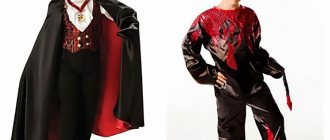
Option 1. This option involves a long dress and a raincoat. The dress can be any black fabric, which must be sewn in such a way that it “sits” on the child quite loosely. Or you can simplify the task by using some of your old dark-colored dresses to create a costume.
Witch Costume Design Ideas
For the cloak, stock up on fabric of two colors: black and some dark one for the inside of the cloak (it can be burgundy, purple, dark green, etc.). The length of the raincoat should be equal to the height of the child from the neck to almost to the toes (a little shorter is possible), and the width should be such that you can wrap yourself in the raincoat.
We apply both pieces of fabric to each other (their size should be absolutely identical) and carefully baste the fabric. Then we use a sewing machine to secure the result. After finishing the sewing process, carefully iron the finished raincoat with an iron.
So that it can be fixed around the neck, we use a ribbon. We cut out a not very wide strip of fabric, cut it and sew each of the halves to the upper edges of the cloak.
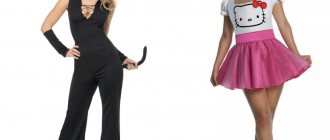
Option 2. This costume is absolutely different from the previous one and is perhaps more suitable for younger girls. It consists of a top (a T-shirt or bodysuit) and a bottom (an unusual fleece skirt).
We make a tutu skirt as follows:
- We take tulle of different colors (orange, purple, green, red, black, etc. are perfect) and make blanks from rectangular pieces of fabric about 15-25 cm wide. The length depends on the size of the finished skirt.
Advice. In order for the pieces of fabric to be the correct size, the length of the skirt must be multiplied by two, since when attaching to the base, we will fold the pieces of tulle in half.
- We take a wide elastic band and fix it on a solid base, such as a roller or a thick book. And we start tying the tulle. Fold the strip of fabric in half, pass it under the elastic with the folded side forward a couple of centimeters, lift the “tail” up and thread it through the resulting loop, pulling it tight. It turns out to be a strip tied in a knot. We do the same with the rest of the stripes, changing colors one by one.
- As a finishing touch, we tie a beautiful satin ribbon on the skirt.
So, our hat is ready, our costume is ready, we’ll add a broom, colored tights and the New Year’s look is complete!
Preparation of necessary materials and tools
A witch's New Year's costume traditionally consists of several elements: a hat, a dress, stockings and a broom. If we use ready-made colored tights/stockings, then all other elements of the New Year's outfit can be made with our own hands. To do this we will need the following tools and materials:
- scissors;
- roulette;
- threads;
- cardboard;
- felt;
- black boots;
- decorative elements for a costume (bats, spiders, cobwebs, etc.);
- cosmetics for applying makeup (optional);
- tulle;
- wide elastic band.
Attention! The list contains the main elements that we will definitely need to create a New Year's look for a child. But this does not mean that you cannot add to the proposed list. Fantasy in this case is only welcome.
Accessories
When creating a costume, accessories play a big role. If the image of an elegant witch is created, then the costume should be complemented with jewelry - multi-tiered beads, bracelets, massive rings. You can make these decorations yourself using Halloween themes (pumpkins, spiders, skulls, rats, etc.)
A decent witch does not leave the house without a means of transportation - a broom. This “vehicle” can be made from an ordinary broom and a mop shaft. It's very easy to make. You need to attach the broom to the shaft with a wire, and then put a cardboard “cap” on the broom to hide the attachment point.
Instead of a broom, you can make a “magic staff” as an accessory. To do this, a piece of a mop shaft can be wrapped with satin ribbons, strips of fabric or colored paper. You can decorate the accessory to your own taste.
If you don’t want to carry a rather massive staff or broom with you, then instead of these items, you can make a “magic” wand. You can hang it on a ribbon from your belt to keep your hands free.
So, creating a witch costume yourself is not at all difficult. You can do without buying expensive fabrics and accessories, and make do with what you found in the pantry. A little imagination - and junk items can turn into an excellent carnival costume.
Shoes
Shoes must be selected in accordance with the chosen image. So, if you are creating an attractive sexy character, then you can wear any suitable high-heeled shoes. But shoes with sharp, upturned toes will look more interesting. Any old pumps that you no longer plan to wear are suitable for making them.
The original toe of the shoes can be made from foil or papier-mâché. It is glued to the front of the shoes. And then the entire surface of the shoe is covered with paper (you can even use newspapers).
It's backwards to just paint the shoes and decorate them. You can use glitter, make large shaped buckles from foil or cardboard, or put plastic spiders or mice on the surface of the shoes.
Stockings for a witch costume can be striped or black, fishnet. If a scary image is created, then the stockings can be deliberately torn, and instead of beautiful shoes, wear old slippers.
Making a hat
A witch's hat must be pointed, but otherwise, do not limit the flight of your imagination. We offer 2 options for making a witch hat: a neat, tight little hat and a large cap hat with a wide brim. Let's consider each option in detail.
For a decorative hat you only need cardboard and a small piece of felt or any other black fabric. The main thing is that it is dense enough. Since the hat will be attached to the head only with the help of various pins, and not put on entirely, the exact size of the child’s head will not be needed.
Hat for witch costume
We cut out a circle from cardboard so that the surface of the future hat does not cover the entire head. Now we draw a diagram of the cone for the cap (we choose the size “by eye”, say, 15 cm). But its top should not be pointed: that is, in fact it will be an isosceles trapezoid with a narrow top.
We cut out the cardboard blank and fold it so that we get a cone. And glue along the fold line. Let it dry. Now all that remains is to cut out the felt according to the same patterns and stick it with a glue gun on a cardboard base. The hat is ready!
The second option is somewhat more complicated. To make a full-fledged hat to put on the head, first of all, take the dimensions of the child’s head. Then we make drawings on cardboard. The diameter of the brim can be different, it all depends on your wishes, but in order for the hat to fit on your head, the diameter of the base of the cone should be the volume of the head + 1 cm.
The length of the cap can be different, but such that the hat does not stick out like the Eiffel Tower. We will take approximately 25 cm. As in the first case, the cone will be without a pointed top. The length of the top peak will be approximately 2-2.5 cm (this is our “margin” for creating the fold line).
We cut out the created blanks from cardboard, glue them together, then cover the resulting hat with felt or other thick fabric.
Both decorative and regular hats can be decorated with additional elements: leaves, beautiful ribbon/lace, decorative spiders, mice, etc.