At the beginning of October, teachers will celebrate their professional holiday - Teacher's Day. On this day, many words of gratitude will be said to our respected mentors, there will be gifts, flowers, and a gala concert. Each class will probably want to congratulate their favorite teachers in an original way, which is why wall newspapers are especially popular on Teacher’s Day. Students can show creativity, imagination, capture the best school moments and leave wishes to their dear mentors. You will learn how to create a holiday poster for Teacher's Day in our article.
General recommendations
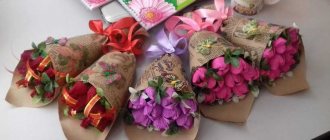
Happy Birthday cards to the first teacher are easy to make, because primary school students cannot yet make a complex version on their own. As a rule, colored paper, thick cardboard are used in the work, and you can also use materials that can be found in every home:
- Buttons. Multi-colored buttons of different shapes on a postcard can turn into flower buds or balloons.
- Felt. Figures are cut out of fabric and glued to the base of the postcard. Autumn felt leaves, flowers, and figures of funny animals look beautiful.
- Scrapbooking paper. It can be used to make balloons, suns, clouds and other cute figures.
- Salty dough. Kids love to sculpt from soft masses, and the sculpting process helps develop fine motor skills. Finished products are attached to the cardboard base with hot glue.
- Pasta. You can lay out various patterns from them and paint them with paints.
High school students can also please their beloved mentor on his birthday with unusual homemade cards. When choosing a sketch, you need to take into account the age of the birthday person, his preferences, tastes and interests. On the spread you can write a touching wish or print out a congratulatory verse.
If you are preparing a surprise for a subject teacher, the drawing on the card may be related to the subject taught by the teacher:
- You can give a physical education teacher a postcard in the shape of a soccer ball or dumbbell.
- For a dance teacher, a craft with an elegant ballerina made using the scrapbooking technique will be suitable.
- You can congratulate your music teacher on his birthday with a card with a picture of notes or a piano.
- You can make a gift for a math teacher in the form of a checkered notebook with formulas, a briefcase, a protractor and a ruler.
- A geography teacher will love a postcard with a picture of a globe.
- A Happy Birthday card for an English teacher can be in the form of a page from an English dictionary with a themed decor.
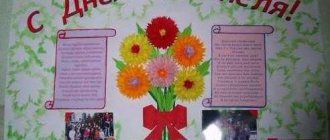
How to make a poster or wall newspaper for Teacher's Day?
The simplest, but at the same time, original way to please teachers on Teacher's Day is to make posters with your own hands. Why an unusually designed piece of Whatman paper will be a pleasant surprise for mentors:
- A blank piece of paper allows you to express your creativity and talents. Some of the students can draw a beautiful picture, others can compose a congratulatory poem. A wall newspaper can be designed in the form of comics, a newspaper spread, decorated with sweets, school photographs, or something else.
- The teacher will certainly appreciate the efforts of the students and will be glad to receive such an unusual gift on their holiday.
- Our parents and grandparents drew wall newspapers by hand, but now you can print out beautiful text, paste ready-made pictures, or make a poster using a special program on your computer.
- Collective creativity is always fun and interesting when the whole class gets together to create a gift for their favorite teacher with their own hands.
There are many options for how you can decorate a wall newspaper for Teacher’s Day in an original way using a simple Whatman paper and your own imagination. Ideas might be:
- Glue your photos and draw a line next to each one, like in a comic book. You can add clippings from magazines and newspapers.
- If congratulations are addressed to subject teachers, decorate the poster with thematic drawings: a globe, formulas, an encyclopedia, works of the classics.
- A wall newspaper does not have to be in the form of a rectangular sheet. You can design it in the form of a school building, a large bell, an owl as a symbol of wisdom, or an autumn leaf.
- Each student draws his own drawing on a small piece of paper, writes a congratulation, and then all the pieces of paper are collected into a large collage.
It’s not at all difficult to create a wall newspaper for Teacher’s Day, but you need to think in advance about how to make the gift original in order to surprise the teacher. Please pay attention to the following nuances:
- Come up with a layout for your future wall newspaper in advance so that the final version looks neat and beautiful.
- It is better to use whatman paper as a basis. You can, of course, glue together many A4 sheets, but this will take time, and you will have to mask the gluing points.
- Come up with a title for your wall newspaper, and then write it in bright letters or print it out and stick it at the top or center of the Whatman paper.
- Think over the information part of the poster. These could be school jokes, anecdotes, a cool horoscope for teachers, as well as wishes and congratulations from students.
- Arrange the photographs between the text, and then glue them so that the composition looks harmonious.
- If there are empty spaces on the paper, fill them with pictures, drawings, glue sweets, decorate with bows and buttons.
- When the wall newspaper is completely ready, attach it to the wall with pushpins or hang it on a chalkboard using magnets.
Master class No. 1. Postcard for primary school teachers
Primary school students will surely be able to cope with a simple application, and the result will delight the birthday girl and evoke positive emotions.
Prepare the following materials:
- thick cardboard for the base;
- colored cardboard;
- colored paper;
- hot glue;
- buttons;
- markers.
Step-by-step instructions on how to make a card with a flower and a bird:
- Transfer the template of flower petals and birds onto colored cardboard and cut out the shapes.
- At the bottom of the postcard, glue a hemisphere cut out of green cardboard - this will be a clearing.
- Glue the bird to the postcard, draw the legs and beak.
- Glue an eye - a black button, and make a wing from pink cardboard.
- Next, draw a flower stem next to the bird and glue the petals to it. Attach buttons to the top using hot glue to create a flower head.
- At the bottom, on green cardboard, glue multi-colored buttons.
Another application option:
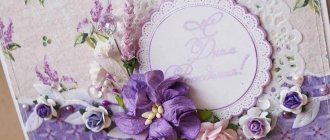
Master class No. 2. Happy Birthday card for class teacher
Students will probably want to wish their favorite class teacher a happy birthday. We offer to please the teacher on this holiday with an elegant card made using the scrapbooking technique. At first glance, it may seem that this is a difficult technique for schoolchildren, but, in fact, there is nothing difficult in making a postcard. The process will captivate students and provide an opportunity to show creativity and imagination.
What you will need to make a postcard using scrapbooking technique:
- colored paper;
- scrap paper;
- cardboard;
- beads;
- ribbons;
- lace;
- buttons;
- congratulatory inscription;
- hot glue;
- artificial flowers;
- butterfly.
The necessary materials can be purchased at a store that sells everything for creativity.
Let's start making a beautiful and elegant craft for the class teacher:
- Fold thick paper or cardboard in half - this will be the base.
- Cut a rectangle from scrap paper slightly smaller than the title page. Glue it to create a small frame around the edges.
- Glue a congratulatory inscription to the assembly, decorate it with a piece of lace on top.
- Decorate the card with artificial flowers, beads, and a bow.
- Glue a decorative paper butterfly on top.
- On the spread, write your most sincere congratulations to your beloved mentor from the entire class.
Photo collage at work as a teacher
Full name: Grebenyuk Diana Alekseevna, teacher of Komi language and literature at the Ruchevskaya Secondary School.
Category: highest
Topic of the report: Photo collage and its use in the creative work of students when teaching the Komi language and literature
Abstract of the report
: The word “visualization” comes from the Latin visualis - visually perceived, visual. The use of various visualization tools and techniques in the lesson makes the lesson more informative and effective, as it allows students to make maximum use of various channels for perceiving information.
Today, with the development of computer technology, new visualization tools appear - infographics, mind maps
(logical-semantic models),
word cloud, timeline, photo collage
, various interactive tasks based on visuals (for example, most tasks in Learning Apps), interactive presentations, etc. The tasks of visualization are to present and structure the main educational material;
supplement the main material; ensure consistency in the presentation of information; demonstrate the relationship between text and graphic images that promote active perception of educational material. Photo collage
is one of the means of information visualization that a teacher can use in his work. Photo collage, as a derivative of collage, is an arbitrary combination in one picture or photograph of several photographic images, sometimes not even related to each other in style and content. When creating photo collages, various visual techniques are used that allow you to make the final picture bright and memorable: overlaying one image on another, combining several images in one, presenting a photo in the form of a mosaic or puzzle, inserting a bright background, all kinds of frames, shapes, lines, etc. P. By creating a photo collage using computer technology, the author has the ability to quickly change its parameters (position, hue, opacity, sharpness, etc.), choose the best results, always being able to instantly return the previous result, which significantly saves time and makes it possible to achieve the best results. You can create photo collages either manually or on a computer using special programs or online services (Photovisi.com, CreateCollage.ru, Avatan, etc.). To create a photo collage with a unique design, it is advisable to use Photoshop (or another graphic editor). However, such “manual” work can take quite a lot of time. Since a photo collage is a priori a bright picture that attracts attention, it can be used wherever a presentation of someone or something is required: photo collage of an entire class or a separate group of students, for example, winners of contests, competitions, forum participants or plein air (on website, blog, multimedia or video presentation, school bulletin board, etc.); results of an educational or educational project, team work, individual works presented at exhibitions of fine arts, arts and crafts, technical creativity, etc.; in lessons when introducing new material, when summing up results, in any educational situation where it is necessary to present some products of educational activity; in the portfolio of a student or teacher; in greeting cards, newspapers; in the work of school museums and galleries of children's creativity. In addition, a photo collage can also be used as a tool for organizing a large amount of visual information. And another area of application of photo collage is the creation of multi-genre graphic works, which can then be used in lessons of the Komi language and literature, and in educational work. Tasks for students of this type will allow them, when organizing graphic information, to systematize illustrations for works of art in a modern form; the life path of the writer, the characters of his works, etc.
Photo collage as a means of information visualization is capable of implementing the most important pedagogical functions:
— development of aesthetic taste and artistic imagination;
-development of design thinking;
-ability to create beautiful and aesthetically competent presentations and videos;
- formation of coloristic perception;
-development of creative abilities and communication skills;
- ability to process and present information in a concise, concise form;
- the ability to foresee the final result and evaluate the result of work.
The use of collage technology as a means of teaching the Komi language and literature radically expands the teacher’s capabilities in choosing materials and forms of educational activities, makes lessons bright and exciting, informationally and emotionally rich. An undoubted advantage in such work is the condition that every student, even the weakest linguistically and less active psychologically, has the opportunity to show activity and independence, their own imagination and creativity. This type of work has great general educational value, since it is aimed at developing social competence in students, that is, the ability to act independently, choosing a strategy for their work to develop a sense of responsibility for the final result, the ability to speak publicly and give a reasoned presentation of the final result. Visualization in teaching allows you to solve a number of pedagogical problems: ensuring the intensification of learning, intensifying educational and cognitive activities, the formation and development of critical and visual thinking, visual perception, figurative representation of knowledge and educational actions, transfer of knowledge and pattern recognition, increasing visual literacy and visual culture . A methodologically competent approach to visualization ensures and supports the student’s transition to a higher level of cognitive activity and stimulates a creative approach.
Master class No. 3. Postcard for a male teacher
A craft for a teacher in honor of his birthday will demonstrate respect and appreciation on the part of students for everything the teacher does for them. A classic card with thematic images (stationery, globe, school building, bell) and a congratulatory inscription will do. If you want to surprise the birthday boy, please him with a card with a shirt and tie, which is very simple to make, but looks very unusual and impressive.
Prepare the following materials for work:
- scrap paper;
- wire;
- thick cardboard;
- glue;
- sign with a congratulatory inscription.
How to make a postcard:
- Cut out 4-5 tie templates from multi-colored scrap paper.
- Use a small piece of wire to make a tiny hanger.
- Secure the top of the ties to the hanger and glue them to hold the ties firmly.
- Attach the hanger to the cardboard base and glue a congratulatory sign at the bottom.
Happy Birthday greetings to the teacher in prose in your own words
Dear (patronymic name)! Our entire class is in a hurry to congratulate you on your birthday! First of all, we would like to express our deep gratitude for your hard work. Thank you for the knowledge and experience that you give us every day. You are a teacher from the heart! We are sure that the wealth of knowledge that you left us will help us throughout our lives! We wish you good health, prosperity, patience and great happiness. Let a joyful smile shine on your face every day.
Our dear teacher! We hasten to congratulate you on your birthday! We wish you health, joy, success, happiness and prosperity! May your every day be filled with joyful events and positive emotions. Thanks for the knowledge! You are a wonderful teacher and a very good bright person. We wish you inspiration and good mood every day and every hour!
Congratulations to the class teacher
Dear (patronymic name)! You are like a second mother to us. We know that you will help us in difficult times and give practical advice. Thank you for your work! Stay the same positive good person. Let a joyful sparkle always shine in your eyes. We wish you as many joyful moments and good events as possible. May you be surrounded by good people and let sorrows bypass your life. Good health, success, happiness, joy!
Congratulations for the math teacher
Name Patronymic name! Happy Birthday! Let health always be multiplied by two, and happiness be squared. We wish you a million new achievements and a trillion joyful moments. Only thanks to you we know that we cannot divide by zero, and the square of the length of the hypotenuse is equal to the sum of the squares of the lengths of the legs. Thank you for your knowledge! We wish you the fulfillment of all your plans.
Congratulations for the Russian language teacher
Name Patronymic name! Thank you for teaching me how to write without mistakes and use punctuation marks correctly. It was only thanks to you that we learned about Evgeny Onegin and Tatyana, Gerasim and Mumu, Natasha Rostova and Andrei Bolkonsky. We wish you health, prosperity, inspiration, bright emotions and fulfillment of your cherished desires.
Congratulations for the history teacher
Our dear (patronymic name)! Thanks to you, we learned about the priceless history of past years. We visited Ancient Egypt and Ancient Greece together, met Peter I and Napoleon, learned the sad events of revolutions and world wars. This knowledge teaches us from the experience of others not to make terrible mistakes. I wish you health, prosperity, success and good mood!
Master class No. 4. Card for math teacher
Your favorite math teacher will surely love this denim pocket craft decorated with stationery.
Prepare for work:
- thick cardboard;
- checkered scrap paper of 2 types;
- glue;
- paper imitating denim;
- small ruler;
- a simple pencil;
- artificial flowers;
- tape;
- lace;
- paperclip;
- button;
- tear-off calendar sheet.
Step-by-step instructions on how to make a postcard for a math teacher:
- Glue a checkered piece of paper to the cardboard base so that there is a small frame around the edges.
- Glue another smaller rectangle in the center. For originality, sew three types of paper around the perimeter using a sewing machine with a decorative stitch.
- Cut out a pocket from denim paper, and also sew it on a sewing machine. Attach the flap on top, glue or sew a button in the center.
- Decorate the pocket on the side with a ruler, pencil, artificial flowers, bow, lace.
- Attach a piece of tear-off calendar with a paper clip on top, on which the teacher’s birthday will be highlighted with a red marker.
Place a piece of paper in your pocket with congratulations and the most touching wishes to your beloved teacher.
Master class No. 5. Holiday card applique
You can make a gift for the teacher with your own hands, and this will be the most valuable surprise for the mentor. We offer to please the birthday person with an original card made using the applique technique. It won't take much time to make, but the result will be a cute holiday present.
What materials will you need:
- thick cardboard;
- colored paper;
- glue;
- colored decorative paper;
- corrugated paper;
- ribbons;
- congratulatory plaque;
- beads, buttons.
Let's get started:
- Fold the cardboard in half and glue a smaller rectangle of colored paper on top to create a frame.
- Cut out several rectangles of different shapes from colored decorative paper - these will be boxes with gifts. Glue the templates to the bottom of the cardboard base.
- Tie ribbons into bows and decorate gift boxes.
- Next to the boxes, glue a triangle cut out of corrugated paper - this will be a bouquet of flowers.
- You can use buttons or twisted strips of colored paper as buds.
- Decorate the resulting flower bouquet with a bow.
- Decorate the craft with curls of colored paper, beads, and glue a congratulatory inscription.
Gift boxes can be made like this:
Postcard using quilling technique
The main consumable material here is narrow strips of quilling paper. Their color depends on what kind of application we will lay out on the paper. To make a gift we will need:
- A sheet of white or any colored paper in A-4 format. You can take any pastel shade (cream, sand, light green, pale yellow, etc.).
- Quilling paper red and green 3-5 mm (for creating an applique of a bouquet of flowers). The shades of the buds can be changed at your discretion.
- Quilling hook (or just an ampoule from a writing pen, slightly cut at the end by a blade to 3-5 mm).
- PVA glue.
- Stationery scissors.
- A template for a congratulatory inscription or a sheet of colored paper in a contrasting shade with the base.
- A simple pencil and a ruler.
We do all the work like this:
- First, take the base sheet and fold it in half. Inside on the right you can immediately draw thin lines to write a congratulation.
- Now on the title side of the postcard we subtly, barely noticeably, draw straight intersecting lines. This will be a template for the stems of the future bouquet. It may consist of 3, 5 or 7 flowers. Try to place the lines at the intersection so that they have an angle of at least 45 degrees with each other at the top. This will make it more convenient to arrange the “buds” of flowers.
- Afterwards, onto the drawn lines we glue strips of green quilling paper along their entire length. The lower ends can be cut at an angle to make them more graceful.
- The next stage of work is the production and fixation of buds. They can be done simply and quickly. Take a strip of paper of the desired color (red, yellow, orange, etc.). Insert one end of it into the hook and begin winding the entire strip.
- Once winding is finished, remove the paper from the hook. We have a peculiar snail. It can be made looser (loose, transparent) or denser. Optional.
- Lubricate the remaining free end of the paper strip with glue and fix it to the “bud” so that it does not unwind.
- Lubricate the lower part of the twisted bud with PVA glue and press the quilling figure onto the base sheet onto the already created stem. You should end up with one flower bud per stem. Make all the following flowers in the same order and stick them in random order.
- Now you need to make leaves on the stems. We form them from green strips of paper according to the same principle as buds. Only after the snail circle is ready, it is slightly compressed to form a pointed oval.
- We attach all the “leaves” with PVA glue at the bottom of the stems throughout the bouquet.
- Finally, use a strip of quilling paper in a contrasting shade to make a bow and glue it to the intersection of all the stems of the bouquet.
- At the bottom of the postcard you need to stick an oval or other shaped template on which the inscription “Dear Teacher”, etc. is written in calligraphy.
Tip: flower buds on a card can be made of any shape and size. This way the bouquet will look more lush and beautiful.
Interesting: DIY wall shelf
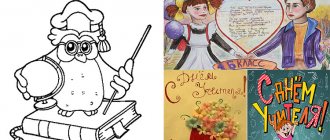
Photo selection of interesting postcards
In this section, you can download a beautiful postcard for your favorite teacher for free and send it electronically on your birthday.