Stylish DIY birthday card for your aunt
A handmade greeting card for your aunt’s birthday, given from the heart, will not only be remembered for a long time, but may well become the highlight of the holiday day . It is quite simple to do, and it does not require large material investments or great physical effort. The result will be interesting, original in its own way and, of course, memorable.
Simple paper card
To make a paper card for your aunt’s birthday with your own hands, you will need the following tools and materials:
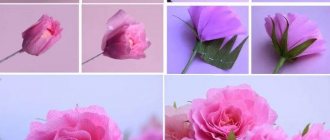
First of all, several circles of different diameters are marked and cut out on colored paper with a compass. Then, using scissors, moving them from the edge of the paper circle to its center, a spiral is cut out - the basis of future flowers. For greater beauty, you can use scissors with curly blades.
Using a wooden stick, which can be an ordinary pencil, the spirals made are twisted from the edge to the central part - you get a kind of flower. To prevent it from unwinding, the center of the twisted spiral is fixed with a small drop of glue. It should be taken into account that the splendor of the finished “bud” depends on the density of the twist.
Postcard for March 8
White thick paper is prepared, a pencil for sketching, colored pencils and felt-tip pens for complete design.
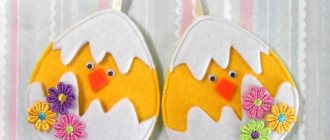
- On the postcard, the number 8 is a stylized ribbon. It has daffodils threaded through it. Festive inscription on the “tail” of the ribbon.
- The boundaries of the number 8 and its “tail” are marked.
- The outline of the number is drawn in thin, weak lines.
- Thicker lines inside the figure eight will make it look voluminous.
- If the child already knows how to write, then an inscription is written on the “tail” of the tape.
- Flowers are drawn step by step with a pencil. The entire postcard shows 4 daffodils. The four circles are the centers of the flowers.
Tip: For a small child, the daffodil can be a challenging flower. The simple technique of drawing it can be practiced on another piece of paper first. But you can replace it with something else.
- The center of each flower should be openwork, and its petals should be pointed.
- Flowers can be drawn in different sizes. In addition, turn them in different directions.
- The fifth flower peeks out from the top of the “tail” of the ribbon. Its peeking petals are completed.
- Short lines are drawn on the flower petals. They will give them a more natural look.
A master class for beginners on creating a holiday card ends with clear contours. You can start coloring.
Volumetric postcards using scrapbooking technique
Scrapbooking is the art of decorating photo albums, but its techniques are also very popular when creating cards.
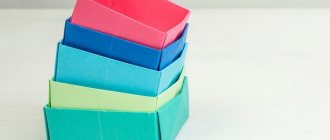
Using Kirigami elements, using the Scrapbooking technique, you can also make a three-dimensional postcard with your own hands. We cut out and fold “steps” from scrap paper for the “pop-up” candles on the second half of the card. Glue the candles and glue the resulting blank onto the base of the card.
You can make a simple but original greeting card from scrap or colored paper. We cut out the candle flame and decorate it with sparkles, then glue it to 2-sided tape. We glue the second part of the candle with glue. The congratulation itself can be tied or glued to an elegant satin ribbon. Simple and original!
A postcard made from paper of a different texture will look completely different)
By placing each element of the card on top of each other, again using double-sided tape, you can create such a voluminous, bright cake!
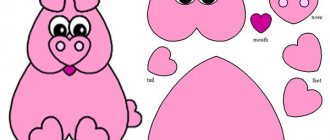
Let's take a look at Tatyana Sadomskaya's master class on how to easily make a voluminous, delicate postcard using the Scrapbooking technique using ready-made pictures.
To create such a postcard, Tatyana used:
- scrap set ScrapBerry's “Favorite Pet”
- scissors
- thick cardboard
- glue
It is better to use scrap paper with a large number of miniatures that can be cut from a single sheet, as well as colored stamp prints and chipboards.
Before creating a postcard, you need to decide on its plot in order to choose the color of the base of the postcard and its “characters”. In this case, the basis is paper with a calm beige print, and the components of the plot are cut out of it: kittens, a puppy, flowers, a crown on a pillow.
Next we work with the base. It is necessary to make markings for cuts on the front side.
Don’t forget to decide before starting this work what will be in the foreground and what will be behind it!
In our case, we put the larger kitten in the foreground, this will enhance the feeling that it is closer than kittens with a dog.
We make the necessary cuts. The result is a design with “steps”. We glue leaves of arbitrary size onto the resulting “steps”. These leaves imitate a wooden fence.
Next, we gradually glue our elements, starting from near to far. We start from the foreground and glue the kitten. We glue it onto beer cardboard, because it gives additional volume and casts a shadow. Using the same principle, you can glue several other elements, for example, balls and flowers. When the inside is ready, glue it to the base of the card.
We also decorate the outside of the card with an elegant floral print.
For greater elegance, decorate the elements of the card with sparkles (use glitter).
For inspiration, check out this masterpiece 3D cake card:
With the addition of children
Without stopping there, you can depict an institution with children going to classes. For this you will also need: a pencil, an eraser, a ruler, a sheet of paper and felt-tip pens.
Step by step drawing:
- Create the outline of the main part of the school using the simple lesson described above.
- Bring to the foreground a schematic outline of two students. Mark their heads with ovals. Draw auxiliary lines to form the bodies. Draw the arms and legs. Create the shapes of the torsos and shoes.
- Draw the details of the body parts, head and face. Draw the backpacks.
- Remove unnecessary strokes with an eraser. Color the image.
It's simple; the only difficulty can come from schoolchildren's drawings. But if you try, you can cope with everything.
What kind of birthday cards can you make yourself?
Homemade cards, which evoke not only tenderness, but also genuine joy, can be made using a variety of decorative little things that come to hand - paper, thread, textile scraps, paints. If they are available, postcard “semi-finished products” – blanks – can be used.
Handmade birthday cards can be divided into several large types:
DIY Happy Birthday Card
Complex components that add chic and shine
When making your own “Happy Birthday!” You can use unusual design details that will decorate it with their surprise.
For example, attach a small envelope inside the postcard or on the back so that you can insert a bill there. Or glue another card of a smaller format on the inside, which also includes congratulatory inscriptions.
You can place flowers made of corrugated paper inside the card, so that when you open it you get a 3D card: the flowers will “bloom”! This option is possible for making any other three-dimensional postcards with your own hands.
There is inexhaustible scope for imagination about what kind of paper figure to place inside - a boat or an anchor, a cake with candles or a kitten, the Eiffel Tower or an Egyptian pyramid.
Card for mom
Mom is the main person in everyone's life. And on her birthday I want to congratulate her by giving her something beautiful, unique and from the bottom of my heart.
How to make a card for mom's birthday? We invite you to consider one of the gift options.
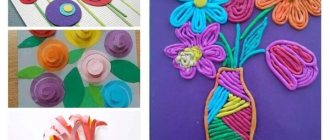
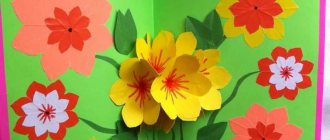
A postcard made using the quilling technique looks very interesting. For this craft you will need colored contrasting paper, ribbons and standard tools.
Next, let's get to work:
First, you need to cut out small circles of different sizes from colored paper. After this, each part must be cut from the outer edge to the middle. It is best to do this with curly scissors, then the resulting flowers will look more sophisticated.
Next, you need to form the flowers by twisting the blanks with a special stick in a spiral. Each resulting flower must be secured with glue.
You need to prepare the base of the postcard. To do this, you should bend a sheet of cardboard in the middle, placing the resulting flower heads and determine where they will be located.
Form a phase for flowers by cutting out its configuration from dark-colored paper. Attach the blank to the future postcard with double-sided tape.
From cardboard of any color you need to cut out a rectangle slightly smaller than the card itself. Next, you need to make a bouquet from the flowers you made earlier. It is necessary to glue the flowers closer to each other to create the effect of splendor.
The last stage is decorating the vase. Using a satin ribbon, you need to tie the card with a bow, and glue a strip of paper with words of congratulations in the desired place. The postcard is ready!
Class inside school
In addition to the school itself, it will be interesting for children to depict the classroom premises. This work is more complicated than the previous one and requires at least a slight understanding of projection. But if you follow the advice, you will be able to complete this task. To work you will need: pencils, a ruler, an eraser and a piece of landscape paper.
Let's get creative:
- Stepping slightly from the center to the right, draw a vertical segment reaching to the top and bottom of the sheet. From the top of the segment we draw two double lines in different directions to the corners of the sheet; these will be the boundaries of the walls and ceiling. We also draw single lines from the bottom - the boundaries of the walls and floor.
- On the left wall, create two windows in rectangles in projection, complementing them with slopes, window sills and window frames.
- On the right wall, draw a board with two doors on the sides, add a shelf below for a pointer, a cloth and chalk. Draw a long lamp above it.
- Draw a teacher's desk in front of the board.
- Starting from the left wall, draw the desks, add seats, backs and chair legs to them. Place square lamps on the ceiling.
- Complete the missing details; if you wish, you can add something of your own.
This will create an image of a school class. The drawing can be painted in suitable colors.
How to make beautiful birthday cards with your own hands
The best gift is one that is made with your own hands, especially if it is a real work of art. Ideas for such crafts are simply in the air. The main thing is to catch the idea in time of what kind of card to make with your own hands for your birthday!
After all, a man-made exclusive is expensive not only in the spiritual sense, but over the years it becomes expensive in a real material sense. One of the easiest gifts to make is a homemade greeting card.
Gift card drawn
An adult can help his child figure out how to draw a postcard step by step with additional elements.
This drawing will be more complex, but a child can handle it just as well.
- For the sketch you need a pencil, as a basis - white paper or colored cardboard, colored pencils.
- There is a round cat in the center of the postcard. A ball is drawn. Inside is his face: eyes, nose, mouth. You can add a mustache.
- The cat must have ears and a tail. For comedy, the tail is drawn thick and long.
- You can’t go to a birthday party without a festive hat.
- In the foreground, a cake with cream and candles is depicted in front of the cat. The bottom of the cat is not visible, so the line is wiped out.
- The cat will come to life if you add stripes to the body and tail.
- The cat guest brings the birthday boy, in addition to the cake, gifts in boxes. They can be drawn from behind the cat.
- Words of congratulations are written on the front side or inside the card. The work ends with coloring the drawing.
- The lesson on how to simply draw a Birthday card is over.
Beautiful DIY birthday cards for a woman teacher
What is necessary:
- White cardboard
- White (brown) corrugated cardboard
- Leaflets
- Flowers
- "Berries in Sugar"
- Twigs
- Red ribbon with polka dots (can be replaced with any other)
- Cesal
- Glue gun (they are the most convenient for gluing)
How to do:
1. Fold the A4 sheet in half.
2. Hot glue a piece of corrugated cardboard 13 by 16 cm.
3. The stripes on the cardboard are not horizontal, but vertical, in both the first and second versions.
4. I glue a ribbon to the top edge of the card.
5. I glue it not just with a strip, but by tucking it. We cut off the excess tape, fold it over and glue it to the card.
6. Along the upper right edge I place cuttings, flowers and berries.
7. I glue twigs, berries, roses and leaves using hot glue.
8. You can go over the edges of the roses and leaves with white acrylic paint.
9. The postcard is ready.
I made 2 postcards using this principle. All that’s left to do is stick on the “Happy Birthday” inscription!
The second postcard looks like this. There are a lot of little things in here that I buy at the scrapbooking supply store. Gold ribbon with glue, berries in sugar, twigs, sesal, small white roses made of foamiran.
Why do I like DIY paper birthday cards? The fact is that the paper, even after 2-3 years, “will not deteriorate”, will not become lighter, darker, or fade. In any case, teachers are happy with such gifts. Beautiful, original, unusual.
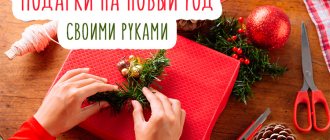
Happy New Year
We are accustomed to the fact that New Year's cards depict a Christmas tree, Christmas tree decorations, and Santa Claus. But you can take a master class on how to draw a non-classic New Year’s card with a pencil.
And, for example, depict a small dog wearing a Santa Claus hat.
- The center of the picture is a dog. This is where the drawing begins. The shape of the head and the area of the muzzle emerge.
- Faint lines show the middle of the head and the location of the eyes. Later the lines are erased.
- Ears emerge. The contours of the cap are drawn. The distance from the dog's neck to its paws is drawn with a vertical line.
- The fur on the hat is visible.
- The design of the cap ends with a tip and a bubo.
- The dog's muzzle is completed with the shape of the eyes, nose, and mouth.
- Wool is imitated by curved broken lines of different lengths. It is drawn along the line of the muzzle. Short hairs are depicted near the nose and mouth. Longer fur around the eyes.
- The fur falls onto the eyes, and in this part the pupil is not painted over with a solid stroke. The hairs are applied intermittently to the ears and over the head.
- By gently pressing the pencil, the hairs are drawn all over the dog. You can use a hard pencil.
- The white part of the cap, the bubo, should be fluffy. Folds will make it voluminous and give it shape.
- Areas darken along the folds.
Tip: If you can't cope with the shadows near the folds, then skip this step.
- Snowflakes all over the front of the card will make it New Year's. There is no need to explain how beautifully to draw a Christmas tree branch to the right of the dog. A garland and New Year's toys are depicted in the upper part of the picture. The congratulatory inscription “Happy New Year!” is written below.
Tip: Instead of snowflakes, you can draw fireworks.
Having understood how to draw a postcard with a pencil, the child will easily create masterpieces with his own hands. Each card adds those details with which the holiday is associated for you.
This is how you can make the drawing individual.
Rules for making your own birthday cards
“When making beautiful birthday cards with your own hands, a lot depends on the selection of colors”
There are quite a lot of techniques to give a homemade postcard an original and memorable appearance. The easiest way is to use an unusual, non-traditional base for manufacturing. A non-standard move, for example, would be to use watercolor paper as a background; A drawing stamped on tracing paper with a backing made of bright, “acid” colored decorative paper will look original.
When making beautiful birthday cards with your own hands, a lot depends on the selection of colors. With the right approach, the simplest composition can very well become a highly artistic product!
For greeting cards, it is important to choose the right color scheme
The main rule in this case is not to overdo it: it is quite enough to use three colors in one card, two bright, contrasting to each other, and one neutral. An unusual, asymmetrical way of folding it will add originality to the craft.
It is preferable to make the inscriptions on the postcard in a beautiful calligraphic font, but always easy to read. When using computer fonts, do not forget that the letters “l” and “p” in many of them are extremely similar and that this can lead to unexpected incidents. The best, festive-looking color for letters is silver or gold.
The gold font looks festive
To make your own birthday card, you can use the scrapbooking technique. In this technique, several background layers are glued layer by layer onto a base made of colored cardboard, each of which contains the necessary decorative elements. Well, very great opportunities, despite its apparent simplicity, are provided by the paper decoupage technique, in which the top layer of ordinary, for example, napkins is used as an image (drawing). This layer is carefully removed from the “source” and carefully glued onto the postcard base with PVA glue diluted with water.
Happy birthday card using scrapbooking technique
The simplest version of a paper card for a teacher
What is necessary:
- Designer cardboard
- Rectangle of colored paper
- The inscription “Happy Birthday” (I printed it from the Internet)
How to make a postcard:
1. I have a designer cardboard with a cake, balls, stars, in a word, festive. A4 format. I bent it in half.
2. Cut out a rectangle from yellow paper.
3. I printed out the inscription “Happy Birthday.” I glued it onto yellow paper.
4. I glued all this onto the card, and voila, the simplest paper happy birthday card is ready!
The card is beautiful, very simple. It couldn’t be simpler, one might even say so. Even a child can cope. You can make it together with your baby and give it to a teacher or kindergarten teacher.
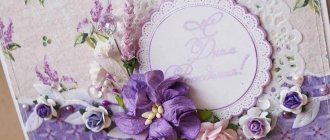
Here is another version of the postcard, in my opinion, it is simple and original. Delicate card with butterflies. This is a version of a simple postcard. I’ll say right away that this idea is not mine, it’s from the Internet, but I really liked it.
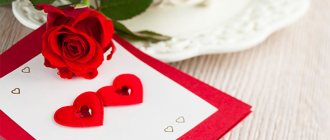
DIY card for mom: voluminous heart
A DIY card for mom with a bright, voluminous heart can be dedicated to Mother’s Day, Valentine’s Day or mom’s birthday. The card itself is not at all complicated, the only painstaking part was the letters, but if you have a special stencil with letters, this will make the task much easier. In any case, you can write nice words with a felt-tip pen.
School Birthday Card
We bring to your attention bright, beautiful, festive and very interesting cards for the school’s birthday with congratulations in poetry and prose.
Using Photoshop and thematic backgrounds, you can create similar greeting cards with your own hands, change the text and font, color and style.
Poster and wall newspaper for the school anniversary
Birthday Card
Birthday is a special holiday. And I want to make the gift individual, unique. This is where a master class on how to draw a postcard with a pencil will help.
A postcard with a picture of a cake is suitable for a child.
- Work begins with preparing the base of the postcard - white paper or colored cardboard.
- In the middle of the sheet markings are made with auxiliary lines. This marks the middle of the cake.
- The lines are connected by an oval.
- The height of the cake is marked with vertical lines.
- The ends of the vertical lines are connected by an arc so that it is a projection of the semi-oval from above.
- Before you beautifully draw the top of the birthday cake, you need to erase the extra auxiliary lines with a grater. The cake becomes like itself.
- The cream appears as a wavy line along the edge. The inscription with congratulations can be made in English or Russian.
- The birthday cake is decorated with candles. The design of the picture is completed with the required number of candles.