Every famous military leader, whose chest is decorated with dozens of orders and medals, once had a mother, and most of these heroes will agree that they deserved all their awards thanks to her upbringing. In addition, everyone knows how hard mother’s work is, so at least on holidays, children should honor those who gave them life. So why not reward the most precious person in the world yourself? For this purpose, medals for mothers that you can make with your own hands will come in handy. To make them, you only need nothing: imagination and a little patience.
Medal with a photo in the shape of a sun: what you will need
To make beautiful medals for your mother with your own hands for her birthday or March 8th, you can use a printer. This is the easiest way to create a blank, which a child over 5-6 years old can then decorate himself.
For the craft you will need:
- colored paper;
- glue stick;
- ribbon;
- small beads of different colors;
- A4 paper.
Making Flowers from Paper - Simple DIY Crafts
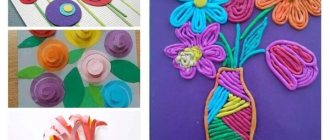
I even prepared a separate topic on creating paper flowers. They are so diverse and unique. My eyes are running wild about what to choose for crafts. After all, a woman can receive the most desired flowers from her child. Do you know what they smell like? Mmmm. Inhale the aroma and feel the breath of tenderness and sincere love of your child. I found several master classes on how to make flowers from paper, including corrugated paper.
To make voluminous flowers, you will need:
- strips of corrugated paper
- wire for stem
- tape for fixation or glue
- We wind a fairly large roll of paper onto the wire. It should be slightly narrower in height than the flower itself. This is done precisely in order to create a natural bend of future petals. Another idea is to attach candy. Then she will be right in the center.
- We measure a height equal to the size of the flower and fold the paper several times. Cut out petals at random. The color may be completely different.
- Now we place one petal one at a time and twist it a little on the wire from below, fixing it in one place. We overlap the next petal slightly. We use as many blanks as you want to make the bud magnificent.
- Cut a thin strip of green paper and wrap it tightly around the wire to form a stem.
- The final touch is the greenery. As shown in the picture, we cut out sharp-shaped leaves and twist them under the bud, securing them with glue.
Another simple master class on how to make a lush peony from thin paper. It’s even an option to use tracing paper. It is dense, but at the same time thin, so that with a little wrinkle it was possible to replicate the natural wavy petals of a flower.
As I wrote above, the forget-me-not is a symbol of Mother’s Day. Again, using soft blue crepe paper, you can create a large bouquet and give it to your mother. In order to make such expressive petals, lightly compress a fairly long and wide strip of paper, then bend it in half, turn it once and fold it into a petal. By analogy with previous master classes, we also fix it on a wire, shaping the stem. The stamen can first be made from a bead or paper.
Such flowers, made by children's hands, will last a long time and will not wither, which means they will delight the mother with their beauty.
Making a medal in the shape of the sun
First of all, you need to print out a circle, along the edge of which the inscription will be written: “Mom is my sunshine!” or something else like that. If you don’t have a printer, you can simply cut out a circle with a diameter of 6 cm from white paper and sign it by hand.
Next you need:
- cut 11 strips of yellow colored paper 12 cm long and 1 cm wide;
- fold each one in half to form a loop;
- stick on the wrong side of the circle with the inscription;
- take a ribbon about 50-60 cm long;
- cut another circle with a diameter of 6 cm from yellow colored paper;
- fold the ribbon in half, connect the ends and glue it to the top of the medal;
- cut another circle;
- stick it on the reverse of the medal;
- take a photo of the mother (you can with the child);
- cut out the part of the photo where the faces are located;
- stick on the obverse along with many tiny flowers made of colored paper;
- take small beads and, using a glue gun, make a frame for a fragment of the photo.
Step-by-step instructions on how to give a gift to your mother (for students in grades 1-4)
With elementary school students who can already work with more complex tools and materials, you can teach a lesson on how to create such a wonderful hat. Let's move away from the floral theme.
Materials:
- Colored cardboard;
- Stapler;
- Scissors (regular and curly);
- Glue;
- Napkins;
- Unnecessary disk;
- Adhesive color film;
- Braid;
- A piece of paper with the text of congratulations printed or written on it;
- A template for cutting out a hat (find and print any one you like on the Internet).
Subsequence:
We take the disk and stick it on the film. Cut it out.
Next, draw a hat on colored cardboard. Here is one of the template options. You can take another one.
The hat will turn out more interesting if you use curly scissors when cutting it out.
Now let's make a flower.
To do this, fold the napkin in half.
Half again. And fasten it with a stapler in the middle.
Using the same curly scissors, we will cut a circle out of it. It will turn out multi-layered.
And fluff it up, bending it towards the center of the edge.
We glue a congratulation to the back of the disk.
We attach the hat.
We decorate it with braid and a flower.
Here's what we got:
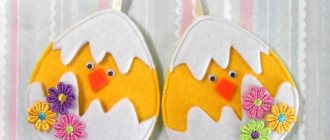
With kids of this age, you can implement a lot more ideas. For example, make flowers like this.
Or make unusual cards in the shape of your own palm.
Surely my mother will appreciate such characters. Great stand for pencils or flowers.
How do you like this craft made from crumpled napkins?
It seems simple, but very beautiful. And it’s memorable.
And of course, I can’t help but show you an example of the so-called “string graphics”. By the way, I advise you to take an interest - even adults can create real miracles with this technique.
Master class on making medals for mothers on March 8
At the beginning of spring, all kindergartens in the country are actively preparing for International Women's Day. On this occasion, you can make beautiful medals for mothers with satin ribbons, which will also serve as greeting cards.
Operating procedure:
- cut out a circle with a diameter of 8-9 cm from not very thick cardboard, which will act as a base;
- sew a satin ribbon along the edge, making large folds (the child will probably need the help of an adult, for example, a teacher or older sister);
- cut out two circles of the same diameter as for the workpiece: one from wrapping paper, and the second from a plain satin ribbon matching the color;
- glue the last part onto the blank, write a wish on it and decorate it with rhinestones;
- a long thin ribbon is folded in half;
- the connected ends are secured in the upper part of the reverse;
- glue a circle of wrapping paper on top.
These medals for mothers for Mother's Day can be made larger in size and hung on the wall. Then it will become a decoration of the hall where the festive matinee is taking place.
Master class on how to make a craft for mom from plasticine
And we finish with flowers again. This time we have such a flowery article. But why not consider these instructions if the result is such beauty.
Materials you will need:
- Cotton buds;
- Colored cardboard;
- Plasticine in green and other colors.
Subsequence:
On each sheet of cardboard we draw the base of the future flower. Its contours.
Now we roll out “sausages” from green plasticine.
This is the stem of our tulip. When everything is ready, we “draw” green leaves with plasticine. To do this, rub it with your finger along the contour of the sheet. Make red (or other color) petals.
We fix the first three leaves firmly, filling the entire contour of the flower with them.
We attach the remaining two only partially: we slightly tuck the top. This will make the tulip voluminous.
Insert cotton swabs into the center of the flower. These will be the stamens. If desired, color them yellow. Ready for Mother's Day!
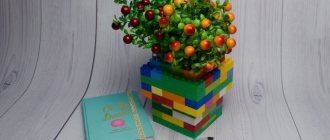
You can come up with many ideas for a plasticine gift. For example, make this cute pencil holder. Specifically, in this example, salt dough was used, but plasticine is also great for a similar purpose.
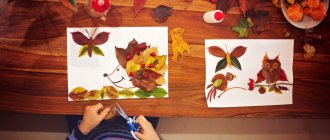
You can make such an unusual applique and frame it in a beautiful frame. True, you will have to be patient.
Plasticine also makes excellent voluminous flowers. Look what an interesting effect mixing several shades gives!
Seven-flowered flower. Let mom have the opportunity to make a wish this holiday.
Experiments with textures always look interesting.
Feel free to combine different materials. Even if at first glance they do not suit each other. Like, for example, rhinestones and plasticine.
In general, create and you will be happy.
DIY medals for mothers for Mother's Day made from salt dough: what you will need
The process of making such simple crafts invariably delights kids. To make a medal for mothers you will need:
- finely ground salt (not coarse, the finer the better);
- flour;
- water;
- a can of bronze paint;
- satin ribbons;
- lighter;
- scissors;
- small diameter coffee cup;
- toothpick;
- glue gun;
- thread and needle.
Master class on making cards for Mother's Day + templates
Of course, in addition to giving flowers, they always give cards. Usually they are made in schools and kindergartens. I found a video story in which the author talks and shows the process of making a greeting card using children's hands. I liked this idea, so I saved it and hasten to share it with you.
Well, as promised, I’m sending you a couple of templates for creating postcards yourself. Print them out for your kids and they will be happy to color them!
The process of making a medal from salt dough
First prepare the dough. To do this, mix 2 tbsp for 1 serving (one medal). l. fine salt and flour. Add a little water and knead a thick dough, as for dumplings. Then proceed as follows:
- put it in a plastic bag and put it in the refrigerator for a couple of hours;
- after this time, remove the dough from the refrigerator, flatten it to form a flat cake and use a coffee cup to cut out two identical circles;
- engrave the surface of each on one side, applying inscriptions with a match;
- place the pieces in the oven for two hours;
- spray the engraved sides of the cooled circles from an aerosol can;
- a satin ribbon is glued along the edge of the back side of one of the blanks, forming frequent folds about 1 cm wide;
- fasten a long ribbon folded in half to form a loop;
- connect two pieces with glue.
Such medals for mom, made with your own hands, can be stored for quite a long time and will always awaken pleasant memories.
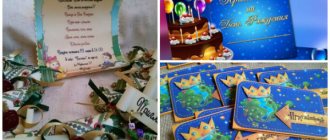
By the way, grandmothers are also mothers. That is why it makes sense to also make a reward for the most caring and affectionate granny with an appropriate inscription. She can also be funny. For example, on a medal you can write: “Thank you for Dad.” The grandmother will definitely appreciate the efforts of her granddaughter and his humor. The same reward can be made for another grandmother with gratitude for her mother. After all, it is thanks to her that dear mommy is so wonderful!
Holiday card made from napkins for mom
There were also a lot of options from ordinary napkins. At least send it to the exhibition. All works deserve attention, you look at them and admire them. Take a look at this miracle; if you make a different inscription, you will get an original gift.
Or wrap flowers like this on an openwork napkin.
Well, if you like to surprise, then create a work in the style of trimming in the form of a mimosa sprig.
There is also this option:
Paper gift award: set of tools and materials
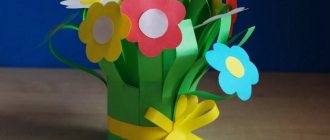
Medals for mothers on Mother's Day or March 8th can be very different. For example, an interesting craft can be made from colored paper, folded like an accordion.
For it you will need:
- a set of paper of different colors;
- pencil;
- stationery knife for cutting paper;
- compass;
- ruler;
- glue (silicone gun);
- felt-tip pen or marker - for signing the award.
Easy and beautiful crafts for Mother's Day from cotton pads
In the following step-by-step description we make a postcard like this. And flowers again!) Well, what else? MK is again intended, as I warned, to be carried out with preschool children.
Materials:
- Colored cardboard;
- Colored paper; Cotton pads;
- Scissors;
- Pencil;
- PVA glue.
Subsequence:
Cut out green leaves from colored cardboard or paper.
You will also need to make the middle of the future flower. In addition, you will need petals. To do this, we put each cotton pad into a small “bag”, as shown in the photo. To prevent the edges of the petals from diverging, we secure everything with glue.
Carefully glue all the elements to a thick cardboard base.
Don't forget about the middle. The gift is ready! All that remains is to come up with the text.
This is what our congratulations card will look like.
You can make a variety of flowers from cotton pads. See for yourself!
Cute, isn't it?
The main thing is the design.
Procedure for creating paper crafts for March 8
Medals for mothers in kindergarten are made with the direct participation of the teacher. Algorithm of actions:
- Two strips of blue and dark blue colors (can be red and white, pink and blue) measuring 4 x 32 cm are cut out of colored paper;
- fold each one into a neat accordion;
- glue the end of the first strip to the end of the second, and then do the same with the free ones;
- in the end they get a socket;
- glue the center of the workpiece and wait until it dries;
- cut out a circle with a diameter of 2 cm;
- cut a piece of tape, trim the edges and fold it in half;
- the bend is applied to the center of the rosette-blank and fixed by gluing a paper circle;
- print out a circle with the inscription “Mom No. 1” on the printer;
- cut it out and stick it on the medal on the side opposite to where the ribbon is attached;
- using a glue stick, attach a safety pin to the reverse so that the award can be secured on the chest of your beloved mother.
If the craft is made in kindergarten, then you don’t have to use a printer, but simply cut out circles with a diameter of 5-6 cm from white paper and write the mother’s name and congratulations. In this case, the strips used for gluing the accordion should be 5 cm wide.
Now you know how to make medals for mothers, and you can please them on March 8th, appreciating their heroic work!
Beautiful cards for mom with templates
Postcards always help to visualize feelings and focus attention on the main thing. There are many touching stories that can be brought to life, and mom will warmly remember the moment of the holiday. The presented templates can be printed or used as a basis for your own inspiration. I also liked the three-dimensional postcards using the kirigami technique. They look very impressive, and they are not difficult to make.
Use postcard templates. For example, a yellow mug with flowers looks fresh and warm.
Original 3D postcard with an umbrella. Leaves or flowers, as well as beautiful frames, will complete the composition
Love lives in the heart and there is never too much of it. Therefore, we will make cards with many multi-colored hearts, as airy and light as a mother’s soul.
Children draw little people very entertainingly and it is especially interesting to watch how they depict themselves or their mother. You can combine all this in a postcard with an umbrella. It is done very quickly, but most importantly it looks interesting and unusual.
Awesome idea on how to use a carved paper napkin. They come in different diameters. And if you use small ones, then such a circle just needs to be folded several times, trimmed and made into a card with a festive dress for your mother.
Here are some more ready-made postcard templates. Some you will have to work hard to cut out, but some you can simply print out and fold in half, give them to the children to decorate or add appliqués to.
Postcard using kirigami technique. Use a sharp utility knife to cut straight edges along solid lines, and just bend along the dotted lines. You can pre-decorate or add elements.
Apple idea
Or a heart
And several more beautiful options for voluminous postcards.
Easy and interesting DIY crafts
I couldn’t ignore a few more ideas. All of them are easy to perform and quite interesting in their execution.
Working with paints, especially if you can paint on yourself, is very exciting. So why not decorate your hands (which is so much fun and ticklish!) and make some fabulous flowers for mommy.
Decorating mom's hands and painting her nails couldn't be easier.
If you have a shaped stapler, then such cards with additions from paper flowers will not be difficult to make.
Toilet paper rolls turn into a wonderful gift - a phone stand. For stability, pushpins with a plastic cap are perfect.
Simple cotton pads, colored paper and even cocktail straws will turn your idea into wonderful creations for a gift.
There are all sorts of pasta products in the store right now. Bows and leaves can be used in any bold composition.
Having pre-colored the seemingly simple and familiar “pasta”, we can give mom such beads that she never even dreamed of.