4.7/5 — (29 votes)
Good day!
Autumn time, the charm of the eyes... Yes, how pleasant it is to walk through the forest, when multi-colored leaves rustle under your feet. I just want to do something with my own hands for the most beloved person in the world. I hope you guessed who? After all, the kindest holiday is coming soon - Mother's Day.
After all, only mommy will be able to appreciate your gift, which, according to tradition, is given to preschoolers and schoolchildren from year to year. For her, so that they would not bring great joy and happiness. Whether it’s a craft in the form of a paper postcard or something else, it doesn’t matter. The main thing is attention, and how you hand it to her, what words or poems you choose when you meet.
When I was little, I also loved to sit and get busy; once I remember I gave my relatives a pincushion, which I knitted with knitting needles. She turned out to be such a funny little girl. And so many years have passed, and it still stands on the shelf, and needles and pins are stored in it.
And now I myself have two cheerful and mischievous sons, who every year from kindergarten bring me small souvenirs, which I happily accept and cherish.
Just today, you can already think about what you will give your mother on this day, which is traditionally celebrated in Russia on the last Sunday of November. Typically, scrap or scrap materials are used for such work. The most popular product is probably paper flowers. Or would you prefer to give her a bouquet of chocolates? There are a lot of options, let's figure it out.
Crafts for Mother's Day in kindergarten from scrap materials with templates
Any gift or souvenir from children's hands looks quite cute. I think that we all associate our mother with an angel. Therefore, I would like to invite you to make it in the form of a simple postcard. I think you will like this idea too. The only thing you can’t do with children of the first or second youngest group is this charm, because the work will be difficult for them. But with older kids (senior or preparatory groups) they can handle it easily.
Therefore, I am giving you a detailed master class on how to make this souvenir.
We will need:
- photo paper
- scissors
- glue stick, PVA glue
- satin ribbon
- openwork paper napkin
- white paper napkin
- decorative hole punch
- markers or colored pens
Stages:
1. Make a printout on a photo printer with the words: “Mommy! You are my guardian angel". Take the background for the postcard light blue or soft blue. Do the work like this, as shown below, the words should be on top.
Then, with the preschoolers, bend the sheet so that you get a thing that will be rectangular in shape and resemble an envelope. Make two vertical folds.
2. Then use a hole punch to make decorative holes along the side parts. Also make two holes and insert a satin ribbon into them.
3. Next we will decorate the inside, we will make an angel. You need to cut the napkin in half, and from one part you will get a bag like this. Glue it to the base.
4. Next you need to take a template with wings.
5. Cut the blank along it. As you can see, you will get delicate wings.
6. Also roll the handles into a cone from the remaining napkin. And the head is made of an ordinary white napkin in the form of a ball.
7. Then proceed to the next step. On a landscape sheet, draw a circle, and on it a face, and glue paper hair in the form of strips, glue the head to the ball, and then to the body.
Cut the hair with decorative scissors with a wavy edge.
Glue the angel onto the card.
8. Decorate the craft with rhinestones or sequins. It turned out cute and quite beautiful. Good luck!
Once, I already showed you one work in the form of a flower, here I think it would also be appropriate. After all, anyone, especially a mother, will be happy with such a souvenir with wishes.
You need to take the templates and print them on office paper (if anyone needs them, they are in Word format, please contact me, I will send them by email).
This is what happened, it’s cool)).
Now all that remains is to assemble the flower, glue all the petals together with a ribbon, and make the middle out of squares.
The size of the squares should be 3.5 cmX3.5 cm, fold them like this.
Then fold it like this.
Glue all the resulting blanks together, and then glue them to the middle of the flower.
I don’t know about you, but I still often use the word sunshine in my speech. After all, our mother really looks like him. She gets up early in the morning and goes to bed when everyone is already asleep.
We will need:
- template in the form of an A4 sheet
- strips of colored paper
- glue stick
- felt-tip pens
Stages:
1. Glue rays from multi-colored strips, roll each piece like this and glue the edges.
2. Fold the A4 sheet as shown in this photo. Then glue a circle in the middle and cut it into two halves. Glue the rays to it.
Advice! You can make rays from satin ribbons, but it will be more difficult with them, since they will be difficult to glue to the sheet.
3. Now glue another circle, and it should be yellow, let it dry, draw a face.
Inside the card, write beautiful lines or congratulations for your mother. You can take them from here, there is a whole collection of poems. Or come up with your own wish.
This is such an unusual and at the same time beautiful card as a gift for mommy on this bright holiday. Good luck!
In a group or in a reception area, you can place the joint work of the teacher and children in the form of palms, and arrange a bright bouquet out of them.
The next option is also very easy, you will need double-sided colored paper, glue, and scissors.
Stages:
1. Take a sheet of green paper and make an accordion out of it.
2. Then find the middle and glue the two parts of the workpiece together to make a lush fan.
3. Now the most creative process, draw any flowers, lilies of the valley or tulips. Maybe even roses. Cut them out.
4. You can give the children ready-made templates, or you can have them draw and cut them out themselves.
5. Then spread the finished pieces on the fan using glue. As you can see, a mini-flower bed has come out that mom or grandma will also like. It will definitely lift everyone's spirits. So, what do you do, creative victories!
Drawing of beloved mother
Not even a drawing, but a whole picture. This is the simplest children's craft. All children love to draw - some with pencils, some with felt-tip pens, some with paints. Moreover, the kids are convinced that they will be able to draw a picture of any content and on any topic. Well, that's great. On the eve of Mother's Day, they need to come up with a wonderful idea - to draw a portrait of their beloved mother. Children will definitely respond to this idea and draw such a picture.
But this is not enough. From the drawing you need to make a real picture. That is, take the drawing in a frame. Then it will be a real work of art! Yes, but how to do it? And it's very simple.
- Wait for the drawing to dry (if it is painted with paints).
- Cut four strips from colored cardboard to the size of the design - these will be blanks for the frame.
- Glue the strips onto the design on all four sides. That's it, the frame is almost ready.
- Yes, but it still needs to be decorated! This can be done in several ways:
- cut out different images from the same cardboard or colored paper: patterns, flowers, circles, diamonds or other geometric shapes;
- carefully stick them on the frame;
- another option is to draw such images on the frame with paints or felt-tip pens;
- Glue a loop of satin ribbon on top of the picture so that the picture can be hung on the wall.
That's it, the picture is ready, and you can give it to your mother. Mom will definitely hang it on the wall and admire her beautiful image.
A simple DIY gift for mom Paper flowers
The next souvenir I want to show you is paper flowers. They are very often given as a gift for such a holiday, and on March 8th too. There are many options, but I would like to show you a bouquet that you can create together with sweets. Cool idea, isn't it?
We will need:
- scrapbooking paper
- any candy
- bamboo sticks cellophane
- glue or glue gun
- scissors
- pencil
- green corrugated tape
- colored ribbons
Stages:
1. Wrap each candy in a plastic bag, like in this picture below. If the candies are flat, then you can even put two pieces.
2. Then, after you have crumpled up the cellophane, take a stick and insert it into it.
3. To secure the bamboo, you will need green adhesive tape or regular tape. You can also take regular corrugated paper in the form of a long strip and rewind the stick with it. In some places, glue it with glue so that the paper does not unravel.
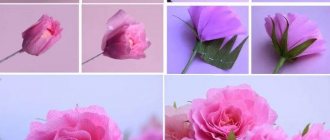
4. Using a simple pencil, make designs of flowers and leaves.
5. Now bend each petal up.
6. Pierce each bud with a bamboo stick from top to bottom. The candy will be inside the flower.
7. Now glue each petal, or rather its edge, to each other using a gun.
8. Add more petals to make the tulip even more voluminous.
9. Continue working on the stem and glue the leaves to it. And your souvenir will be completely ready. If you want, you can find even more ideas for such sweet gifts in my other post. Feel free to follow the link.
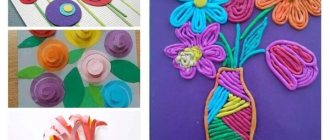
And the second autumn-spring option in the form of a large basket or pot, but with a lush mass of flowers.
We will need:
- colored napkins of different shades and white
- inflated balloon
- PVA glue and superglue
- any basket
- stapler
- white threads
Stages:
1. Cover the balloon with white napkins and make it look like decoupage. You need to dilute PVA glue in water in the proportions of 0.5 tbsp of glue per 100 ml of ordinary water.
Let the wipes dry completely. As soon as this happens, release the air.
2. In the meantime, while the product is drying, you can do other work. Crumple the yellow napkin (which is already folded four times, they are packed like this in the pack) in half, then in half again. Along the edge, cut out a shape resembling a circle.
3. Also fold the blue napkin in half. Cut out a circle, it should be larger than the yellow one. Cut the edges of the workpiece.
4. Now connect the two pieces with a stapler.
5. Afterwards, gently fluff the flower with your hands. You need to make a whole bunch of such blanks to cover the entire balloon.
6. Decorate the craft with flowers and glue the base to the basket.
For collaboration, you can also do work in the kirigami style. Or decorate a music room or group or classroom with such flowers. You fold a piece of paper in the same way as if you were making a snowflake for a window.
The result will please you and never disappoint you. Take note.
Beautiful Mother's Day cards for children. Master classes with diagrams and pictures
This year we even have competitions on this topic. Why not. Therefore, I invite you to take part in it too. Before this, you and I had already made such souvenirs, and then one MK caught our eye, but its shape is not as primitive as everyone else’s. The author tried his best, so go for it, maybe it will be useful to you too.
Stages:
1. Take green cardboard. Bend it almost in half, but leave a couple of centimeters (2 cm).
2. Next, bend these two centimeters in the other direction.
3. Use a pencil to mark two curved lines to create something similar to a flower pot or perhaps remind you of a trapezoid. Cut along these contours with scissors.
4. Cover the top, which was 2 cm, with a different color or use corrugated cardboard; alternatively, you can decorate it with scrapbooking. Glue a butterfly for decoration.
5. Now you will need another blank in the shape of a fungus.
6. Cover the hat with corrugated leaves and flowers to make it green or light green. And write happy holiday wishes on the leg.
7. Now insert the fungus into the pot. The result was a craft with a surprise inside.
Also, everyone's favorite asters can also be used in postcards. Take leaves of different colors and cut them into strips 2.5 cm and 3 cm thick. Make a fringe, but do not cut to the end about 5 mm.
You will still need strips 7 mm thick; roll the cores out of them using a toothpick.
Then glue the ends together with glue and let dry. It is to these washers that you glue the prepared fringed strips.
Afterwards, all you have to do is lightly fluff the product with your hands so that the aster comes out.
Make leaves in quilling style.
This work is done in the same way, using a toothpick, only then you need to give the desired shape with your fingers.
In conclusion, you need to think about how you will arrange all the elements and where the inscription with your wishes will be written. The craft can be used in labor lessons in primary school or kindergarten, children aged 5-7 years.
And finally, I would like to give you ready-made blanks in the form of coloring pages.
Heart in open palms
This craft is one of the simplest and most favorite among kindergarten children. And therefore they will perform it with special pleasure. It needs to be done like this.
- Take a sheet of colored paper and fold it in half.
- We place a child’s palm on the sheet and trace it with a pencil. The child himself is unlikely to cope with the task, so he needs help.
- Using scissors, cut out the outline of the palm.
- We unfold the cut out palm, and since the sheet was folded in half, we end up with two open paper palms.
- Cut out a heart from colored paper.
- Glue it onto your palms.
That's it, the craft is ready. This is a wonderful and symbolic gift. It turns out that the child is giving his mother his own heart, holding it in his open palms. There is no need to be afraid that the baby will not understand such symbolism. Its essence will definitely be clear to the child. Well, there’s nothing to say about mom: she will certainly appreciate such a gift.
Crafts for Mother's Day from cotton pads and paper napkins
In fact, to make a craft yourself you don’t need much patience and materials. You can even use improvised materials to create an applique and even a picture. To do this, you can take regular cotton pads, cocktail sticks and straws, etc.
Take the instructions and create, let this time there be calla lilies that will fit perfectly on a plate, for example. This is an excellent option for elementary school students (grades 1-2), but children in grades 3-4 will definitely cope with this work even better.
In the same way, you can do the job and put the flowers in a vase or a regular disposable cup.
Here is another masterpiece, simple and at the same time beautiful.
In addition, you can also adopt these MKs.
And after you learn how to assemble such compositions, build a topiary.
But for kids 2-4 years old, such an application will be possible. Cotton pads will have to be decorated using a pipette and colored paints, or rather a solution of water.
As they say, let your imagination run wild. Then dry the circles and glue them onto the sheets.
If you are a creative person, then you can also use such a cute character, did you know who he is? Yes, this is a guardian angel and, as you can see, it is also made from ordinary cotton wool. See the working steps below.
Or this is a miracle.
Any housewife loves to dress up and decorate the house, and therefore you can give your beloved mother a brooch for her curtain or blouse for her interior.
Mother's Day is the most tender holiday
What date is Mother's Day 2021 celebrated in Russia?
Mother's Day in Russia was established at the state level by a presidential decree of 1998. Since that year, the holiday has been celebrated every last Sunday of November. In 2021, Mother's Day falls on November 28th .
history of the holiday
The history of the day, on which mothers are given special honor and respect, began a century ago on the territory of our state. Then Russian scouts decided to celebrate it. Mother's Day was first celebrated in the Petrograd movement detachment on December 1, 1915. Afterwards, the initiative was supported by detachments throughout the Russian Empire. Members of the youth scouting movement celebrated Mother's Day until 1926. By the way, after the collapse of the Soviet Union, the tradition of scouts celebrating Mother's Day was revived. Moreover, they honor mothers not on the last Sunday of November, but on December 1st.
Since the late 1980s, many schools throughout the Soviet Union have unofficially celebrated Mother's Day. The idea of holding events in honor of mothers was suggested by teacher Elmira Huseynova from Baku - she began holding Mother’s Day at her school. Her efforts resonated in the hearts of teachers from other cities. The tradition in many schools, even after the collapse of the union, was not forgotten until the moment when Mother's Day became an official holiday.
Mothers are not forgotten in other countries either. But there is no single date for Mother's Day in the world. So in 23 countries, including the USA, Australia, Turkey, Japan, Ukraine, Brazil, the celebration takes place on the second Sunday of May. In Belarus, mothers are honored on October 14, in Armenia - on April 7, in Great Britain - on the first Sunday in March.
How to make a craft for mom? (step-by-step instructions for primary school children)
Here is another memorable gift that can show off on your mother’s shelf for a long time. Moreover, it will be unusual, but quite bright. Teachers, take note and create together with the students.
We will need:
- cardboard
- colored wool threads
- flower template
- needle
Stages:
1. So, hand out the handout and have the child circle the flower-shaped blank.
2. Next along the contour you will need to make holes with an awl or a needle. Insert the thread into the needle and start creating. Make patterns from one petal to another.
3. After changing the thread, take it of a different color.
4. Continue on until all the holes are gone.
5. Glue a small pompom in the middle.
Here is another perky and incredibly cute masterpiece. Which is made of little arms and legs.
We will need:
- finger paints
- napkins
- sheet A4
- juice straws
Stages:
1. Dip the foot of a child’s foot in paint, and then make a print.
2. Do the same and blot your hand.
3. Cut out the blanks and then glue them onto a stick.
4. And then put them in a vase or glue them on cardboard and design the work as much as your imagination allows. An example of such a product:
Unusual pasta creations as a gift for mom - quick and easy
Well, such a gift is really unusually cool, and it’s a pleasure to make it. For example, give your mother beads made from multi-colored pasta. Which can be painted with acrylic paints, but it is better to use food coloring for eggs with the addition of vinegar, or buy ready-made ones.
The easiest way is to place the noodles in bags and add the prepared bright solution to them.
Then put the blanks on a thread and the souvenir is ready.
You can create other souvenirs, for example these. Here are a couple of ideas for you.
If you want, you can also make this year’s new box from this material, and this video will help you. You will definitely like it, all the work steps are clearly shown, use:
By the way, they also lay out entire paintings from pasta. So, you can also create such a composition if you wish.
What traditions are associated with Mother's Day?
Forget-me-not is the main symbol of Mother's Day in Russia. This flower (as its name suggests) reminds us of loved ones. Also, images of a bear with forget-me-nots are popular as cute trinkets and cards for Mother's Day.
But as you understand, the main tradition of the day (which is not measured in monetary terms) is showing care and attention to your mother. By the way, on Mother’s Day, don’t forget to also congratulate your grandmother and mother-in-law/mother-in-law. Unlike International Women's Day, you shouldn't congratulate all women without exception, you never know what sore spot you might accidentally step on.
Do you want to share your love for your mother with all of Russia? Then it’s worth taking part in the annual Mother’s Day campaign “Mommy, dear, I love you!” In 2021 it runs from November 15 to December 5. Participants can share their drawings, crafts, poems, photo and video works on the topic “Expressing love and respect for mother” with the organizers, and they will put your creativity on public display on the website centrideia.ru.
Curious traditions associated with Mother's Day also exist in other countries. So in the USA and Australia, during celebrations, you can see carnations attached to the clothes of residents. If the flower is white, it means that it is worn in memory of the departed mother, and if it is colored, it means she is in good health.
In Great Britain, a traditional dish on Mother's Day is Simnel cake, which was customary to give to a parent on the fourth (Mothering) Sunday of Lent in exchange for her mother's blessing. If you want to treat your mother to this delicacy, then pay attention to the fact that the recipes for “Simnel” are very different (they are easy to find on the Internet), but you should focus on the decoration: a circle of 11 marzipan balls or berries is made on top.