What poster to make for the birthday of a 2, 3, 4 year old child?
interesting wall newspaper for a girl on her second birthday
Children after one year will already be interested in birthday greeting posters.
Therefore, young parents take a responsible approach to their creation. For example:
- in photo collage format
- defining the development of skills and talents
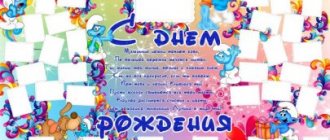
- taking as a basis a template with the child’s favorite cartoon characters
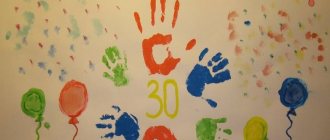
- independently making a voluminous wall newspaper - with pasted animals, balloons
- with sweets in moderation
- congratulatory option with filled text or empty cells for guests to enter it in
- an extended version of the “who do I look like” template with more photos of the birthday boy
Beautiful DIY poster for the birthday of a boy 8 – 11 years old: templates, photos
What a congratulatory poster for a boy should look like:
Poster for a boy made on a computer (for printing)
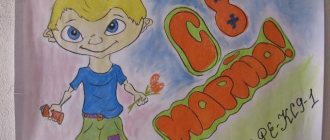
Poster in the style of "Soyuzmultfilm" for a boy's birthday (for printing)
Colorful poster for a 3 year old boy (made and printed on a computer)
Hand-drawn birthday poster for a boy
A simple version of a DIY poster
Simple colorful poster for a boy's birthday
Original DIY birthday poster for a boy
Options for printable boys birthday poster templates:
Poster, wall newspaper for a child’s birthday made from sweets: ideas, photos, templates
Children love sweets, and parents try to dose them. An interesting original option for this is a wall newspaper, a poster with birthday sweets pasted on.
When creating it, consider a number of points:
Plot. Think it over in advance and prepare materials. For example, cut out your child’s favorite cartoon character from paper or draw him on whatman paper. Main inscription. For example, the child's name, the words "Happy Birthday"
They should attract attention and be bright. Layout of sweets. Be sure to sketch it in a notebook before transferring it to a large sheet of paper. Method of fastening them
Light ones - glue, heavy ones - secure with a stapler. List of sweets and poems/slogans, their location. Elements for decoration, for example, sparkles, pebbles, cut-out details, photographs of the hero of the occasion, ribbons, beads.
Your favorites can be used as sweet inserts on the poster:
- candies and cookies
- juice and chocolates
- glazed cheese curds
The text for a wall newspaper can be:
- classic poems
- compliments with an emphasis on sweets
- emphasis on talents and skills
- advertising slogans
- your poems
- short fairy tale
The list of materials for creating a children's wall newspaper is as follows:
- whatman
- felt-tip pens
- paints
- tassels
- scissors
- pre-prepared sweets in wrappers
- stapler
- silicone glue
- magazine clippings
- elements for decoration
For inspiration, we add a photo of a number of ready-made wall newspapers for a child on his birthday.
Original ideas for translating your thoughts into a sweet poster:
- book
- puzzles
- the name of the birthday person, collected from small candies
- postcard
After viewing the photos of the finished posters above, you will get even more ideas for realizing your ideas and use the first ones as templates to create your own unique children's “sweet” posters.
What materials are needed to create a poster?
- Chocolates, sweets and other goods (packaged waffles, glazed cheese curds, coffee bags, packaged dragees, etc.).
- Whatman paper (cardboard, thick paper or folder).
- PVA glue (“Moment”, hot gun or double-sided tape).
- A simple pencil.
- Eraser.
- Colored markers (markers, paints). Or the text can be printed on a printer.
- Scissors.
- Other decorative elements as desired (magazine clippings, rhinestones, satin ribbons, etc.)
- Fantasy and desire to please.
How to draw a poster for a child's birthday?
paints, markers and pens on a girl’s table before drawing a wall newspaper for a child
Stock up:
- Whatman paper
- felt-tip pens, pencils, paints, pens
- scissors and linear
- eraser
- auxiliary materials - magazines, photographs, decorative elements
Creation order:
- on a rough draft, sketch out a sketch of the future wall newspaper,
- determine the place for the main inscription and complete it,
- take the brightest colors,
- Using watercolor paints, also change the tone of the canvas to bright, but not too catchy, so that the main inscription remains visible,
- decide on your wishes and their location,
- draw/glue the plot of the poster,
- if desired, decorate with ribbons and three-dimensional figures.
If you are fluent in design programs on a PC, draw a congratulatory poster for your child in electronic form or use ready-made templates. Supplement them with wishes, photographs, drawings at your discretion.
Beautiful poster for the birthday of a girl 12 - 15 years old: templates, ideas, photos
A poster for an adult girl aged 12, 13, 14 and 15 should be different from posters for small children
At this age, the child begins to feel himself as an individual and therefore it is important to fully take into account all preferences. As a rule, teenage girls love movies and music, modern TV shows and social networks
Try to take into account your teenager’s hobbies, because such a poster will not only be interesting, but also pleasant. You can also fill the poster with wishes and poems, because at this age the child perceives all the pleasant words and is happy. You can decorate the poster with artificial or homemade flowers from corrugated paper, draw and cut out flags, and inflate balloons.
Poster ideas for teenage girls:
Poster for a child
Children, like no one else, love everything bright and colorful. You can make your own poster in honor of your child’s birthday using a large number of his photographs. If the baby is turning three or five years old, choose pictures where he is one month old, six months old, one year old, and so on. If the baby is only a year old, photos by month will do. Don't forget to write inscriptions with your wishes. You can decorate the poster with images of animals, funny people, drawn or cut out from magazines, as well as your child’s favorite cartoon characters. The main inscription can be made as follows: “Our (daughter’s name) is already a year old” or “Our (child’s name) is six years old.”
What's on your menu?
Any appetizers, salads, main courses, desserts, drinks can be decorated taking into account the features of the themed celebration.
Beautiful and tasty - How to stylishly and competently decorate a table for a child’s birthday
It’s not difficult to buy or order themed disposable tableware, cups, napkins, straws, tablecloths. If you're against disposable tableware, set the table however you like, adding pirate party touches while sticking to primary colors.
What can you come up with as original treats:
- Sandwiches in the shape of a treasure map and ships under sail.
- Stuffed eggs with sails.
- Build a pineapple palm tree and a pile of fruit.
- Order an original pirate cake, or better yet, bake it yourself, giving it the shape of a bandit schooner, or maybe your imagination will suggest other options.
Don’t be lazy to arrange a super celebration for your children and guests! Give them a fireworks display of emotions and a storm of pleasure!
Interesting ideas for adults and children
As mentioned above, decorating a room for a birthday depends on many factors. These include gender, age, and even the professional activity of the birthday person (for example, there are a lot of ideas for decorating a holiday for a teacher, educator, or director).
If you are decorating a room for your mother, grandmother, sister or friend, adding balloons will be a win-win solution. From them it will be possible to form original and large figures. If you are afraid to take on such creative work on your own, contact a professional decorator. Place all the balls and the figures formed from them throughout the entire area of the room. Can be distributed in a specific arrangement or randomly - both options are allowed. Build an arched structure from the balls in the entrance area.
Decorating a room for a woman’s birthday is much easier than for a male birthday boy. Dads, grandfathers, and brothers often turn out to be more picky. Here the “designers” will have to act more thoughtfully and carefully. For example, on a man’s sixtieth birthday, you should not decorate a room in soft pink or daring red colors with a predominance of flashy decor - such decisions may be more interesting to a teenager than to a birthday boy who is turning 60 years old.
When decorating the interior for a man’s birthday, it is recommended to pay special attention to table decoration. Complete it with a beautiful tablecloth
It may have a contrasting color, especially if the environment is dominated by calm shades. It is also acceptable to decorate the table with candles in exquisite candlesticks. Decorated glasses will come in handy. But in many cases it is better to refuse adding balloons to a gentleman’s birthday.
Many parents are puzzled by the question of how they can decorate a room for their child’s first anniversary. If the baby has his own room, it is advisable to decorate it secretly from him. To do this, it makes sense to send the child to grandma or to another room while you do the decorating work.
Try to interest the child. Divide his room into several exciting areas where he and his friends can have dinner and have fun. In the second zone it is worth attaching bright posters, photographs of the young birthday boy, banners, beautiful crafts and other similar things. This will be a good solution.
If we are talking about the birthday of an adult child who is turning 18 years old, then cute animals and applications may be inappropriate. However, you don’t have to give up decorating the interior with balloons, lush flowers and ribbons. Pick up a lot of balloons in original pastel shades and cover the entire room with them. Against this background, my daughter’s 18th birthday will be great.
A bold decision would be to design it in an unusual way. For example, it could be a kind of black, white and red party with decorations of similar colors. Wall crafts made from corrugated paper with funny skulls pasted on them are another interesting detail. This design can be prepared for the birthday of a son whose age has not yet reached adulthood.
When a son turns 18 or 20 years old, he should decorate his room in a discreet, minimalist manner (it is recommended to follow the same rule if he turns 30 or 35 years old). Try to use stylish, modern decorations. For example, pale pink balls may be superfluous, but black and white, blue or black and gold will look good. Try not to use a lot of frills and “girlish” details.
On a teenager's birthday, a decoration in the form of a large collage or poster containing the best photographs of him and his friends will be a pleasant surprise. Against the backdrop of a minimalist interior, such a detail will stand out perfectly!
For your husband’s or father’s anniversary (for example, his 50th or 60th birthday), you can prepare a chic surprise for him - stick a large photo collage on the wall in the shape of a number reflecting the age the birthday boy is turning. A similar collage should be made using old and more recent photographs of the hero of the occasion. Arrange the photos in such a way that guests can trace in detail the period of growing up of the birthday boy. Usually such decorations cause real delight in everyone and bring back many good memories.
Posters for boys
The son will need different images on the poster that emphasize masculine character traits. Despite the fact that the child is 1-2 years old, he must understand that he is a future protector and helper.
The boy will need other images on the poster, emphasizing masculine character traits.
The images can be:
- a bear with a basket of fruit or a bag of cubes (you can write some letters on them);
- a car drawn on the entire page, and a photo of a child in the cockpit window;
- in the center of the poster there is the inscription “happy birthday”, and around it are interesting shots of one year of the baby’s life;
- various photographs pasted all over the poster surrounded by painted cars, trains, balloons, cubes, pyramids or animals, birds, etc.;
- a huge cake with a number and a certain number of candles, depending on how old the child is.
Any image on the poster should attract the attention of children, and if you put your soul into the poster, then the children's party will leave an unforgettable impression. After the celebration, the poster can be carefully rolled up and kept as a keepsake.
Rules for poster design
11 rules for an effective poster:
Rule one. Compliance of text blocks (main and additional headings), as well as artistic design and design style with the theme, idea and purpose of the poster.
For example, a poster with information about a scientific conference or other official event is best done in a business style, discreet colors and discreet design.
Advertising, concert, holiday and greeting posters, on the contrary, should be designed brightly, catchily, creatively, and sometimes with humor.
Rule two
Informative, concise, interesting, attention-grabbing and easy to read text message. The text of the poster must be carefully edited: make sure it is short, clear and easy to understand, correct errors, get rid of unnecessary and insignificant words, unsuccessful phrases
Rule three. The key information contained in the poster should be read and remembered first. That is, the most important text block of the first level (the main heading) is typed in the largest font. More detailed information and details are included in text blocks of the second and third levels (additional headings, or subheadings). Smaller font sizes are used for them.
Rule four. One poster contains no more than two types of fonts that combine in style
When choosing a font, it is important to remember: the size and style of letters and numbers should not be discordant with the format and theme of the poster. It is worth considering that beautiful, but overly pretentious, decorative fonts can actually turn out to be illegible and tiresome for the eyes when reading from a distance
Rule five. Fonts should be visible and clearly visible from afar
To do this, it is important to choose the optimal line and letter spacing. Words, lines and headings of different levels should not merge into a continuous canvas on the poster
Otherwise, it will be difficult to read what is written.
Rule six. Images, backgrounds, frames and other visual elements of the poster should also correspond to the theme and complement the text block. They are selected and placed on the sheet in such a way that the text remains visible and easy to read. Some posters (in particular, diagrammatic posters, posters for visual education in school and kindergarten) may contain only images. Others (for example, educational posters-tables, posters-instructions, diagrams, etc.) may consist only of text blocks.
Rule seven. The sharper the text and images contrast with the background, the more noticeable the poster.
As you add elements to your poster, it is important to ensure that contrast is maintained and that letters, numbers and pictures remain easily visible from a distance.
Rule eight. The most important text elements should be placed at the top and right, and illustrations should be placed primarily on the left. This makes information read and remembered easier and better. This rule is associated with the peculiarities of our brain’s perception of verbal (verbal) and non-verbal (visual) images.
Rule nine. All elements of a proper poster must be made in a harmonious color scheme. It is advisable not to combine the colors of warm and cold palettes in one poster. If you know where the poster will be placed, it is better to select the shades of the background, symbols and images in accordance with the design of the room. Graphic designers use special color wheels and palettes to find optimal color combinations.
Rule ten
When designing a poster, regardless of its purpose and theme, it is important to observe moderation. Ideally, this is only an expressive contrasting background, laconic (at the same time maximally informative) text elements and images that harmoniously complement them
Rule eleven. You should not try to fill the entire space of the sheet. The poster can end up cluttered with details, tiring to the eye and difficult to read. When planning the arrangement of elements, it is worthwhile, as designers say, to “leave some air” - to provide areas of free space. This is one of the effective ways to increase the effectiveness of a poster.
The main stages of creating a poster:
- Stage 1. Determine the theme, purpose and style of the poster design.
- Stage 2. Writing headings and text blocks. Editing. Selecting suitable fonts.
- Stage 3. Search for poster design ideas. Selecting backgrounds and images. Choosing a harmonious palette of colors and shades.
- Stage 4. Creating a rough poster layout in a graphics editor. If the poster is drawn by hand, create a pencil sketch on paper.
- Stage 5. Making edits, adjusting combinations of font colors and images, line and letter spacing.
- Stage 6. Printing a test sample.
- Stage 7. Creating a final version of the poster.
Main types
Among the variety of ideas for designing posters, we can highlight several popular themes: funny, photo collages, romantic, “sweet” gifts.
Comic congratulations
Interesting posters with jokes can be made to congratulate colleagues, friends, and relatives. An excellent background for a poster - views of nature, travel, photos from memorable parties. If the main dream of an adult birthday boy is a car, then a small glued-on car will look original and fun. Greetings and wishes are written in a playful manner. You can mention the birthday boy’s favorite phrases.
Everyone had a hand in creating the poster.
Photo collage
This type of poster can be given to anyone. The main thing is to choose enough colorful and cheerful pictures of the birthday boy (with his friends or relatives). To congratulate parents, it is advisable to find photos of childhood, youth, pleasant family holidays. A gift like this will always bring back pleasant memories. It will become a sign of attention, love and respect from loved ones.
Poster with photos of life's journey
Congratulations in a romantic style
It is better to make such posters curly - the sheets are cut out in the shape of a heart, a cloud, a basket with a balloon (it is advisable to take a balloon filled with helium).
Airy and floral greetings
A lot of playful compliments, words of love will be an excellent congratulation. A great option is to decorate the poster with cut-out butterflies.
Decorative element in the form of a butterfly
Sweet greeting
For children, it is better to design a poster with small gifts. The main idea of congratulations can be cartoons, the main favorite characters. For decoration, bright colors, stickers, delicious candies, and Kinder surprise figurines are selected. If your child draws, it is advisable to glue several of his works.
Delicious poster for little sweet tooths
The poster of an older child will be perfectly complemented by photos from different years, which show how the birthday boy has changed.
Birthday poster for sister
What you will need:
- Whatman;
- Paints;
- Comb;
- Double sided tape;
- Scissors;
- Marker black;
- Coffee 3in1 Nescafe (strong);
- Snickers chocolate;
- Chocolate Bounty;
- Bitter chocolate;
- Chocolate Milky Way;
- Skittles candies;
- Raffaello sweets;
- M&M's candies;
- Kinder Surprise;
- "Happy Birthday" balloon.
Process:
- We take a brush with paint and run it along the comb over the Whatman paper to create splashes of color. We make splashes of different colors;
- Let the Whatman paper dry;
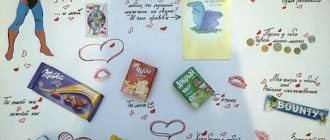
- With a black marker we begin to write a speech, during which we paste in sweets that suit the meaning. The speech should look something like this: My beloved sister, I congratulate you “Happy Birthday”, may your health be as strong as this coffee (3in1 Coffee Nescafe), may life bring you only pleasant surprises (Kinder surprise), and may it only be bitter chocolate (bitter chocolate). I wish you to be active (Snickers chocolate), but at the same time tender (Milky Way chocolate), bright (Skittles candies), but feminine (Raffaello candies). Enjoy life (Bounty Chocolate), and I will always be there (M&M's Candies).
Birthday greetings and wishes texts for best friend and sister for poster
Texts of congratulations and birthday wishes
Remember, for greeting posters and collages, short and succinct congratulations and wishes are suitable, which will fit into small openings between pictures or photos.
If you want to place a large congratulation on them, then set aside one part for it and somehow additionally highlight it, for example, with a bright painted border or just any decorative material.
Texts of congratulations and wishes:
- Dear sister! I wish that all troubles and misfortunes bypass you, and that luck will always be your companion. Always bloom and rejoice, and warm me with warmth, my dear man.
- Sister, on your birthday I want to wish you all the best. Bright sun overhead, roads without sharp turns and unexpected twists and, of course, good health, both mental and physical.
- My beloved and irreplaceable friend! I wish you to be that magnet that attracts only happiness, luck, health and love. Be happy my dear!
- I wish that the smile never leaves your face, and that luck will always be with you. Let your internal energy continue to flow like an endless fountain, thereby helping you overcome the most difficult obstacles with ease.
The process of creating a miracle poster
Draw up a diagram of the future poster in advance. Consider where the inscriptions will be on the sheet, and where the pictures or photos will be, so that everything looks harmonious and there is enough space for all the components. Lay out the Whatman paper on the floor or other large surface where it can lie flat without hanging down. Place all decorative elements on it. First, with a simple pencil, write a congratulatory inscription at the top, which will take up the most space. Attach letters, images, words, photographs - whatever is intended. Be sure to take into account the character traits, dreams or hobbies of the person you are congratulating and make several mentions of them. After securing the lightest elements, you can begin attaching the sweets.
Here it is important to take into account their size and weight and attach them securely so that they do not fall off at the most inopportune moment. For the heaviest sweets, use a stapler. Final elements - sparkles, stones, rhinestones to create an even more spectacular look
And don’t forget to indicate the date of the special event.
That's it, the Happy Birthday poster is ready, all that remains is to hand it over to the birthday boy on the special day, accompanied by the most sincere and sincere wishes!
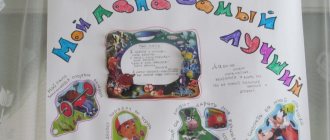
Poster for a child “Who do I look like?”
In order to make such a poster, you will need pictures of the baby, mom and dad. Decorate the top of the sheet of paper with the inscription “Our baby is (number of years old) today.” Place his photo in the center of the poster. On one and the other side there should be photographs of mom and dad. At the bottom write “Dear guests, who do I look like?”
What do you think you can give your mother for her birthday? After all, “standard” gifts are not suitable for the person closest to you. This article describes in detail how to make gift boxes with your own hands.
In addition, whatman paper can be decorated with images of animals and cartoon characters. You can also leave space on the poster for a small table. It will have two columns - “Mom” and “Dad”. Each guest who comes to the holiday will have to make an entry in the appropriate column. At the end of the event, you can make calculations and find out who the guests think your child is like. To make the next poster, you will only need a sheet of whatman paper, a few multi-colored markers and a little creativity. Watch the video: https://www.youtube.com/watch?v=Tisnw1g84jQ
Sweets poster ideas for different events
Romantic poster
What kind of deeds does love push us to? A romantic confession poster will be a great gift for Valentine's Day or an anniversary.
In the center of the poster you can place a photo of your loved one in the shape of a heart, and around it you can place inscriptions - declarations of love, compliments, and maybe even marriage proposals.
Heart-shaped chocolates, Love is... chewing gum, and Mersi sweets are suitable as the basis for such a poster.
Sweets poster for parents
Congratulating mom or dad on an anniversary, birthday or other holiday with sweets is a great idea.
When congratulating mom or dad on their birthday, you can place your childhood photographs and photographs from their youth on the poster. To avoid damaging old photographs, do not glue them, but make cuts in the corners of the poster and insert the photo with the corners into the slots.
Write why you love and appreciate your parents so much, words of gratitude, wishes for health and long life will also be helpful.
Poster with sweets - congratulations on the anniversary
An anniversary is a very important event, which means that you also need to approach the production of a congratulation poster with sweets responsibly.
An anniversary poster is exactly the case when it is difficult to overdo it. Balls, bows at the corners of the poster, sparkles and rhinestones.
You can write a congratulation in verse, or you can leave an empty space on the poster, attach a marker or colored pen to the ribbon and invite the guests of the hero of the day to write something of their own.
Poster "Happy Birthday" to brother or sister
This is where you can unleash your sense of humor. Remember funny stories from childhood, common pranks and reflect all this in your congratulations.
Try to find candies that your brother or sister loved as a child, it will be an unexpected and pleasant surprise.
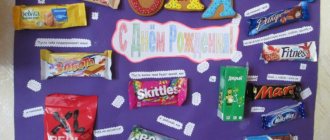
Sweet baby birthday poster
When making a poster for a child, use the rule - less text, more sweets. Sweets, chocolates, figured marmalade. The child will be delighted.
You can draw a fairy-tale hero with a bouquet of sweets, a gingerbread house or a mountain of gifts.
It's a great idea to create a treasure map on a poster with riddles and candy tags.
Sweet congratulations on the wedding
Wedding congratulations suggest tenderness and romance. Take marshmallows, Tenderness candies, Raffaello, everything that is associated with love. Use candies in the form of gold bars (there are such) to wish for a golden wedding, chocolate coins to wish for prosperity in the family.
Newlyweds posterAn envelope into which you can enclose a cash gift will fit seamlessly into such a congratulatory poster.
How to make a poster with your own hands
Before you start decorating, you need to choose a theme. The best option is to think through several ideas and decide for which theme there are more photos and decorative materials.
Delicious congratulations
It is better to design such a poster like a wall newspaper. Replace keywords and compliments with some sweets: candies, chocolate bars, small packages of cookies.
You will also need tasty items: boxes (for juice, coffee, sweet cheese), small packages of cookies, sweets or waffles. The main principle of choice is that objects should weigh a little and stick well to the sheet.
Basic tools, materials: a sheet of whatman paper (can be white or colored), scissors, glue, double-sided tape, stapler, tape, pencils, paint brushes or felt-tip pens, decor (bows, ribbons or braid).
Glue is used for gluing photographs and appliques, and for attaching sweet parts it is better to use a stapler or tape.
Stages of work
1On a separate album sheet, a layout plan for inscriptions, pictures, boxes/packages with sweets is thought out.
2Whatman paper is laid out on a flat, free surface (the sheet should not hang down). On paper, with a simple pencil, a congratulatory inscription, places for packaging with sweets and gluing pictures or photographs are outlined.
3If a background is needed for certain sections of the poster, it is easier to make it with watercolors or colored pencils.
4The central place in the congratulation is given to the address to the birthday person. To design your greeting, you can cut out letters from colored paper or write them beautifully yourself.
5Taking into account the future location of the sweets, pictures, photos, images of your favorite characters are pasted. When drawing up signatures, the hobbies of the birthday person, his advantages and better character traits are indicated.
6 Delicious gifts are attached. In this case, the weight of the products must be taken into account and the appropriate fastening method is selected. It is recommended to fix heavy sweets with a stapler.
Congratulations poster with various elements
To make it interesting for kids to get acquainted with the poster, you can arrange the sweets in the form of riddles.
Gluing sweet parts
Types of birthday posters
Don't have an interesting idea or lack creative inspiration? Don’t be discouraged - below are suggested options for what you can depict on your gift poster. But be sure to add something from yourself personally, put a piece of your soul into an unusual gift.
Artistic poster
This is the most common type of birthday poster. It is equally suitable as a gift for your mother, sister, husband, friend or child. The main thing is to decorate it in the most suitable style.
Photo: Examples of artistic birthday posters
On whatman paper you can depict a simple thematic drawing - a cheerful bear with a basket of flowers, balloons, gift boxes. Or even try to draw the birthday boy himself (if, of course, your artistic skills allow it).
Congratulations can be either written on paper with your own hands, or typed on a computer and printed. For additional decorative elements, use real balloons of different colors, just do not inflate them completely so that they do not look too bulky.
Photo: Poster with birthday sweets
If there are flowers and petals on the poster, attach to each of them a small wish with warm words for the hero of the occasion. Or attach several envelopes to whatman paper (after decorating them) and put pieces of paper with wishes in them.
Collage poster
This option is perfect for those who are not particularly talented in the fine arts. It doesn’t matter – there is always a solution to any problem. Therefore, urgently go online and look for beautiful pictures that will be appropriate for your birthday! And then print them out, cut them out and attach them to a poster.
Photo: Congratulatory collage poster for son
A congratulatory collage is suitable for a child, a friend, or a work colleague, because you yourself will make it most suitable for each specific occasion.
You can (and should) supplement the collage with photographs of the birthday boy himself, funny photos of you and him, for example, from past holidays. An interesting solution is to get a child’s photo of the perpetrator of the event and attach it to the poster on one side, and put the last adult photo on the other. Between them, depict the stages of growing up in a comic form.
Photo: Birthday poster for grandma
And, of course, sign a funny comment or a pleasant wish under each photo. If you wish, you can supplement your poster with small drawings and applications.
An equally interesting idea would be to use funny and/or random photos. The main thing, of course, is not to hurt the feelings of the birthday boy. But the Happy Birthday poster will come out really cool and will certainly evoke a lot of positive emotions.
Don't forget to also place printed or drawn greetings between photos.
Photo: An unusual version of a poster for a loved one
Such a congratulatory collage will not take up too much of your time, but it will become a gift that will be remembered for a long time.
Sweet poster
Handmade sweet posters are especially popular today. They are great both for congratulating kids and as an interesting option to express your feelings to your loved one. Or they will simply be a pleasant addition to the main present.
Photo: Gift poster with sweets
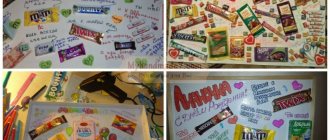
Fortunately, the selection of sweets in supermarkets is now simply impressive. And their original names deserve special attention, which are perfect for a festive birthday poster.
Interesting ideas:
- write “You are simply a Miracle!” and attach the corresponding candy bar;
- or add the caption “You and I are as inseparable as Twix” to a chocolate bar of the same name.
Not only candy bars are suitable, but also various candies with funny names in colorful wrappers, lollipops, packaged dragees and even coffee bags!
In general, don’t hesitate, but rather go to the confectionery department to replenish your supplies of sweet ingredients for such an unusual congratulatory Whatman paper.
Congratulatory photo collage
To create such a gift you need to select as many photographs as possible. To make it easier to decide on the idea of a collage, it is advisable to group them by topic - with friends, with relatives, with colleagues, on vacation.
This poster was created as a gift for a mother who dreams of her own big house.
You will need materials and tools: Whatman paper, pencils, markers, scissors, ruler, photos, postcards, decor.
Work progress
Whatman paper is laid out on a flat surface. Photos are arranged based on size and theme of the pictures.
Lay out the photo on whatman paper
Since the birthday girl dreams of her own large home, the center of the composition is made of an image of the house (you can draw it yourself or print the picture on a printer).
Adding decorative details
The location of photographs on whatman paper is marked with colored pencils. All pictures are removed from the sheet and the background of the poster is created. Small cuts are made at the corners of the contours of the photographs (if you are afraid of cutting the base, you can then paste the pictures on). To create a background, the sheet is painted over with a yellow marker.
Making slots for attaching photos
All photos are inserted into the slots. Additionally, the poster is decorated with decorative elements cut from magazines and postcards. You can use bows and rhinestones. To fix individual elements, glue and double-sided tape are used.
Gluing decorative parts
If you wish, you can sign each photo with a humorous comment.
https://youtube.com/watch?v=2qBk7Z6ciIU
An interesting idea for decorating a collage - in the form of drawn puzzles. Moreover, it is not necessary to paste a photo strictly into each cell.
Let's create a creative gift with our own hands
If you have at least minimal drawing skills, you can easily make a congratulatory poster yourself. Fairy tales and cartoons are always associated with childhood, so images of cartoon characters will be appropriate for both children and adults.
Remember the basic rules for creating a poster - maximum bright colors. It is better to draw with felt-tip pens or markers. If you are making a large banner, for example, A1 format, then it will be difficult to color such an area with felt-tip pens. Make your task easier and take watercolor or gouache paints.
To hone your skills, first draw all the details of the future poster to the selected scale. If you are satisfied with the fruit of your labor and effort, then you can safely begin applying it to the banner. We will first draw with a simple pencil, so we can easily eliminate any error with an eraser.
Step-by-step description of the creative process:
- Let's clear the work surface so that foreign objects do not interfere with us.
- We have a blank sheet of paper in front of us and we are ready to create.
- Our goal is to create a poster like this.
- Let's start with drawing the blanks.
- The basis of our poster is the table. Draw an oval.
- On it you need to draw an oval-shaped cake.
- We move our gaze higher and draw three large circles and four more smaller ones. These will be the heroes' ears.
- But the last character, the duck, has a cap on his head. Why should we quickly draw a cone?
- What's a birthday without gifts? Scatter the boxes around with a pencil stroke. You see, they have the shape of squares and parallelepipeds.
- Slowly we will begin to draw our heroes from their faces.
- Let's draw the contours, eyes, noses and mouths.
- Now let's pack the boxes and draw bows.
- We will decorate the birthday cake with candles.
- Let's outline the faces of the cartoon characters with a thick outline and see if they look believable.
- At this stage, everything can still be corrected. An eraser will help you.
- You need to put the service on the table. Let's draw a couple of plates and mugs.
- The rough work is done, we can remove all the auxiliary lines with an eraser.
To make our masterpiece perfect, we will shade the faces of the characters using dashed lines.
Now we can color our poster. Bright colors will give it unique originality and a festive mood.
Remember that the best gift is not a present created by the hands of a fashion designer or jeweler, but a craft. A birthday poster will be a wonderful addition to the main gift. Show your imagination, and go ahead for new emotions and impressions. I wish you creative success!
Read other interesting sections
https://slovami.net/kak-oformit-svoimi-rukami-plakat/https://nyaskory.ru/den-rozhdeniya/plakat.htmlhttps://ladyspecial.ru/dom-i-xobbi/svoimi-rukami/ plakat-na-den-rozhdeniya-svoimi-rukami-mame-pape-muzhu
Where to start creating a poster with chocolates and inscriptions with your own hands
First, decide what the person for whom you are creating a gift likes: what kind of sweets he likes, what kind of character and sense of humor he has, choose the main theme of the congratulations. And then choose the form:
- traditionally a rectangular or square sheet of Whatman paper (cardboard);
- carved in the shape of a heart, a flower with petals, a cloud, a fruit, etc.;
- unusual: in a stationery folder or folded in half like a postcard.
Afterwards, buy all the sweets and start decorating.
Step-by-step description of the creative process
1) Take a sheet of Whatman paper and cut out the shape of a postcard (or leave it rectangular).
2) Decorate the background: draw a frame, decorate with paints.
3) Draw a rough diagram of the location of sweets and inscriptions with a simple pencil.
4) Write congratulations with colored pens, circle with felt-tip pens.
5) Glue or draw pictures, stickers, photos (if so intended).
6) Attach sweets, main gifts (if provided), and other decorations (petals, feathers, sequins, etc.).
7) Sprinkle glitter on top and secure with hairspray.
 If the postcard is folded or made in a stationery folder, then it is necessary to additionally design the outer cover - decorate it or paste it with colored cardboard, pictures cut out from postcards with flowers and gifts.
9) At the end, do not forget to write the main congratulations, addressing the hero of the occasion.
How to make a colorful poster
The work process will be fun and easy if you follow a few rules:
- in order not to spoil a large Whatman paper, it is advisable to make a preliminary sketch on a regular landscape-size sheet;
- birthday is a holiday from childhood. Therefore, to create a joyful, carefree mood on paper, bright and contrasting colors are used;
- Don't be discouraged if you don't have drawing skills. Patterns can be copied, printed, or use pictures from magazines - carefully cut them out;
- The images are always accompanied by funny captions. The informational part can be very diverse: the name and date of birth of the birthday person, the names of friends, wishes and jokes.
Such a gift can also be an excellent decoration for a holiday room.
Original DIY poster
How to give a sweet gift to a loved one
When making such an exquisite product as a poster with chocolates, you pay attention to several points. Firstly, wishes are prepared initially
They are written down on a simple piece of paper. You can use a laptop or computer. You will also need a list of candies to fill out the poster. After completing the development of the preliminary layout, you will have to go to the store and buy all the necessary sweets with other goodies. After you have managed to stock up on candies and bars, you should put them in their places. This is done in order to see how everything will look. If everything is planned correctly, the poster will bring a lot of emotions to a girl, mom or dad.
Necessary materials
You can make a gift in the form of a collage with sweets with your own hands. It should be bright and unusual: decorated with different types of chocolate and other goodies. The cost of such a gift is small compared to options that can be purchased in souvenir shops. Creating a poster with original inscriptions will be a good solution to express your feelings to a friend.
To create gifts for a friend or girlfriend you will need the following:
- Bars or other sweets. In this regard, anything that has a bright and original wrapper is suitable. Branded products would be a good option. It is easiest to create a successful slogan for it, given the many advertising blanks for sugar products entering the market.
- Whatman paper and cardboard in various shades. With their help, they create separate backgrounds and zone the place on the postcard. Cardboard sheets and elements obtained with their help will add dimension to the gift.
- Scissors, pencil, markers, tape and other office supplies. They will be needed to secure the photo collage with candy bars.
- Beads and other jewelry. In this regard, you can really fantasize. It all depends on whether the present is intended for a friend or a friend. If a gift is being prepared for the anniversary of a holiday, there will definitely be numbers in its center. Even leaves from trees or rose petals are used to create them. A variety of stickers will also help. For musicians, music lovers and car enthusiasts, the range is especially large.
Computer and printing equipment falls into a separate category, which will be indispensable when searching for original ideas and ready-made solutions. If you want to get a truly beautiful composition, you need to use everything to the maximum.
Step-by-step description of the creative process
Placing sweets on a poster
Only those who can be patient and follow the instructions can create a sweet gift on whatman paper. The creative process involves the use of an initially prepared layout.
When preparing it, pay attention to the following:
- The creator of an original gift needs to think about how to harmoniously combine all the components that will be placed in frames against the background. These include: sweets, decorations, inscriptions or photos. In this regard, a good idea would be to create special, separate bases from the background. They will fill in those places where sweets and inscriptions are missing.
- The diagram drawn with a pencil will play an important role. Its background is filled with light colors. Then they begin to place the inscriptions, which should be thought up in advance.
- Placing the sweets itself will be the final stage. They are attached using double-sided tape, glue, thread, tape or other available devices.
If a person is not confident in his skills, he needs to practice first. This will allow you to gain the necessary skills in order not to spoil whatman paper. It is also worth learning how to write beautiful letters with a certain slant on plain paper. Inscriptions can be printed on a printer and pasted or folded from separately cut out letters, and then added to the overall composition.
If there is any free space left on the poster, fill it using stickers or photographs. In this regard, everything will be to your taste. You just need to use your imagination. Depending on whether the gift is intended for a boy or a girl, a man or a woman, it is decorated with jewelry and other small elements. Well-chosen words will help highlight a bright surprise.
Congratulatory photo collage
To create such a gift you need to select as many photographs as possible. To make it easier to decide on the idea of a collage, it is advisable to group them by topic - with friends, with relatives, with colleagues, on vacation.
This poster was created as a gift for a mother who dreams of her own big house.
You will need materials and tools: Whatman paper, pencils, markers, scissors, ruler, photos, postcards, decor.
Whatman paper is laid out on a flat surface. Photos are arranged based on size and theme of the pictures.
Lay out the photo on whatman paper
Since the birthday girl dreams of her own large home, the center of the composition is made of an image of the house (you can draw it yourself or print the picture on a printer).
Adding decorative details
The location of photographs on whatman paper is marked with colored pencils. All pictures are removed from the sheet and the background of the poster is created. Small cuts are made at the corners of the contours of the photographs (if you are afraid of cutting the base, you can then paste the pictures on). To create a background, the sheet is painted over with a yellow marker.
Making slots for attaching photos
All photos are inserted into the slots. Additionally, the poster is decorated with decorative elements cut from magazines and postcards. You can use bows and rhinestones. To fix individual elements, glue and double-sided tape are used.
Gluing decorative parts
If you wish, you can sign each photo with a humorous comment.
https://youtube.com/watch?v=2qBk7Z6ciIU
An interesting idea for decorating a collage - in the form of drawn puzzles. Moreover, it is not necessary to paste a photo strictly into each cell.
How to make a poster with your own hands
Before you start decorating, you need to choose a theme. The best option is to think through several ideas and decide for which theme there are more photos and decorative materials.
Delicious congratulations
It is better to design such a poster like a wall newspaper. Replace keywords and compliments with some sweets: candies, chocolate bars, small packages of cookies.
You will also need tasty items: boxes (for juice, coffee, sweet cheese), small packages of cookies, sweets or waffles. The main principle of choice is that objects should weigh a little and stick well to the sheet.
Basic tools, materials: a sheet of whatman paper (can be white or colored), scissors, glue, double-sided tape, stapler, tape, pencils, paint brushes or felt-tip pens, decor (bows, ribbons or braid).
Stages of work
Congratulations poster with various elements
To make it interesting for kids to get acquainted with the poster, you can arrange the sweets in the form of riddles.
Gluing sweet parts
Poster for a boyfriend or girlfriend
To make it you will need paints, whatman paper and a photograph of you together. This option will be made in the old Russian style. The predominant colors are yellow, beige and red. Draw a scroll in the center of the Whatman paper. It will contain a photo of you and your boyfriend. It can be decorated with an ornate frame. Borrow the required pattern for it from the Internet. In the lower left corner draw two buffoons. One of them can play the pipe, and the other can walk on stilts. Draw a sun in the upper left corner. Above the photo scroll, write “Happy Birthday!” in pen and ink. Place your congratulations and wishes on the right side. It can also be framed with an old Russian pattern.