Hello everyone present! Nastya Skorekeva is in touch and today we will learn some interesting ideas on how to make Halloween costumes with your own hands.
Halloween is very soon - on the night of October 31st to November 1st. And many people celebrate it with all their might (this is especially true for English lessons and youth parties). Both need bright and original ideas for unforgettable images
Of course, not everyone has the opportunity to buy a cool suit in a store. Still, the price tags for the holiday attributes there leave much to be desired. In addition, there is a high probability that you will need the suit once, and then it will gather dust in the closet like a wedding dress (for which, by the way, this is quite appropriate: a turning point in life, after all) .
Today I will show you options that can easily be done at home and at the same time later use the created outfits for other purposes.
There are ideas for both boys and girls.
Content:
- What date is Halloween in Russia 2021
- History of the holiday for children Symbols of Halloween How to make a pumpkin for Halloween
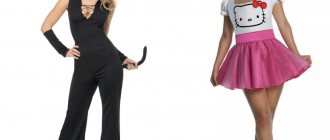
- Versatile Halloween Costumes
- Invitations and gifts
The modern face of Death
Today, Death is most often depicted as a skeleton in a black cloak with a scythe over his shoulder. The main attribute of clothing is often very long and has a deep hood. According to some legends, Death sometimes at the most unexpected moment threw off his hood, revealing a bare skull with empty eye sockets. Interestingly, this mythological character does not have a specific gender. Accordingly, the Grim Reaper Halloween costume is suitable for both sexes. It is not necessary to make him too sinister; this character is sometimes portrayed in a kindly caricature style.
History of the holiday for children
Halloween is more of a British holiday. The Celts in England began to celebrate it in the 9th century. For the ancient people, Halloween was its own New Year: people celebrated the end of the harvest and lit a sacred fire.
The Celts believed that it was on this night, from October 31 to November 1, that spirits descended to Earth. Different: good and evil. Angry spirits were supposed to be appeased, and people left treats for them at the door, and they themselves left the house, dressed in costumes made of animal skins.
Later, with the advent of Christianity, the history of Halloween became intertwined with All Saints' Day, and the holidays began to be celebrated at the same time. In the United States, Halloween has only been celebrated since the mid-20th century. But Celtic traditions are actively observed: children and adults dress up in scary costumes and go from house to house, playfully demanding sweets from their owners.
Halloween symbols
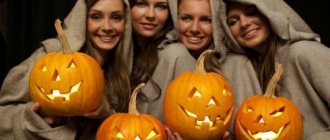
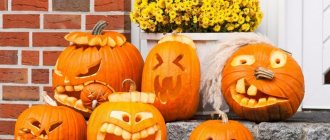
The main symbols of the holiday: pumpkin lanterns, scary figurines for decorating your home and yard, sweets in the shape of tombstones, monsters, insects. The main symbol since the times of the ancient Celts has been the pumpkin head, which is usually called the “Jack-O-Lantern”.
According to legend, Jack was the name of a not very decent man who lived in Ireland many centuries ago. The drunkard Jack even managed to piss off the devil - the Irishman was not allowed into hell after his death. But there was no way for him to go to heaven because of the abundance of sins. Since then, Jack has been walking around the world, lighting his way with a pumpkin lantern. They say that the devil himself gave the pumpkin with a smoldering coal inside to the sinner.
How to make a pumpkin for Halloween
Sketch of a classic Jack. Print, transfer to pumpkin and cut out!
What could a holiday be without its main symbol? A Jack Lantern will not only decorate a “scary” night, but will also gather the whole family around it, including children - after all, making this attribute is very easy, fun and entertaining! And what emotion Jack will display (creepy, cute, funny) is up to you to decide.
Step-by-step instructions on how to carve a Halloween pumpkin with your own hands:
- First you need to choose the right fruit. Pay attention to the absence of damage and rotten areas. The surface of the pumpkin should not be very hard, and the bottom should be flat so that the finished Jack-o-lantern stands confidently on horizontal surfaces.
- Carefully cut off the top of the pumpkin (you will need this “lid” in the future). You can first draw an even circle so as not to make a mistake with the shape.
- Through the resulting hole, remove all the contents of the pumpkin - pulp and seeds. To do this, it is better to use a spoon with pointed edges. Choose the side for the “muzzle” and “scrape out” the pulp in this place especially carefully. The thinner the wall, the easier it will be to cut out the “face” of the pumpkin.
- Take a marker or felt-tip pen and draw a face on the pumpkin. The classic version is triangular eyes and a smile with teeth. But you can show your imagination and make a unique pumpkin, giving Jack a creepy or, on the contrary, a cute expression. You can print ready-made templates (see options above).
- Using a well-sharpened knife at a right angle, cut out the details of the face according to the previously drawn sketch.
- If you want to extend the life of your holiday attribute, coat all edges with Vaseline. Make small holes on the lid of the lamp (see point 1) so that the heat from the candles can escape through them. If desired, the “insides” of Jack can be rubbed with cloves and cinnamon so that the pumpkin not only disperses the shadow, but also smells fragrant!
- Light and insert a suitable size candle inside (make sure it is level and secure). Life hack: to make the candle burn longer, first keep it in the freezer for a couple of hours.
- Cover the lantern with a lid. Ready! Now the "face" of the Jack-o'-lantern has found life and seed.
Find more ideas, pumpkin templates and visual master classes in the article How to carve a pumpkin for Halloween: simple and effective ideas!
Traditions
Trick-or-treating has been a tradition that has accompanied Halloween since the beginning of the holiday. But then beggars begged the owners of the house for sweets.
Only in the 19th century did adults begin to go from house to house for candy; a century later, children got involved. Teenagers, younger children and very young children beg for sweets in scary and simply fabulous costumes: sorcerers, vampires, heroes of fairy tales and films.
In the USA and European countries, girls on Halloween tell fortunes about their betrothed; the ritual is similar to Epiphany in Russia. Children and young people play traditional games for the celebration: “The Mummy”, “Catch the Witch”, “Dracula’s Meal” and others.
Treats
Traditional treats for those begging for sweets are caramel apples on a stick and fortune bread. Apples on a stick are especially good because even small children can make such a festive treat.
Since the middle of the last century, unusual sweets for Halloween have come into fashion: finger-shaped cookies that imitate brain jelly, gummy worms, and everything that the confectioner’s imagination can conjure up.
Where can I get a braid?
The Death Costume cannot consist only of a robe and ordinary clothes. An important attribute of this outfit is the braid. The easiest way is to make it from durable cardboard and paint it with suitable paints - black or brown for the handle and silver for the blade. The cutting element can also be covered with foil. The Grim Reaper costume will look even more impressive if you manage to get hold of a real farming tool somewhere. This is an option for men who decide to reincarnate on the eve of All Saints. Remember that a real braid weighs a lot, and it will not be easy for a girl in a Death costume to wear it all evening. An important condition is that the tool must not be sharpened, otherwise you risk getting hurt or injuring others.
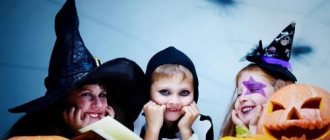
Halloween costumes for children: image ideas and makeup
Decide with your child what kind of character he will transform into: good or evil. Perhaps a shy kid will want to try on the role of a villain or, conversely, a bully child will want to dress up as an angel.
If the chosen costume requires makeup, prepare everything you need in advance:
- colored crayons;
- theatrical or face painting, appropriate for age;
- decorative cosmetics: mascara, eyeliner, powder, shadows;
- available materials: napkins, cotton pads, makeup brushes, makeup remover.
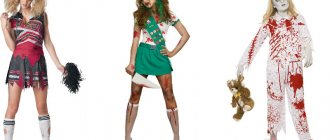
Top 5 Kids Halloween Looks:
Fairy tale heroes
The idea with fairy-tale characters is especially good if you are planning a home party in honor of Halloween. The parents come to an agreement, and all the children come to the holiday in different costumes, choosing heroes based on the same theme: from Russian folk tales, European ones, or fairy tales of the same author. Adults, if they wish, can join in the celebration by dressing up as heroes from selected fairy tales. Makeup for fairy-tale characters is usually simple - just apply makeup with ordinary decorative cosmetics.
Animals
An animal costume is easy to choose for any child, regardless of age and gender. Possible outfit options: black cat or cat, spider, bat, zebra, dinosaur, dragon. The easiest way is to make a cat costume: any black clothes, a belt as a tail, and false ears from a themed store will do. To depict a cat's nose and whiskers on a child's face, a cosmetic black pencil is enough. The zebra costume looks impressive - black and white clothes and black and white makeup.
Superheroes
There are suitable superhero images for boys and girls: Batman, Spider-Man, Catwoman. It's very easy to make a Hulk costume. It is enough to put on the child torn trousers and a thick green top. For greater effect, under the suit you can place an imitation of a mountain of muscles - a puffy jacket or vest. Green face painting is good for Hulk makeup. You can do without makeup by buying a hero mask in the store.
Doll
The simple look is intended exclusively for girls of any age. Any elegant dress can serve as an outfit for the doll. The main thing in the image is makeup: contoured powdered lips, bright pink blush on the cheekbones, black eyeliner around the eyes and false eyelashes, drawn on freckles. A large bright bow on the girl’s head will complement the look.
Cartoon characters
The images are just as good for a themed carnival party as fairy-tale characters. It is better for children close in age to unite for a celebration—preschool children like some cartoons, teenagers like completely different ones. Cartoons with the maximum number of characters are well suited for implementing the idea: “Smeshariki”, “Fixies”, “Fairytale Patrol”. To make up images, it is enough to use decorative cosmetics.
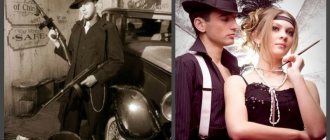
Classic vampire
Unlike modern vampires, classic ones were made according to Victorian canons. This, of course, is a pale face, slicked hair, a formal suit and a long cloak - this is still the best role for men.
While makeup and a tuxedo are easy to get, a trench coat is not sold in stores. But it’s easy to sew it yourself if you use these instructions.
Children's Halloween party: how to organize
If you decide to throw a children's Halloween, first of all think about the guest list. The holiday will be especially successful if children of similar ages gather together.
Actively involve your child in preparing for the party. It won't be boring - neither you nor him!
Invitations and gifts
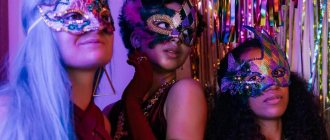
Create an atmosphere of a mysterious holiday even before the party begins: send themed invitations to your guests. You can buy them in a store or make them yourself. There are many options for invitations made with your own hands: figurines of owls, skeletons, pumpkins, bats. Mention in your letter that the party will be a costume party.
Give guests small gifts. Children of any age will be delighted by gummy worms or themed souvenirs.
Jewelry and crafts
Get your home ready for the party with crafts and decorations that are associated only with Halloween. The obligatory symbol of the holiday is a pumpkin with a carved face. The pumpkin can be depicted as good or evil; if your guests are preschoolers, choose a smiling pumpkin. The craft is simple to make: draw a face on a thin-skinned pumpkin and carefully cut it out with a knife.
Other Halloween Crafts and Decorations:
- stickers on windows similar to New Year's snowflakes; you can stick figures of ghosts, bats, black cats;
- pickled brain for older children - put cauliflower in a jar of tea and teenagers will be delighted;
- little ghosts - put pieces of white fabric on white helium balloons and draw funny faces for the ghosts;
- crafts made from autumn leaves - any kind, not just scary ones: animals, fairy-tale characters.
Alien from another galaxy
The theme of aliens and extraterrestrial civilizations never gets old . Despite films and eyewitness accounts, no one can yet say for sure what the alien looks like. Therefore, when creating a costume, its owner has complete freedom of action. And if at a party they ask, “Where have you seen such an alien?”, you can safely answer: “Where have you seen NOT such an alien?”
It so happens that the image of an alien is associated with the color green. You can play up this image by painting your face the color of grass. Cute green horns, which can be made from a girl’s hair hoop, will decorate your face.
To prevent the homegrown alien from being confused with Shrek, he will need a costume. use silver and shiny materials, such as foil. It is optimal if you have a jumpsuit that can be decorated with reflective tape.
You can buy overalls at a hardware store. The cost of a disposable suit is low, so you won’t mind ruining it.
We complement the image with accessories
The details add a highlight to the look. Their choice depends on the character’s profession and his interests. Take a phonendoscope, a wrench, and an old toy with you. Everything that symbolizes the created image.
Attach the scissors to the headband using tape. This will create the illusion of a pierced head. Fix the handle of the knife on your head. Make an ax or hammer out of cardboard or foam. The hand from a doll or mannequin looks impressive and will constantly fall off.
If you have a bat lying around at home, take it too, it looks menacing. Girls can sew the same aged handbag from scraps of fabric. Sprinkle all accessories with fake blood and sprinkle with earth.
Make a brain out of cotton wool and tape. Throw it at your friends, it will be fun.
Nurse
Horror films often use nurses as maniacal characters. First prepare the basic kit. The right zombie makeup won't hurt. You can find a detailed makeup guide here.
You can also just put on a long hospital gown, but this won’t scare anyone. It’s better to sew it yourself, adding a little otherworldly charm. For production, you can use this guide as a basis.
Pastor
There is even such a disease - hagiophobia, that is, fear of priests. And the most frightening ones are Catholic pastors in formal suits.
He doesn't need much: a sinister black suit and a distinctive padre collar. Below are instructions for making your own clothes.
Doll
Living dolls don’t just look creepy, many people are afraid of them to the point of becoming phobic. Moreover, to create an image you only need:
1 Doll clothes. Gothic dolls have been popular for the last 10 years. Therefore, you will need a dark dress with a corset.
2 Makeup. There are many options, but for a gothic style a simple make-up of an old doll will do.
If you decide to sew costumes with your own hands, then this video will help you:
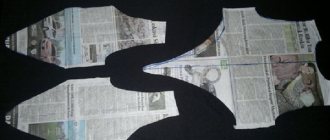
To sew a double-sided raincoat you needed:
- Red satin - 4 meters (4×1.5)
- Black satin - 4 meters (4×1.5)
- Nonwoven
- Satin ribbon for ties
The pattern of the raincoat can be adjusted depending on the desired length. The width of fabric in stores is usually 1.4 m and 1.5 m (I have two pieces of fabric 1.5 m wide and 4 m long). I sewed a reversible raincoat, designed for tall people. I cut it according to my own pattern, based on the size of the fabric:
We cut each section in half and sew it together (the dotted line means “Sew” in the drawing), we get two parts three meters wide. Cut it out as shown in the drawing. Using an iron, we glue the necks of the parts with non-woven material to prevent the collar from stretching.
We sew everything together along the edge (front side to front side) except the neckline. Turn it inside out and sew a finishing stitch along the edge to secure it. The double-sided cape is ready, let's move on to the hood.
It is relatively large; in films, all sorts of sorcerers and magicians usually wear such hoods.
I think that the most interesting thing about a raincoat is the hood (I haven’t found such a sewing method on the Internet yet). The method is convenient in that the hood can be sewn without a pattern, relying only on scraps after sewing the cape. From the “triangle scraps” that remained after cutting out the details of the cape we will sew the hood.
First we sew red with red and black with black (line 1 in the photo below). Then connect the red and black parts along line 2. We slightly round (cut) along line 3.
We gather the hood along line 3 to a size equal to the neck of the cape. Line 3 is the line along which the hood is sewn to the cape. Thanks to this design, the hood is ideally shaped, i.e. voluminous at the back and sides.
Sew on the satin ribbon ties and the reversible raincoat is ready!
Create with your own hands and everything will work out!
Step-by-step technique for creating zombie makeup
You can do zombie makeup for Halloween with your own hands, you don’t have to ask your friends or acquaintances for it, call all your neighbors and ask for help. You can do it yourself, applying makeup step by step, but for this you will need a diagram, which we will offer you.
Cleansing the face
The first thing you should do is cleanse your face. Do not use cream under any circumstances, as the skin should be dry.
- Apply makeup base or white paint to a dry, already cleansed face. Most people who create their own zombie image are inclined to choose stage paint, explaining this by the fact that such a product still has its effect on the skin.
- To make your zombie makeup more true and accurate, we advise you to add a few more primary colors. It can be gray, which will give you the appearance of a corpse, red and blue - bruises, and green and yellow will create a semblance of gangrene.
- Let us remind you that to make zombie makeup for Halloween look natural, buy only high-quality paint. In addition, the condition of your skin depends on this not only on Halloween, but also after it.
Drawing dark circles under the eyes
Second, draw dark circles under the eyes. You must be a real living dead person, as if you just stepped out of the computer monitor where the guy was playing at midnight. Black paint or a pencil will help you add this to your zombie makeup. Add blue and red colors to the periphery of the dark circles to create the effect of fresh bruises.
Highlighting the cheekbones
Third, clearly highlight your cheekbones. To do this, pull in your cheeks, and in the area where the depressions appear, make a line with dark paint. For example, burgundy. Next, carefully, so as not to damage the makeup, blend these lines of burgundy blush.
Highlighting lips
The fourth thing you should do is highlight your lips. Halloween makeup for girls may not necessarily include black or gray lips. You can highlight your lips with the same burgundy paint as your cheekbones, or paint them with lipstick
It is very important, before applying lipstick, to use a pencil to draw the outline of the lips. On top of the lipstick, add a couple of strokes of blue paint, blending it with the main one - again to create a bruise effect
Finishing touches
- Using green and yellow paints, you can paint a hematoma on your face and neck, only an old one. Make a couple of strokes along the neck, and, if desired, along the face, blend these features.
- Scary zombie Halloween makeup should look like it matches your costume. But, if no one forgets about the costumes, then not everyone worries about the image as a whole.
- You don't have to wash your hair, this will give your look fullness. Or use gel, there should be plenty of it.
- Don't forget, eye lenses will give you an even more sinister look. There are no restrictions when choosing the color of the lenses, and the shape of the pupils can be completely different.
- You can buy fake creepy teeth. But you will have to suffer with them. Therefore, shortly before the party, you can rinse your mouth with water and brown food coloring. This will make your teeth darker and look like zombie teeth. (Tip: After a party, brush your teeth with baking soda to make your teeth white again.)
Our step-by-step instructions are simple. Just follow it, doing everything right, and your Halloween zombie makeup will be worthy of praise!