No holiday is complete without gifts and small cute souvenirs, be it a Birthday, New Year, St. Nicholas Day or Christmas. But in order for not only the surprise, but also its packaging to match the festive mood, they must be bright and memorable.
This master class on creating packaging in the form of candy for a sweet treat or small trinkets that kids love so much will allow you, without spending a lot of time and effort, to make sure everything is perfect at your celebration.
How to make packaging for candies, sweet gifts with your own hands: diagram, photo
What could be more symbolic than packaging candy in the form of candy ? So, you need:
- A4 cardboard sheet. Color does not matter - everything is at the request of the master
- A sheet of paper that can be used as decoration - again, the color is not important
- Braid for decoration
- Pencil, eraser, ruler
- Scissors, stationery knife
- Glue – the usual “Moment” may work
IMPORTANT: If you still want to decorate the packaging not with paper, but with colored film, it is recommended to choose glue in the form of a pencil or double-sided tape. This will prevent any noticeable glue stains from appearing on the packaging.
Here's what you need to make packaging for candy.
You can get started:
- On the wrong side of the cardboard you need to draw the following diagram . In it, solid lines are cut lines, dotted lines are fold lines.
Scheme for creating packaging for candies
- Now you should cut out the necessary parts , using a stationery knife and a ruler for convenience. It is preferable to place some hard surface under the workpiece, such as thick cardboard.
Cutting out parts in the process of making packaging for candies This is what the blank for packaging for candies looks like in the end
- Now step back a centimeter from the cut diamonds on the front side of the cardboard , drawing a line. You also need to retreat the specified distance from the second row of diamonds.
These lines need to be drawn on the candy packaging blank.
- Next, you need to make folds according to the previously drawn dotted lines. It’s worth starting with smaller parts , then it’s better to process the longitudinal lines , and only then the transverse ones.
IMPORTANT: It is preferable to use a ruler to obtain straight fold lines.
Bend parts using a ruler in the process of making candy packaging
Fold the longitudinal lines of a blank for packaging candies Fold the transverse lines of a blank for packaging for candies
This is what you get for candy packaging:
- The model is assembled and glued together.
You need to wait for the candy packaging blank to dry.
- Now you need to try on the wrapping paper and cut out the necessary pieces.
It is advisable to first try the wrapping paper on the blank for packaging candies.
- The wrapping paper is glued to the cardboard base.
Gluing wrapping paper to cardboard base for candy packaging
- Next, measure and cut out two pieces of decorative braid. Each of them should be approximately 30 cm.
Preliminary measuring of decorative tape for candy packaging
- All that remains is to tie the braid at the ends of the candy packaging - and the job is completed! Inside such a wonderful package you can put both crumbly candies and some small sweet figurine.
This is what the packaging for sweets looks like in the end:
"Corset"
This stylish packaging will definitely lift your lover's spirits.
For a gift you will need:
- whatman;
- scissors;
- ribbons;
- braid;
- buttons (optional);
- rhinestones;
- artificial flowers.
Work process.
- To make an unusual gift, just draw a corset on two pieces of paper, move 1 cm away from the edges (except for the upper parts) and cut out the templates.
- Next, on one side we make slits for the ribbons.
- Now we connect the templates together and fix them on the cardboard.
- We insert ribbons into the holes and make bows out of them (like on a real corset).
- If desired, we decorate the packaging with artificial flowers, rhinestones or braid.
- We fill the craft with candies and give it to our loved one.
How to pack candies and sweets in corrugated paper: diagram, photo
To create a cone-bag in which you can put candy, you will need:
- Corrugated paper
- A sheet of regular landscape paper or cardboard
- Scissors, glue
- Ribbon
- Ruler, pencil, compass
IMPORTANT: If the latter is unavailable, you can use something round and hard - for example, a saucer.
Operating procedure:
- A circle is drawn on landscape paper or cardboard
- The circle is divided into 4 sections
- Now you need to leave 2 sections, cutting off the excess . But you must remember to leave a small piece for gluing.
- Next, the workpiece is glued together to form a cone.
- Now you need to glue corrugated paper along the edges of the formed cone.
IMPORTANT: It is recommended to glue it in a slightly folded state.
- All that remains is to decorate the cone, fill it with candies and tie the packaging on top with some fancy ribbon.
This is how the packaging for sweets ends up in the form of small bags.
And you can make the packaging only from corrugated paper. To do this you just need:
- a template in the form of petals of any flower from plain paper
For example, a template for making packaging for candy could look like this
- Corrugated paper needs to be folded in half
- to it . It is preferable to secure it with paper clips
- The workpiece is cut out using a stencil
- Next, the workpiece needs to be unfolded - this mechanism resembles the process of cutting snowflakes
- A candy is placed in the middle of the blank . You can try to fit in a few sweets too
- All that remains is to tie the packaging on top with some tape
IMPORTANT: If you tie the corrugated packaging directly above the candy and straighten the remaining paper, the petals will turn out more voluminous.
As a result, you may end up with a flower-like packaging for sweets.
"Bouquet"
A wonderful sweet composition can be presented to your beloved or mother. Women will appreciate a cute and at the same time luxurious gift.
It is best to purchase round candies in foil packaging.
For work we will need:
- long wooden skewers;
- multi-colored corrugated paper;
- glue;
- foil;
- wire;
- ribbons;
- various decorative elements.
Manufacturing process:
- We take corrugated paper of several colors, draw squares, and cut them out with scissors.
- On each blank we draw petals and straighten them, giving them the desired shape.
- Then we insert one petal on top of the other (diagonally), thereby forming a rose. For reliability, the petals can be secured with glue.
- Place a round candy in the center of the flower.
- Now we make the stems and leaves. Wrap a wooden skewer in green corrugated paper and secure it with glue.
- We draw the leaves, cut them out, and glue the blanks onto the stems.
- Use a skewer to pierce the middle of the flower so that it goes slightly into the candy itself. But if you do not want to use this method, then you can first connect the skewer with the flower with wire, slightly straighten the upper part of the stem and, last of all, carefully insert the candy.
- Next, we decorate the flowers in foil, wrap the finished bouquet with ribbon, decorate it with rhinestones if desired, and give it as a gift.
How to pack candies and sweets in organza: diagram, photo
Sweets in an organza bag are a rather cute, elegant and at the same time simple gift. To create such a find you need:
- Actually, organza
- Satin ribbons
- Sewing threads, pins
- Scissors
- Sewing machine
- Crochet hook - if you want to make threading ribbons easier
Here's what you need to create packaging for organza sweets.
You can get started:
- A piece of organza needs to be cut lengthwise. You should get two stripes.
This is how you need to cut a piece of organza for candy packaging
- On both cuts you need to smooth the edges.
IMPORTANT: You should retreat at least 4 cm.
This is how you need to smooth the edges on pieces of organza in the process of making candy packaging
- Using a sewing machine, you need to lay the first line on half of the foot. This must be done on both cuts. There is no need to trim the threads.
Processing pieces of organza during the production of candy packaging
- After retreating 1 cm, you need to lay another line.
This is what the final candy packaging looks like:
- Now each strip is cut into equal parts. How many parts - so many bags in the end.
Blanks for candy packaging
- Each piece needs to be folded in half. And so that the front part looks inward. For convenience, you can fasten the fabric with pins.
This is what the candy packaging looks like at this stage:
- Starting from the top edge, the future bag needs to be stitched . At the beginning of each line the thread is secured.
Candy packaging bags
- The bags are turned inside out and ironed.
Now the candy packaging bags look like this
- Next you need to cut the ribbons.
- Now all that remains is to make 4 holes to place the ribbons. You can get a seam ripper from the sewing machine kit. Or you can use small scissors with sharp ends.
IMPORTANT: Holes are made exclusively in the upper layers of the material!
This is how holes are made in the process of making candy packaging
- Next, the ribbons are inserted and tied into a knot. The bag is ready!
The process of threading ribbons into a bag-packaging for organza sweets This is the beauty that comes out in the end, but, of course, you can put more sweets in such packaging
How to beautifully and originally pack a box of chocolates as a gift?
Candy as a gift for a teacher is a traditional gift. But you can present sweets in an original way! What you will need:
- Box of chocolates that opens like a book
- Several sweets in individual packages - optional
- Corrugated paper. It is preferable to choose several shades
- A small piece of foam
- Satin or nylon ribbon
- Small wooden skewers or toothpicks
- Scissors
- Glue, double-sided tape
- A brand new presentable ruler, pen, pencil - they are needed for decoration
You can start:
- First of all, you should carefully remove the candies from the box.
This is what the box should look like before processing.
- Then the box is covered with the most elegant corrugated paper.
IMPORTANT: The corners and sides must be glued especially carefully and accurately.
- You can return the candies to their place.
And this is what a box of chocolates looks like after covering it with fancy paper
- The box is already quite elegant, but this is just the beginning! Using glue you need to attach two small ribbons.
This is how ribbons are glued to a box of chocolates
- to print the “School Magazine” sign on the printer in advance . Of course, you can add more. The sign is glued to the box.
A sign glued to a box of chocolates
- to the lower left corner . The size is small - approximately 5x5 cm.
A piece of styrofoam on a box of candy
- Small pieces of double-sided tape onto school supplies as shown in the photo.
This is how you should apply tape to school supplies to decorate a candy box.
- Next, all these things are glued to the box.
School supplies need to be glued to a box of candy like this:
- Now you need to stick artificial flowers or flowers created around individually wrapped candies into the foam. How to create such candy flowers will be discussed below in the section on candy bouquets.
IMPORTANT: It is preferable to additionally fix it with glue.
There should not be too many flowers, otherwise the box of chocolates will look overly weighted
- are drawn on colored paper . You can, of course, simply print them out in finished form in advance.
- Leaves are cut out.
These are the leaves that will be useful for decorating a candy box.
- The leaves are then glued onto the box.
Leaves glued to a candy box can be arranged like this:
- You can add a few more ribbons as decoration A rowan twig will come in handy.
Here's a wonderful tasty gift in the form of a box of chocolates for Teacher's Day
Standard size box packaging
How to pack a gift in standard size gift paper: following certain rules for the procedure will help. For the first time, you should practice on a newspaper, and after working out the procedure, use the prepared material.
Step-by-step instruction:
- Measure out the required amount of paper. To do this, place the box in the center face down and leave a few centimeters of paper on the sides so that there is enough paper on all sides.
- Make a fold of the vertical side of the paper measuring 1 cm and glue double-sided tape to it without removing the protective layer on the other side. Connect both sides so that they fit snugly against the box. After this, glue them together according to the established principle, so that the junction is exactly in the center. If everything is done correctly, the seam will be almost invisible.
- On the side, fold the top edge of the paper to fit the size of the box. Then screw the flaps on the sides. And stick tape on the edge (1 cm) of the bottom side without removing the protective layer. Fold it over and make sure that the seam is exactly in the center. Only after that glue it.
- Turn the box seam side down and make sure the packaging fits tightly.
- Decorate the box with a ribbon or bow, choosing them taking into account the characteristics of the main shade.
How to beautifully and originally pack loose candies as a gift?
How about a whole basket of delicious bunnies ? They can be created according to the scheme proposed below. Each bunny has candy inside.
Using this scheme, you can create a bunny packaging for bulk sweets
Bunnies with candies, in turn, can be placed in some beautiful basket
But the packaging is made from ordinary cardboard rolls , which remain after using toilet paper. You can even use them to create unusual candy packaging! Diagram below:
Scheme for creating packaging for candies from a cardboard roll
IMPORTANT: It is preferable to additionally wrap them in cling film before placing the candies in the package. Of course, if the bulk sweets do not have individual packaging.
You can try to create an original, but at the same time very simple to make shoe packaging. For such work you will need:
- A plastic cup or plastic packaging from some product
- Some material such as fabric or crepe paper
- Waste piece of paper
- Ribbons, ribbons
Operating procedure:
- A piece of material is cut out - paper or fabric
This is the piece of material you need to cut out to make candy packaging
- The paper needs to be crumpled so that it turns into a tight ball.
- Then a paper ball and a cup are placed on the material as indicated in the photograph.
This is how the components of the future packaging for bulk sweets are placed
- Next, the cup and paper need to be wrapped as shown below.
So you need to start wrapping the candy packaging
So you need to continue wrapping the candy packaging
- Now the blank is tied up, decorated - and you get a cute shoe that can be filled with candies.
This is how the candy packaging shoes turn out
"Slipper"
You can please your child with such an original gift.
For our work we will need:
- a plastic cup;
- corrugated paper;
- album sheet;
- braid;
- glue;
- ribbons.
Instructions:
- Cut out a small piece of landscape paper and crumple it to form a tight ball.
- Then we draw a square on corrugated paper, cut it out, place a glass in the center of the workpiece and place a ball close to it.
- Now we wrap corrugated paper around the objects so that its ends are inside the plastic cup. The edges of the paper can be glued.
- Then we tie the blank with braid and ribbons, fill the shoe with sweets and give it as a gift.
How to beautifully and originally package homemade handmade sweets as a gift?
Handmade sweets look best in small boxes processed using the decoupage technique. Such boxes are created as follows:
- The wooden blank for the box is carefully sanded and coated with primer .
IMPORTANT: This must be done on all sides of the workpiece.
- Then you can apply the background paint.
- After this, the decoupage napkin is separated from the base, applied to the surface and treated with glue on top.
To decorate a box for homemade sweets, for example, this decoupage napkin is ideal
- It's time to tackle the terrain. Experienced crafters recommend applying it with putty using a stencil.
- After the relief has dried, it should be slightly moistened with a damp cloth and then sanded . This step will prevent further chipping.
- Using a sponge, apply a little paint to the relief.
- Now you can apply the antique finish.
IMPORTANT: This coating should be lightly wiped with a cloth for a better effect.
- Next, the edges should be treated with bitumen - it will give a darkening effect.
- Now you need to apply shellac varnish.
- Once again, you can walk a little over the future box with sandpaper.
- All that remains is to decorate the outer part of the box to taste, and sprinkle the inside with coffee and cinnamon. This last step will make the box smell amazing when you open it - just what you need to store your handmade chocolates!
This is how you can make a beautiful handmade candy box
Square or rectangular
Most often, gifts already have their own factory packaging in the form of a square or rectangular box, but to give the surprise a more sophisticated look, you need to wrap it in beautiful gift paper.
How to wrap a square or rectangular gift:
- Spread the prepared material on the table, back side up.
- Wrap the box with paper on all sides and leave an additional margin of 4-5 cm. After this, cut a piece from the roll.
- Make a 1 cm bend along one of the long edges and glue double-sided tape over it without removing the protective layer on top.
- Also secure the second long edge with a small piece of adhesive tape 1.5 cm further from the center of the box.
- Place the prepared fold on top, but so that it runs exclusively in the center. Once you are sure of this, remove the protective layer and glue it.
- To wrap the remaining two sides, you should initially bend the side flaps tightly.
- Then make a 1 cm fold along the edge of the bottom side of the paper, and glue double-sided adhesive tape on top.
- Press the top edge tightly against the box and secure it in the center with a small piece of tape.
- After this, place the prepared bottom edge on top with a fold so that it runs exactly in the center of the side.
- If everything matches, remove the protective layer of tape and stick it tightly.
As a result, the central seam can be hidden using a satin ribbon of the required color.
How to pack a bouquet of sweets as a gift?
In order to create a candy bouquet, you should purchase in advance:
- Sweets
- Corrugated paper, organza, foil, ribbons, cords - all this will help to decorate flowers. You can stock up on a few things from this list, or all of them to diversify your crafts.
- Fabric, wrapping paper, mesh - everything you might need to wrap a bouquet
- Toothpicks, barbecue sticks - they are needed if you plan to create stems
- Polystyrene foam, foam rubber or polyurethane foam
- Glue gun
- Pliers
- Wire
- Decorative elements to taste
- Scotch
IMPORTANT: it is recommended to purchase several types of tape - transparent, colored, paper.
You can make a bouquet according to the diagrams below:
You can create such a charming bouquet from sweets Another scheme for creating a bouquet from sweets Or you can create a bouquet from such interesting candy flowers
How to pack tea and sweets as a gift?
You can, guided by the previous schemes, create flowers based on sweets . The flowers are artistically decorated, and a tea package is placed in the same composition with them. Examples:
Composition of flowers, sweets and tea
A bouquet of sweets and tea can be decorated like this
By the way, not just standard store-bought tea boxes, but carefully made tea bags . You can also put sweets in such a simple, but at the same time interesting bag. The scheme is as follows:
Scheme for creating a bag for tea or sweets
And this is what tea or candy bags look like in the end
IMPORTANT: By the way, it is very good to attach a piece of paper to such bags describing the composition of tea or sweets made with your own hands.
Master class No. 2: Garland of paper candies
These paper candy garlands will be a great apartment decoration for a birthday party. It is very easy to make. You can also make such a garland together with your children and hang it in your child’s room.
You will need:
- colored paper;
- scissors;
- glue;
- thread or thin rope.
Caramels
1: Draw circles on a piece of paper. Cut them out and choose a contrasting color of paper for the candy wrapper.
2: Draw the outline of the candy wrapper as shown in the picture and cut it out. Then glue the previously prepared circles on top.
Round icicle on a stick
1: Now cut larger circles from paper of different colors.
2: Select the circles from which you want to make a spiral to decorate the icicle. Cut a thin spiral starting from the middle, then glue it onto the circle. Glue a thin strip of brown paper on the back side.
Icicle
Cut sheets of paper of different colors into thin strips. Cut half of them into narrow diagonal strips and glue them at the same distance from each other.
Glue all the paper candies onto a thread or string and hang the garland on the wall or above the dining table.
How to beautifully pack candy for a kindergarten or school birthday: ideas, photos
Let's consider options for packaging sweets that can be given to children in kindergarten or school, as well as options suitable for Birthdays:
Candies made of corrugated paper with sweets inside - children will be delighted!
Such a wonderful cake from several compartments-pieces can be built as a package of candies. A table for a birthday, including a child’s one, can be decorated with such candies scattered in a beautiful glass bowl. You can build for children such a cake from candies with some kind of toy on top
Boys can build a tank like this out of candy
Children of preschool and primary school age will be delighted with these candies. Cute bunnies made of colored cardboard with sweets inside will certainly delight the kids
Bright candy jars topped with lollipops will delight children.
Candy bouquet cake - an interesting combination of ideas
Box cake
Such a lovely gift can be given to a woman on her birthday or March 8th. This gift is also suitable for a wedding celebration.
For this craft we will need:
- round plastic container with lid;
- scissors;
- cotton pads;
- braid;
- felt;
- glue.
Let's get to work.
- We measure the width and length of the object and cut out a strip of felt.
- We glue the piece onto the container, wait until the glue dries, and then decorate the bottom and top parts with openwork braid.
- We decorate the top of the container lid in the same way and additionally glue flowers from cotton pads on top (or attach ready-made small artificial roses).
- When the craft is dry, fill it with candies, cover it with a lid and give it as a gift.
How to beautifully pack candy as a gift for the New Year: ideas, photos
The most long-awaited holiday of the year - how to decorate a sweet gift for this occasion?
Chocolates can be packaged like this in the form of Santa Clauses and snowmen. Bright personalized candy packages for children, each of which contains a sweet surprise.
A whole jar of sweets is the dream of not only a child, but also an adult.
It’s so simple, but at the same time interesting, you can wrap a box of chocolates by placing it in wrapping paper and tying it with twine, and sticking a wish on top
It’s easy to pack chocolate for the New Year by wrapping it in colored paper and sticking snowflakes on it.
Snowman made from candies - elegant and delicious!
Making a sleigh from candy is not at all difficult, and the effect will justify the work a hundredfold.
Christmas tree made of candies
It’s great to put crumbly candies in these New Year’s bags
Candies inside Christmas balls
Paper selection
The most common way to decorate a gift is gift paper.
It comes in several types, each of which has its own differences:
- Sheet glossy paper. The paper can be of different colors, both plain and multi-colored. The density of the sheets is minimal, which allows them to be used in various interesting wrapping options.
Most often, this type of paper is used for packaging boxes in the shape of a square and rectangle.
- Craft. Characterized by increased wear resistance and density. To the touch, kraft paper is much rougher than the previous version and has a ribbed surface with a cross section.
Great for gifts in retro or Provence style, as well as large sizes. Such packaging requires additional decoration on top.
- Silence. This type of packaging is papyrus Whatman paper. Its thin airy structure allows you to give the gift a smart and elegant look.
Tishyu is also used as a filler in a gift box. It is convenient to wrap objects of complex geometric shapes in this paper, which gives them additional volume.
- Polysilk. It is a stretchy film onto which a metallic shade is applied. It only comes in a single color version.
Used for wrapping objects with sharp corners, as well as toys. The gift is placed in the middle of the packaging list, and the edges rise up and are decorated with a bow made of the same material.
- Corrugated paper. For packaging gifts, material with large embossing is used. Often this look is complemented with polysilic bows, which gives the packaging a sophisticated look.
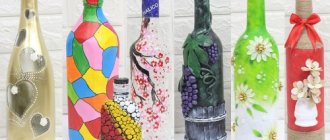
You can wrap any objects in this paper: boxes, bottles, tubes.
- Mulberry. Designer look of crinkled paper. Available in a variety of colors, and in some cases also has an ornament or design.
Used as a wrapper for items of any shape. If necessary, the gift is complemented with a small decor on top.
How to beautifully pack candy as a gift on March 8, February 14: ideas, photos
Women's Day and Valentine's Day - maybe it makes sense to prepare something themed?
On February 14, you can just stick candies on the heart base like this. On February 14, you can beautifully decorate a box in the shape of a heart, and even add gingerbread letters
But a man will also be delighted with such a sweet and not only gift for February 14th
On February 14, you can wrap each candy individually in red corrugated paper or organza - it will be thematic
Each candy, packaged separately for February 14th plus the corresponding box - labor-intensive, but impressive!
Number 8 made from candies - the simplest and most delicious gift solution for International Women's Day
And this way you can decorate a box of chocolates or a chocolate bar for March 8th Mini bouquets for March 8th made from sweets
How to beautifully pack candy as a gift for a teacher, doctor: ideas, photos
We looked at one option for wrapping a gift for a teacher a little earlier. Let's see what else interesting things we can come up with! And also for a doctor, because people in this profession are also often given sweets as a sign of gratitude.
A music teacher will certainly appreciate a piano made from candies
A box of chocolates can be styled as a teacher's briefcase
A pencil made from sweets as a gift for the teacher. You can create a set in which each chocolate bar or candy needs to be signed with a separate wish for the teacher. A geography teacher can pack a box of chocolates into a card. By analogy with the previous example, a music teacher can pack a box of chocolates into sheet music
This is a jar you can put sweets for the doctor in.
You can create such a chest by decorating it with candy flowers and placing candy inside
You can present to the doctor such a set of bird's milk candies, each of which should be labeled with a wish.
Medical bouquet consisting of a beautifully decorated box of chocolates, a bottle of alcohol
Syringe made from sweets for a doctor
Or you can simply stick a personalized thank you letter to the doctor on the packaging of sweets
The best design for sweet gifts: photo
We bring to your attention another small selection of creative candy packaging options:
Sweets in a cup - both tasty and for a long memory
Candy pineapple is sure to surprise everyone
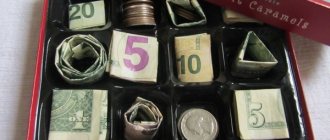
Candy alarm clock - the most pleasant type of alarm clock
It’s so simple, but interesting, you can pack sweets, for example, for colleagues
A steering wheel made of candies will delight car enthusiasts
A bat hugs a candy - quite cute and unusual
Coffee candy gift idea
A gift in the form of a candy mug, in which the mug itself consists of candies!
Candy gift for real football fans
Candy ship
Beautifully and originally packaged sweets look completely different. This is definitely a gift that will please both the eyes and the stomach.