- November 6, 2018
- Crafts
- Sofia Ermakova
Do-it-yourself volumetric figures can often be seen at children's parties. This is a light decoration that will create a festive atmosphere and serve as a prop for memorable photos. Such decorative elements are beyond competition. Volumetric figures are light, inexpensive to make, and beautiful. They evoke extremely pleasant emotions. The original composition requires a creative approach, so making the figure will take more than one hour. In this article we will tell you how to make a three-dimensional figure.
What you need for work
Most often you can see voluminous numbers, generously decorated with flowers, fringe or pom-poms from ordinary table napkins. They also make decor for children's birthdays using glitter and balloons. It all depends on imagination, the theme of the holiday and desire. But the external decorations hide the base frame, which allows the figure to be voluminous. The base is usually made of cardboard, wood or foam. To make a volumetric number 2 (or any other) with your own hands, you will need the following materials and tools:
- Cardboard. The larger its size, the larger the finished decoration will be. You can use the boxes in which household appliances were delivered, that is, those materials that are often sent to the trash bin.
- Styrofoam. You can buy a foam panel at a hardware store and glue several sheets together to make the number thicker.
- Plain paper napkins (one package is not enough, it is better to take several at once, 100-200 pieces each).
- Instead of napkins, corrugated or any other thin paper is suitable;
- scissors, glue, threads, a simple pencil and ruler, tape, foam glue, additional materials for decoration.
Aids for learning numbers
To study the number 8 with your child, it is not necessary to immediately take up mathematics or copybooks. It’s better to start getting acquainted with numbers in an original, unusual way.
Puzzles are tasks in which the number 8 is encrypted. To solve the puzzles, the child will have to make every effort and intelligence. Puzzles make you think, use logic and imagination. It is the puzzles from all the tasks in the textbook that are most often remembered by children who attend 1st grade.
Proverbs and sayings can be an interesting solution for a math lesson. Offer the kids proverbs and sayings if they need to take a break, get distracted, but at the same time not lose the kids’ attention. For teachers who are going to class in 1st grade, sayings will be an excellent addition to a fact-filled lesson. Use proverbs and sayings more often to develop your child’s speech. It wouldn’t hurt to include tongue twisters with the number 8 in your practice.
A genre of folk art close to puzzles is riddles. It is riddles that make it possible to develop children's intelligence, associative and creative thinking. Riddles contain a description of an object or phenomenon, and from this description you need to guess what it is about. In the case of the number 8, riddles describe it using objects similar to the number eight: rings, donuts, hoops, etc.
Riddles will help a teacher coming to 1st grade to attract children's attention to the material in the lesson
Poems will help develop speech and at the same time teach counting. It is best to use S. Marshak’s poems for children, which can be downloaded on the website. However, if this is not possible, take into account the poems of modern children's authors. Poems will be useful for children to develop a sense of rhythm, memory, and imaginative thinking. Set to learn poetry at home as homework. This is a very useful exercise for children attending 1st grade. Poems not only teach, but also instill a love for the native language.
Coloring will help prepare your child for spelling. Even if the child is already in 1st grade, coloring will be useful for him to practice fine motor skills. Coloring will not only teach you how to trace and color pictures correctly, but later coloring will also be a faithful assistant in copywriting. Let the coloring book enter every home where there are children. Coloring would also come in handy during a lesson in a kindergarten or development center.
Of course, copybooks will help teach children how to write the number 8 correctly. Writing the number 8 is quite simple: just draw two circles one above the other. But even this simple technique can cause difficulties. To learn how to write the number 8 correctly, you need to develop the skill of continuous writing, which results in two circles. Writing numbers correctly is a great skill, and the children will still have to learn it using copybooks.
Popular articles Kitty
How to make a base for a number from cardboard
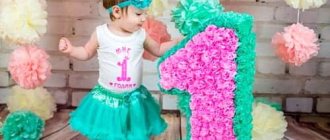
How to make a three-dimensional number for a birthday? The whole process begins with the formation of the base: the number itself 1, 2, 3 or any other. You can make whole words and figures voluminous (the baby’s name, a favorite character for a child’s birthday, the initials of the newlyweds, a figurine of the bride and groom for a wedding, and so on). The baby's first birthday requires special attention, so many mothers are interested in how to make a three-dimensional number 1 with their own hands. The child will not remember the decoration of the holiday, the number of people present and the treats, but you can take bright and colorful photos that will preserve the memory of the first birthday.
Let's take a closer look at how to make a three-dimensional figure from cardboard. If you have chosen this particular material for the base, then draw a number of the required size and shape on it, cut it out with a sharp stationery knife. You will need two such blanks. You can generously decorate one piece with voluminous decor. If you intend to create a three-dimensional base, then in addition to the second blank you will need to cut strips from cardboard. Their width depends on how voluminous you want to make the figure.
To ensure that the strip bends without creases, make notches every 2-3 cm with a stationery knife. On one side, attach a strip along the entire perimeter of the number with tape, then apply the second part of the workpiece and also secure it well. You can glue the tape on the front side, because everything will be covered with decor.
One for a year - for beginners
A very simple master class for those who have never done needlework.
- Cut out the base of the number from an old cardboard box (dimensions are given below)
- Take napkins or wrapping paper and cut it into squares with a side of 5-10 cm as desired
- Take the center of the square and glue it to the base with PVA glue.
- Let it dry for 2-3 hours. Ready!
Also below in the photo are several sizes - ready-made diagrams and drawings for the number one . You can take more or less, at your discretion.
Blank for small decoration
Food packaging produces small numbers. If you decide to use a box in which cornflakes, juice or milk were sold, then before starting the process of decorating the number, glue the surface of the base with a layer of papier-mâché so that the factory design is not visible. For pasting, take thick PVA glue and toilet paper (newspaper or plain thin paper). This will give the workpiece additional strength, because thin cardboard may swell and blur during operation. Another option is to simply choose foil-faced packaging. These produce many dairy products and juices.
Ballerina
The first master class is a ballerina. Looking at such a craft, it seems that it is the work of a real master.
You will need:
- Thin wire - about one and a half meters.
- Napkins (preferably plain, but you can choose any).
- A thread.
- Scissors.
- PVA.
I suggest watching a video on this topic.
Manufacturing:
- We weave a skeleton from wire. To do this, we need to divide our wire into several parts: long (about 90 cm) and short (40 cm). From the long one we form the legs, back and head, and from the short one – the arms.
- Now that there is a skeleton, we make it a little more human-like. We tear the napkin into small long pieces and paste them over our base.
- In order not to wait for the torso with the “muscles” to dry, we make a dress. It can be molded into a lush one - this will look more impressive. To do this, make a couple of flounces, which you then attach to the “waist” of your ballerina. All that remains is to decorate it the way you want.
Foam base
How to make a three-dimensional figure from napkins and foam? If you choose foam plastic as the base material, then it will be much more convenient to work. Cut the number out of paper or draw it directly onto the foam and then cut it out. If the sheet of material is too thin, glue several sheets together with ceiling tile adhesive. It is most convenient to work with this capricious material with a special tool.
If it is possible to use a professional cutting tool with a heated nichrome thread, be sure to take advantage of it. A similar cutter can be made from a soldering iron with fixed copper wire, but this is only for creating volumetric figures in large quantities. Foam can be cut well with a regular knife using a metal ruler.
Stages
- On one of the sheets draw the outline of the number. The width can be determined based on the number of rows of flowers that will need to be glued to it. For example, based on the size of the cardboard, you get 2 rows of flowers. In this case, the width of the figure around the entire perimeter will be about 9 cm.
- Then cut out one. If the cardboard is very thick and hard, you can use a construction cutter.
- The resulting number is placed on a second sheet of cardboard, traced around it and also cut out.
- Next they make blanks for the side parts. To do this, measure and cut strips of cardboard 9 cm wide. Experienced craftsmen advise making them as long as possible - this will make it more convenient to glue them.
- Then, first one and then the other half of the unit with the strips prepared for the “sides” are glued together with tape. Craftswomen advise using softer and more flexible cardboard for the side parts, which will be easier to bend and glue along the contour of the number.
Jewelry options
Any thin paper can be used for decoration. You can decorate the number with large pompoms, voluminous or flat flowers, fringe, and so on. For a large figurine you will need about 100-200 paper roses. We inform you of this to understand the scale of the work. It is advisable to choose lush flowers, such as roses or asters. To save time, the sides can be covered with corrugated paper. You can decorate the number with the same or different flowers, for example, combine two or three colors and make gradient transitions. The same goes for fringe.
Corrugated paper decor
The process of making numbers from crepe paper is similar to working with crepe paper, but you will almost certainly have it on hand at home if you have small children. Of course, it is better to use double-sided colored paper.
LIFE HACK: You can glue white office paper and then paint it with watercolors or spray paint.
You can also add colored tape, which will decorate the number and additionally hold the paper.
TIP: If you have thick multi-colored napkins, you can also cut them into fringes and use them for decoration.
How to make paper roses
How to make a volumetric figure with your own hands? Step by step, the entire process of creating a decorative element with a cardboard base is as follows:
- On a large sheet of cardboard, draw a blank - a number of the required shape and size.
- Cut out two number blanks and a strip of cardboard. Make notches every 2-3 cm on the strip with a stationery knife.
- Fasten all the elements together using tape.
- Make the required number of paper roses for decoration. This can be done in different ways, which we describe below.
- Glue the decor to the workpiece in a certain order or randomly if several colors are used. It is better to use delicate shades for the front side, and darker ones on the edges. This will make the figure look even more voluminous. You cannot use skewers for fixation, because the composition must not only be beautiful and durable, but also safe for the child.
To make the simplest rose, you will need to draw a spiral on a square of colored paper and cut a strip along the marked contour. Then roll the strip tightly, starting from the center. For strength, you can add a little glue to the base of the structure.
To make more natural roses, you need crepe paper. Cut out 15 petals in the shape of hearts and 5 in the shape of drops. Lightly stretch each petal from the center to the edges to give it a more natural shape. Fold the edges in using a pen or pencil. Now attach the droplet petals to the wire base, then the heart petals. If necessary, secure the structure with adhesive tape.
To make roses that look like real ones, you need to cut the paper into strips 1-5 cm wide. From one A4 sheet you can get up to 20 roses.
From balloons
All children love balloons, so this figure will delight your little one. However, inflatable balloons are a universal thing for decorating a holiday for people of any age.
There are many ways to make a unit using balloons. We will look at several basic options that do not require special training.
Method 1
Action 1
First of all, we prepare everything necessary. We buy balls whose diameter does not exceed 10 - 15 cm. It is better to take balls of two or three colors, so the unit will turn out more beautiful. The approximate number of balls is 90 – 100 pcs. We will also need a transparent thread or fishing line to tie the balls together.
Act 2
We inflate all the balloons with a pump. An important condition is that all balls must be the same size. If they are different, the figure will turn out to be crooked.
Act 3
We tie together two balls of the same color. Then we make the same pair and tie the two pieces together with thread. You will get four connected balls.
This is one level, we will make 10 levels of one color for the base, and 15 levels of a different color for the vertical part and tail.
Act 4
We connect the base balls together using thread. You should get a voluminous rectangle. The levels must be fastened tightly; they should not move away from each other or have large gaps between them.
Action 5
We attach one level of a different color to the middle of the base. This will be the vertical part of the unit.
We connect the vertical levels to each other in the same way as the base. This will take 11 levels.
Action 6
We connect the remaining levels together, this will be the upper tail. Carefully attach it to a vertical surface so that it stands at an angle.
Action 7
The number is ready, if you have the desire and time, you can decorate it with balls of a different color.
How to make voluminous asters for decoration
To create a lush aster you need to take six napkins and a stapler. Fold the napkins in a stack, cut out the petals (round the edges), fasten them in the center and unfold them, moving the petals a little. Fluff the flower. You can try making the edges wavy. A flower with jagged edges will look interesting. For one flower, try using napkins of different colors to make the decor look brighter and more varied.
From paper napkins
To make these flowers, we will again need crepe paper, or the easiest way is to take paper napkins.
Step-by-step instructions for decorating letters:
- cut one square from such paper;
- fold like an accordion and tie in the middle;
- fluff to create a flower shape.
ATTENTION: Flowers can be either the same color or different colors, harmoniously combined with each other. The more flowers, the more volume will be created.
Volumetric figure using the cutting technique
How to make a three-dimensional figure with your own hands? Decor using the cutting technique will allow you to create a very fluffy decorative element for a children's party. For decoration, it is better to use corrugated paper, but napkins also work well. Cut the paper into squares, and then insert a pencil into the middle of the sheet (without piercing it) and press it down with paper. Attach the paper and pencil to the surface previously coated with glue. Thus, you need to fill the entire surface of the volumetric figure. When everything is dry, you can straighten the decor with your hands and carefully trim off any excess.
If your number is "8"
Pythagoras believed that the number eight symbolizes harmony and determines a person’s destiny. This is why numerologists and astrologers associate the number “8” with what is called the planet of fate.
Does your date of birth have the number "8"? Then you are among those who will be entrepreneurial in all areas. You will move forward, successfully implement plans and implement your plans. Owners of 8s are strong-willed and strong-willed people, they know how to manage a team and are able to attract people to follow them.
Popular articles The second life of a stoolRecognized and financially secure, they must always remember that success is impossible without spiritual development, because the appearance of the number eight consists of two halves. Expanding knowledge and being responsible to others is their task.
Where else is the number “8” present?
And the number “8” is also associated with the first spring holiday, when we congratulate the entire female half of the planet - our mothers, grandmothers and sisters!
Volumetric figure with fringe
This is the easiest way to decorate a three-dimensional figure. You will need a long strip, so it will be more convenient to use quiet paper. How to make a volumetric figure with your own hands? Fold the paper into a neat rectangle and cut it, then straighten and fluff the fringe. The strips can be attached to the workpiece with double-sided tape. This way you can combine colors to create a very bright number for the decor of a children’s event or photo shoot. The fringe that is glued on with waves looks much more interesting. In this case, it is especially good if the colors are contrasting.
Painting numbers with acrylic
Volumetric numbers can be simply painted using a brush or spray can. Just pay attention to the fact that after gluing the cardboard structure, adhesive tape remains on top and after painting it can be visible.
Paint: the best option is acrylic paint
TIP: Therefore, for a more accurate result, we initially recommend gluing paper on top of the cardboard , but using double-sided tape to create a flat surface.
Let these numbers, regardless of the chosen design method, give joyful emotions to you, the birthday party and all the guests of the party, because this is their purpose! Good luck!
Figure figurine for children's birthday
Based on a simple number, you can make themed decor for a holiday. For example, parents of girls throw Minnie Mouse themed children's parties - this is a simple and effective option. How to make a three-dimensional figure with a thematic slant with your own hands? An ordinary figurine just needs to be decorated accordingly. For example, cover a large number 3 (or another) with red and black napkins using the cutting technique, add white paper circles, and cut out two circles from black cardboard and secure them “on the top” of the number (these will be the ears). Similarly, you can stylize the figure to resemble your favorite cartoon character. It is enough to use a suitable color and add a few details from other materials.
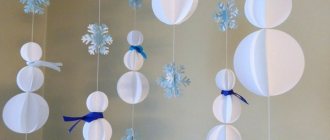
Winter version of numbers for decoration
How to make a volumetric figure unusual? If you decide to decorate your house with a voluminous congratulatory inscription or the number of the coming year, you can decorate the decoration in the appropriate style. If your child's birthday falls in the winter, you can also use a New Year's theme.
In addition, pom-poms made of woolen threads are perfect for winter decorations. This figure will look cute and homey. The base is made from any convenient material: cardboard or foam. Wood is not suitable because such numbers are usually simply painted.
Pompoms can be made in different sizes from different colored threads. Very small pompoms can be made on a fork, and slightly larger ones can be made simply on your hands. Any size is available if you use the standard method: winding wool threads on a cardboard base circle. It's easier to make pompoms on your fingers. Simply wind the required amount of yarn on your fingers and then tie with a thread (optimal length 20-25 cm) between the middle and ring fingers. Remove the future pompom from your hand and fluff it up. To decorate a three-dimensional figure you will need a lot of such blanks.
Additionally, you can stick decorative snowflakes, sparkles, and beads on the figurine. If desired, you can sprinkle the numbers and letters with “snow”, which is made from white foam. To do this, you need to cut small pieces from the sheet (or take the waste that remains after making the number) and crumble them thoroughly. “Snow” is poured onto the adhesive base.
Features of writing numbers and examples of numbers
Start writing a small stick a little higher and to the right of the center of the cell, draw a line up to the upper right corner of the cell. Then write a large stick from the upper right corner almost to the middle of the bottom side of the cell.
Start writing slightly below the middle of the upper side of the cell. Draw a line up, rounding it in the upper right corner of the cell. Then draw a line down to the middle of the bottom side of the cage. Along the underside of the cage. Write a wavy line along the bottom side of the cell, leading your hand to the lower right corner of the cell.
Start writing slightly below the middle of the upper side of the cell. Draw a line up, rounding it in the upper right corner of the cell. Then they draw the line down, slightly short of the middle of the cell and write the lower semi-oval.
Start writing a little to the right of the middle of the upper side of the cell. Draw a straight line almost to the center of the cage, then draw the stick to the right and slightly short of the right side of the cage. Write with a long stick, starting above the middle of the right side of the cell and bringing it to the bottom side of the cell.
They begin to write an inclined stick slightly to the right of the middle of the upper side of the cell and lead it almost to the center of the cell. Then they write a semi-oval. A wavy line is written from the top of the stick to the right.
They begin to write a semi-oval slightly below the upper right corner of the cell, round it off, touching the top side of the cell, and move their hand down. Round the line, touching the bottom side of the cage and move your hand up. Then round the line to the left slightly above the center of the cell.
Start writing a wavy line slightly below the middle of the upper side of the cell and bring it to the upper right corner of the cell. Then they write with a large stick, bringing it almost to the middle of the bottom side of the cell, and then cross it out with a small stick in the middle.
Start writing a little lower and to the right of the middle of the upper side of the cell. Draw the line up and to the right, round it off, touching the top and right sides of the cell. Then they move their hand down, rounding the line, touching the underside of the cage. Then, rounding off, the line goes up to the starting point.
Start writing slightly below the upper right corner of the cell. In the upper right corner of the cell, the line is rounded and the hand is led down to the center of the cell. Here the line is rounded again and leads up to the beginning of the oval. Then they lead the hand down, rounding it at the middle of the bottom side of the cage.
The oval begins to be written a little to the left of the upper right corner of the cell. Draw the line down, rounding it in the middle of the bottom side of the cell. Then they lead their hand up to the beginning of the oval.