A baby's first birthday is certainly an important and very exciting event, especially for the mother! I would like to celebrate it beautifully and cheerfully, and preserve wonderful memories for life!
What mothers don’t invent! They order incredibly beautiful cakes, decorate candy bars, arrange festive photo shoots, and decorate the house with fancy balloons and Chinese lanterns.
One of these decorations, which is very popular nowadays, is voluminous figures!
They take pictures of the child and the whole family, decorate candy bars and simply leave them as a souvenir.
Number 1 for one year anniversary
The number will decorate any holiday
The children will be delighted!
This figure can be ordered from craftsmen or companies that organize events.
Plus, you can make it yourself! To do this, you do not need to have special skills and abilities, you only need desire, a great mood, the necessary materials and 19-20 hours of free time
What to give a girl for her 1st birthday
Yes, yes... This process is certainly fascinating, but also very lengthy! So it’s better to start preparing for the birthday in advance!
We have prepared for you a detailed master class on how to make such a unit and we are in a hurry to share it!
This is what your number will look like
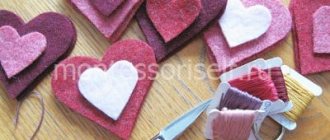
Trimming
Numbers decorated using the cutting technique turn out to be very fluffy. It’s better to use corrugated paper, but plain napkins also work well.
- The paper is cut into squares.
- Then you place a pencil in the middle of the sheet and press it with paper.
- We apply a stick with paper to the surface coated with glue.
- Having filled the entire surface in this way, straighten the decor with your hands and trim off the excess with scissors.
Trimming method
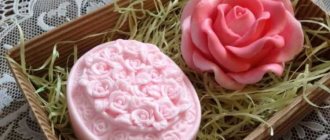
General rules for making flowers
You can make flowers with your own hands from almost any napkins, paying attention to the following recommendations:
- single-layer thin material is suitable for airy flowers without clear straight lines;
- In order for the craft to retain its shape for a long time, it is better to use high-density material;
To make flowers, it is better to use plain napkins.
- to add scent to decorative flowers, you can use scented napkins to make them;
- Accuracy is important in the work, since the material of the napkins is not strong enough.
Preparing the material
Numbers and letters made from ordinary table napkins are an affordable element of original room decoration for any celebration. To create three-dimensional elements, you need to prepare cardboard and multi-colored napkins. The brighter the napkins, the more colorful the holiday number will be. For the frame, it is recommended to use packaging cardboard from household appliances. To ensure that during the work process it does not turn out that there is not enough paper, it is better to prepare several packages. On average, to make one volumetric figure 2 with a height of 50 cm, one package of napkins will be required.
Materials and equipment for work
Looking at pictures depicting three-dimensional numbers made from napkins, many people fear that it is impossible to do something similar with their own hands. In fact, they are not difficult to make. The process takes some time, but the birthday boy’s emotions of happiness cover all costs.
Not the last place at the holiday is occupied by external paraphernalia - flowers, gifts, music, surroundings.
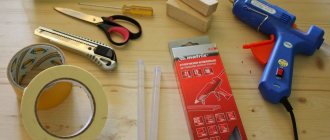
Tools and materials required for work:
- Paper napkins. They can be single-layer or multi-layer. When choosing a color, you should focus on the occasion of the celebration, the gender of the baby, and the surrounding interior. It is advisable that the napkins be plain. The approximate quantity is calculated based on the planned number of flowers - 1 napkin will be required for each unit.
- When creating numbers from napkins, you can combine several shades, alternating them with openwork and carved specimens. They will make the composition more voluminous and unusual.
- The threads can be simple cotton. For ease of cutting, you will need scissors or a stationery knife.
- A stapler will simplify the fastening process.
- Glue or tape for fixation.
- To create the base you will need a cardboard blank. You can use an empty box from household appliances.
The decor of the room in honor of the festival can turn a traditional celebration into something special.
Important! To ensure a high-quality connection of elements, it is necessary to select the strongest options.
Stages
- On one of the sheets draw the outline of the number. The width can be determined based on the number of rows of flowers that will need to be glued to it. For example, based on the size of the cardboard, you get 2 rows of flowers. In this case, the width of the figure around the entire perimeter will be about 9 cm.
- Then cut out one. If the cardboard is very thick and hard, you can use a construction cutter.
- The resulting number is placed on a second sheet of cardboard, traced around it and also cut out.
- Next they make blanks for the side parts. To do this, measure and cut strips of cardboard 9 cm wide. Experienced craftsmen advise making them as long as possible - this will make it more convenient to glue them.
- Then, first one and then the other half of the unit with the strips prepared for the “sides” are glued together with tape. Craftswomen advise using softer and more flexible cardboard for the side parts, which will be easier to bend and glue along the contour of the number.
General instructions for making a frame of volumetric figures
The production of numbers begins with a frame on which paper elements are attached. The cardboard must be thick so that it does not deform during decoration. The basis for numbers from napkins can be flat or voluminous. The latter look much more impressive. To do this you will need:
- Cut out two identical numbers from cardboard using a stencil or templates. You can draw them yourself or print them from files from the Internet.
- Decide on the width of the numbers and cut out a rectangular tape for the end part.
- For numbers “0”, “4”, “6”, “8”, “9”, which have an internal closed space, additional side parts will be required.
- They work very carefully with the figures “0”, “2”, “3”, “5”, “6”, “8”, “9”, which have rounded edges.
- Having completed all the preparations, all the cut out parts are secured with tape.
The preparatory stage of work is over.
Types of frame
First of all, you should make a frame onto which the paper elements will be attached in the future. It is advisable to choose thick cardboard that will not tear or deform during the decorating process. There are several options for the basis for numbers and letters from napkins. They can be voluminous, flat or frameless.
One of the simple and uncomplicated ways to decorate your home is the holiday trend of recent years - numbers made from napkins.
Flat figure
Flat figures look less impressive compared to voluminous ones. However, their production will require less time and effort. To create such a frame with your own hands, you will need to follow the recommendations.
This decorative element has gained popularity; it is used as a prop at children's photo shoots and at various holidays.
- If the size of the figure does not exceed an A4 sheet, you can find a suitable diagram on the Internet and print it.
- To create large figures, you need to draw a diagram on whatman paper by hand or print it in parts.
- Cut out all components.
- If there are several parts, connect them end to end with tape.
- Then the resulting diagram must be attached to the prepared cardboard and carefully traced around the outline.
- After this, you need to cut out a figure from cardboard.
- If you plan to make several numbers from napkins with your own hands, you will need to repeat the entire process in the same way.
Four: a detailed description of how to make the number correctly
The number “4” should be made from napkins by analogy with one; only straight lines are used to draw the frame. The color shade is chosen depending on the gender of the hero of the occasion. For ladies, both young and old, warm tones are used; for men, cool shades are suitable. Let's get started:
- Draw the outline of the number on the cardboard or trace the template. We cut out the blank with a stationery knife.
- We apply the cut out shape to a piece of cardboard, trace and cut out exactly the same second flat shape.
- To glue them together, you need to get several rectangles of the same width, the lengths of which will be different and correspond to the individual external and internal parts of the figure.
- Glue all the rectangles to flat images with masking tape to get a three-dimensional figure.
- Choose the shape of flowers you like and make the required amount from paper napkins.
- Carefully paste over the figure - and the craft is ready for use.
Types of paper napkins and materials for production
Paper napkins are divided into the following types:
- white;
- plain colored;
- white or colored with ornaments;
- single-layer;
- two-layer;
- three-layer;
- with perforation;
- hygienic;
- cosmetic;
- canteens;
- serving.
Paper napkins are made from cellulose.
To make flowers from paper napkins you will need the following materials and tools:
- paper napkins;
- threads or paper tapes;
- needle;
- threads;
- scissors;
- pencil without edges;
- stapler or glue;
- thick colored paper;
- thin hair clip;
- multi-colored paints.
Rainbow letter
We offer you a master class on creating letters from napkins using a very interesting technique; such a letter will be a wonderful decoration for any occasion.
On an A4 sheet of paper, print or draw the letter you need (if you want a larger size, make it larger).
Thus, we have made a template, now we need to transfer it to cardboard, you can simply glue this template, or you can trace it and cut it out.
We make markings for the pattern. We measure out about four centimeters with a ruler (if your letter is larger than A4 size, you need to make more stripes, although it all depends on your preferences, you can make it narrower or wider) and draw a line diagonally, as shown in the photo.
Cut the napkins into small squares and roll them into lumps. Glue the resulting balls onto the first area of our letter.
We continue in this spirit until the end, changing the colors of the napkins.
Our letter is ready, and, as you can see, it was not at all difficult to make.
This is what she looks like from behind:
The letter can be decorated with some kind of applique.
How to make flowers from napkins?
This question is usually faced by those who have decided to thoroughly study how to make a number from napkins in order to please the little birthday boy with this decoration. Flowers from napkins are usually cut out in unlimited quantities. For this:
- a single-layer napkin is folded in four and divided into four squares;
- the squares are laid in an even stack and fixed in the center using a stapler or a piece of thin wire;
- then the square stack is cut to form a circle;
- All that remains is to cut through the edges of the created circle, not reaching the center;
- then they lift the napkin petals and straighten them.
This creates fluffy flowers, which can later be glued to the base using PVA glue. However, needlewomen offer many other options for creating napkin flowers. Some of them can be found later in the article.
Let's get started
To decorate a room, you can make a flat or three-dimensional figure from napkins. The first option is much easier and faster to do. To do this, you need to cut out the outline of a number or letter from corrugated cardboard. And then decorate the blank with blue paper flowers for a boy. But a volumetric decorative element looks much more impressive and interesting.
Volumetric figures
The step-by-step master class begins with creating flowers from napkins. They are not difficult to make, but they take quite a long time.
So, to make a three-dimensional flower you need:
- Take a napkin and cut it in half.
- Fold the halves in half and cut again.
- Cut out circles from the resulting squares.
- We squeeze each circle in the center to make a flower.
- To obtain splendor, it is important to compress the circle well and secure the center with a stapler and staple.
Cardboard frame
The master class on creating three-dimensional numbers from napkins continues with the process of constructing a frame.
The step-by-step instructions are as follows:
- On one of the pieces of cardboard we draw the number 1 or any other element. The width and height of the inscription should look proportional.
- Cut out the number along the outline. If the cardboard is hard, use a construction cutter for cutting.
- Using the resulting template, we cut out the second part of the volumetric structure.
- Then we cut out the side elements necessary to fasten the front and back of the number.
- We glue all the parts together using wide tape.
As a result of following these step-by-step instructions, you should get a three-dimensional figure 1 made of cardboard, which is shown in the photo.
Cardboard frame of four
Let's move on to decoration
To make your handmade numbers from napkins for a boy’s birthday beautiful, it is important to decorate the cardboard blank correctly. We glue the previously prepared flowers to the frame using colorless universal glue. This must be done carefully, trying not to wrinkle the paper blanks. After gluing all the flowers, you need to wait for the glue to dry. And then straighten the flowers, giving them splendor, as shown in the photo.
Making flowers from napkins
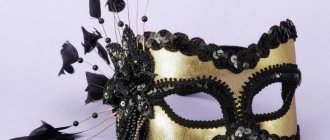
To make the number 2 or letter even more solemn, you can complement it with an original crown. You need to cut this element out of bright double-sided cardboard. Then glue the resulting crown with colorless glue at the top of the inscription. Instead of a crown, you can cut out any image from cardboard. For a boy's birthday, an image of a car or any other favorite cartoon character is suitable.
Instructions for performing numbers
To make artistic numbers from napkins you will need:
- cardboard;
- paper napkins of one or more colors;
- scissors;
- pencil;
- ruler;
- stapler;
- glue.
Digit 1
Manufacturing process:
- Make 1 flower from napkins: draw a circle on a napkin folded in 16 layers, cut it out, fix the center with a stapler, crumple each layer of petals, straighten the flower.
- Based on the size of the flower, determine the thickness of the lines of the number. Draw the outlines onto the cardboard and cut out 2 identical pieces. For the sides, you can use any scraps of cardboard. Glue the frame using any tape. Calculate the approximate number of flowers for the craft, make according to the previous description.
- Apply glue to the back of each flower, attach the flower to the frame, and press gently. It is better to glue flowers to the number 1 in horizontal and vertical rows.
Digit 2
How to make number 2 from napkins:
- The work begins with creating a control sample, this is done like this: a napkin folded in several layers is fixed with a stapler in the center, then the contours of the circle are applied, then you need to cut out the circle, crush each layer of the napkin, and give the shape of a flower.
- On a large sheet of cardboard, draw the number 2. Make the thickness of the lines such that 2 flowers fit side by side. Cut out the 1st blank, attach it to another sheet of cardboard, trace along the contour, cut out the 2nd blank.
- For the side parts of the number 2, it is better to use long rectangles. Assemble the workpiece using tape: first glue the sides to the 1st part of the workpiece, then attach the 2nd part of the workpiece.
- Make paper flowers in an amount of at least 90 pieces following the example of the control sample. Glue one at a time to the frame with parallel lines.
Digit 3
Description of work:
- Make 1 flower: place several napkins on top of each other, sew at the central point, mark a circle and cut it out, cut the edges of the circle along partial radii, lightly crumple each layer of petals and straighten them. All other flowers are made in the same way.
- On a large sheet of cardboard, draw the number 3 so that at least 2 flowers are placed next to each other on the lines of the craft. Cut out the figure, while the base of the figure should be horizontal. On the 2nd cardboard sheet draw the 2nd part of the blank. For the sides, prepare horizontal strips of cardboard. Glue the three-dimensional figure with tape.
- Calculate the required number of flowers to decorate the number. Make flowers and glue to the frame.
Digit 4
Manufacturing procedure:
- The work begins with making the 1st flower according to the following scheme: the napkin is folded like a fan, fixed in the center with a clip, the edges are torn off by 2 mm and painted with a marker, the clip is removed, the center of the workpiece is tied with thread, then you need to shape the flower.
- Making a figure frame: draw the number 4 on a sheet of cardboard (the base of the figure must be at least 30 cm), cut it out, place the resulting figure on the 2nd sheet of cardboard and trace it along the contour, cut out the 2nd part of the workpiece. For the side edges of a three-dimensional craft, you can use cardboard scraps. Glue the frame with tape.
- Calculate the required number of flowers, make flowers following the example of the 1st flower. Cover the front part of the frame and the side edges with flowers; the flowers should form parallel lines.
Number 5
Making artistic number 5 from napkins:
- Fold the napkin into a square in several layers; the more layers, the more magnificent the flower will be.
- Sew the center of the workpiece, cut out a circle, cut the edges.
- Crumple each layer of paper to form a flower. Make all the flowers for the numbers according to this pattern.
- Draw the number 5 on a sheet of thick cardboard; for the stability of the figure, the base must be horizontal.
- Cut out the number, place it on another sheet of cardboard and trace along the outline. Cut out the 2nd part.
- For side rounded edges, prepare horizontal strips of cardboard; for straight sections, you can use scraps. The side edges are glued with tape at an angle of 90° to the 1st half of the workpiece, the 2nd half is glued on top last.
- Calculate and prepare the required number of paper flowers. Randomly cover the frame of the number with flowers.
Numbers 6 and 9
The process of making large decorative numbers 6 and 9 is similar, the only difference is the location of the stable base.
Instructions:
- Make 1 flower (all flowers for crafts are made the same way) according to the following description: fold a paper napkin into a square in several layers, stitch the center point of the square or fasten it with a stapler. Draw and cut out a circle. Press each layer of paper into the middle and straighten the flower.
- Observing the proportions and taking into account the dimensions of the previously prepared flower, apply the contours of the figure to a sheet of cardboard and cut it out. Make the base of each number horizontal. On the 2nd sheet of cardboard, make and cut out a similar shape. For the sides, cut out horizontal stripes from cardboard. Glue the frame with tape.
- Make flowers from napkins according to the pattern. Cover the frame with flowers in any order.
Number 7
The order of work on the craft:
- Make a flower according to the diagram: cut the napkin into 4 equal squares.
- Divide each square into 2 rectangles with a horizontal fold, twist the edges and middles of the rectangles, roll the first rectangle into a tight roll, and wrap the rest around it. Secure the finished bud from below with a thread. Follow this diagram when making all the flowers for the craft.
- On 2 sheets of cardboard, draw the number 7 and cut it out. The base of the figure should be at least 30 cm for stability. For the sides, cut the cardboard into long rectangles. Attach the sides to the figure at an angle of 90° with mounting tape. Glue the second part of the craft on top.
- Attach the pre-prepared flower to the frame and calculate the exact number of elements. Make a certain number of flowers. Carefully glue to the frame.
Number 8
The number 8 from flowers is made according to the following description:
- Fold a flower from a napkin, which will later be needed to determine the exact number of elements, according to the description: place the paper napkin in a diamond shape towards you and bend the corners to the central point, turn it over and repeat the same steps.
- Lift the bottom triangle and expand its sides from the outside to form a petal, form 4 flower petals. The remaining flowers for the number are made in the same way.
- On 2 sheets of cardboard, draw 2 identical numbers 8 with a flat base. Cut out the blanks. The side faces will consist of narrow rectangles. Glue the side edges to the first blank, then attach the second half of the volumetric figure on top.
- Determine the number of decorative elements, prepare according to the example of the 1st flower and glue to the frame in any order.
Digit 0
The number 0, consisting of paper flowers, is made according to the scheme:
- A paper napkin is folded in several layers and secured in the center with a stapler; a circle is drawn and cut out on the blank. Each layer of the napkin is pressed to the center and straightened. Using a similar description, make all the decorative elements, the exact quantity of which will be determined later.
- Making a cardboard frame: the contours of the number are applied to 2 sheets of cardboard, the figures are cut out. For the side edges, cut several rectangles from cardboard, which are glued to the joints of the front and back of the number.
- Attach the paper flower to the frame and calculate the required number of elements. When all the flowers are prepared, glue all the elements to the front part and side areas of the frame.
Making decorative crafts from paper napkins is a creative and fun process. Following step-by-step instructions, you can make any of the existing colors from available material, which you can then use to decorate the birthday person’s numbers.
Author: Doroshenko E. N.
Article design: Natalie Podolskaya
Ballerina
The first master class is a ballerina. Looking at such a craft, it seems that it is the work of a real master.
You will need:
- Thin wire - about one and a half meters.
- Napkins (preferably plain, but you can choose any).
- A thread.
- Scissors.
- PVA.
I suggest watching a video on this topic.
Manufacturing:
- We weave a skeleton from wire. To do this, we need to divide our wire into several parts: long (about 90 cm) and short (40 cm). From the long one we form the legs, back and head, and from the short one – the arms.
- Now that there is a skeleton, we make it a little more human-like. We tear the napkin into small long pieces and paste them over our base.
- In order not to wait for the torso with the “muscles” to dry, we make a dress. It can be molded into a lush one - this will look more impressive. To do this, make a couple of flounces, which you then attach to the “waist” of your ballerina. All that remains is to decorate it the way you want.
Inflatable numbers for birthday
A children's party is not complete without balloons. For a birthday you can make a great wall decoration:
- you will need a polystyrene foam base (this is a rectangular piece or a square piece)
- small balloons draw the desired number
- we inflate the balls and attach them to the base with double-sided tape according to the pre-drawn shape
The number can be attached directly to the curtain
Facing technique
Numbers and letters made from napkins made using the cutting technique for a birthday or anniversary look very voluminous. They turn out fluffy and weightless. Corrugated paper is best suited for these purposes. If you don’t have it, you can use plain napkins.
The joyful emotions of your loved ones and guests more than pay for all the time and effort.
The process consists of several stages.
- Cut paper or napkins into equal squares.
- Place a pencil in the center of the sheet and press it with paper.
- Apply glue to the surface.
- Place a pencil, crimped with paper, on the glued base.
- Fill the entire area in the same way.
- After this, smooth out the entire decor with your fingers and carefully cut off the excess parts with scissors.
It is quite difficult to predict in advance how many napkins you will need. But when purchasing, consider the size of the finished product.
Flowers can also be made using the trimming technique.
To do this you will need:
- rectangular sheets of paper;
- stick or pencil for trimming;
- plasticine.
The larger the figure, the more material will be needed for it.
Manufacturing instructions.
- Stretch the plasticine with your hands.
- Wrap the paper around the pencil so that most of it remains free.
- Insert it into the prepared plasticine.
- Do the same procedure for 3 more petals.
- Fill the voids between them with petals of other shades.
- Cut out the center from corrugated paper and attach it to the center of the flower.
The more magnificent the decor, the better the numbers made from napkins look.
The best option for trimming is polystyrene foam. Using it, no glue is required, the stick easily enters the soft material, leaving a trim in it. In this way, you can make decorative lines and patterns on the figure.
It costs from 3 to 7 packs of napkins to prepare.
Collecting numbers
Upon completion of all the preparatory processes, you can proceed to the most important and interesting thing - attaching the buds. To do this, you need to apply a small amount of glue to the lower, flat part of the flower (it is most convenient to do this with a special gun) and carefully glue it to the cardboard base.
Important! For high-quality gluing, you should press each element well, holding down the pressure for several seconds.
You will most likely need from 200 to 500 flowers per piece.
All edges of the figure are decorated in a similar way. At the final stage, when making numbers from napkins, you need to wait until they dry completely and straighten all the attached buds.
In the same way, with your own hands you can make not only three-dimensional numbers from napkins, but also parts of words. Having prepared several figures, it is possible to congratulate the birthday person on his birthday by making a composition from the letters of his name.
This way you can make inexpensive, but very effective decor for your holiday.
To make the finished product unique, experienced craftsmen advise paying attention to unusual decor - rhinestones, shiny stones, sparkles. With the help of such accessories, flowers for numbers made from napkins will look brighter, more elegant and solemn. In addition, it is not necessary to make all the buds the same color. Various shades can be used.
The main thing is that they combine with each other and match the rest of the holiday decoration.
Thanks to this article, there should be no questions left about how to make numbers and letters from napkins. Using a little imagination and armed with the necessary materials and tools, you can make not only a children's party, but also any other celebration unforgettable.