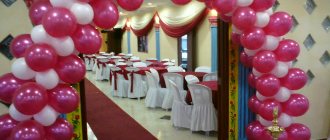
A garland is an integral symbol of a big holiday. Children love bright and beautiful decorations. The use of garlands is especially important on family holidays. Birthday, New Year or wedding anniversary - any family event will become even more joyful when the house is decorated yourself. In particular, when you create a garland with your own hands.
Garland is an integral symbol of a big holiday
DIY garland: how to make it from paper
The traditional and simplest option is a paper garland. This is taught in the elementary grades of school, and often children’s skills remain for life. However, older people certainly want to make paper creations of a different level, which will impress the adult guests of any holiday.
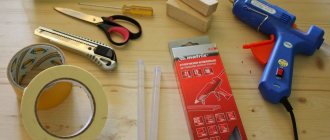
To do this you will need:
- Two shiny multi-colored papers;
- Several blanks (stars, sparkles, other symbols);
- Glue;
- Thread;
- Pencil;
- Scissors.
How to do:
- To begin, place the blank on the back of the paper. Outline it. Ideally, the entire sheet of paper should consist of the outlines of a star. Don't press too hard on the pencil. Stars or other symbols should be of medium shades, otherwise they will be very noticeable.
- Next, remove any excess paper. You should be left with only the blank with the stars drawn on it. After this, begin to carefully cut out each star along the contour. At the end of the process you will have several stars of two colors.
- Take strong thread and glue. You need to lay out the stars in the order in which you want them to appear in your garland. After this, determine the place where you want your thread to go in the garland. It must be lubricated with glue. There is no need to overdo it, a few drops of regular glue will suffice.
- Start gluing the thread to the stars. Make sure the lines are straight. All you have to do is show a little patience by gluing the remaining stars together. It’s more logical to make at least three similar garlands so that you can hang them on the wall to decorate a festive place.
Games and competitions
It would be a great idea to invite animators to the holiday, who will happily play the role of your favorite characters. Professionals also have a special, pre-prepared script. A birthday in the style of Mickey Mouse will be even more fun if you prepare more different games and competitions.
Let's make Mickey. Give your guests pieces of pastry fondant, puff pastry or plasticine and give them a master class on sculpting a Disney cartoon. Each child will be able to make a souvenir for themselves and keep it as a keepsake, and if it’s mastic, then decorate a birthday cake with it.
Best Pluto. The kids will be happy to compete with each other to see which of them barks better. A fun and noisy competition will be fun entertainment for everyone. And the winner, of course, will receive a prize!
Sleeping giant. One of the most favorite active games for children. One of the adults lies down on the floor and pretends to be a sleeping giant, with many soft toys scattered around him. Children must carefully collect all the toys without waking the giant. And naturally, the giant will wake up at the most unexpected moments and grab the laughing guys by the arms and legs.
Bowling. To organize the game you will need a regular set for children's bowling. To keep the Mickey Mouse themed birthday party, stick pictures of the cartoon characters on the pins and balloons. Divide the kids into teams and have a real bowling competition. Dynamic and catchy music will make the game even more fun and active.
Who is faster? Quite an old game that absolutely everyone knows. But that doesn’t stop kids from liking her. Print out a large image of a mouse on regular A4 sheets. There should be one less sheet than the number of participants in the competition. We lay out the leaves in a circle, the children stand around, turn on a quick, cheerful melody and run! The second the music stops, the children must take their place on the piece of paper. A child who does not have time is eliminated. The game continues further, before the next stage the presenter picks up from the floor one piece of paper with the image of a cartoon character.
Bones for Pluto. Hide fake dog bones somewhere in an inconspicuous place before the holiday. You can buy them at any pet store. Tell the children that the dog Pluto hid his bones, and now he can’t find them himself and asks them for help. Give your kids a real treasure hunt competition! Divide them into two teams. To diversify the quest, use traces and arrows previously posted around the room. Prepare riddles and puzzles so that the children can think and, in the end, find the lost bones. Don't forget to reward the winning team with sweet prizes.
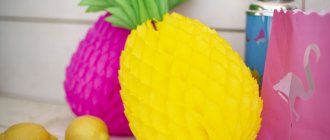
How to make a paper umbrella with your own hands
Not only a traditional garland, but also any unusual handicraft made by yourself can become an interesting attribute for the holiday. For example, beautiful paper umbrellas are especially popular. They are relatively easy to make and do not require special skills.
To get started you will need:
- Purple paper square;
- A strip of yellow paper;
- Glue stick;
- Knitting needle.
How to do:
- Fold the square diagonally twice. That is, the output should be a folded triangle. Open it face up and fold it in half. Then cut in half again.
- Next, assemble the figurine. The result should be a large triangle. At this stage, you will already begin to recognize the future umbrella hat. Fold the long side to the center line. Unfold along the fold and fold along the intended fold into a diamond. Do the same with the other side of the triangle. Accordingly, the cap will be the same on both sides. Do the same on all sides to complete the top.
- Bend the upper part of the resulting structure upward and hide it under the bottom of the umbrella. The basis on this is ready.
- Next you need to make the handle of the umbrella. First of all, wind a strip of pre-prepared paper onto a knitting needle. At the end, secure with glue. Can be connected.
- Cut off a small portion of the top of the umbrella. Apply glue to the handle and push it into the hole created after cutting off the top. Don't forget to fold the umbrella handle to finish.
Accessories
On a Mickey Mouse-themed birthday, it’s worth stocking up on accessories not only for the birthday boy, but also for his guests. Girls should be offered headbands with bows and Mickey ears, boys - butterflies. You can give out white gloves to everyone, and also make festive caps on which you can stick an image of Disney cartoon characters or write the name of the birthday boy and how old he is. Personalized caps for guests will look original. Kids will be able to keep them as a souvenir, and it will become easier for children to get to know each other!
DIY garland for the New Year
A New Year's garland can be used to decorate not only a room, but also a Christmas tree or any other irreplaceable attribute of the New Year holidays.
You can take any thing as the basis for New Year's garlands. You don't have to get hung up on traditional stars.
Take felt-tip pens, thread and a hole punch, and the necessary images for the holiday garland printed in A4 format.
- Carefully cut out the images;
- Use a hole punch to make holes in the images;
- Place the images in the order you want the garland to appear;
- All that remains is to stretch the thread into the very holes made by the hole punch.
A New Year's garland can be used to decorate not only a room, but also a Christmas tree.
Using this system, you can make absolutely any New Year's garland.
Suits
Decorating for a party is, of course, very important, but don’t forget about costumes. It is worth choosing the appropriate outfit not only for the hero of the occasion, but for his/her parents. You can buy a themed outfit in the shape of your favorite hero, but they very often look too intrusive. Moreover, around the child there will already be plenty of three-dimensional and flat images of the mouse and his friends. It is best to choose clothes in appropriate colors and complement the look with bright accessories.
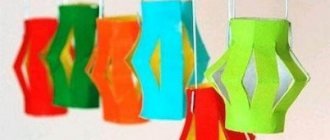
How to make a garland from threads or circles
Another simple version of the garland is made from ordinary paper circles connected to each other with a thread. This is exactly the same craft that is taught to almost all children at school during labor lessons.
- Take 10 sheets of thick cardboard. It is logical to use beautiful paper patterns rather than a simple one-color paper;
- Cut each sheet into approximately five equal strips;
- Cut circles from the resulting strips (use either a hole punch or cut with curly scissors according to a previously drawn model)
- Arrange the laid out mugs in the required order;
- All that remains is to sew the garland.
You can sew a garland by hand, but this is a rather long process. It is better to use a sewing machine. Place the first of the circles into it and then the machine will quickly connect your circles with one thread.
Prizes
For a child's Mickey Mouse-themed birthday party, it's easy to find many small and inexpensive gifts and souvenirs that kids are sure to love. Following the theme of the holiday, children can be given:
- coloring books;
- stickers;
- puzzles;
- bubble;
- magnets;
- sweets;
- pens or pencils;
- notepads;
- hairpins;
- keychains and much more.
Organizing and decorating a party for a child is a fun and very exciting activity for parents. Recreating and immersing yourself in the atmosphere of a Disney cartoon is so wonderful. The world of childhood, kindness, carelessness and fun will make you forget about your problems and for a moment become a child again. And for your beloved child, such a celebration will become one of the most memorable birthdays in life!
Garland of photographs
A garland of photographs will look beautiful at a family holiday. Older people already prefer this kind of decoration. Such garlands will be relevant, for example, during a wedding anniversary celebration or as a romantic gift for Valentine's Day.
A garland of photographs is made in a few minutes. You actually need photographs, as well as two sets of wooden clothespins and thread.
A garland of photographs will look beautiful at a family holiday.
Take a thread and connect it with a photograph using a clothespin. Further according to the same template. Finally, attach the garland to the wall. Such a simple gift will help cement positive memories forever and become a permanent decoration in the apartment.
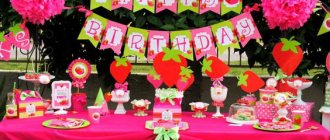
Festive table and cake
Setting a festive table for a birthday in the style of Mickey Mouse should also be fully consistent with the overall theme. In order not to go overboard with primary colors, you can also use a yellow tone in your holiday decorations. Cover the table with a pretty polka dot tablecloth, fold the napkins into a Minnie bow and place the plates on top. Hang a balloon on each chair and hand out striped drinking straws to the children.
Decorate the table with cookies or gingerbread in the shape of Mickey and Minnie, branded bottles of lemonade. You can also use glass bottles with Coca-Cola, they will also fit perfectly into the holiday theme. From the main dishes, prepare everything that the birthday boy likes. In addition to the drinks used for the candy bar, you can also offer children milkshakes.
For a Mickey Mouse-themed birthday, a boy's cake can be made in the shape of a mouse's head, and a girl's - Minnie's. Such a cake, covered with mastic, will look very impressive. A special fireworks candle will perfectly complement the atmosphere of fun.
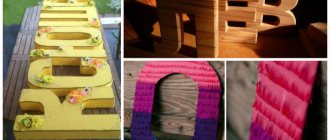
Mickey Mouse garland: manufacturing secrets
The modern Mickey Mouse garland is actually a more updated variation of the traditional birthday craft with letter patterns.
For it, in addition to glue and scissors, you will need red and black bright cardboard, letter templates and, of course, a Mickey Mouse template for the garland to live up to its popular name. Also stock up on double-sided tape and satin paper.
- Start tracing the Mickey Mouse templates with a pencil and cutting out the resulting outline with scissors;
- Cut out templates with letters;
- Glue several circles with letters using double-sided tape onto the paper cut out from the template;
- Make a small cut on the resulting “ears”;
- Insert the tape into the cut, connecting the elements together.
The result is a beautiful garland made in a children's style. A child as young as one year old may like the bright colors and become a pleasant surprise for an older cartoon lover.
Room decoration
Decorations for the birthday boy’s room can be purchased at specialized stores for the holidays or made yourself. How can you decorate a room?
First, these are garlands. A multi-colored themed garland in the form of flags will help you immediately create a festive mood. It is advisable that polka dot flags periodically alternate in the garland. You can hang a poster with illustrations from the cartoon on the walls. On a piece of whatman paper, write in Disney's signature font the name of the birthday boy and how old he is.
A good idea would be to make a photo collage of 12-24 photos of your child over the past year. They will look original in black and white colors. You can place them on a sheet of whatman paper and place them in a large red photo frame, having previously decorated it with Mickey Mouse ears.
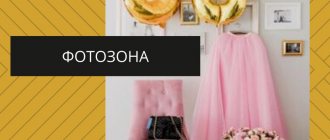
Birthday in the style of Minnie Mouse
Hi all !
I want to tell you about my princess’s birthday in the style of Minnie Mouse. This idea appeared a long time ago; I wanted to create a fabulous holiday atmosphere for the children, keep everything in the same style, and get a little creative myself - I love this business, and now the opportunity arose. The theme was, of course, not chosen by chance - my daughter loves Minnie, and I was happy to immerse myself in preparing the holiday, as far as this can happen with 2 year olds. I had the opportunity to order some of the attributes through Amazon, but I made most of them with my own hands, including the cake (this is the kind of cake I baked probably for the 2nd time in my life, and I dared to decorate with fondant for the first time) So, first I decided on the color scheme - we have pink, black and pink polka dot print, there can also be a color scheme of red, black and red polka dots, additionally - colors yellow or lilac, depending on the dress, decorations and your preferences. I spent many nights on the internet collecting room decor and table decor ideas, and this is what I came up with.
1. Dress. Ordered online
2. Other clothes. It is clear that my daughter will not spend morning until evening in a festive dress, but they took photographs and shot videos right in the morning, so I wanted to not deviate from the theme of the holiday, and I bought pajamas and a T-shirt with a tutu skirt, which, of course, my daughter can wear and Then.
You can replace Minnie's dress with any other pink polka dot dress, or pick up a T-shirt and skirt, further decorating them.
They also bought a themed T-shirt for my brother.
3. I bought myself such a bow hoop
Guests and other family members can make or buy caps or hoops with ears.
4. Pinata (pinata) - a hollow toy made of paper or cardboard, filled with candies, toys, surprises, confetti, which, according to tradition, is hung up and broken by children with a stick until all the contents spill out of it. I made a piñata out of cardboard, covered it with tissue paper to match the paper pom-poms, and decided that we would not mock it by breaking it with a stick. And the children are still small... It served as decoration for our room and photographs. I made a door and a string at the bottom and filled it with candy and small toys. The daughter then pulled the string and there was a wonderful surprise - a rain of sweets and toys.
5. Minnie Mouse Airwalker balloon - ordered online. My daughter was extremely delighted; she played and danced with him all day
6. Posters - ordered online, but you can draw them yourself.
In a box (I converted a diaper box into a smaller size and covered it with paper) - such a set of dishes, my daughter really loves to play games
Daisy was included
7. Stretch banner - I made it myself from black cardboard, paper and ribbon
8. Wall decoration - I made it myself from gift bags and cardboard
9. Paper pompoms - I made it myself from tissue paper
10. Balls
11. Move to the table. Disposable tableware, napkins and tablecloth to match.
To decorate the table, I cut out minnies and ribbons in the same style as the banner above the table
And a photo of the table itself
Cupcakes have “ears” made of chocolate coins
Cookies on sticks - Oreo and Oreo mini cookies, you can use chocolate coins and icing bows instead of ears
She baked the shortbread cookies herself and decorated them with white and pink icing.
The pizza is also my version, consists of 1 large and 2 small + 2 pieces for a bow
Cake “Golden Key”, mastic on top
12. Well, some photos of the birthday itself
Our birthday went great, the children were delighted, the candle on the cake, as expected, was blown out many times in a row, and I’m thinking about organizing the next birthday