Every year there are more and more enthusiasts who are ready to put on scary rags for fun and decorate the house for Halloween. If you belong to them, here are some tips on how to decorate your home for the holiday very simply and quickly. In this master class I will show you how to make Halloween decorations with your own hands - 20 options with step-by-step photos on how to decorate your house scary beautifully!
How nice it is to dilute the gray autumn days with a bright, warm and tasty holiday. Even though this holiday came to us from Celtic countries and its roots go far into Western history, this does not prevent residents of other countries from treating it with warmth.
In Russia, the attitude towards Halloween still remains ambiguous. Some people consider it an incomprehensible and uninteresting event, which only young people are interested in, while others are excitedly waiting for it to have fun from the heart!
How to Make Halloween Decorations
In any case, you should start preparing for this holiday in advance. In order for the party to turn out in the desired style, you should first of all take care of the decor of the rooms in which it will take place. Unfortunately, there are very few places in Russia where you can buy decent decorations for this holiday.
It is best to order them online, although chain stores often add themed accessories to their assortment before the holiday. But you can do everything yourself. So, let's make our house scary beautiful for Halloween!
The most popular decorations were:
- Pumpkins with cut out eyes
- Webs and spiders
- Ghosts and witches
- The bats
- Walking zombies and mummies
- Brooms, magic wands and other belongings
- Black cats in all forms
- Candles, dry leaves and other attributes of autumn.
Themed decor tips
Crafts and decor ideas depend on your imagination and your capabilities. But here are some tips on how to decorate your kitchen and table for Halloween.
Kitchen decor for Halloween, see tips:
Fruits and fruits
A basket with apples, pomegranates and late grapes will decorate the kitchen . You can decorate with rowan or viburnum, which by this time has already turned red. In the corner you can pile pumpkins of different sizes, draw faces on some of them . Autumn fruits: nuts, chestnuts, acorns can be used both for table setting and table decoration. A great option is to place glass glasses and jars of colored beans, nuts or acorns on the kitchen shelves .
If you have a glass sliding table in the kitchen, you can decorate it thematically. Multi-colored corn cobs can be tied around the legs of chairs. You can learn about kitchens in green tones in this article.
Check out the creative pumpkin decor
A pumpkin walked around the garden... and ended up at a party
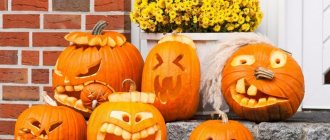
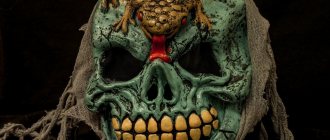
The main attribute of Halloween, of course, is the pumpkin, and it has many options to make your wildest fantasies come true: it can be cut out in the shape of a head with a terrifying smile and crooked teeth, dressed up with an elegant hat, painted with paints, wrapped in bright threads or covered with black lace stockings - who cares? that he is capable.
Pumpkins will ripen in the fields in October. And you can bring one such huge fruit into the house, extract all the pulp, cut out the scary face and put a candlestick inside.
In the dark, such a head will look very scary.
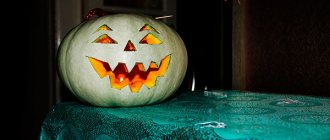
Jack-o'-lantern
Now you can make a real work of decorative art from a pumpkin. You can draw intricate shapes and patterns on it, either with paints or with a regular pen, to suit every taste. You can also cut beautiful lines across the entire surface or make fancy-shaped through holes so that the chiaroscuro from the candle creates beautiful patterns.
Pumpkins come in a variety of colors, shapes, and sizes. Large pumpkins should be placed near the entrance to the house. Smaller ones can be placed in rooms. They can be decorated with beads, sequins, rhinestones (suitable for light pumpkins) or fabric, bows and buttons (for bright orange pumpkins). On the surface you can depict drawings of spiders, cobwebs, bats, etc.
See how quickly and easily you can make a bat out of a pumpkin.
You can also cut out funny faces and scary pictures. Pumpkin can also be used as a flower vase. You can put asters, chrysanthemums and any other autumn flowers in it. Here you can also use rowan brushes and autumn leaves. Small pumpkins can be made into candlesticks. It will look very neat and cozy.
How to make a pumpkin from plasticine for Halloween
Perhaps because Halloween occurs in the fall, the pumpkin is the centerpiece of the day. This can be a decor item, a costume, or a children's craft. The main thing is to give a terrifying appearance, to scare everyone.
On our website rukodelielux.ru we offer a craft option for young children, since they are the ones who love to sculpt from plasticine. You can make a pumpkin from an orange block, and not just one, but 3 pieces at once. You can also draw wonderful faces with plasticine and a toothpick on a soft surface. And also then make an unusual pyramid design, so to speak, a snowman out of pumpkins.
To create a Halloween decoration from plasticine, prepare:
- orange and black plasticine;
- toothpick
We will make the autumn fruits themselves from orange plasticine. Black will be needed for the eyes, and you can also put a black witch's cloak on the figure.
Divide the orange block of plasticine into 3 portions, but not equal, but gradually reducing the amount of mass in each of them. Mash each piece individually in your hands. Pumpkins will be made from them, they will become a kind of lumps for creating a snowman. The finished faces will need to be collected into a pyramid.
Roll the prepared pieces into balls. Then press down on top of each one with your palm to make the balls more flattened. It’s convenient to press out the veins with a toothpick.
Now turn each prepared part into a muzzle. It will not be just a vegetable, but a kind of specimen that forms one part of a single structure. The first largest pumpkin has a hard time, because it is located at the foot of the pyramid. Give her a nose, a distorted mouth and pits for the eyes.
Also, stick on a patch for decoration to show that the strongman pumpkin has burst more than once and has been sewn up to be repaired.
The second pumpkin is in the middle. It’s hard for her too, but not as much as the previous one. She is surprised and tries to gather her strength. Come up with a facial expression for her.
For decoration, make a black blot on the side.
Now comes the smallest and most cunning pumpkin, which completes the whole structure. She smiles and winks at everyone around her, her cheeks stand out, it’s not hard for her at all, because she doesn’t hold anyone on her.
When your pumpkin fantasy is ready, assemble your snowman. Glue one piece to another to size.
Mash a large amount of black plasticine in your hands, crush it with your fingers, pulling out a rectangular, very thin cake. From the prepared part we will make a long cloak with a cap. On one side, close the corners and smooth the seam with your fingers, pull out the sharp cap.
Glue the cape onto your head, or rather your face. The cap will be placed on the head and go down in the form of a long cape.
An interesting DIY plasticine craft for Halloween is a unique composition that fits perfectly into the theme of the holiday.
How to make a pumpkin bookmark
The next pumpkin bookmark is made using the origami technique.
The orange sheet is folded as shown in the photo.
Then you need to design the face of the pumpkin.
The bookmark is ready!
Recipes for a “scary” kitchen where everyone will have fun
Well, everything is decorated, now let's go to the kitchen. A Halloween table can be scary, or it can be funny and cute. We chose the second option. We'll leave the brains and severed hands for the 12+ party (and let the teenagers have fun cooking themselves). Today we have on the menu only what is sure to bring smiles and not nausea.
Photo: savingeveryday.net
Sinister pasta
The simplest dish. All you need to do is buy black or red pasta, cook it just before dinner and place it in a spectacular pile on a large plate. If desired, you can decorate with egg “eyes” (more on them below) or “blood” from ketchup.
Photo: blog.gocco.es
Mummy sausages
In fact, it is the same hot dog, only in different “clothing”. It’s easy to do: take store-bought dough, cut it into thin strips and wrap them around the sausages, and then put them in the oven. The final touch will be two strokes of mayonnaise, ketchup or mustard, which will depict eyes for the resulting mummies (apply to cooled sausages).
Photo: taps.org
"Terrible" peppers
Large sweet peppers of any color are ideal for this recipe, but red and orange ones, of course, will look most impressive. We cut holes in them to represent a face, like Jack's, and use them as dishes for carrot and cucumber sticks, pretzels, nuts, or even a side dish. You can put whatever you want inside.
Photo: vintagekitty.com
Egg eyes
For this dish you will need boiled eggs and olives. Cut the eggs into halves and place olive slices on the yolks. If desired, you can drip ketchup under the olives. For those who want something more complex and healthier, there is an option with beets: you need to take out the yolks, mix with beet juice or the beets themselves, grated on a fine grater, and then return this malasha porridge back to the whites and garnish with olives.
Photo: readyseteat.ca
Banana ghosts
All you need are bananas and chocolate chips. If there are no drops, they can be replaced with thick berry or chocolate sauce. We cut the bananas into halves, and then stick in chocolate eyes and mouths (or apply a pattern by carefully dripping the sauce).
Photo: ampravda.ru
Hairy sausage
Children squeal with delight when they see these sausages, and they are very easy to make. For this dish you will need the thinnest spaghetti, which cooks quickly, and, in fact, sausages. Decorate a whole sausage with “hair” or pre-cut it into circles. You can stick the spaghetti sticks in right away or make holes with a toothpick first.
Photo: tesco.com
Carrot fingers
This recipe requires a little more artistic effort. Cut large carrots into sticks similar in size to fingers, give them a rounded shape and apply notches, like on real phalanges. Using cream cheese, glue pieces of peppers cut in the shape of nails onto the tips of the “fingers.”
Photo: care.com
Olive spiders
Blanks for such spiders are very easy to make, but require some manual dexterity during assembly. Cut the olive in half - here you have two spider “bodies”. Cut another one lengthwise into two parts, and then into half rings - here you have the legs. It is most convenient to collect such spiders on some kind of puree (potato or pumpkin), but you can experiment with other dishes.
Photo: cleanandscentsible.com
Apple critters
Divide the apple into 4 parts, carefully cut out an open mouth on the side with the skin. We generously coat it with peanut butter or Nutella and stick teeth made of seeds or marshmallows. If desired, you can add strawberry tongues and chocolate chip eyes.
What else remains? Of course, a suit!
We are giving a life hack for the lazy - let there be a mummy, a ghost or a Joker at this holiday. For the first option you only need bandages, for the second - an old sheet, and for the third - a regular jacket, talcum powder and your mother's lipstick.
Happy Halloween!
Weave, weave, web, big and small
Of course, without the web, a horror festival would not be possible. It can be cut out of black polyethylene and hung in all corners of the room. Or you can go a more practical and aesthetic way - paint and decorate wooden hangers - let guests, even on the threshold of the house, take off their outerwear, immerse themselves in the appropriate atmosphere.
If there is a web, there must be spiders. They can be cut out of paper and “placed” in a lampshade by gluing it to the inside. Or, for example, make spiders from egg trays and chenille wire.
Watch a step-by-step master class on how to make them yourself.
Here they are - our handsome spiders!
How to make a spider from chestnuts
The next master class is how to make spiders from chestnuts.
"Sinister" tablecloth
Table setting begins with the choice of tablecloth. Try to style your decor primarily in the traditional Halloween colors of black and orange. Interestingly, black symbolizes dark forces and darkness, while orange symbolizes a rich harvest. It’s not for nothing that the main symbol of the holiday, the pumpkin, is orange.
Yes, as for the tablecloth... There are several interesting design options:
Cobweb paradise
Take a plain black tablecloth. Using gouache, if you plan to immediately throw away the tablecloth after the holiday, or special fabric paints, if the accessory will be used more than once, draw a white cobweb. If you make sure that the center of the web is in the center of the table, then you can put a homemade spider on it.
Viscous swamp
It's very easy to create a real scary swamp on the table. If you have a white cotton or linen tablecloth lying deep in your closet, now is the time to take it out. Prepare a special solution for painting: to do this, according to the instructions, dilute the swamp green paint in water. Fold the tablecloth in any shape and soak it in the solution without unfolding it. After this, sprinkle some areas with the same paint and dip into water again. In this way, you can create an imitation of a real swamp on the tablecloth. If you want to make your masterpiece even more striking, use red paint to create blood trails.
Bloody party
If you and your guests are fans of various horror films and creepy stories, then you can make a tablecloth in this style. Take a white tablecloth made of any material and leave “bloody” prints of your hands on it. To do this, make a solution of red paint, just as you did in the previous case. Dip your hands in this mixture and make a print. You can additionally “stretch” your hand along the canvas a little, imitating the torment of an exhausted victim.
Afterwards, the tablecloth can be decorated with various themed accessories, but more on that a little later.
Ghosts and witches for Halloween
As far as ghosts and witches go, this is just a classic. Ghosts can be either simple, made from a sheet, or modern mechanical devices that independently move around the room and frighten guests. It all depends on the imagination and budget of the owners.
How to make a ghost from gauze
Making such a ghost is very simple:
- dilute flour with water to the consistency of sour cream;
- prepare a piece of gauze 10-15 cm wide;
- dip it in water with flour and cover the glass with the ball;
- leave to dry overnight;
- decorate the finished ghost, for example, glue on eyes.
Witches and witches are the most common characters of Halloween. They can also be made into a decorative feature on the walls or as a stand-alone display piece sitting in a chair. They can be both intimidating and playful. The main thing here is not to overdo it and not forget about the hat.
More interesting ideas to add to your collection
Paper Witch
How to make a witch out of paper - see a detailed step-by-step master class here.
DIY witch for interior decoration for Halloween
This witch is made from scrap materials - a plastic bottle, garbage bags and ribbons. The special thing about this DIY craft is that it can be used on Halloween to decorate your garden and yard.
Nightmare Candlesticks
The candlestick is based on a glass jar, then there are many options to suit every taste. Here are some of them:
Mummy candlestick. The jar is coated with glue and wrapped with a bandage. The eyes will tickle your nerves in the twilight.
Be careful, only a low candle is placed in such a candlestick, so the bandage will not get dirty or catch fire!
Using colored paper
More squares are cut from colored wrapping paper.
Translucent wrapping paper will sufficiently transmit the candle light, tinting it.
Parts of the face are cut out from dark paper. Frankenstein's monster came out in the picture.
A useful idea: for younger children, you can cut out different parts of the face in advance, from which he will then take the ones he likes and assemble an ominous face; Older children can already draw and cut out the fruit of their own imagination.
And the face sticks to the background on the can. It will cast fancy shadows on the walls and ceiling.
DIY bats
The bat can be placed on any surface, or hung from the ceiling or door frame. The bigger, the better! They can be made from black bags, black tape, fabric and other materials. You can simply buy a toy at the store. You can place a web nearby and place it on a small spider. It is convenient to make a web from gauze or thin woolen threads. Most guests will definitely be impressed.
How to make a Halloween decoration - a bat from corks
These bats are made from cork and black paper.
To bring your finished mice to life, don't forget to glue on the eyes!
FELT Pumpkin with treats
We will need:
- Black, green and orange felt (felt);
- Threads;
- Scissors;
- Needle.
Making:
- Cut out an oval and half an oval from orange felt.
- From black - 2 circles, a triangle and a smile.
- We need a small trapezoid made of green felt.
- We sew the oval and half of the oval (it turns out like a pocket). And at the top there is a green “tail”.
- Glue the eyes, mouth and nose to the oval.
Why did we make a pocket? So that the kids can get the candy treasures we have hidden from the pumpkin
Author MK
Idea - 9
- The napkin is folded as follows: in two, the fold is located at the top
- Corners that fold at the top to the middle part along the lines
- The sides of the napkin are aligned so that the corners with the sharp part are at the bottom
- Turning the figure over, bend the ends, this will be a support
- Bend inward and place the finished napkin
"Horrifying" menu
Do you want to turn your home into a sinister hideout for witches and vampires for one night? We will be happy to help you with this. Make a sign with the name of your establishment. Come up with something unusual and themed, such as “Witch Kitchen” or “Vampire Crypt”. Also draw up a menu from sheet A-4, or from whatman paper. In the latter case, it should be hung on the wall in the room where the whole feast will take place. Come up with original and unusual names for dishes, for example, severed mummy's head (sandwiches), old cemetery (tombstone sponge cake), witch's hat (cream cake), demon's intestines (raspberry jam pie).
Idea - 3
- Fold in two, again the same way;
- The sides of the rectangle are folded down;
- Turn it with the wrong side facing away from you, and twist a “bag” from the ends;
- The resulting parts are connected together.
Many more decoration ideas (photos):
When clicked, the pictures increase in size.
Where did napkins come from?
In Rome there was a mention of this item of etiquette. One gentleman who loved to eat, when this happened, he would reach across the table for a napkin, but at that time it was just dough with a raw texture.
How this thing was used was to put the dough on the face, thereby causing food to stick to it, then bake it and eat it. Not very hygienic, of course, but according to the Romans, this was one of the optimal solutions of that time.
Later at dinners they brought something more similar to our napkins, these were fabric ones. When Rome fell, Europe thereby forgot to use this element; girls mainly wiped themselves with dresses or sleeves.
When such a phenomenon as the Renaissance occurred in the country of France, then along with this phenomenon, large napkins appeared, covering almost the entire table. The main drawback was the fact that it could only be wiped off together.
Over time, the napkin acquired more and more similar shapes to its contemporary. The term napkin etiquette appeared in France after 1699.