Good afternoon, dear parents and loved ones of your one-year-old son or daughter! It seems like we were only recently in the maternity hospital, and a whole year flew by unnoticed. Your baby's first birthday is just around the corner, and you're wondering how to make a one-year-old birthday card with your own hands? Now we will discuss everything in detail.
There are many ways to create one for the holiday. We will tell you about seven of them, and you decide which option suits you best.
Balloon unit
You are required to inflate more balloons and tie them together in the shape of the number “1”. It's simple, inexpensive and looks very impressive. The balls can be collected in the form of a unit, either with or without a frame.
To make such a decoration without a frame, you will need:
- Pump for inflating balls.
- 36 balls of one color and 52 balls of another color. You can take plain balls or 44 balls of different colors.
- Fishing line.
- Scissors.
Now we act according to the instructions:
- Blow up 88 balloons. Try to keep the balls the same size.
- Tie 4 balls of the same color together. To do this, first connect 2 balls, then 2 more and twist the pairs of balls together. You should get 9 fragments of one color and 13 fragments of another color, each of which has 4 balls connected.
- We take 1 four balls and wrap their bases with fishing line. We make a knot and hide the tip of the fishing line.
- We press the next group of balls tightly and again use fishing line to connect the first and second blanks. We connect together 9 fours of the same color. This will be the horizontal unit stick.
- In the same way we connect 10 fragments of a vertical stick.
- We tie together the 3 remaining fragments and form the nose of the unit.
- We connect together all the elements of the unit with fishing line and rejoice at the result.
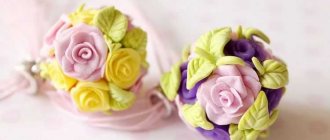
Elegant one with a cardboard base and flowers made of corrugated paper
Do you have enough patience and time? Then we offer this option for a bright one-year-old. We advise you to stock up on the following materials to create it:
- Graph paper for a clear outline.
- Ruler.
- Pencil.
- Scissors.
- Stationery knife.
- Large cardboard box.
- Paper tape.
- PVA glue.
- Stapler with large staples.
- Corrugated paper.
- Paper napkins.
Next, we proceed step by step according to the instructions:
- Draw the outline of the unit on graph paper.
- We transfer the sketch onto cardboard.
- Our figure will be three-dimensional, so we cut out 2 identical blanks in the shape of “1”, as well as the bottom and side parts. To make the curves of the number smooth, we cut the side parts from the inside.
- We assemble the frame of the unit, gluing the parts with tape on both sides.
- We seal the cardboard blank of the unit with paper napkins to hide the faded color of the cardboard. You can use white napkins or choose a color to match the decorations.
You need to make a lot of flowers from corrugated paper. To create one flower, cut out a 25 by 25 mm square. Fold it 4 times and put a stapler in the middle.- Next, use scissors to give the workpiece the shape of a circle. We lift each layer of napkin with our hands and press it so that it stands vertically. We do not touch only the bottom layer of the workpiece.
- The number of flowers depends on the size of the unit. When there are enough of these flowers, glue them with PVA glue onto a cardboard base.
- The decoration can be monochromatic, two-color or variegated. It can also be additionally decorated with butterflies, ladybugs and other accents. A soccer ball against a background of a green horizontal stick will look very harmonious at the birthday party of a one-year-old boy.
Number “1” made of foam plastic and flowers made of napkins
As the basis of the product, you can take not only cardboard, but also polystyrene foam. You can use packaging material from household appliances or buy it at hardware stores.
If you have a professional hot thread cutting tool, this is ideal. If not, you will have to give the desired shape to the material using a knife and ruler.
Then we make flowers from napkins. We take 3 napkins, fold them in a stack and make an accordion out of them. We bend the workpiece in half and trim the edges. We tie the middle of the accordion several times with thread to make a bow. We straighten the paper towards the center. In the middle we make a bud, for which we press the petals tightly.
We cover the entire surface of the foam blank with these colors using hot glue or double-sided tape.
Flat unit from photographs
Surely during the first year of your baby's life you have accumulated a whole bunch of funny photos. It's time to show them to your guests in a very original way.
Cut out a blank in the form of a unit from thick cardboard. Then simply glue the photos over the entire surface of the number. Some photos will have to be trimmed with scissors to give the desired shape.
This cute decoration can be hung on the wall, on the door to the children's room or on a curtain.
Number "1" made of fabric
Do you want your item to bring practical benefits after the holiday? There is a suitable option for this too. It will not be difficult for needlewomen to sew it from fabric and stuff it with any soft material, like a pillow.
This craft can be additionally decorated with ribbons, lace, embroidery - anything. After the baby's birthday, it can be used as a decorative pillow.
A piece of fresh flowers
Was your baby born in the warm season? If your family lives in a private house, near which there is a small plot of land, then you can easily make a flower bed in the form of the number “1”.
Of course, you will have to worry about such decoration in advance, but your guests will be pleasantly surprised right from the door. And next year you can experiment with the number “2”. And you won’t be tormented by the question: “What to do with this decoration after the holiday?”
Delicious number "1"
If you are a recipe lover, now is the time to bake a single cake. You can also make cookies so that every guest, including your birthday boy, gets an eloquent number. You can place a salad or other delicacy in the form of the number “1” on a large platter.
And now the main question: why is this necessary?
- With an elegant one, you can make a wonderful photo shoot and video.
- Your family will appreciate your efforts, especially the birthday boy.
- You will show your creativity and will not want to stop there.
- You will probably need the help of your loved ones, which will give you many pleasant moments of communication and creativity.
- Creativity relieves stress, fatigue, and gives a good mood, which is always passed on to the child.
This is interesting: Artem Komarov and Anna Sedakova
The best unit for you and your one-year-old baby is the one that you do with your soul. Therefore, estimate in advance how much effort and time you will need to create it and how many resources are available.
So let your imagination run wild and bring your ideas to life! And we believe that our proposals will be able to push you to create a unique one for your beloved baby. See you again!
Tell your friends about it by clicking on one of the social buttons. networks:
DIY number 1 for a year old, description and step-by-step guides
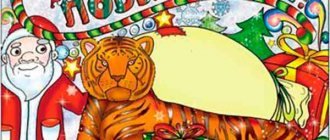
Are you celebrating your child's second birthday when he or she reaches one year of age? You will definitely need the number 1. And today we will tell you that the number 1, made step by step for a year, is a very simple and easy DIY craft. The number one may be required for any other holiday associated with the date. For example, Victory Day and others. All numbers can be made from a wide variety of materials: from shdm, from felt, from satin ribbons and many other available materials. The abbreviation “SDM” stands for: “Balls for modeling”. Essentially, these are special balls that have a variety of shapes and are made to create a variety of crafts. At the beginning of the article, in the photo, you could see the number 1 from the shdm.
Do-it-yourself volumetric paper numbers diagrams and templates
Recently, large and small numbers made of cardboard, created specifically for children, have become popular: they are used for birthdays and other themed events. We have collected for you the best options for three-dimensional numbers made from paper with your own hands: diagrams and templates will help you quickly make the desired combination of a number series and use it in your idea.
As a rule, figures are made for holidays. They look unusual and cause delight among all guests at home: the baby’s grandparents are especially touched, because the number not only decorates the room, but also eloquently indicates that the baby has become older. The numbers serve as an excellent background for thematic photographs: the baby can pose with numerous relatives or independently.
Numerical figures are made at any event agency , however, parents will save a lot by making such crafts with their own hands.
Making them is extremely easy and does not take much time: good imagination and creative skills will help you create paper numbers that will look no worse than store-bought ones.
in detail how to do this and what is needed for this in the article.
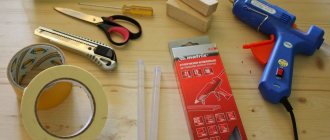
Materials for production
If there is a very small baby in the house, and you have not yet got hold of office supplies, we advise you to immediately go to a craft store. Create a note in your phone so you don't forget the tools you need to purchase for a future craft:
- Cardboard The size of the cardboard depends on the size of the figure you are going to make. For a large number of numbers that are planned to be used as props for a photo shoot, it is better to prefer thick A4 cardboard. if you plan to make huge crafts, you will have to be creative and find large boxes of large household appliances. The easiest way to do this is to ask in the store: usually sellers are happy to give away unnecessary product packaging.
- Scissors Take comfortable scissors: when cutting cardboard, they should not rub the areas in contact with the skin.
- Corrugated paper If you don’t yet have a clear idea in your head of what your number should look like, take the colors that most appeal to you in the store. Otherwise, select the material according to your design.
- Twine Buy a couple of skeins of twine if the planned event will be held in a rustic style.
- Construction stapler A stapler will be needed when working with thick cardboard. Without it, creating three-dimensional figures will become almost impossible.
- Glue gun Needed for fastening parts
- Rulers, pencils, erasers Materials are needed for constructing and marking numbers on sheets of cardboard.
- Additional Materials Purchase additional materials as needed. These include: textiles, beads (beads), napkins and colored paper, knitting threads, tinsel.
Making a frame of volumetric numbers
There is a big advantage in volumetric figures: a child can play with them and rearrange them to any place in the apartment. At the same time, a high-quality figure will last for more than one year.
Follow the instructions if you want to make a three-dimensional figure:
- Decide on the sizes. Depending on this, choose the material: regular A4 size cardboard or a large refrigerator box.
- On a selected piece of cardboard, draw a number by hand or using a template. Templates are given below.
- Cut out the number . Use scissors or a utility knife for this. If you cut out only one figure, the craft will turn out flat: you can hang it on the wall or make festive skewers as the child ages.
- For a three-dimensional figure, prepare two identical numbers. In addition, cut out strips of cardboard that will serve as a layer between the templates. Determine the width of the stripes depending on the size of the number.
- Attach the two templates and the inner strips using a staple gun, paper tape, or a glue gun.
- Decorate the resulting frame depending on the idea and materials at your disposal.
Options for volumetric numbers from scrap materials
We have made an extensive selection of three-dimensional numbers created by craftswomen especially for their kids. Some options are given with descriptions, so you will not have any difficulties with the execution of particularly complex figures.
Paper numbers
Magnificent figures from colored paper are very easy , however, their creation often takes several days of painstaking work.
If you want to make a neat craft, take the creation of decorative elements into your own hands. The child can provide minimal assistance: feeding sheets, choosing colors, or gluing decorative elements in the indicated place.
Detailed instructions for decorating letters with paper flowers are provided in the photo tutorial.
Button numbers
This figure will amount to a tidy sum if you are not a craftswoman with a collection of buttons. Glue the buttons onto cardboard or paper by dropping a little superglue in the middle. If thin cardboard is used and the figure does not exceed the size of an A4 sheet, the buttons can be sewn on with contrasting threads. This will give the craft a special charm.
Number from photographs
A figure with images of a baby or family is executed in three-dimensional and flat versions. To attach photographs to paper, you need PVA glue or small pieces of tape.
Fluffy number
Looking at such creations, it’s hard not to smile: they are soft, fluffy, you want to touch them. Imagine how nice it is for a baby to cuddle up to a three-dimensional figure?
Making it easier than ever : select the threads for knitting in the desired colors. Then follow the instructions:
- Wind the threads around the item in the desired size. This could be an ordinary mug or a flowerpot.
- Carefully remove the wrapping and fold it in half. Tie off the core.
- Cut the threads along the edges and fluff them up. The soft pompom is ready.
Thread craft
Another craft option using knitting threads. Just wrap the frame as shown in the picture. You can decorate the composition with a single color or mix several contrasts. For a rustic party, use twine.
Corrugated paper numbers
in this fulfillment of fantasy . A variety of colors and embellishment techniques will help you create a figure to suit your taste and needs. Here are the simplest frills, flowers, and ordinary pasting: look carefully at the photo and get ideas from the finished works of young mothers.
From napkins
You shouldn’t think that numbers made from scrap materials will look ugly, because the craftsman’s work is scary. Study the photos below: all volumetric figures were made by ordinary women. In the process, they only used number templates and napkins they found at home. Try it too: the result will exceed your expectations!
From wrapping paper
The simplest option, requiring a minimum of effort and expense. Purchase wrapping paper that matches the style of the event and wrap the number frame around it. Despite its simplicity , the result is very cute. Examples in the photo.
Purchased items
If you don’t have time to cut out flowers and think through the details, purchase decorative elements in the store These could be flowers, beads or flower wrapping paper.
We collect the number 1 for a year with our own hands from balloons
Our master class will open with a unit of balloons. This is one of the simplest, but at the same time great crafts. Such a unit can turn out to be of absolutely any size. We will tell you how to make such a beautiful unit:
First we need to make a frame. Wire is best. It is very light and easy to attach balls to. We make a blank of the size we need.
You may need a different number of balls. Don't rely on the photo. The number of balloons depends on the size of the number and how much you inflate them. Be sure to make sure that the balls are approximately the same size and, at the same time, not too inflated. If you inflate the balloons too much, the likelihood that they will burst increases dramatically.
Are the balls ready? Great! Now they need to be attached to the frame. Just tie them on a wire frame
The resulting figure is very easy to transfer from place to place, and it is also very easy to disassemble if desired.
Unit options without frame.
If the previous option could not be completed due to the fact that it requires a frame, then we can offer you a lightweight option. However, it is worth understanding that a figure without a frame will also not be mobile and its location will be limited to one point.
We won't need to make a separate frame, but we can still find a replacement for it. And this replacement is a wall. Yes, this method of making a unit from balls involves placing it on the wall.
Just like last time, we inflate the required number of balloons. We make sure that their sizes are approximately the same. Then we attach them to the wall, thus forming our number 1. The balls can be attached with double-sided tape. One-sided is also possible, but it is more difficult, since we only have to glue the tails.
The second option for a number without a frame is a number made of cardboard. We take an old and unnecessary cardboard box and unwrap it. We try to get as large rectangles as possible. We cut out the necessary elements: the leg, the nose, and the base. The vertical part of the unit - the leg should be the longest. Approximately three times longer than the toe - the inclined part of the “/”. But the base - the horizontal lower part should be about half as long as the leg.
Next, we need to glue it all together and get our number. True, it will be of a nondescript color, but this can be corrected by decorating it: painting, sticking on some decorative elements.
Fluffy napkin unit.
Making numbers from napkins is somewhat similar to making numbers from fabric. Only when using napkins we need a frame. We will make such a beauty.
First, let's determine the list of necessary materials:
- Threads (preferably blue or white)
- Napkins (We take several packages at once, three or four should be enough)
- Thick cardboard serving as a base
- Scissors
- Stationery knife
- Stapler
- Simple pencil with ruler
First, we make a base from cardboard. We take a piece of cardboard and draw on it the number of the sizes we need. Let's cut it out. The base is ready. We have completed the simplest step. Making the base for a “two-dimensional” unit is not difficult.
In order to get a three-dimensional figure, we need one or two pieces of cardboard. We draw two identical units and cut them out. We should end up with a pair of identical units. Now we decide on the thickness of the number and cut out the side edges. There should be ten of them in total. After all the components are ready, take tape and glue them together into a three-dimensional figure. With some skill, you can use glue instead of tape, but this is much more difficult. In creating the frame, we pursue one goal - to create an approximate and durable contour 1.
The frame is ready. It's time to start making flowers that will decorate the surface of the unit. Take two double-layer napkins and tear them into two even parts.
The resulting four elements must be carefully placed on top of each other. We get the following result:
We fold our multilayer rectangle into an accordion shape and tie it in the center with thread. If you have a stapler, then use it.
We unfold the accordion, lifting it slightly and straightening the folds. As a result, we should get something like this:
This is interesting: Increased Blood Sugar, what to do
Now we need to make a few more of the same flowers. You can take white napkins. And make approximately equal numbers of blue and white napkins. This way we get alternation.
When the frame and flowers are ready. We can start gluing flowers onto the frame. PVA glue is best suited. First we paste over the front side, then the back and after that we move on to the side edges. Our fluffy and very tender unit is ready!
Making numbers
Most often, small balls are used to create such decorations. But not everyone can make an air number for their birthday on their own.
- There are other, no less beautiful options:
From cardboard
You will need a large (or not so large) unnecessary box. On it you should draw a beautiful number corresponding to the child’s age, and then cut it out.
- Next, the cardboard base needs to be decorated: painted with paints, covered with bright scraps of fabric or wrapped with floral film.
From photographs
A kind of collage made on a cardboard figure.
Photo cards should be selected in advance and arranged according to the desired pattern.
From flowers
- The cardboard blank must be pasted over with many flowers made from colored or corrugated paper.
- The decorations should be laid out closer to each other, and in this way fill the entire base with them.
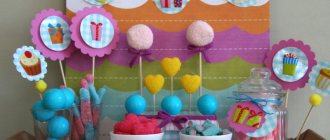
From pompoms
The meaning is the same as in the previous version, only you need to paste it with multi-colored pom-poms made from woolen threads.
From satin ribbon
Cover the cardboard number with a bright satin ribbon. Additionally, you can decorate with beads or sequins.
From buttons
If you have a large number of buttons, you can paste them over a cardboard base.
From felt
Sew two pieces of bright fabric in the shape of a number, like a toy, and stuff them with padding polyester. Additionally, you can decorate with small felt figures.
- With this number, the birthday boy will even be able to play after the holiday.
Volumetric figures
If there is still time before the name day, then you can make a three-dimensional birthday figure with your own hands, which the baby can play with and move around the room.
The same cardboard is used as the basis, only this time you will need two identical parts. In addition to them, you need to prepare several cardboard strips of the desired width - these are the sides of future beauty.
- You can assemble the number using masking tape or tape: to do this, glue the parts to each other one by one.
Frame decoration
From napkins
To create a “fluffy” figure, in addition to napkins, you will need a lot of patience. But this is nothing compared to how happy the little birthday boy will be.
The process of creating a decoration is quite simple: a napkin (single-layer) must be folded in four and cut - you should get four squares. They should be stacked on top of each other and secured in the center. Wire, stapler or thread can help with this.
The sharp parts of the resulting part need to be cut off so that the final result is a circle. Then cut through the edges without touching the central part. All that remains is to lift and straighten the petals.
This creates one flower. To cover the figure completely, you will need quite a lot of them. Having prepared the required amount, you need to glue the flowers to the base, filling the entire space with them.
Corrugated paper
A large birthday number decorated in this way will turn out simply incomparable.
In order to create beauty you will need a large amount of corrugated paper. It would be better if it were multi-colored. You should cut the paper into strips of half a meter.
The optimal width is 3.5 cm. At this stage, you need to monitor the veins on the paper: they should be directed along the future flower.
Then you should stretch the strip on one side. Hold the workpiece in waves upward and, grabbing the base, wrap it around its axis. Secure the bottom of the flower with thread or wire. Spread the petals of the resulting rose.
Cover the cardboard frame with flowers. For convenience, you can use a glue gun.
Quilling
You can make a beautiful number for your child’s birthday by using the appropriate technique. Paper flowers mounted on a cardboard frame will create the desired composition.
When working on numbers, you shouldn’t regret the time spent. It is more than compensated by the smile and joy of your beloved child. And for inspiration, it is recommended to look at photos of birthday numbers.
Photos of birthday numbers with your own hands
Source: https://sdelajrukami.ru/cifry-na-den-rozhdeniya-svoimi-rukami/
Do-it-yourself one for a year: how to make it?
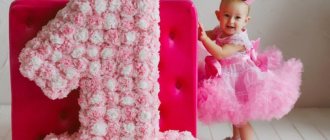
Mothers carefully prepare for their baby's first birthday, trying to think through everything down to the smallest detail. Recently, decorations that stand on a par with entertainment and treats have become increasingly popular. Since the child is celebrating his first birthday, the main decoration of the celebration is a large, colorful and elegant one.
But how to make a three-dimensional number 1? This won’t be much work, because you can order a number from balloons, post one from photographs of the baby, but in our article today we will talk about a number that will be made with your own hands from polystyrene foam or cardboard.
First of all, it is worth noting that a cardboard figure can be not only three-dimensional, but also flat.
DIY flat unit
It’s not at all difficult to create a flat number 1 with your own hands. To do this, we need to get an unnecessary box made of high-quality cardboard , draw a 1 on it and cut it out. The next stage is decoration. In this case, everything depends solely on your imagination: you can paint the number with paints or paste it over with colorful wrapping paper, wrap the silhouette of the number with threads or carefully wrap it in foil. To make your creation even more festive, you should decorate it with flowers, butterflies or a crown. If it’s a boy’s celebration, then you can paste over the number with cars and airplanes.
You can use this attribute on a birthday in every possible way: hang it on the wall, decorate the birthday boy’s chair with it, or put it on a candy bar. And also, don’t forget about the festive photo shoot.
DIY volumetric unit
In order to make a three-dimensional figure, we first need to make a frame , which we will then decorate. You can make it using thick cardboard or ordinary unnecessary large boxes .
- Draw a pattern of number one on a piece of paper. It is recommended to use a sheet of paper with a checkered pattern or with appropriate markings, since this is the only way you will be able to get straight lines and sides. Measure the figure, taking into account the desired width and height, calculating the scale according to the template parameters.
- Transfer the enlarged figure onto the cardboard. And also draw another figure, mirror image of the first one. Cut out the shapes along strictly marked boundaries.
- Next, you need to make sure there is a bottom for the figure. First of all, you need to decide on the width and thickness of the figure. Keep in mind that the wider it is, the more stable the birthday party decor item will be. If you want to hang an object rather than place it, then make the width as small as possible. The length of the bottom should be the same as the width of the bottom of the unit.
- Secure the resulting bottom to one of the sides using tape or strips of paper with PVA glue. All such work must be done exclusively on the inside of the figure.
- Next, unfold the resulting bottom and glue the second half of the unit to it. On the inside, additionally reinforce the fold lines with continuous strips of tape.
- Then, following a similar method, you need to cut out the top for the number one. Its width should be similar to the width of the bottom.
- Using tape, you need to connect all three parts (two side halves and the top) together.
- In this case, it is necessary to glue the outer folds with adhesive tape to strengthen the frame.
- As a result, we get a hollow figure and in order to complete it, we need to cover absolutely all sides of the unit. Pay special attention to ensure that the length and width of all workpieces are the same and correspond to the size of the bottom.
If you did everything correctly, then you have a three-dimensional figure that will serve as an amazing decoration for a children's party.
How to cut letters from foam plastic with your own hands?
In order to make letters you will need: polystyrene foam, a stationery knife, plain paper, sandpaper, a ruler, a sponge or a wide brush, PVA glue, paint (can be acrylic) or varnish, a marker, decorative elements (beads, threads, colored paper, flowers, buttons) and your imagination.
Gluing letters together or gluing imperfections with paper using superglue is prohibited; the foam corrodes and becomes unusable. Simple PVA, wallpaper or stationery glue is suitable for the job.
Sequencing:
- take polystyrene foam and use a marker to draw letters along a ruler;
- To prevent the letters from having sharp edges, use sandpaper;
- Use varnish or paint to paint the letters, you can stick on flowers or other thematic compositions;
- if you don’t have paint on hand, you can decorate the letter with colored paper, carefully glue it together, and mask the borders;
- small letters can be decorated using woolen threads, double-sided tape is pasted and threads are wound on it, the composition is monochromatic, or, if desired, colored.
Number 1 from birthday napkins: decor
The next, perhaps most important stage in creating an attribute is decorating the figure. One of the most popular methods of decoration is the use of corrugated paper or napkins .
You need to prepare:
- glue gun;
- stapler;
- scissors;
- napkins or corrugated paper of various colors.
- First of all, it is necessary to calculate the diameter of future flowers. Unfold the napkins or crepe paper and cut it into strips according to the desired dimensions. Then roll it several times to make a square that will be equal to the diameter of the bud.
- Cut the square along the fold lines. As a result, you should get many squares of the same diameter.
- Collect several of these blanks. Please note that the volume of the flower will depend on their quantity. If you want to get dense flowers, then use more of these squares.
- In the central part of these squares, connect them together using a stapler. If necessary, install one more bracket in the middle of the workpieces.
- Trim the corners of the blanks to form a circle. To make it even, we recommend that you first draw the outline with a pencil.
- Having completed all the above manipulations, we begin to form the flower petals. First of all, fold the first few circles tightly towards the center.
- Then fold each subsequent circle, pressing firmly in the middle.
- Using a glue gun, attach each piece of paper to the frame of the figure. Place flowers tightly so that no cavities are visible.
- Such unique flowers must be glued to all sides of the figure.
- As an addition, you can use various decorations or ribbons.
Number 1 from corrugated paper and napkins: DIY voluminous roses
Let's look at another option for creating flowers , which will make them more voluminous, airy and delicate . corrugated paper rather than napkins .
You will need:
- Cut the corrugated paper into strips. Please note that their thickness is equal to the height of the flower, on which the volume of the figure will depend. Take one end of the strip and roll it into a tube.
- Wrap the strip near the center, forming peculiar curls. Then, wrap the rest of the strip around the curl, forming the middle. By following this algorithm, you will be able to form a rose until the tape runs out.
- You need to apply glue to the back of the flower to attach it to the frame of the figure.
- It is not recommended to place these flowers very close to each other, as their edges will become wrinkled and the result will be sloppy.
This is interesting: What not to say to a man
Summing up, I want to believe that thanks to our master class you will be able to create one for your child’s birthday with your own hands. This attribute will not only serve as a bright decor for the room, but will also become an original addition during a photo shoot.
Facing technique
Numbers and letters made from napkins made using the cutting technique for a birthday or anniversary look very voluminous. They turn out fluffy and weightless. Corrugated paper is best suited for these purposes. If you don’t have it, you can use plain napkins.
The joyful emotions of your loved ones and guests more than pay for all the time and effort.
The process consists of several stages.
- Cut paper or napkins into equal squares.
- Place a pencil in the center of the sheet and press it with paper.
- Apply glue to the surface.
- Place a pencil, crimped with paper, on the glued base.
- Fill the entire area in the same way.
- After this, smooth out the entire decor with your fingers and carefully cut off the excess parts with scissors.
It is quite difficult to predict in advance how many napkins you will need.
But when purchasing, consider the size of the finished product. Flowers can also be made using the trimming technique.
To do this you will need:
- rectangular sheets of paper;
- stick or pencil for trimming;
- plasticine.
The larger the figure, the more material will be needed for it.
One for a year: do it yourself
Preparing for their baby's first birthday, mothers carefully plan every detail of the holiday. And along with treats and entertainment, holiday decorations occupy not the least place on this list. Since the child is turning one year old, almost the main decoration at the holiday is a large and elegant one.
Such a unit can be made from anything - order a number from balloons, lay out a large number from photographs of a child, but we will focus on a homemade number from cardboard or polystyrene foam and try to help those mothers who are thinking about how to make a one-year-old number with their own hands.
A cardboard unit can be made flat and voluminous.
Flat unit
It’s not difficult to create a flat number - we find an unnecessary box from under household appliances, draw a unit on it and cut it out. Next comes the decorating process. The easiest option is to paint the number or cover it with beautiful wrapping paper. You can also wrap such a number with threads or wrap it in foil. To make our craft look more interesting, we decorate it with a butterfly, flower, and crown. If we are preparing for a little gentleman’s birthday, we decorate it with a car, an airplane or something else boyish.
This figure can be hung on the wall, used to decorate a candy bar or birthday chair. It will also come in handy at a holiday photo shoot.
Volumetric figure
A volumetric unit looks much more impressive. Let's figure out how to create a three-dimensional unit for a year.
Option one - order a foam base. You will have to look for organizations in the city that cut out figures from foam plastic. Most often these are advertising agencies involved in the production of signs.
Option two - we make the unit ourselves from cardboard. We find a large cardboard box, cut out two flat units and fasten them together. A more complex method is to cut out rectangles from cardboard and secure them with tape around the perimeter of the unit.
The simpler method is to attach ordinary disposable cups between the flat units, and cover the sides of the numbers with napkins, paper towels or toilet paper. Coat the corners of the figure well with PVA glue and let dry.
We decorate the finished unit according to our taste and desire. Often such a unit is pasted over with flowers made of corrugated paper or napkins. To ensure that the flowers stick well, it is advisable to cover the unit with paper.
Here is a good master class on making a unit from cardboard:
But get ready for the fact that for one such unit you will have to make from 300 to 500 flowers. If you are not ready for such a feat, then you can decorate the number with beautiful paper with a nice pattern, foil or fringe.
Volumetric letters using polyurethane foam
Prepare a letter layout from cardboard, gluing all edges except one, where the foam will be poured. Slowly fill the space in the cardboard with foam. If you are in a hurry, the polyurethane foam will have holes and you will have to spend some time on modifications.
Wait a little for the foam to harden and carefully remove the cardboard from it. Use a utility knife to trim the uneven edges, sand it with sandpaper, and you can start painting and decorating the letter.