A fabulous time is approaching, filled with miracles and fun - the time of the New Year holidays. Which means very soon, each of us will be decorating a beautiful Christmas tree.
The news portal “Vtemu.by” in this article has prepared for you several useful master classes on making your own Christmas tree decorations from natural materials. If you are a connoisseur of everything natural and synthetic materials are alien to you, then you will like this article.
Useful tips
- It is necessary to reconsider the set of Christmas tree decorations and garlands. Old jewelry that has lost its attractiveness - go away!
- There is no need to rush to the store for expensive balls, wreaths and cones. You can make amazing New Year's decorations with your own hands from natural materials. Believe me, your Christmas tree and New Year's table will only benefit from such toys and compositions.
- Take care in advance of the natural materials that you will use for decorations. You may need: apple and thuja twigs, willow twigs, spruce or pine cones, rowan berries on twigs. However, natural material can be collected without any restrictions. Anything that inspires you can become a wonderful New Year's decoration that will surprise your guests and delight you throughout the New Year.
- And one last thing. In addition to natural materials that you can collect in the park or in the forest, when taking the whole family on an unforgettable winter walk, you will have to stock up on cans of gold and silver paint, braid, wire, tape, glue and other decorative elements and fastenings, which are sold in handicraft departments and in specialized florist shops. Purchasing paint, beautiful ribbons and twine is a mandatory and important point. Nowadays you won’t surprise anyone with glued foam chips, and windows painted with gouache are appropriate only in a kindergarten. New Year's decorations made from natural materials should be elegant and sophisticated. You should not overload the product with all sorts of decorative things. A single ball with a golden bow on a spruce foot looks more attractive than a whole mountain of beads and “rain.”
Participants
"Golden cone" Mironova Daria. Foamiran.
"Flashlight". Leshchenko Anna. A lantern made from egg cells, painted with gouache and decorated with decorative elements.
"Herringbone". Voronkov Yarik. Made from fabric of beads and ribbons.
"New Year's bell." Pechenkina Arina. Material: felt, thread.
"Father Frost". Shishkina Anastasia Ivanovna. Material: sequins, beads.
"Mitten for Santa Claus." Fatykhov Anton. Colored cardboard, tinsel, various decorations in my case it was a Christmas tree toy and tinsel, satin ribbon or braid.
"Snowball of Wishes" Bodyagin Timofey. Papier mache.
"Toys for the Christmas tree." Kapustina Arina. The toys are made from fabric, felt and fleece and include: Gingerbread Star and Zodiac Tiger. The products are decorated with embroidery and sequins.
"Beautiful star." Korotya Sofya Andreevna. The work is made of foil paper using the origami technique, decorated with sequins and rain.
"Santa Claus's Helpers" Mingalieva Safira. The craft is made of colored paper and cotton pads.
"Christmas Star". Petrov Kostya, Sementsova N.E. The work is made of threads and glue.
“New New Year’s outfit for the Christmas tree!” Maxim Dmitrievich Shubin. We are a beautiful guest for our Forest Christmas tree, Making gifts and looking forward to visiting you soon.
"Polar bear". Kudryavtseva Svetlana. For work we will need: Pine cones - 2 pieces. Branch cuts - 2 pieces (take a twig 1 cm thick and cut off a ring with pruning shears or a knife, also about 1 cm. With the help of adults!!!) Plasticine of any color for a scarf, felt boots and mittens. The paint is white. Work progress: 1. Paint the cones and saw cuts with white paint. 2. We fasten them with plasticine, do not spare it, the head must hold tightly, and everything that fits over the edge will be a scarf :). 3. Attach the ears - saw cuts - to the plasticine. 4. Roll the plasticine sausage and divide it into 2 parts, these will be felt boots, we also make mittens. 5. We sculpt the eyes and nose. Don't forget about the rope. 6. The toy is ready! Using the same technology, you can make a bunny or any other toy animal!
"Felt boots of Santa Claus." Sorokin Artem. The boots are made of felt and decorated.
"Snowman". Graveyard of Milan. The Christmas tree toy snowman is made using the cutting technique. Eyes and nose applique.
“Matryoshka”, “Scientist cat”. Shklyarova Angelina. Papier-mâché technique, two balls, napkins, PVA glue, paints.
"Lunar cat". Volodichev Ilya. Cardboard, thread, paper, Christmas tree toys.
"Christmas balls". Polyakov Elizar. A foam ball with a diameter of 8 cm was divided into equal slices with a thread. Then we cut shallow holes with a knife in the direction of the threads. Segments larger than 0.5 cm on the ball were cut out of the fabric. Using a nail file, carefully tuck the fabric into the cut holes according to color. Decorate with ribbon using hot glue gun. Decorate with bows and tassels.
New Year's decorations from balloons - master class
"Snowman". Elena Tarasova. The toy is made of fleece + knitwear, yarn, synthetic padding, buttons.
"Christmas decorations". Oleksandra Gritsenko, 6 years old. The work is made of corrugated paper, covered with white paint, decorative ornaments and glitter. Decorated on the background.
"Magic snowflakes". Trofimov Vova, 6 years old, and Polina, 5 years old. Our snowflakes are made from the bottoms of plastic bottles. If you glue two halves together, you get a three-dimensional snowflake. We painted them with gouache and glued a loop. We decorated the Christmas tree in kindergarten with these magical snowflakes.
"Merry fluffs." Zhilitsky Savely. Double-sided snowflakes are made of chicken feathers, paper, glue, and decorated with glitter. Designed for decorating a New Year tree.
Sheep and Teddy Bear. Elena Tarasova. Made from fleece, yarn, padding polyester and laces.
The pink elephant is made of chintz and padding polyester. Bunnies are made of fleece, padding polyester and knitwear.
"Christmas trees for the Christmas tree." Serova Polina. Crochet.
"Ball for the Christmas tree." Andreev Fedor, 3 years old. We make a three-dimensional ball from an inflated balloon, thread and glue. After it dries, decorate it with rhinestones. A loop was made from shiny sequins.
"Snowman made of papier-mâché." Savelyeva Daria. Frame for the snowman: crumpled food foil. The surface of the figure is a mass of mixed toilet paper and PVA glue. The figurine is painted with gouache paints. The shine is achieved using acrylic mother-of-pearl enamel.
"Snowman made of papier-mâché." Zemskaya Sofia. The frame for the figurine is crumpled up food foil. Mom is a figurine of a snowman made from a mixture of toilet paper and PVA glue, color - gouache paints, gloss - pearlescent acrylic enamel. The hat is food foil, covered with toilet paper with PVA glue and painted with gouache. The eyes are blanks from the store.
Wreath in ethno style." Ignatievskaya Taisiya. The wreath is made of cardboard and fabric, decorated with pine cones, birch branches, ribbons and buttons.
"Angels and a snowflake." Izmailova Maria Anatolyevna. Christmas tree decorations are crocheted from white threads No. 10. Different combinations of double crochets and rows of chain stitches were used. The angels were knitted starting from the body, a halo was tied to it, and the wings were knitted and sewn separately.
"Toys made from ball plasticine." Prytkov Alexey. Polystyrene foam, ball plasticine, modeling compound, wire, thread.
"Christmas ball". Zaitseva Victoria. The ball is made of: a foam ball, a satin ribbon and a small crystal.
“Snowman light bulb.” Ulyana Novikova. Light bulb, gouache, glitter, woolen threads.
"Fantasy". Apolozova Ekaterina. Cardboard, glue, thread, shiny tape.
“Santa Claus light bulb.” Alina Sysoeva. Materials used: light bulb, gouache, tinsel (blue).
"New Year's watch." Krestov Yulia and Alexandra. The New Year's clock is made from a plastic bottle of liquid soap, on one side there is a window cut out into which a double-sided picture was inserted, on one side there is a New Year's drawing, on the other - a clock. Everything is decorated with tinsel and sparkles.
"New Year's ball-clock." Krestov Yulia and Alexandra. The ball is made from a plastic bottle, thin rings were cut from it, covered with ribbons, then connected to each other using a glue gun into a ball. Then a double-sided picture was inserted into the ball, with a New Year's deer on one side and a clock on the other. Decorated with tinsel and sequins. Everything was done together with the children, they drew a picture and glued decorations.
"Christmas decorations". Fominskaya Polina. Christmas tree decorations for boys are made of felt, decorated with buttons and designs with acrylic paints.
"Christmas ball". Torosyan Vazgen. The basis of the craft is a foam ball. Small balls of woolen threads are glued onto it. Tape loop.
"New Year's circle." Kerimov Bogdan. Made of cardboard, pasta, spruce, pine cones, gift ribbon, beads are glued on.
“Keychain toys for the Christmas tree.” Kislyuk Daria. The work is made of rubber bands of different colors. Type of weaving - crochet.
House made of paper vine - master class
"Cockerel." Kislyuk Daria. The cockerel is crocheted from soft baby yarn. Type of knitting - amigurumi toys.
"Gingerbread." Niatbakieva Vitalina. The work was done using the amigurumi method.
"A gift for a dog." Kallaeva Anna. A dog bone made of cotton wool. Foil, cotton wool, PVA glue, paper clip, tape.
"New Year's ball". Ivanova Olesya. The New Year's ball is made using the papier-mâché technique based on a balloon, decorated using the decoupage technique, three-dimensional contour drawing.
"Christmas tree." Vetchinkina Irina, 9 years old. Coffee Christmas tree toy is made of cotton fabric, covered with aromatic soil (coffee, vanillin, cinnamon, PVA glue). Drawing with acrylic paints. Decoration with tinsel and bells.
“DIY Christmas tree decorations.” Markel Daria. Materials:
- PVA glue,
- balloon,
- "Iris" threads
- needle,
- disposable cup,
- ribbons, cones, Christmas tree legs, cotton wool,
- hot gun,
- new Year decoration.
Pour glue into the glass, then take a needle and thread and pierce the glass through just above the bottom. The glue should cover the thread. Inflate the balloon to the desired size and tie it. Then we wrap the ball with thread and glue in different directions. We leave the ball to dry for two days. When the threads are dry, we pierce the ball with a needle and take it out from the inside. You should get an openwork ball. We cut the required hole in this ball and decorate the edge of the cut with openwork ribbon. The top of the ball was decorated with pine cones and the legs of an artificial Christmas tree using a hot gun. And inside the ball was decorated with New Year's decorations.
“Volume Christmas tree toy.” Tsibina Arina. We took an old cardboard box, gouache, tinsel and began to “create”. First, we painted the box blue, drew a face - this turned out to be the basis of our Christmas tree decoration. Then we cut out ears and paws from cardboard and painted them the same blue color. Then we glued the ears and paws to the base. And now our Krosh is ready. We decorated it with tinsel and tied a ribbon so that we could hang it on the tree.
"New Year's ball for my sister." Strutskaya Valentina. 1. New Year's ball from the Fix-Price store. 2. Hot glue or “moment”. 3. Photo of your beloved sister. 4. Glitter.
"Herringbone." Polina Revizorova. I sewed a Christmas tree from scraps. First you need to draw a Christmas tree on paper. Then cut it out and place it on the fabric, sewing the edges. Sew a bead onto each branch.
Christmas tree toy “Symbol of 2018” Author: Ksenia Ivanova, 12 years old.
"New Year's ball "Kusudama". Zhidkikh Valeria. After I made several of these balls, we gave one to a kindergarten, now we are delighted to make more multi-colored balls to decorate our New Year tree at home, and to give such balls to our loved ones for the New Year.
A toy for a street Christmas tree made from CDs and cocktail straws. Maltster Anna.
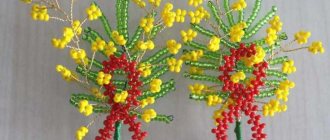
"Santa Claus, Snow Maiden and Christmas tree." Izmailova Veronika Sergeevna (7 years old). Beading: Santa Claus, Snow Maiden and Christmas tree are made of large beads and wire. “Goldfish are wish-fulfillers.” Beading: fish are made from large beads and wire. Each fish is intended as a gift for a mother and two grandmothers.
"Teddy Bear." Mishchenko Diana. Made from: a honey jar, nail polish, glitter and ribbon.
Christmas tree decorations made from salt dough. Denisova E.V.
New Year's decoration cone with a bow. Author: Malyshev Artyom, 9 years old, Serpukhov-15. To make a Christmas tree decoration we will need: a ribbon, a needle and thread, a shiny rope typical for the New Year's holiday, a pine cone (which can be covered with a white touch and varnish), snowflakes for decorating the bow.
Natalya Yuryevna Lukinova. Teacher at MBDOU No. 116, Ryazan. The craft is made from clothespins and painted in the golden color of the coming year of the dog.
New Year's owl:
In order not to forget the address of the page and share with friends, add to your social networks: Do you want to know news about competitions or master classes?
Tags: DIY Christmas tree decorations, New Year's crafts
Attention! It is better to write urgent questions in the comments on the website (form at the bottom of the page) or, better yet, directly by email. There are no notifications about comments from the VKontakte form! This form is more for feedback. 
Discussion: 4 comments
- Peskova Olga Vladimirovna:
December 12, 2021 at 06:52 pmGood afternoon. How can I get a diploma for a craft? I found a photo of the craft on your page.
Answer
Larisa:
December 13, 2021 at 0:36 am
Hello! Diplomas will be sent by email to the authors of works who will take 1st, 2nd and 3rd places in the competition.
PS For the rest of the participants, diplomas will be issued upon request, write here in the comments.
Answer
January 10, 2021 at 07:26 pm
Hello. Please send a Diploma for 3rd place in the competition of New Year's toys Karbakanova Sayaana Andreevna beadwork "Gnome" MBU DO Center for Children's Creativity in the village of Khandyga, Tomponsky ulus of the Republic of Sakha (Yakutia), director Lazareva Valentina Ivanovna. Thank you
Answer
- Larisa, editor:
January 10, 2021 at 08:07 pm
Hello! They sent it back in mid-December. Please check your spam folder.
Answer
Vine toys
Toys made from grapevines will be an excellent Christmas tree decoration. You can weave simple balls, bells and stars from it. The vine for the product should be flexible and not too thick. The ends of the vine are fixed with wire. When the toy is ready, let it dry for 3 to 5 days, then spray paint it. If paint is applied to a wet product, it may peel off as it dries. Tie a thin golden thread or cord to the finished decoration. You can tie ribbons in the form of bows to the attachment point, as in the photo.
Christmas tree toys, crocheted with patterns
Now a selection for those who are interested in knitting. I found the coolest, in my opinion, crocheted souvenirs. I am sending it to you along with the diagrams. Knit for good health!
- "Bell";
- "Herringbone";
- "Angel";
- "Snowflake";
- "Father Frost";
- “Sweetie” and “Sock”;
- "Snowmen";
- "Dog";
- "Mouse";
- "Piggy".
Pine cone decorations
Real pine or fir cones look very beautiful on the Christmas tree. They look much more beautiful when they are already open. Closed cones need to be dried in a warm place, then they will open. Paint them with gold spray paint. To hang a pine cone on a Christmas tree, hook several scales of its base with a thread and tie a knot. Using the resulting loop, hang the decoration on the spruce foot.
You don’t have to paint the cones, then your artificial Christmas tree will look like a real living forest beauty.
The cone may look snowy and truly “wintery”. To do this, the tips of its scales are painted with white paint. A regular white concealer will also work for these purposes.
Pine cones, unlike spruce cones, are placed with the top up. To do this, a thread, or golden twine, with which the cone will be attached to the spruce leg, is wrapped around several scales of the base. No loop is made; the ends of the thread remain free. Using a thread, the cone is tied with the top up.
Small spray painted pine cones can be used to decorate a Christmas wreath.
New Year's stylized hats made of threads
The remains of knitting threads are perfect for creating such delightful hats, or suitable for decorating windows, shelves and fir trees.
- Cut a ring of the desired diameter from the sleeve, or glue it from a strip of cardboard;
- Fold the yarn in half, attach it to the ring and thread the ends through the loop. Pull them carefully so that the knot is tied at the bottom of the ring;
- Attach the threads throughout the ring so that they lie tightly. The main thing is that the base should not be visible through them;
- Tie the loose ends with yarn. Trim the edges to create a nice neat pompom. Sew a loop to it and hang it anywhere.
Advent wreath using natural materials
You can make original table arrangements from natural materials. It has now become very fashionable to place a Christmas wreath in the center of the table. Also pay attention to this master class with step-by-step photos: “DIY New Year’s wreath.”
To make it you will need:
- Thuja twigs;
- Small Christmas balls;
- Candles;
- Tea saucer for placing candles;
- Wire;
- Christmas tree beads.
- Weave a wreath from thuja branches, fastening the branches together with wire or strong dark green thread. Decorate the resulting wreath with beads, leaving large gaps between turns. Remember, the product must not be overloaded!
- You can use old plastic beads. To do this, separate the beads into individual beads and string each one onto a thicker thread so that the beads do not slip. The beads should not touch each other; leave gaps of 1.5 - 2 cm between them. Spray paint the resulting chain. After the paint has dried, wrap the beads around the wreath. Then hang the balls on the branches of the wreath. It is better that they are the same color and size. If your beads are golden, red or gold beads are best. It’s quite cold, but silver jewelry looks no less original.
- Place a saucer in the center of the wreath and place candles on it. To do this, drop melted wax on a saucer and immerse the candle in it. Hold the candle for a while until the wax hardens. Decorate the saucer with thuja branches or flower petals. You can place cinnamon sticks between the branches. This will give the wreath a special aroma.
Just a little time, hard work and imagination and original New Year's decorations made from natural materials are ready. Let them take their place in your home and bring an atmosphere of comfort and celebration.
Christmas tree toy “Garland” made from plastic bottles
Now we will make a decoration in the form of a garland. Moreover, the garland will not be simple, but made from plastic bottles. How do you like this idea? Personally, I'm delighted.
"Flower Garland"
You will need:
- plastic bottles with caps;
- spray paints;
- scissors;
- electric garland;
- knife.
Manufacturing process:
1. Cut off the tops of the bottles. Make cuts to create a flower.
2. Round the petals and paint the blanks in any color.
3. While the flowers are drying, make cross-shaped cuts in the caps of these bottles. Insert light bulbs from an electric garland into the cuts.
4. When the pieces are dry, screw them to the lids, spread the product over the Christmas tree and turn on the electric garland. Admire the creation!
Well, a simple option for making a garland of icicles .
You will need:
Manufacturing process:
New Year's crafts from fir cones
Fir cones differ from pine cones in shape. They are more neatly designed and more elongated. It’s impossible to say for sure which pine cones are more beautiful, because it all depends on your taste and craftsmanship. In some cases, fir cones will not look as impressive as pine cones.
What can you make from fir cones with your own hands? New Year's crafts are completely diverse. This could be a beautiful garland, a Christmas wreath, candlesticks and other decorative elements.
Beauty cone
An ordinary pine cone will fit perfectly into the New Year's decor. It would seem how unpretentious an accessory it is, and what wonderful toys can be made from it and how many ideas can be realized. The cone can simply be hung by a coarse twine, and the top can be decorated with a beautifully tied bow made of satin ribbon to match the overall color scheme. Or make New Year trees from pine cones, crowning them with numerous multi-colored plasticine balls. It seems simple, but it looks really unusual and creative.
Garland of pine cones for the New Year:
Making a garland is not at all difficult. It will look equally beautiful if you make it from fir cones or pine cones.
To do this you will need:
- leg-split
- satin ribbons or burlap
- bumps
- glue gun
Using satin ribbons, attach the pine cones to the twine.
If you have burlap, cut it into thin strips.
You can secure the cones using a glue gun. You can decorate this craft from Christmas tree cones with your own hands using beads. You can also cover the cones with white paint and add artificial snow to the edges.
As the holidays approach, New Year's crafts made from pine cones for kindergartens become relevant. Here your imagination can run wild, because you can do anything. It could be a simple Christmas tree made of pine cones or a wreath.
Large decorative ball
Large crafts made from pine cones look very impressive - like this ball on a foam rubber base covered with pine cones.
List of materials and tools:
- foam ball;
- cones;
- wire;
- satin ribbon;
- glue gun
First, prepare the cones - clean them of debris and dry them - you will need well-opened specimens. To make your craft look especially elegant for the New Year, make the cones shiny - spray them with hairspray and sprinkle the scales with glitter.
Making decor:
- Attach a wire to the bottom of each cone - roll it into a spiral and glue it with glue, leaving a long, even tip.
- Stick the sharp edge of the wire together with the pine cone into the foam ball.
- Decorate the ball with cones over the entire area, piercing it from all sides.
- Fold the ribbon into a loop and glue it to the foam base.
An alternative to foam rubber is a foam ball or even a ball of polyurethane foam. The main thing is to disguise it well with pine cones, decorate it with tinsel, branches or rain.
New Year's craft Christmas tree made of pine cones for kindergarten
This option is perfect for a children's competition. After all, you can make not just a Christmas tree, but a beautiful Christmas tree composition.
Consider the principle of creating a Christmas tree below, but you can decorate it in such a way that it will become a bright and original decoration for the New Year holidays.
Necessary materials:
- bumps
- cardboard
- glitter
- decor
- sisal
- glue gun
- white enamel
Make a cone out of cardboard.
To make the tree stable, fill the cone and cover the bottom with cardboard
Attach pine cones and Christmas balls to the cone using a glue gun
Cover the pine cones with heat-resistant enamel
You will get such a snow-covered beauty
You can also decorate the Christmas tree with green branches, inserting them between the cones
Using white primer, add snow to the Christmas tree, attach other decorations - artificial berries, beads and snowflakes.
Make a ring from sisal to decorate the base of your New Year's pine cone craft.
New Year's crafts for the garden made from pine cones amaze with their diversity. If you don’t have a large number of cones and other materials, then even from one cone you can make a beautiful New Year’s craft with your own hands.
It is impossible to imagine the New Year without a beautiful Christmas tree, and such trees can be placed in different rooms. They will give your home comfort and add magic. After all, a festive mood is so necessary on cold winter evenings.
New Year's crafts for kindergarten using pine cones can be a little simpler, so that it would be more interesting for the child to be creative with you.
Why do we need homemade toys?
In fact - why? After all, any New Year's toy can be bought in a store. Nothing could be easier! So why waste time and effort, getting craft materials somewhere? Moreover, it is far from certain that the result will be something truly worthwhile.
The answer to this question suggests itself as follows. Yes, of course, there is less hassle with store-bought toys. I bought them, hung them on the tree, and it was done. But still, a toy made with your own hands is much more valuable than a purchased one.
- New Year's toys that are sold on the shelves, with all their diversity, are still the same type and similar to one another. This is consumer goods. And you can make a unique toy with your own hands. A homemade toy is always a piece of goods.
- A toy made by yourself is much cheaper than a purchased one, which is also of considerable importance.
- The process of making New Year's toys is also important. Man is a creative being. By making New Year's crafts, people are imbued with a special creative spirit and mood, they begin to look forward to the coming of the New Year, and a feeling of celebration settles in their souls. This applies to both adults and, especially, children.
- By the way, about children. In addition to joy and pleasure, such skill brings other benefits to kids. It teaches them to feel and see beauty, develops perseverance and attentiveness, and helps them master handicraft skills that will definitely be useful in later life.
That's how many benefits there are from DIY New Year's toys! So create, gentlemen, create! And in this article we will tell you how best to do this.
Christmas wreath made of pine cones
Not long ago, the tradition of hanging Christmas wreaths on doors came to our country. If you are wondering what to make as a craft for school, then this pine cone wreath would be a great idea.
Necessary materials:
- bumps
- decor
- acrylic paint (brown)
- brush
- glue gun
- the basis
The first step is to think about what will suit the base of your wreath. You can buy ready-made foam plastic in the store or make it yourself from cardboard.
In this case, a stick from a water pistol is used. Bend it and secure it with tape.
Paint it brown
Let's attach the cones tightly to each other.
We decorate the cones with decorative pompoms
Making such a wreath is not difficult. But if you use other decorative elements, you may get a completely different result.
DIY New Year's toy for the competition
Such competitions are held quite often - in schools, kindergartens, and at city forums. Every year, parents captivate the organizers with their imagination and skills. For those who are not good at needlework or don’t have time to fantasize, we suggest considering several simple and at the same time interesting New Year’s tree decorations. Competition in kindergarten and at school are two different things, because the complexity of the craft depends directly on the child’s capabilities. No matter how hard the parents try, the child must take part in the creation if he cannot cope on his own.
For kindergarten, you might consider making a cute sleigh out of wooden popsicle sticks. To do this you will need several sticks, paint and rope.
Another option is a chic Santa Claus, which is made from the same sticks with cotton wool and felt.
Connect the sticks as needed as shown in the picture using hot glue.
Glue cotton wool instead of a beard and cut out a hat from felt. You can choose the eyes at a store that sells toy products.
Kart
A Christmas tree can be significantly transformed by a bright and beautiful decoration. Therefore, it is so important to approach the time of decorating the Christmas tree more seriously and choose or make toys with taste.
You can create a bright New Year's toy from old buttons.
Using a similar technique, you can make a ball of sequins, which can be secured with sewing pins that have colored heads.
If you beautifully lay out the beads on a foam ball, you can get bright and beautiful Christmas tree balls.
On the Christmas tree decorations you can see real paintings and compositions made of beads
Christmas tree decorations made of jute and burlap
Eco-design is becoming more and more popular, so we use jute thread and burlap in our New Year’s crafts.
Big toys
Using threads, you can also create wonderful jewelry of rather large size - giants. Just inflate the balloon, wrap it with a thread soaked in PVA glue and leave it for 24 hours. After drying, the ball is burst, leaving an airy New Year's toy made of threads, which, for decorative purposes, can be coated with silver or gold paint, decorated with beads, seed beads, sequins, and ribbons. Thread the ribbon and the accessory is ready. If you prepare two or three balls of different sizes, you can make a snowman.
Christmas trees are made from threads using the same principle. Use a Whatman paper cone as the base on which you will wind the thread. You can make such a toy in miniature if you take a simple sheet of cardboard instead of whatman paper. Light beads and ribbon bows are useful for decoration.
By the way, use a cone of whatman paper for the base if you are going to make Father Frost and the Snow Maiden. It is enough to glue such a cone, paint it, or make clothes from paper or fabric. The head can be an inflated balloon with a painted face.
Boxes from household appliances are also useful for giant toys; they can be covered with foil, colored paper, appliques, or even made into a Nutcracker.
DIY fragrant Christmas tree decorations
We make Christmas decorations with elements of natural flavors: cinnamon sticks, oranges and tangerines, twigs of thuja and spruce.
Funny ninjas
Small ninja toys with cute moving eyes will save your home’s beautiful Christmas tree from being too formal. After all, looking at such New Year's decorations, you involuntarily want to smile.
To work, you will need very few materials: dark opaque balls (they can even be made of plastic), narrow ribbons of different colors, toy eyes (a pair for each ninja).
- We wrap each ball with two turns of ribbon, securing the improvised fighter’s bandage to a knot at the back. For greater reliability, the tape can be placed on glue.
- Glue the eyes to the ribbon on the front, that’s it – decorations for the New Year can be hung on the Christmas tree.
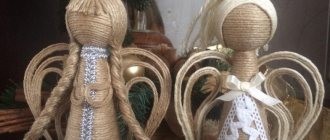
Angels on the Christmas tree
For Christmas we are adding new decorations to the Christmas tree. We suggest making magical angels with your own hands.
They can be made from soft fabric or felt.
You can make a toy for the Christmas tree from a piece of napkin or a stand for cups, according to the work diagram:
The silhouette of an angel can be knitted or made using the macrame technique.
You can make a Christmas panel on a Christmas tree. To do this, we use a cut-out illustration with a holiday theme, a roller of large tape, mesh, glue, lace, ribbons and beads for drapery.
You can make an angel figurine from white shells and beads.
Spiny hedgehogs
The easiest way to make a hedgehog figurine is from natural material, because the shape of the cone itself resembles its body. For creativity you will need:
- one bump;
- a piece of brown felt;
- 2 black beads – one large and two small;
- glue.
Procedure:
- From felt, cut out the face of a hedgehog in the shape of a heart.
- Glue beady eyes and a nose to the muzzle.
- From the same piece of felt, cut out two ears of any shape.
- Glue the muzzle and ears to the pine cone.
You can make several hedgehogs at once - arrange them on shelves at home, place them under the Christmas tree, or create a New Year's composition with fir branches.
Christmas wreaths and other decorative elements in eco-style
The Christmas wreath is a decor “not ours”, borrowed. But in many homes it has taken root, become “native”, and it would be wrong to ignore this traditional holiday attribute for European countries. Moreover, very nice decorations are made from natural materials: Christmas wreaths in eco-style Don’t you like the word “wreath”? What's the problem - replace it with the word "star", for example! And give the decoration the appropriate shape, of course - let your home be decorated with Christmas stars:
Don't like wreaths? Let's make stars! Christmas wreaths are traditionally hung on the front door. But we also need to decorate the windows and add a festive touch to the interior. So we need more ideas!
Eco-decor for the interior In general, New Year's compositions can be made from anything and in any way. These can be plot sketches and abstractions; volumetric installations and wall panels; laconic or rich in details, deliberately simple, even careless or immaculately perfect - it doesn’t matter. The main thing is that you enjoy the process of creating them and be happy with the results of your creativity. Here are some more options for inspiration:
Festive compositions made from natural materials You will find even more ideas, as well as detailed instructions and master classes that will help you create decorations for the New Year's interior in our publications:
- What and how to make a Christmas wreath with your own hands
- From New Year's decor to a jar of jam, or what can be made from ordinary cones
- Christmas wreaths, garlands and other decorations for the New Year's interior
- Ideas for New Year's bouquets and compositions for the festive interior
- 10 simple ideas for New Year's decorations for the garden
- New Year's stars and wreaths: make your own decorations
- New Year's wreath made from natural materials: we use moss and bright dried fruits
- Street decorations for the New Year's cottage
- Window decorations for the New Year: 13 ideas for a festive mood
Snowflakes made from... pasta
For a thrifty and creative housewife, even pasta can become the basis for creating amazingly beautiful decorations in the new year 2021. You can give free rein to your imagination here - after all, each new snowflake can be completely different from the previous one. All you need to do is stock up on as many different types of pasta as possible in the nearest supermarket (flowers, Christmas trees, spirals, shells, etc.). You also cannot do without glue, white paint and braid (ribbon, fishing line, thread) for hanging.
We form the pattern starting from the center, maintaining symmetry. How the toys turn out depends only on your imagination. We glue the parts of the decoration together with glue. At the end of the work, paint the snowflake white, additionally decorating the decor with sparkles to your liking.
New Year's candlesticks in eco-style
Another indispensable attribute of the New Year and Christmas is candles. And where there are candles, there are candlesticks; you can’t live without them.
Eco-friendly candlesticks made from logs and pieces of wood If you take a log or driftwood as the basis for a future candlestick, add pine cones, twigs, moss and other natural materials, we will get an original and stylish decoration for a festive interior. The main thing is not to forget about fire safety: wood, of course, is perfectly environmentally friendly, but it is very flammable. If you don’t want to take risks, take an ordinary glass jar and decorate it to your taste - we get a beautiful and safe candlestick:
Candlesticks with decor made from natural materials Or you can take not a jar, but a wide glass or a tall glass. And place the decor not outside, but inside. Or make a “scented candle” using an orange, lemon, tangerine or lime as a candlestick - when heated, they will spread a citrus aroma.
Rooster on the Christmas tree
It will look good made of paper or other materials. You can make a lot of these cockerels and collect the pendants into a garland to decorate your home. If you are going to make a paper cockerel, use cardboard as a base, which you will cover on both sides.
- You will need multi-colored sheets of colored paper (you can use colored cardboard) and a sheet of cardboard. Draw the silhouette of a rooster on cardboard and cut it out.
- Using a cardboard blank as a template where necessary, draw the details on colored paper (cardboard): head, torso, wings and tail - first fold the sheets in half so as not to waste time preparing blanks for the second side.
- The next stage: we cut out our blanks.
- Now we glue the parts made of colored paper (cardboard) onto the cardboard blank. After the cockerel has assembled into a whole picture, you can decorate it with sparkles, beads - whatever comes to mind.
- Make a hole in the blank, thread a ribbon and hang it on the tree.
We recommend making this New Year's cockerel for the Christmas tree together with your children.
You can make a similar toy from felt and also use it to decorate a Christmas tree.
Draw the pattern by hand or use any ready-made one, for example, this one:
Homemade cockerels made using the origami technique will look original.
Instructions on how to make a craft from straw
Before you start making crafts, you need to thoroughly plan the entire process. If you are a beginner creator, then choose the simplest composition for your first work. This will help you master the skills of working with straw material.
After drawing up a plan, you need to prepare a place for creativity. It is more convenient to create on a large and flat table surface. You need to place it closer to the window, as well as provide an additional light source. The surface of the table must be covered with oilcloth to protect it from glue or scratches.
Prepare and arrange all the necessary equipment. This could be: various scissors, a stationery knife, tweezers, an awl, an iron, pencils, glue, thread and a needle. The list can be modified, it all depends on the complexity of the selected composition.
The next step is to prepare the base to which we will attach the straw. If the craft is flat, then fabric, plywood, or cardboard can serve as a base. And if you are planning a three-dimensional figure, then you first need to make a frame. It can be constructed from wire or wood.
Let's start processing the straw. To make it softer, you need to pour boiling water over it. Leave for a while and the stems will soften. Afterwards, we take the material out into a wet cloth and, as straws are needed for the craft, dry them with an iron.
Once all these points have been completed, you can proceed directly to the practical production of the craft.
To understand how to properly make crafts from straw with your own hands, let’s carefully analyze one example of such a craft.
pillow toy
A difficult, but very exciting activity in making toys is creating a pillow in the form of a symbol of the year, which will delight you not only in the year of the Rooster , but much longer. You will need a pattern, fabric, filler, felt (depending on the chosen model), thread and needles. Here it's a matter of small things, we trace the pattern, sew the parts together, leaving a hole to fill the pillow with filler. We turn it inside out, put the filling inside the toy, and sew it up until the end.
There is also a more complex plan with fabric painting - this is batik, thanks to which the pillow will acquire a bright color. After you have traced the cockerel on the fabric, paint it using special paints; they can be replaced with gouache if you mix it with PVA glue. We leave it for a day so that the paint dries and continue to finish the pillow in the shape of a rooster.
Straw doll
Take some straws and fold them in half. To ensure even edges, cut them using scissors. We wrap the base with thread. As a result, we get the body and head of the doll.
- To the side we make handles by analogy, marking the elbow bends on them. Using wire or toothpicks, we connect the parts to the body. The making of the doll is completed. In addition, you can make a hat and a fabric scarf, as well as draw a face.
Cute snowflakes
A simple but wonderful decoration in its laconism is snowflakes. Backing material... rolls left over from using toilet paper or kitchen towels. Also stock up on scissors, glue, decorative elements in the form of large rhinestones and thin fishing line. The whole process looks like this step by step:
- we crush the sleeve, pressing it well from the edges;
- cut the bushing into strips of equal width. The resulting elements are visually reminiscent of flower petals;
- glue the resulting blanks together in the center so that you get a flower;
- decorate the middle with rhinestones;
- We thread a fishing line through one of the petals. That's it, the snowflake is ready to float near the branches of your Christmas tree.
Beautiful flowers made from straws (or panels)
Prepare the following tools for work:
- wire 2 mm-20 cm;
- purple linen fabric;
- similar cotton threads (purple and yellowish);
- thin ribbon;
- container to bleach the straws.
Stages of work:
Place the straw in a deep container. Pour in the solution: 0.5 liters of water, hydroperite (9 tablets), ammonia (1 tsp) for 5-6 hours for uniform bleaching. You can press it down with a weight. Then rinse well and put in polyethylene for quick work.
Flower. You need 8-10 straw tubes, cut along the stem, unfold, and smooth with a hot iron.
We glue our strips onto white paper (preferably thin tracing paper) with PVA glue as a continuous sheet. Remove excess glue, roll with a rolling pin or put under a heavy press.
You need to make a stencil for flowers from cardboard. Place a stencil on the reverse side, draw 12 petals and cut out. Glue 12 petals onto purple linen fabric.
The same dense threads (twist with a rope), glue around the petal onto the fabric, leaving the “tails” at the bottom.
- After drying, cut out all the blanks.
- You need to cut out a 10 cm circle from thick cardboard and glue 6 petals to it. It turns out to be a flower.
- On the other side, glue 6 more petals, and they should be slightly larger than the central ones, located between them. We are waiting for it to dry completely.
- We pierce it in the center in 2 places to tie it to the prepared wire. Cover the center nicely with straws.
- We bend the flower beautifully and cover the wire with thread or ribbon. The flower is ready.
You can make another flower from 1 layer (6 petals). Place 1-3 flowers in a small vase.
Note! DIY crafts from egg trays: original toy ideas for children and useful crafts for adults (115 photos)
You can make an oval-shaped panel and decorate the inside with a large cage of sticks. Attach 3 flowers to the “net”, tie a ribbon or twist a thin straw into a spiral. To do this, we run scissors along the fiber of the straw, a “spiral” will spin,
Beautiful DIY New Year's toy for the city tree
On the eve of the New Year holidays, preparations begin in all cities. Each locality considers it its duty to place a tall and beautifully decorated Christmas tree in the center. Therefore, you can often see do-it-yourself toy competitions for the city Christmas tree. Large toys that will hang on the city Christmas tree have a number of features:
- the size is at least 20-30 cm, and even about 50-60 cm (for huge Christmas trees);
- they must be made of material that can withstand bad weather: snow, rain;
- toys should not be heavy so that the branches do not sag (they may be hollow).
One of the simplest DIY Christmas decorations for a street Christmas tree are boxes with gifts. It could be an empty shoe box. The box can be painted or covered with brightly colored foil.
Using large foam balls, you can make toys for the city Christmas tree, decorating the ball with pine cones and twigs.
A beautiful shiny ball can be made from foam and pasta. An aerosol with silver paint will help make the toy sparkle.
Hot glue the pasta onto the foam ball and then cover it with paint. Don't forget to attach the ribbon at the top of the balloon.
Kart 61
DIY toys from a plastic bottle for the city Christmas tree
Making such toys is not difficult, you just need to show a little imagination and accuracy in painting. It is better to use acrylic paint or spray paint.
After applying the paints, the toy should be coated with acrylic varnish.
Automotive paints can also provide bright, rich colors that will adhere well to the surface of the bottles.
Enamel paints are also great for this type of activity. They can be applied with a brush or sponge.
Before you start painting, you need to wash the bottle of all labels and inscriptions and degrease the surface.
You can make cute penguins from large round bottles. To do this, cut the bottle - cut out the middle part to make the penguin shorter.
Glue the two parts together and paint one by one. After each layer you must wait for it to dry.
Santa Claus can be made from a large plastic bottle (5-6 liters) using red paint and plastic spoons. Glue the spoons, having previously broken off the handles from them, with super glue or a hot gun. You can also add Christmas tree tinsel to the design of the craft, making it more festive.
Straw applique
The preparation of the material is described above. The straws can be steamed in water, always over low heat. Cut, steam with an iron.
You get beautiful children's crafts from straw based on a stencil, which is best drawn on tracing paper.
To get different shades of straw, the iron must be at different temperatures. The hotter the iron, the darker the straw will become.
From salt dough
Children are often asked to bring some New Year's crafts to school competitions. Make it from salt dough. A craft made from bioceramics can also be an excellent gift from children to grandparents. Moreover, this activity is so exciting that it quite claims to be a hobby.
Before you make a toy from salt dough, you need to prepare the dough itself. To prepare the dough, use fine table salt, regular wheat flour and water in a ratio of 2:4:2, respectively. First, mix flour and salt, and then add warm water, kneading the dough thoroughly for at least 10 minutes.
There is another recipe for making dough. In this case, take flour and salt in the same proportions, only the flour is pre-sifted. You need to take a little less than 1 1/3 cups of water. The cooking method will vary. According to this recipe, water must be brought to a boil and salt dissolved in it. Only then is flour added.
When the dough is ready, start making crafts. If you are making crafts with your child, simplify the task by using cookie cutters, for example, in the shape of Christmas trees or bunnies - you will get wonderful Christmas tree decorations. Make a toy (you can use beads or seed beads for decoration), don’t forget to make a hole at the top. To harden the toy, it is left for 24 hours or baked in the oven. After the toy has hardened, it is painted with acrylic paints, gouache, watercolors, allowed to dry thoroughly and coated with either colorless nail polish or nitro varnish for wood. Thread a thread or ribbon through the hole. So the New Year's gift is ready.
Photo ideas for crafts made from salt dough
Straw boat
Separate parts, for example, sails - it is more beautiful to cut the strips in one direction.
Take turns gluing them onto dark-colored velvet paper, carefully looking at the diagram.
We make the sails light, the schooner itself is a little darker, and the sea - the wavy stripes can be darker. Place it under a press to dry the picture. Then you can put it under glass and frame it.
Interesting ideas for crafts made from straw:
- one flower;
- a bouquet of flowers in a vase;
- animal (bunny, bear, fox, dolphin, etc.);
- birds;
- fish with algae;
- a bunch of grapes with 2-3 small leaves.
- Any drawing can be transferred to tracing paper and glued with straws onto beautiful (velvet) paper.
Wonderful crafts - wickerwork using the macrame technique, etc. You can weave a summer hat or make a three-dimensional doll or animal.
Note! DIY crafts from coffee beans: master class on creating original jewelry (150 photo ideas)
Creative ideas for photos of straw crafts.
Step-by-step instructions on how to make a New Year's toy from cotton wool
And ahead of us awaits a detailed master class on creating another Christmas tree decoration in the form of a bright cockerel. We will make it from ordinary cotton wool.
"Cotton Cockerel"
You will need:
- cardboard (thick but cutable);
- cotton wool (from a pharmacy, regular in a roll);
- cotton pads;
- white threads;
- potato starch;
- black half-bead eyes;
- tailor's pin (with a loop at the end);
- paints for painting.
Manufacturing process:
1. Take cardboard and draw the outline of a cockerel on it. Cut it out.
2. Unwind the cotton wool from the roll and tightly wrap it around the cut out outline to the legs.
3. Now wind the thread over the cotton wool. Do the same with the leg.
4. Next, take a voluminous lump of cotton wool and distribute it over the breast. Wrap it with thread and go down to the very bottom, tie the thread and make a loop.
5. Cut wings (4 pcs.) and parts for the tail (4 pcs.) from cotton pads.
6. Cut out one comb and two parts for a beard from a cotton pad.
7. Make a starch paste and coat our rooster figurine with it. Then wrap thin pieces of dry cotton wool around our product. Apply paste to all uneven surfaces. Next, saturate all other parts with paste and carefully attach them to the cockerel. Form folds, fluff the tail, you can additionally make a thin strip of cotton wool and glue it around the neck. Glue on the eyes.
8. Dry the product upside down (hang it on the thread we left). And then paint it to your liking. Cut the thread and insert a pin, thread an elegant rope.
Use this technology to make other animals, fairy-tale heroes and characters.
Photos of simple DIY straw crafts
Sources- https://chto-podarite.ru/novogodnie-ukrasheniya-iz-prirodnogo-materiala-svoimi-rukami-s-foto/
- https://larecmasterici.ru/podelki-iz-prirodnyx-materialov/podgotovka-k-novomu-godu-podelki-iz-shishek.html
- https://materinstvo.ru/art/11053
- https://7dach.ru/MarinaGerasimenko/novogodnie-podelki-i-dekor-v-eko-stile-155660.html
- https://rukodelieinfo.ru/podelki-iz-solomy/
- https://tytrukodelie.ru/prostye-podelki-iz-solomy-svoimi-rukami/
Snowmen
Snowmen made from socks – there is nothing more primitive, but it looks very original. To do this, we fill the sock with sand, buckwheat, and with the help of threads we give it a shape and sew on buttons. A white sock can be used to make a base, and a colored sock can be used to make clothes. Cute snowmen can also be made from an unnecessary light bulb; it is simply painted with acrylic paints and decorated with cotton wool and sparkles.
Beautiful New Year garlands for the Christmas tree for school and kindergarten
You can buy a lot of ready-made decorations and hang the Christmas tree. Undoubtedly beautiful. But something made with your own hands can add soulfulness. And in this part of the article, we’ll look at beautiful New Year’s garlands for the Christmas tree that kids can bring to school or kindergarten. While at the event, children will definitely find their product on the decorated Christmas tree and feel their importance and involvement in preparing the matinee.
How do you like the idea of making a garland from multi-colored stripes of fleece?
Volumetric paper balls that can be folded in a certain way look original.
The pictures show a master class on how to make such a garland. Choose your own color scheme.
In such a chain, every detail is unique. You can cut out several shapes at once and then decorate each one as you wish. This is also a good topic for joint creativity in children's groups.
A fragrant scattering on a string can decorate a Christmas tree or walls.
Or this idea with repeating elements.
Multi-colored light bulbs look beautiful and festive. Use thick paper so that it holds a smooth bend well.
Fold the paper several times and draw any outline. Snowman, Christmas tree, hare or mouse. The main thing is that when unfolding the workpiece, they seem to be holding together by the paws or handles. And now you can draw unique faces and dress them up in clothes.
Perhaps needlewomen who knit a lot or grandmothers have a lot of small skeins of yarn left. Look how beautifully they can be assembled into a New Year's garland.
And if you make pompoms from yarn and weave a multi-colored rope, then this beauty comes out.
Well, this option is again from my childhood. And they could just glue meter-long decorations. It is made very simply from flats of multi-colored paper and simply fastened with a chain.
A more complicated option with pointed stars. Looks very nice.
Don't forget corrugated paper. It makes an interesting craft.
What do you think of the idea of making an edible popcorn garland? But so as not to eat it while it is hanging at the holiday, I recommend painting it with paints.
You might like the ideas for garlands made from multi-colored strips of paper. Moreover, they can be folded in different ways. For example, in the shape of hearts.
Or voluminous balls
This is how you can glue strips of stickers that already have an adhesive side. Or simply secure it with a strip of tape on the other side of the thread.
There are a lot of fantasies, as well as materials from which you can make a festive scattering of multi-colored lanterns, stars or pompoms. The main thing is the alternation of bright shades.
In eco style: Christmas tree decorations made from natural materials
Modern handmade masters know a million ways to turn natural materials into real works of art. And New Year's toys are just among them. Forest cones, wooden slices, branches, acorns, nuts and dried orange slices - this is what you can use to create unique masterpieces for your Christmas tree for the holiday.
Animal figurines made from pine cones and felt are excellent New Year’s crafts that can be hung on a Christmas tree or taken to school for a competition. Children really like this kind of creativity.
Sweet decorations
The following options are clearly for those with a sweet tooth.
Caramels
The appearance of Christmas tree decorations can be deceiving, because they may well turn out to be sweet candies. It's very simple: first, mix 300 g of sugar and 100 ml of water, put on fire, stir until the sugar melts and the syrup begins to boil, acquiring a golden hue. The finished syrup is poured into molds, pre-greased with vegetable oil, and left to cool completely until the caramel hardens. Then we carefully wrap the candy in crispy plastic, tie it with a ribbon and you can safely hang it on the Christmas tree. It's even easier to melt caramel in molds.
Christmas tree made of candies
The New Year cannot be complete without a Christmas tree; a candy tree is not only a decoration, but also a delicious gift with which you can please your friends or family. But even a small child can handle the manufacturing technology:
- Make a cone out of cardboard, glue it or secure it with a stapler.
- Using the same stapler or glue, attach the candies.
- Lightly wrap the Christmas tree with tinsel.
- Ready.
A lot of toys can be made from scrap materials, the most important thing is imagination and the desire to make something unusual.
Crafts from cotton swabs and disks for kids
Kids love to do things with their own hands. Together with your parents, you can make many different souvenirs and gifts from cotton swabs and disks. If kids go to kindergarten, then this is a great idea to make wonderful crafts from available materials.
Without cutting out or inventing any fancy shapes, you get an excellent picture with snowdrifts and snowy trees.
Cotton swabs are great for building huts, sheds, and growing snow-covered Christmas trees.
Cut pieces from cotton pads. Draw a triangle on cardboard with your child. This will be the future Christmas tree. At the moment of creativity, you can repeat the counting, if only you learn the letters and numbers. From below we glue the branches, first further away from each other, then denser and denser. And the higher the Christmas tree, the fewer parts will be required. Have you counted how many are in each row? How many branches did you get in total?
And here is a Christmas tree decorated with beads. We roll the cotton pads twice and fix them with glue. The base is still the same cardboard cone. Let the child come up with what kind of decoration will be on the top of the head.
You can also make cute angels and snowmen that look like ice cream from simple cotton pads.
For the craft you will need:
- Cotton pads - 2 pieces of different diameters
- Cardboard - 3 mugs
- Wooden stick (can be used for ice cream)
- PVA glue or glue gun
- Decor for a snowman
We leave two blanks of cotton pads unchanged. This will be the bottom part of the snowman. We cut the remaining two a little smaller than the previous one. We make blanks of the same diameter from cardboard. We will need it for rigidity.
Glue the cardboard to one disk, then slightly overlap each other.
Next, apply glue to a wooden stick and fix it on the structure so that the lower part peeks out.
Then we close it with a second disk, glue on the eyes, a carrot nose, and be sure to put on a headdress and scarf.
And this is a master class on making an angel for a Christmas tree. I will not describe the process in detail. It is shown in the pictures. The only thing is, if you don’t have a ready-made large bead, you can use either white plasticine or salt dough to make the head.
You might like this version of Christmas figurines.
On blue cardboard, recreate a frosty New Year's night with a clear starry sky. And the houses are buried in snow-white snowdrifts.
Or this cityscape
The snowman is probably what kids make most often. And you can make it from cotton swabs. We take foam plastic balls as a base and, having cut the sticks on both sides, often stick the plastic side into the ball. You will need a lot of them, as well as patience. To make black eyes and a smile, you need to first dip the sticks with a cotton tip into the paint.
New Year's decorations made from cotton pads look very original. Make the fabric layer in different colors and sew it as shown in the picture.
Finally, a couple more ideas with cotton pads.
As it turned out, discs and sticks are a very versatile material and can be useful not only for cosmetic purposes.