What do you need for a party?
In addition to the basic Mickey Mouse baby shower supplies like plates, glasses, napkins, and decorations, try getting the following items:
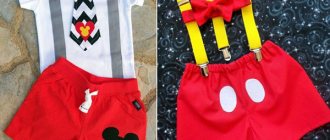
- Mickey Mouse ears (in the form of headbands or hats);
- several pairs of white gloves;
- Mickey-shaped balloon;
- cartoons about Mickey Mouse.
Invitations
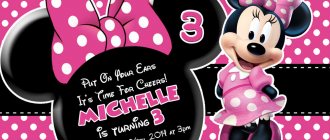
A Mickey Mouse themed party cannot be complete without original invitations. And here are three great options for making them yourself.
- Take a photo of the birthday boy with his favorite soft toy - a Disney cartoon character - and print this photo on the invitations.
Write, “Mickey and Minnie would like to see you at (your child's name)'s birthday party,” and include all the event information on the back.
- On a piece of black cardstock, draw the outline of Mickey's head (one large circle for the head and two small circles for the ears). Then, cut out the shape and write the details of the holiday with a red marker.
You can, for example, write: “Hey, Buddy! Look who's turned (age)! Join us for a fun birthday party at the Mickey Mouse Club!" Don't forget to also write the address and time of the meeting.
- And finally, you can use themed coloring pages. To do this, print them from the Disney website, fold them in half and write all the information about the event on top. Young children will be especially happy about this invitation.
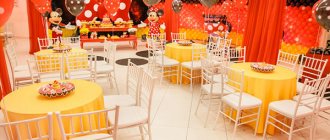
Scenery
In order to decorate the room in which the children's party in the Mickey Mouse style will be held, use red, white, yellow and black colors. For a girl's party in Minnie style, you can additionally use pink and gold colors.
Diy: Mickey Mouse paper rosette
- Cut out a large Mickey Mouse head from black cardstock and place it on a raised platform near the entrance.
- Using tracing paper, draw Mickey's footprints in the hallway toward the door and hang a sign that says, "Welcome to the Mickey Mouse Clubhouse!"
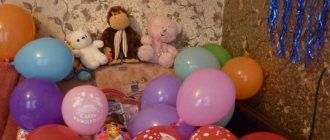
- Place toys related to Disney cartoons in the room, hang posters (or drawings) of Mickey and his friends on the wall, and be sure to decorate the room with bundles of balloons and streamers.
- On a large sheet of wa (a giant computer shaped like Mickey's head) and tape it to the wall. Hang up the Club's calling words: “Bowl, Muska, Mickey Mouse” and play music from the cartoon.
- Lay out a red or yellow tablecloth on the holiday table, place printed and laminated Mickey and Minnie pictures under the plates, and tie balloons to the backs of the chairs.
Find out how to decorate a candy bar with your own hands
Step-by-step photo lesson:
The cartoon character's body will be black. Therefore, we take half-cardboard of this shade and draw a rectangle of 13 x 6 cm.
Cut it out.
We also need red half-cardboard, from which we will make clothes for Mickey Mouse. Cut out a rectangle 13 x 4.5 cm.
Place the red rectangle on the black one in the middle. Roll it into a tube and staple the edges.
This is how we ended up with a blank for the body of a cartoon character.
We will make a head and muzzle from black and white paper.
Let's draw Mickey's face with a pencil.
Now you can outline all the details of the muzzle with a black marker.
We attach small white buttons in the middle of the body on a red background.
Glue on the black part of the head.
Our Mickey Mouse made from colored paper is ready! A beautiful craft will decorate not only a corner in the nursery, but will also complement your child’s gift for a friend’s birthday.
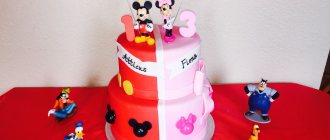
Mickey Mouse cake is a beautiful and unforgettable treat for children. There are many options for preparing this culinary masterpiece. Below are the most interesting recipes that even a mother inexperienced in confectionery can handle.
The least financially and time-consuming way to prepare confectionery mastic is from marshmallows.
You will need:
- marshmallow – 200 g;
- powdered sugar – 0.5 kg;
- lemon juice – 1 tsp;
- butter – 1 tsp;
- gel dyes.
Step-by-step instruction:
- Place marshmallows in a deep bowl, add butter and lemon juice.
- Place the container with the ingredients in a steam bath.
- Slowly stir the mixture until the pastille begins to melt.
- Gradually add powdered sugar into the melted mixture.
- Bring the mastic to the consistency of plasticine.
- Place the mixture on cling film and divide into 2 parts.
- Add red dye to one half and knead like dough.
- Divide the remaining part of the mastic in half and add dyes (black and beige, respectively) to each, also kneading thoroughly.
- Wrap each of the three lumps in cling film and place in the refrigerator for at least 8 hours.
Important! Use the finest powdered sugar, otherwise the mastic will tear.
The classic version of the Mickey Mouse cake for girls is made from sponge cakes.
You will need:
- eggs – 7 pcs.;
- granulated sugar – 200 g;
- flour – 130 g;
- starch – 30 g;
- vanillin – 10 g.
Step-by-step instruction:
- Separate the whites from the yolks.
- Whisk the egg whites very quickly.
- In a separate bowl, beat the yolks with granulated sugar and vanilla sugar.
- Gradually add starch and sifted flour into the mixture of yolks and sugar, without stopping beating.
- Having achieved homogeneity of the mass, turn off the mixer and, carefully mixing the dough, introduce the whites into it.
- Line the pan with parchment paper and place the dough in it.
- Place the biscuit in a preheated oven and bake at 180° for about 40 minutes.
- When the biscuit is cooked, leave it in the open oven until it cools completely.
- Carefully take out the cake, running a knife in a circle, wrap it in film and refrigerate for at least 8 hours.
The best option for cream for a children's cake is curd and butter. If desired, you can add any fruit to the cream.
You will need:
- fat cottage cheese – 0.5 kg;
- butter – 250 g;
- powdered sugar – 200 g.
Step-by-step instruction:
- Using a mixer, mix the softened butter and powder until smooth.
- Beat the cottage cheese in a blender.
- Combine the cottage cheese with the butter mixture and mix.
- Place in the refrigerator for 8 hours.
Important! The amount of powdered sugar for making the cream may vary depending on how sour the cottage cheese is.
After all the ingredients have been left in the refrigerator for the required time, you can proceed directly to preparing the cake.
Step-by-step instruction:
- Divide the biscuit horizontally into 3 layers.
- Layer the sponge cakes with cream and fruit.
- We press the workpiece with a press and put it in the refrigerator for a couple of hours.
- Cover the cake with cream on top and sides.
- Refrigerate for another hour.
- We decorate the finished product.
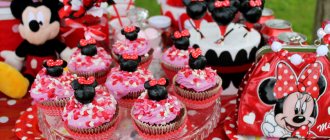
The easiest way is to make a round cake by covering it with a red or pink sheet of fondant. As decoration, you can use white mastic circles, a figurine of your favorite hero cut out of a black confectionery mixture, etc.
How to entertain arriving guests?
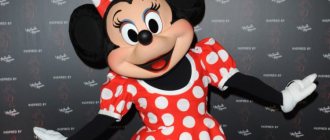
- Transform into your favorite characters from the world of Disney. When the kids arrive at the party, give them headbands with Mickey Mouse ears (available at any party store) to wear throughout the party. Use special makeup or a black marker to paint the children's noses.
- Color Mickey. Scatter coloring pages of Disney characters and connect-the-dots pictures across the floor. Provide crayons and pencils for children to color in their favorite characters.
- Watch the show. While the remaining guests are expected, invite the children who have already arrived to watch an episode of The Mickey Mouse Club.
Cooking with cream
For those who don’t want to bother with fondant, we offer a simple and delicious cake with cream decoration. The basis for it can be sponge cakes or prepared with condensed milk. It is better to prepare the cream for decoration from cream that does not separate and is easy to whip and color.
You will need:
- cream 35% fat – 400 ml;
- powdered sugar – 150 g;
- citric acid – 1/3 tsp;
- dyes.
Step-by-step instruction:
- Cool the cream, whip it until fluffy, gradually adding powder and citric acid.
- Continue beating until the mixture begins to hold its shape.
- Divide the cream into the required number of parts and add different dyes to them.
- Decorating the cake.
You can coat a children's cream cake with sour cream whipped with powdered sugar, or with a layer of fruit prepared according to one of the above options.
Important! The buttercream must be used immediately after preparation, otherwise it will no longer hold its shape.
Souvenirs for memory
To remember a fun birthday, give the children souvenirs - stickers and coloring books, plasticine, soap bubbles, crayons, headbands with Mickey Mouse ears, inflatable balls, and so on.
Games and entertainment in the style of Mickey Mouse
Mickey Mouse Easter Egg Hunt
Before the party, print and laminate images of colored eggs, then hide them throughout the room where the party will be held.
During the game, give the children the task of finding as many Easter eggs as possible. Offer them clues, such as drawing arrows to show them where to look. Invite the youngest guests to play in a group, and make sure that all children collect approximately the same number of eggs.
The game will be even more interesting if you use opening plastic eggs. They can be filled with candy or other prizes, and theme stickers can be placed on them.
Mickey, Mickey, Goofy
Play the game "Duck, Duck, Goose", remade according to the holiday theme. If most of the guests are girls, then you can call the game “Minnie, Minnie, Daisy!”
Don't wake the giant
This activity will bring a lot of fun to children.
Ask one of the adults to be Willie the Giant. He will have to lie down on the floor and pretend to be asleep. Place several toys as close to the giant's body as possible (near the legs, arms, etc.). Children will have to try to steal the toys without waking the giant.
If the giant wakes up and catches one of those stealing toys, then such a child is eliminated from the game and receives a consolation prize. Allow the youngest children to stay in the game even if they get caught. This game is sure to greatly excite and amuse the guests.
Bark like Pluto
Taking turns, allow the children to show off their best bark. Award prizes for the scariest, funniest, loudest, most realistic barks. Distribute the nominations so that each guest receives one prize.
Find out more about the nominations for children's awards
Bowl, Muska, count it!
This is a wonderful game for little ones that will help them strengthen their counting skills or are just learning to do so.
Find out how to teach your child to count
Ask the children to stand in a circle and hold hands. Say: “Let’s count how many guests are at the Mickey Mouse Club today.”
Ask one child to say the words: “Bowl, Muska, one” (all other children should repeat the sequence in unison), then, moving in a circle in one direction, the next child says “Bowl, Muska, two”, then, “Bowl, Muska, three,” and so on until you finish, going around the entire circle. Then, start counting backwards, starting with the same child who opened the previous round.
Singing and dancing
Insert the Mickey Mouse Clubhouse into your CD or DVD player and let the children sing and dance one at a time.
Birthday pinata
Make a Mickey Mouse piñata and have the children, one at a time, with their eyes closed, hit it with a bat. Start with the birthday boy.
Materials needed to create Minnie Mouse ears and hair ties:
1. Black felt 2. Red ribbon with white polka dots 5 cm and 1 cm wide 3. Headband and 2 elastic bands 4. Scissors 5. Synthetic padding 6. Thread with a needle 7. Glue 8. Cardboard for the ears template 9. Sewing machine (but you can do without it).
Let's begin: First, take cardboard and cut out a circle with a diameter of 7 cm from it. And on one side of the circle we make a protrusion of about 1 cm, the size of the protrusion depends on the width of the rim. We apply the cardboard template to the felt and cut out 4 such circles with a protrusion.
From thick padding polyester, cut out 2 circles with a diameter of 5 cm. Place them in the middle of the felt circle, cover the top with a second felt circle and baste with thread along the edge of the circle. There is no need to baste the protrusion; it should be free, just baste it in a circle.
We stitch on a sewing machine...
These are the stitched ears we got
We mark on the rim the place where our ears will be located
We apply glue to the indentations that we left and glue it to the rim
We mark the middle on the segments and tighten both ends of the tape to this middle. We sew two strips together in the middle with a thread and then tighten and secure the knot.
We also fold one strip and stitch it similarly to the previous ones.
Assembling the bow: I put one strip under the bottom and glued two to it. Glue the finished bow in the middle of the ears.
Back side. Additionally, I made some rubber bands. And it turned out to be a Miss Minnie Mouse set
This is such a wonderful set.
Minnie ears on a model
If you liked the master class, be sure to add it to your bookmarks so as not to lose it, or click on the social networks button and the link will appear on your page.
Other master classes can be viewed here
Don't forget to stay tuned for updates. Bye bye.
Print Thanks, great lesson +0
Black round ears, a white muzzle and a red overalls are, of course, Mickey Mouse. In this step-by-step tutorial we will show you how to make the Walt Disney Company symbol, Mickey Mouse, out of paper with your own hands.
- Half-cardboard or paper in white, black and red colors
- Two small white buttons
- Black marker
- Stapler and staples
- Simple pencil
- Scissors
- Ruler
Food and drink
Birthday cake
Bake one thick cake with a radius of 9 inches (23 cm) and two cakes with a radius of 6 inches (15 cm). Arrange them so that the large cake forms the face, and the two small ones form Mickey Mouse ears.
Cover the face with white icing. Print out a photo of Mickey Mouse from the Internet and, looking at him, use a toothpick to outline the contours of his face. Using a pastry bag, draw on the facial features with colored cream and cover the ears with chocolate icing.
Treat ideas
- Peanut butter sandwiches. Using a variety of cookie cutters (stars, hearts, etc.) you can cut out a variety of holiday sandwiches.
- Mickey Mouse ice cream. Make Mickey's face out of ice cream scoops using special spoons of different sizes. To do this, use the largest spoon to place one large scoop of vanilla ice cream - this will be Mickey's face, and two small ones (smaller spoons) - this will be the ears. Add one piece of chocolate for the nose, two chocolates for the eyes, and place two round chocolate Oreo cookies on the ears.
- Daisy Crackers. Spread the cream cheese onto small round crackers, cut the grapes in half and arrange 6 halves in a circle. Add blueberries to the center.
- Hot dogs.
- Hamburgers in the shape of Mickey Mouse.
- Puffed rice
- Jelly (cut out and arrange to resemble Mickey Mouse's face).
- Cheese cubes.
- Popcorn.
Find out more about the sweet table for a children's birthday
Birthday in the style of Mickey and Minnie Mouse / Party Ideas / Mickey Mouse Birthday Ideas
Drink ideas
- Club smoothies. Treat everyone to fresh fruit smoothies.
- Ginger soda. Regular colorful lemonade will work just fine too.
Festive dessert for a boy
Your son with a sweet tooth will definitely love the cake prepared according to the recipe below. It will also be covered with mastic, but made from condensed milk.
You will need:
- condensed milk – 210 g;
- powdered sugar – 165 g;
- powdered milk – 150 g;
- lemon juice – 2 tsp.
Step-by-step instruction:
- Combine the dry ingredients and sift the mixture through a sieve.
- Mix condensed milk with lemon juice, add a mixture of dry ingredients to them.
- Mix the mastic well.
- Divide the resulting mass into three parts, add dyes.
When preparing a cake for a boy, red dye can be replaced with blue. Cakes can be biscuit or made with condensed milk.
You will need:
- condensed milk – 380 g;
- eggs – 2 pcs.;
- baking powder (slaked soda) – 20 g;
- flour – 160 g.
Step-by-step instruction:
- Mix all ingredients until the consistency of thick sour cream.
- Cut out a circle from parchment.
- Place 2 tablespoons of dough onto the paper base and spread evenly.
- Bake 8–10 cakes (oven temperature – 180–200°).
We prepare the cream from whipped cream. We add any fruits to the layer, except those that release a lot of juice.
You will need:
- cream (33% fat content and above) – 500 ml;
- powdered sugar – 150 g.
Step-by-step instruction:
- Beat the cream with a mixer for 10–15 minutes.
- Gradually add powdered sugar while beating.
When the cream is ready, spread the cakes, adding fruit to the layer, and decorate the finished cake.
Important! The cream should be kept in the freezer for about an hour before whipping.