I would like to remind you about a relatively fresh option for decorating festive events with balloons - aero mosaics. This decorative technique quickly won an army of admirers, as letters, numbers and figures made from balloons have never looked so impressive.
I’ll show you right away with an example. Let's compare!
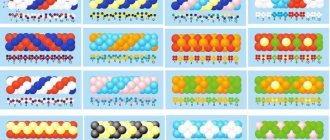
- Here are four pictures. On the first there is the number “3”, woven from thin modeling balls (SMB).
- The second picture - the numbers are assembled from ordinary balls (there is a wire frame inside, but many of the numbers and letters turn out to be indistinct and blurry).
- The third is an example of a standard foil number. All products look the same, there is no variety of fonts, so to speak. The number of colors is limited, they often leak air in the seams and lose their shape.
- The fourth image shows the same frame with a clear outline, inside of which balls of different diameters are placed. This is an aero mosaic, and we will talk about it.
We collect the number 1 for a year with our own hands from balloons
Our master class will open with a unit of balloons. This is one of the simplest, but at the same time great crafts. Such a unit can turn out to be of absolutely any size. We will tell you how to make such a beautiful unit:
First we need to make a frame. Wire is best. It is very light and easy to attach balls to. We make a blank of the size we need.
You may need a different number of balls. Don't rely on the photo. The number of balloons depends on the size of the number and how much you inflate them. Be sure to make sure that the balls are approximately the same size and, at the same time, not too inflated. If you inflate the balloons too much, the likelihood that they will burst increases dramatically.
Are the balls ready? Great! Now they need to be attached to the frame. Just tie them on a wire frame
The resulting figure is very easy to transfer from place to place, and it is also very easy to disassemble if desired.
Unit options without frame.
If the previous option could not be completed due to the fact that it requires a frame, then we can offer you a lightweight option. However, it is worth understanding that a figure without a frame will also not be mobile and its location will be limited to one point.
We won't need to make a separate frame, but we can still find a replacement for it. And this replacement is a wall. Yes, this method of making a unit from balls involves placing it on the wall.
Just like last time, we inflate the required number of balloons. We make sure that their sizes are approximately the same. Then we attach them to the wall, thus forming our number 1. The balls can be attached with double-sided tape. One-sided is also possible, but it is more difficult, since we only have to glue the tails.
The second option for a number without a frame is a number made of cardboard. We take an old and unnecessary cardboard box and unwrap it. We try to get as large rectangles as possible. We cut out the necessary elements: the leg, the nose, and the base. The vertical part of the unit - the leg should be the longest. Approximately three times longer than the toe - the inclined part of the “/”. But the base - the horizontal lower part should be about half as long as the leg.
Next, we need to glue it all together and get our number. True, it will be of a nondescript color, but this can be corrected by decorating it: painting, sticking on some decorative elements.
Fluffy napkin unit.
Making numbers from napkins is somewhat similar to making numbers from fabric. Only when using napkins we need a frame. We will make such a beauty.
First, let's determine the list of necessary materials:
- Threads (preferably blue or white)
- Napkins (We take several packages at once, three or four should be enough)
- Thick cardboard serving as a base
- Scissors
- Stationery knife
- Stapler
- Simple pencil with ruler
First, we make a base from cardboard. We take a piece of cardboard and draw on it the number of the sizes we need. Let's cut it out. The base is ready. We have completed the simplest step. Making the base for a “two-dimensional” unit is not difficult.
In order to get a three-dimensional figure, we need one or two pieces of cardboard. We draw two identical units and cut them out. We should end up with a pair of identical units. Now we decide on the thickness of the number and cut out the side edges. There should be ten of them in total. After all the components are ready, take tape and glue them together into a three-dimensional figure. With some skill, you can use glue instead of tape, but this is much more difficult. In creating the frame, we pursue one goal - to create an approximate and durable contour 1.
The frame is ready. It's time to start making flowers that will decorate the surface of the unit. Take two double-layer napkins and tear them into two even parts.
The resulting four elements must be carefully placed on top of each other. We get the following result:
We fold our multilayer rectangle into an accordion shape and tie it in the center with thread. If you have a stapler, then use it.
We unfold the accordion, lifting it slightly and straightening the folds. As a result, we should get something like this:
Now we need to make a few more of the same flowers. You can take white napkins. And make approximately equal numbers of blue and white napkins. This way we get alternation.
When the frame and flowers are ready. We can start gluing flowers onto the frame. PVA glue is best suited. First we paste over the front side, then the back and after that we move on to the side edges. Our fluffy and very tender unit is ready!
What is aeromosaic?
Decorators have finally figured out how to make shapes with clear contours from round balls! Boxes with sides appeared, inside which balls of different diameters were placed. This is a real mosaic of individual balls, which are attached to the bottom of the structure and to each other with double-sided adhesive tape on a fabric basis. The sides are wide, the decoration stands on the floor without additional supports or fastenings.
These are quite large decorative elements. Their height is rarely less than 1 meter, since small balls in several rows should easily fit inside. Let's put it this way: the larger the frame and the smaller the balls, the clearer the image you have in mind.
Here are a few examples; below I’ll tell you what the differences are and why the cost of some structures is many times higher than others.
How to make a unit out of balloons?
Let's look at ways to make the number 1. The first option is from round balls, without using a frame. Such figures are voluminous and quite large - they are perfect for installation on the floor, or they can be hung from the ceiling as part of a garland.
To make a unit you will need round balls, a hand pump, fishing line and a special template. It is necessary so that all the balls have the same diameter. The template is cut out from a sheet of cardboard.
How to make a unit out of balloons:
- Inflate the balloons and tie them in pairs.
- From twos we make fours, tying the pairs with a cross. Each four is a basic element of the figure.
- A piece of fishing line is tied to a support (for example, to a table leg) - the base of the unit.
- Fours are strung on the fishing line. The balls are attached with several turns of the fishing line around the joint. You need to make sure that each four is adjacent to the previous one, and the balls line up in one line.
- The next stage is the formation of the “body” of the unit, the process is the same.
- Next, the “tail” of the number is made; two “fours” are enough for it.
- The last stage is connecting all the elements to each other using fishing line.
The unit is ready. For greater stability, its base is made heavier by attaching a weight to the fishing line.
When to use aero mosaic decor
In principle, the design of the boxes and the color palette allow the use of aero mosaics for any event, even the most prim.
The frames are fairly large, stable structures that have been tested not only indoors, but also outdoors. Figures using the aerial mosaic technique can become an independent photo zone or be used as one of the decorative elements.
The height of the frame is most often from 1 to 2 meters high. Smaller ones are difficult to design using the aeromosaic technique, larger ones are too expensive to produce, install and transport.
I’ll quickly go over the most popular events for which similar decor is appropriate:
Numbers made from balls inside a frame
Children's birthday
A huge frame with a number symbolizing a birthday is the most popular order. Beautiful ones, twos, fives, filled with balloons of different diameters, go well with paper decor and different-sized balloon garlands. Children next to such numbers seem very small and look like cartoon characters.
September 1
Schools purchase reusable structures to install a photo zone with the number of the educational institution. And by September 1, classes are often decorated with numbers and letters with the name of the class: 1A, 7B.
High school graduation
Gorgeous photo zone! Four numbers - the year of graduation, made using the aerial mosaic technique, with a height of, for example, 120 cm (in this case, the graduates stand behind the decorative elements). With larger figures, you should take pictures in small groups on the right or left, so as not to cover all the beauty. Instead of numbers, spectacular stars, abstract figures, and hearts are chosen for graduation.
New Year
The idea is suitable for shopping centers, banquet halls, children's clubs, schools, etc. Four numbers with balloons in honor of the new year, a couple of balloon fountains, and your holiday is decorated in an impressive and modern way. For the New Year, many frame manufacturers have blanks for huge New Year's balls, Christmas trees, Santa Clauses, snowmen, etc.
February 23
In offices, photo zones are often set up in the common foyer or on the floor when exiting the elevators. To congratulate defenders of the fatherland, frames of the numbers “2” and “3” with balloons in camouflage shades or in the colors of the Russian flag are often chosen. Festive and noticeable!
March 8
The number “8” on such a day often appears in offices, cafes, shopping centers, and beauty salons. A frame with balls favorably complements a photo zone made of paper decor or fountains made of balls.
Anniversary
Congratulating the hero of the day in the office can begin by decorating his workplace with chic designs in the form of numbers. There are a huge number of examples of different color schemes on the Internet. For the hero of the day, metallized balloons of different shades are often chosen in combination with matte balloons. A great combination of textures inside one frame!
DR of the company
A photo zone for a company's birthday can be quite large. In this case, the frames will be made to order; final assembly is most often carried out on site. The numbers can also be placed on the street if your office is located in a separate building. When creating a rigid structure, materials that are not afraid of moisture will be used.
From cardboard and napkins
The simplest, but very beautiful way to make a three-dimensional figure is to use hard cardboard for the main frame. After this, it can be decorated with paper flowers or corrugated paper.
There are several options for making a large and beautiful number.
Flat digit
The first, most simple one, is to make it from one flat piece.
The blank is cut out of cardboard. Ordinary cardboard boxes used for equipment will do.
Or sheet corrugated cardboard. The parameters of the product depend on your imagination, as well as the size of the source material.
After the base is cut out, you need to select the material with which the number will be wrapped. This can be twine or simple knitting threads. The color is chosen individually, however, there are unspoken rules - all shades of blue are suitable for a boy, and red and pink are suitable for a girl.
Next you will need colorless glue, which is better if it dries quickly. We use Moment Crystal glue.
In addition, you can take molar tape.
Glue one end of the rope to the base of the number. Then we glue the base and wrap it tightly with threads so that the cardboard is not visible.
The finished number can be decorated with flowers or any other decorations.
Volumetric figure
The second is a three-dimensional figure, which looks much more massive and beautiful.
We cut out two front blanks from cardboard.
You can change these parameters yourself.
Then we cut out the sides.
We connect them to the front sides using masking tape and colorless glue.
Ultimately, you should get a volumetric figure.
The finished piece doesn’t look very nice, but it doesn’t matter, since we will decorate it with paper flowers.
We will make flowers from napkins of the same or different colors. It all depends on your imagination and desire to make something extraordinarily beautiful.
There are a huge number of options for making artificial flowers. We will look at some of the simplest, but no less beautiful examples.
Option 1
We will need regular napkins,
paper stapler,
scissors and colorless glue.
Step 1.
We take one single-layer napkin and cut it along the seams on all sides to make single squares.
You should end up with four squares.
Step 2.
We bend the resulting squares in half and cut them again.
You should end up with eight rectangles.
Step 3.
We bend the rectangles again and cut them.
This makes sixteen small squares. We will use them to compose and make flowers.
Step 4.
From the resulting squares we make a snowflake.
Approximately 5-7 squares will be needed for one snowflake.
Step 5.
We fasten the snowflake with a stapler exactly in the middle.
Step 6.
Then from each square we form a petal of the future flower.
After all the squares have formed into petals, you should end up with a flower that looks something like this.
Step 7
We drip a little glue onto the back surface of the flower and glue it to our cardboard blank.
You need to glue the flowers as close to each other as possible so that there is no open space. Ultimately, you will end up with a big and beautiful number.
Option 2
This option takes a little longer, but in the end, the figure will look much more effective. We will make not monochromatic, but multi-colored flowers.
Take two napkins of different colors, for example, pink and light yellow, and cut each napkin in half.
Then fold each napkin twice to make squares.
Place them together and secure them with a stapler exactly in the middle.
You should get a multi-colored square.
Carefully cut out a circle from the resulting square, cutting off all the corners with scissors.
We cut the resulting circle perpendicular to the center. The depth of the cut is 1 – 1.5 cm, the distance between cuts is 1 cm.
After this, we peel off each leaf to form a petal.
You should get a multi-colored bud, which must be carefully straightened so as not to tear.
Glue the flowers to the cardboard base. You can make a gradient - a transition from one color to another. The end result will please you.
Shapes filled with balloons
The aero mosaic technique is used to make not only letters and numbers. There are almost no restrictions for frame manufacturers; they make quite complex structures with rigid partitions inside. Decorators can fill each closed area with balls of different colors, so almost any idea becomes an element of decor.
Professional holiday
A steam locomotive on Railway Worker's Day, a pharmaceutical company logo, a house or trowel on Builder's Day. Together with the decorator, you can come up with an expressive design that will certainly become a spectacular decoration for your professional holiday.
Children's themed parties
Using the aeromosaic technique, you can make vegetables and yellow leaves for the autumn holiday, snowmen for the New Year, pirates, unicorns and sea creatures for a birthday, and repeat your favorite toys for graduation in kindergarten. I recommend getting inspired by ideas on Pinterest, for example.
Design of exhibitions, opening of stores, beauty studios, car showrooms, etc.
Also a fertile topic. Exhibition pavilions try to attract visitors in every possible way, so large figured frames with bright balls are an excellent solution. The company logo or the most popular product in the form of a figure with balloons will definitely not be ignored by visitors.