- November 17, 2018
- Needlework
- Irina Kotova
Today, large artificial flowers are a popular decoration at any event: children's parties, weddings, birthdays, and they are also often used in photo shoots. Such products bring tenderness, beauty and sophistication to any interior. Real flowers are short-lived, so they are replaced by artificial ones. This decor can be created using paper and other materials. In this article, we will look at how to make a large flower on a large stem.
Product advantages
Large flowers for decorating a room are an excellent alternative to fresh flowers and have many advantages:
- Unlike real flowers, paper decor does not fade or crumble.
- The creation process is interesting and exciting, and children can also be involved in this type of activity.
- When decorating, such voluminous flowers can be easily attached using pins, glue or tape.
- In financial terms, fresh flowers are inferior to artificial ones.
- Using your imagination, you can create any flowers to your taste.
Photo of large flowers in the interior
Huge flowers delight everyone and give a feeling of magic. They can become the highlight of most holidays - weddings, birthdays, March 8 and Valentine's Day. Large flowers look great in photos, but is it worth spending your time and money just for one day? Of course, these luxurious flower arrangements can become a decoration for your home, where they will please the eye for a long time and remind you of pleasant events.
In the living room, corrugated paper flowers will become an unusual decorative element that will attract everyone's attention. Flowers decorating the wall in the bedroom are a delicate, fabulous accessory, especially if this room is intended for a girl.
The photo shows a realistic peony placed on a white wall in the living room.
But when creating and using large flowers from corrugated paper, a logical question arises about caring for them. It is necessary to periodically clean them from dust that accumulates in the folds of the petals:
- This can be done using a fine bristled or feather brush. You need to carefully remove the dust by brushing over the flowers.
- You can also use a hair dryer in cold blow mode. If you turn on a hot stream, the petals will lose their shape. The air flow should be minimal.
- Another option, but for the advanced, is a can of compressed air, which is used when cleaning the keyboard.
In addition, it is not recommended to place and hang dark or bright flowers near windows: in sunlight, corrugated paper can simply fade.
Paper flowers
To make a large flower on a large stem, you can use a variety of paper and other materials:
- colored paper;
- cardboard;
- white paper;
- craft;
- musical notation;
- silk, organza;
- corrugated paper.
- disposable tableware.
The list doesn't end here, you can experiment with other different materials and create your own works of art.
Rainbow of shades
For a bouquet you will need to make five or seven flowers. For each flower, you can take an individual color or combine shades, for example: red with pink, blue with light blue. You can use spray paint and glitter.
Thanks to the imagination of craftswomen, such masterpieces can be created and used as a gift.
Technique for making large flowers from corrugated paper
This material is light and airy, which is great for creating decor. Its structure makes it easy to fluff and produce flowers similar to natural ones.
The following is a step-by-step process for making large paper flowers:
- You need to prepare rectangles of the sizes you need from corrugated paper or other material.
- On these blanks we make cuts on one side. It is the length, width and shape of the cuts that influence what kind of flower you get in the end.
- The finished flower bud is attached to a rigid aluminum wire pre-wrapped with green paper. To decorate the stem, the paper can be replaced with tape or satin ribbon.
- Then leaves are attached to it, the template of which can be drawn with your own hands.
This option is the easiest to implement. If you do not add wire to the product as a stem, you will get an interesting interior decor. Such large flowers on the wall will look interesting and original.
Let's talk about materials
When it comes to life-size flowers, you may not immediately believe that this beauty is created from paper. But the corrugated one has unusual properties - in the article on making small flowers we looked at them in detail. Let us remind you that for tall giants, crepe paper with a density of at least 120 g with A and B flute (folds 1.6 and 3.2 mm deep) is most suitable - this will allow the petals to keep their shape.
But! Not all life-size flowers are made from thick corrugated paper. There are models whose petals should bend, curl or fall freely. For these colors, thin paper is used.
These balls do not require thick paper; thin paper for children's creativity or marked fine crepe is also suitable.
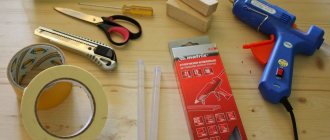
To make large flowers, also prepare auxiliary materials and tools:
- thick cardboard for the base;
- scissors or knife for cutting blanks;
- heat gun - large petals are easier to connect with hot glue;
- wire for the stem frame;
- round nose pliers for bending wire;
- fabric, thread, cotton wool for filling the base or for combining materials;
- foam balls or plastic containers as a base.
You will also need: imagination, good mood and a little magic...
Paper dahlia
To create such a flower you need:
- Cut paper of various shades into rectangles or squares, roll and secure with a stapler or glue.
- From the outside, we glue the first row of cones to the cardboard base and gradually rivet the blanks from the outer edge to the middle.
The leaves and stem are made in exactly the same way as described above.
Creative ideas
The technique for creating flowers differs insignificantly; for work, in addition to napkins and corrugated paper, they use:
- colored thick paper;
- cardboard egg trays;
- toilet paper;
- old postcards.
Small mimosas are made like balambos: long narrow strips are cut, they are wound on a magazine twisted into a tight bundle. It is carefully pulled together, then the edges of the bundle are folded in the middle and secured tightly.
Minecraft from paper - a selection of master classes on creating models from the game
How to make a tank out of paper - simple and clear master classes on creation (65 photos)
The resulting loops are cut, and the resulting petals are fluffed. Another idea is a lot of small bags glued together on the sides. This technique is used to make dahlias that resemble natural flowers. Asters will be made from wide strips, 2/3 of one side cut “into noodles.” They are rolled into rolls. Roses are made in the same way.
Rose from an egg carton
A small master class will awaken your imagination; for work you need to prepare:
- part of a tray with convex pyramids between the cells;
- scissors or stationery knife;
- paper for making leaves;
- paints;
- glue.
Let's get started:
- Pyramids are cut out; this is the future part of the bud;
- Petals are formed: each pyramid is cut along its edges, the upper platform remains intact. The edges of the 4 parts are rounded and unbent.
- The bud blanks are painted and dried.
- A rose is formed: a bud is made inside: the edges of the petals of one piece are glued together on top. Then rows are added along the surface.
When making a large rose, additional individual petals are glued on the outside.
DIY paper crafts - a selection of creative master classes, photo ideas, tips
How to make paper stars with your own hands - step-by-step master classes
Fluffy hyacinth
It is made from colored paper. It is cut into strips 5 cm wide, the length is arbitrary. We cut the strips into fringes 1/3 of the thickness; these are the future petals. The strip is wrapped on top of the sushi stick so that after bending the fringe the wood is not visible.
After this, each petal is wrapped on a pencil. For simplicity, the strip is laid on toilet paper, the entire fringe is immediately twisted, and only after that it is attached. The bottom of the stick is decorated with colored corrugated paper; hyacinth leaves are long, narrow, pointed, and made from thick double-sided paper. The original flower is fixed on a stand or placed in a vase.
Lilies
To make large lilies, you will need two plates of different sizes - a large one and a smaller one:
- Using the large one, we outline a circle, this will be the base of the flower, and then we draw the petals, outlining the small one.
- You will need three of these blanks: cut out two petals from one, one from the second, and cut the third one petal at a time.
- Now all that remains is to assemble and glue all the forms: we roll and glue the blanks.
- Then we glue the petals from larger to smaller to form a flower.
- Glue the base on the bottom.
Interior transformation
Large paper flowers will add color and joy to any room. By fixing them on the wall, you can decorate the space of your desktop or corridor with a delicate flower arrangement.
Thoughtful decoration using panels visually enlarges the room, adds light and hides the irregular shape of the room. Guests will immediately ask the question of how to make large flowers with their own hands.
Note!
Amigurumi for beginners - photos of the best toys, a master class on knitting items with your own hands step by step
DIY bear costume: step-by-step master class for DIY sewing. Costume design options for the New Year
Bead weaving patterns for beginners - step-by-step instructions with photos and descriptions
Peony
Stage of work when creating a large flower from corrugated paper on a stem with your own hands:
- Cut out several circles of different shades and sizes of the desired color.
- We cut out wavy edges from one part of the blanks, and teeth from the other. We attach the leaves to each other from largest to smallest.
- To give the correct shape, you need to crush the flower with your hands and give it volume.
MK: flowers on a stand
To create a large flower on a stand, there are several ways. Let's consider one of them, making a delicate peony from corrugated paper. To make the stem, metal-plastic pipes are most often used, which bend and hold their shape, as well as PVC pipes and cement.
The photo shows large flowers on stands to decorate the room.
Tools and materials:
- Corrugated paper pink and green (3 meters).
- Cardboard circle (any box will do).
- Metal-plastic pipe (20-25 mm, sold in the plumbing department).
- Glue gun.
- Ruler.
- Scissors.
Step-by-step instruction:
- Let's get to work. Take 3 meters of paper and fold it in half along the long side. We measure a 6 cm segment from the edge, fold the paper into three layers:
- We cut the workpiece as shown in the photo, leaving about 3 cm from the bottom:
- We cut the accordion on both sides, giving it the shape of a petal.
- Its size should be approximately 20x8 cm:
- Using the same pattern, cut out a strip 1 meter long:
- We proceed to the second meter, but this time we increase the elements by 2 cm (22x10).
- The third part should have petals measuring 24x12 cm.
- We twist the ends of the blanks:
- We straighten the paper and stretch it a little:
- We make a circle of cardboard with a diameter of 30 cm. We cover it with corrugated paper.
- Take a glue gun and fix the smallest part in the center of the circle. The petals must be glued one at a time.
- Glue the other two parts in a circle, gradually increasing and straightening the flower. To give it more splendor, you can glue in additional petals.
- Let's start making the stand. We bend the metal-plastic pipe so as to make the base stable. If necessary, we decorate it with green corrugated paper, securing it around the pipe, or paint it.
- We fix the cardboard circle to the upper edge of the “stem”:
- Firmly glue the barrel to a large cardboard circle:
- We decorate the base of the flower with corrugated paper.
- This creates large, realistic peonies.
Here you can see detailed instructions for making a large peony using the ribbon method:
And how to make a stand from cement and plastic pipes at minimal cost is described step by step in this video:
Large flowers made of foamiran
This decorative material is highly flexible, easily stretched, embossed, cut and painted. He is not afraid of temperature changes or moisture. It does not wrinkle and retains its appearance and color perfectly. Flowers made of foamiran, or, as it is also called, “artificial suede,” look very natural and impressive, and they also do not wrinkle and are easy to clean.
What tools are needed to work in this technique?
The basic tools for making large and voluminous flowers are:
- curly and regular scissors;
- glue gun (you can use Moment glue);
- iron (an alternative would be a lighter or hair straightener);
- if coloring is necessary, use oil pastels or wax crayons;
- stacks with various tips or toothpick;
- wire.
Undoubtedly, this list must be supplemented with the material itself, which will be one of the important elements in creating a flower. Other improvised means such as foil, tape and more may also come in handy. It all depends on what method and model of flower you plan to make.
giant flower
You will need: colored thick paper, a sheet of cardboard, scissors, glue.
Master Class
- Create patterns for the petals: 6 large, 6 medium and 6 small.
- Cut out the petals.
- Make cuts at the base of the petals.
- Curl the ends of the petals away from you.
- Flip the petals over and glue the ends close to the cut, forming a natural petal shape.
- Glue 6 large petals together in a circle.
- Glue the middle petals, and then the small ones.
- Glue a piece of cardboard to the bottom of the flower.
- Fold the sheet in half and cut the “brush” from the fold side. Repeat this process with two more sheets.
- Separate and unfold the cut sheets.
- Roll the first leaf, then add the rest to create a core.
- Glue the core to the center of the flower.
The giant flower is ready! I recommend watching this video!
DIY tulip from foamiran
For this decor you will need:
- foamiran of different colors - for buds and leaves;
- scissors;
- wire;
- glue;
- thick cardboard;
- knitting needle or toothpick;
- dry pastel (crayons);
- green tape;
- foil;
- iron.
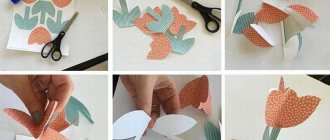
Work stage:
- We take a suitable petal template or draw it and then cut it out. A toothpick or a thick knitting needle is suitable for this. To make one flower, you need to create about six petals.
- Add color using dry pastels or chalk. Make the top part a little lighter than the bottom.
- To give the desired shape, you should use an iron in the “silk” mode: stretch out each petal in width and length and make a small indentation with your fingers.
- We apply the sheet to the iron and then roll it along its entire length.
- To make a bud you will need foil from which you need to roll balls.
- We glue three petals onto the finished ball. We apply the following ones in a checkerboard order.
- To add flexibility, glue the wire in the center of the leaf.
- Wrap the stem with green tape.
- Attach the leaves and the flower is ready.
Materials and components
When making roses from corrugated paper, it is not necessary to follow the instructions 100%. It will be better if you show resourcefulness and ingenuity. Materials can be replaced and forms adjusted at your discretion. And if you want to do something unusual, you can use caramel or cotton candy to form a flower core - children will be delighted with sweet roses with a secret. So, what do you need and how can you replace this or that material:
- Corrugated paper (colored toilet paper, multi-colored paper napkins);
- Wooden skewers (wire, thin twigs, etc.);
- Colored paper (green, red or other colors). You can, of course, get by with white or use paints;
- Concentrated sugar syrup or office glue (imitation dew), small stapler;
- Maximum imagination and additional elements, according to your creative plan. You can’t do without this!
Option 1 “Royal Rose”
Based on the first diagram, prepare corrugated paper in the natural colors of the royal rose - white, delicate pink, juicy purple, poppy red, etc. Then proceed step by step:
- Randomly cut the petals into various shapes (smaller-larger, wider-narrower);
- On the flower “leg”, wrap a strip of corrugated paper (core) with a roller and fix the workpiece (tie it with thread);
- Instead of a corrugated roller for the “heart” of the rose, you can use caramel or wrap a little cotton candy around the stem of the flower - the core will become sweet;
- Holding the petals with your fingers, form a flower by randomly placing leaves on the core, layer by layer. Fix the petals at the base (tie with thread);
- Mask the binding of the petals with a flower corolla cut out of green colored paper (secure the corolla with glue), as in the picture;
- Wrap the peduncle with brown paper (the effect of a woody rose trunk) or use the same green color (paper, gouache, foil - at your discretion);
- Apply drops of glue or thick syrup to the rose petals (dew) and let them dry.
Option 2 “Sudanese Rose”
Do you know how to make a spectacular Sudanese rose in just 5-15 minutes? Everything is even simpler than in the case of the royal sister of the queen of the gardens. In addition to the standard set of materials, you will also need a stationery stapler. The latter, if you show your imagination, you don’t have to use. Looking at the picture below:
Cut two (or more) identical circles from the corrugation and stack them on top of each other; Having grabbed all the mugs, roll them into a single “ball” (as for seeds) - it’s very simple; Retreating 1.5-3 cm
from the top of the cone, secure the workpiece with a stapler, punching the “bag” through with a paper clip; Carefully turning the structure inside out, make the top of the former cone the core of the future flower (it will be more difficult to turn it inside out, the more circles you initially took); Prepare the stem by wrapping a wooden skewer in green construction paper, which can also be used to make stem petals; Insert the stem into the flower and, if necessary, additionally secure the connection (glue, tying a thread from the inside of the rose, etc.); Fluff the petals as desired, give the flower bowl the required shape, decorate the rose with “dew”.. Having made one rose from corrugated paper, proceed to the next one - you will get an impressive bouquet that you won’t be ashamed to give as a gift or place in the living room
And if your royal rose turns out well, make a new one of gigantic size - you will amaze everyone with your decorating skills
Having made one rose from corrugated paper, proceed to the next one - you will get an impressive bouquet that will not be embarrassing to give as a gift or place in the living room. And if your royal rose turns out well, make a new one of gigantic size - you will amaze everyone with your decorating skills.
Popular articles Cool congratulations on March 8, 2021. Wonderful verse on March 8
Gigantomania
From corrugated paper you can make not only standard-sized roses, but also huge ones. They are also used mainly for decoration, but you can also organize a cool photo shoot. We look at the manufacturing process in the video.
If you like making paper flowers, pay attention to our article about a paper tulip using the origami technique
Rose from foamiran
To create a rose you will need:
- foamiran;
- corrugated paper;
- foil;
- lighter;
- dry pastel;
- wire with a diameter of 3 and 0.7 mm;
- glue;
- scissors.
Work stage:
- We print out the desired petal template or draw it ourselves. They must be different sizes.
- We make a base that looks like a five-pointed star.
- We cut out flower blanks from foamiran according to the template in the following quantities: small - 12, medium - 10, large - 7, largest - 5 pieces.
- We paint the edges of the petals on both sides with crayons or dry pastels to your taste.
- To make the petals of a raging rose more pliable and softer, they should be folded in height like an accordion and rolled into a tube, and after a few seconds straightened.
- To add naturalness, you need to use a lighter: place the petal with the corner facing you, heat the middle of the workpiece from below and, while the material is warm, make a depression with your hands.
- We pass fire along the edge of the petal, causing them to become bent inward.
- We repeat this procedure with each workpiece, but the recess should be made in ascending order. Thus, on large ones it will be larger than on small ones.
- We select the wire for the stem depending on the height you want the finished product to be.
- We make a drop shape from foil and glue it to the center of the prepared base.
- We start collecting from small petals. The first four pieces are completely coated with glue and glued to foil. We cover the remaining ones with glue only halfway and also fasten them on the foil in a circle.
- We glue medium-sized blanks slightly overlapping each other and apply the glue below the middle of the petal.
- We lubricate seven large blanks with glue only from the bottom and also place them in a circle.
- In order to attach the last, largest petals, you need to tilt the bud down and glue the blanks in a spiral, using even less glue.
- To make leaves we take foamiran. Draw and cut out ten leaves.
- We paint this blank on both sides with pastels or green crayons.
- Using scissors, we make small indentations on the leaves. It is advisable to perform these actions with the tip of a cutting object so as not to push the material through.
- On each piece, add a brown or dark green tone along the edges.
- The next step is to collect the flower: to do this, you need to fold the base to the size of one part, twist it into a tube and after a couple of seconds straighten it, without opening the corners too much.
- We twist the leaves of the flower in the same way.
- We take ten pieces of thin wire about eight centimeters long. We glue it on the inside of the leaves, placing it just above the middle of the workpiece.
- In order to create branches from leaves, you need to stack three blanks on top of each other, with the top element being one centimeter higher.
- Stepping back one and a half centimeters from the bottom edge of the leaves on the wire, we cover them with green corrugated paper. Then we open the lower leaves in different directions. The thread is ready.
- You will need at least three of these branches.
- We return to our flower, which stands with the stem up and the bud down. From the scraps we cut out small pieces with a diameter of one and a half centimeters and thread them along the wire to the base of the flower.
- We wrap the stem with green corrugated paper. We fix the branch from the base of the rose downwards and at a distance of 10 cm.
- And we place the remaining branches along the length of the base. Our DIY foamiran flower is ready.
How are large paper flowers used for home decor or photo zone?
Oh, every fashionista dreams of capturing herself next to such a tender photo zone. Giants are used for photo shoots at weddings, anniversaries and other important events. After all, it is important to create a beautiful background. By the way, this composition is also popular for magazines and even clothing collections. I think that such paper florists are in high demand.
See how one of the online stores brought their stand to life. Gentle, original and very feminine, isn’t it? Maybe you have your own business, then this idea can be adopted to create an image.
And our compositions look so easy in the interior of an ordinary apartment. Very unusual and bright.
An unusual idea of using origami techniques to create giants. Look how fabulous it is. The girl seems like just a fairy or an inch against their background.
When you don’t have much time, you can create such fantasy flowers in the shape of the sun yourself. Use a regular landscape sheet for small fragments, and sheets of whatman paper for large ones.
You can make this decor as follows. Fold the sheet lengthwise into an accordion, tie the middle and unfold each side. Glue the edges of one side to the edge of the other.
Cover the center nicely with a paper circle.
Paper dandelions captivated me. By the way, the top of the inflorescences can also be made using toilet paper, as I described above.
Decor idea for a children's party.
See how you can combine several types of petals. Light and pastel colors almost all combine with each other. The main thing is to take all the tones of the same saturation so that a single whole is created, and not so that one bright element attracts all the attention.
Make an imitation of wisteria. It comes in such different shades that you can choose almost any color, but I would prefer pink and lilac tones. They are more natural and natural.
Try to choose paper of the same tone but of different saturations, from dark to lighter.
First we need to make the blanks. To make it faster, fold the strip of paper several times.
Cut out the drop.
Wrap the base of the workpiece.
Now bend this tail inward. To make it stick better, you can fix it with glue.
This is what we got. You need at least 20 blanks of each shade.
We string the workpieces onto a strong thread at the base, wrapping each subsequent one in the other direction.
Now these petal threads can be tied to the base you decide to use. If you have a suspension, as in the photo above, then for the base, select a hoop of the required diameter.
From isolon
Izolon is a production material that serves for insulation and insulation, and can be purchased at construction stores. But despite this, it is great for making decor. Below is a video that details how to make large decorative flowers on a stem from this material.
The advantages of isolon are:
- it doesn't burn, it just melts;
- lasting;
- tolerates weather surprises well, making it great for outdoor events;
- easy to cut and process.
The disadvantages of isolon include:
- Small variety of palette. The main colors are white, yellow, green and red.
- It does not glue well, so when creating decor from isolon you should use a glue gun. This material can also be sewn and stapled.
For what events can you order full size flowers?
These flowers are called growth flowers for one simple reason - together with the stem, they have a height of 150 to 250 cm. Adults next to them look like Thumbelina and beautiful elves. The voluminous buds look fabulous in daylight and artificial light; all guests of the event must take pictures in such a photo zone.
This is what large flowers look like on stands:
- Weddings, anniversaries, children's parties, graduations, corporate events, city holidays.
- Conferences, fashion shows, presentations of cosmetics, perfumes and other products for women, wedding and jewelry exhibitions.
- Window decoration.
- Stage design for reporting concerts of music and dance studios, etc.
Rose from isolon
To get a rose like in the picture, you will need:
- isolon of any color for making roses (thickness 3 mm) - 1 meter;
- the same green material for creating leaves - 35 cm;
- glue gun;
- foil;
- wire;
- corrugated paper;
- cardboard or towel roll.
Work stage:
- From this material we cut three squares of different sizes: 23 x 23, 25 x 25, 27 x 27 and four rectangles 15 x 30.
- To form a flower you will need foil to make a ball out of it. Glue it to a towel roll (or you can make one similar from cardboard).
- Cut out leaves from the squares.
- We hold the blanks over an industrial hair dryer and, while the material is soft, we create a certain shape.
- Using a glue gun, glue the ball with petals. To avoid angularities, we blow the bases of the petals with an industrial hairdryer and, after softening them, press them with our hands;
- We cut out the base for the leaves from isolon, shape it using a hairdryer, make crosswise slits and put it on the sleeve;
- We cut out the leaves at random or according to a template.
- We wrap the wire with corrugated paper and glue it to the leaves.
- On the reverse side we glue a strip of isolon onto the wire.
- Using a hairdryer, shape the leaves.
- We screw our leaves onto a flower stand wrapped in isolon.
- We put a rose on top, and the flower is ready.
Single flower or composition
Decorators often suggest making 3-5 flowers of different sizes at once, since when assembled, the result is a spectacular composition with gracefully curved stems and buds facing the light at different angles. In addition, if you order several life-size flowers in the same color scheme, you will receive a discount.
The composition uses buds with a diameter of 50 to 90 cm. The decorator can make long flexible stems - in this case, people find themselves inside a giant bouquet. Large buds are sometimes placed at a short distance from each other, then the effect of a flower carpet is created. Both options are very popular for window dressing and as holiday photo zones.