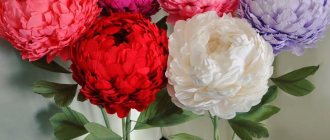
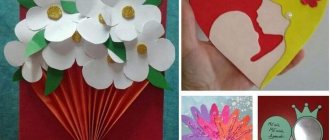
What will we make today? DIY large flower made of corrugated paper. I'll show you simpler and more fun ways. How can you use such crafts? Of course, decorate the room. Large flowers are the best gift. You can make an interesting background for a photo shoot. Do you have any ideas? Tell us about them, please.
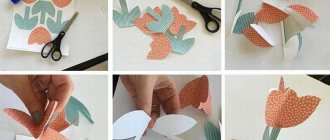
Master class on a very simple method
The first time I saw such a flower, I thought that a lot of time and effort had been invested into it. And that it was done by a cool professional, but after watching the master class I realized that anyone can do it, even a 5-year-old child. And the result is incredible. You can combine different colors to create a wall of flowers for a photo shoot.
All we need:
- Corrugation or silence;
- Scissors;
- Wire.
Making:
We will need 2 multi-colored sheets of paper. Pink – 33 cm wide. Yellow – 16.5 cm. Length of both – 51 cm. Yellow rectangles – 2 pcs.; pink – 7 (5 – dark pink and 2 – light). And also green - 2 pcs. green is the same size as pink.
We put all the sheets like this: green at the bottom. On it - 2 dark pink ones, then a light one. Again 2 dark ones. Light again. The next layer is dark. Top middle – yellow.
We fix the sheets on one side with a paper clip.
We begin to fold it like an accordion on the other side. If necessary, cut off the excess edge, trimming it.
We bend it well so that all the bends are fixed.
Separate yellow, green and pink.
Fold the yellow accordion in half. We make cuts 2-3 cm deep from the edge.
Fold the pink accordion. We cut and round the edges (first on one side of the strip, then on the other).
We also fold the green accordion in half and cut off one corner from the edge.
Again we lay out the accordions one on top of the other, just as they lay before. We make sure that they do not move to the side. Place folds within folds.
We collect and trim. We tie it in the middle with wire.
Carefully take out each layer and lift them up. First yellow, then pink.
And at the end - green. Only the very last green layer is not raised up.
When all the leaves are raised on one side, straighten them.
We do the same on the other side.
DIY large flower made of corrugated paper. Author MK
Such a flower will look very cool in the interior of your apartment. They can be used to decorate curtains, walls, or make a whole bouquet in a vase.
What paper is best to use
To create flowers, you can use a wide variety of paper and other materials. If you show your imagination, then the following will come into play:
- cardboard,
- colored,
- white,
- corrugated,
- musical notation,
- craft paper,
- toilet paper rolls,
- disposable tableware,
- starched fabric (silk, organza).
It is good to make such decorations together with children. For example, for a holiday at school, students can not only do a large amount of work, but also enjoy it and realize their creative abilities.
Advice! Making flowers from paper is an interesting idea for a craft lesson in kindergarten or school, especially if you later decorate the class or group with crafts.
It is also useful for adults to engage in such creativity. Moreover, hand-made paper flowers for the hall will cost several times less than buying ready-made ones.
When choosing shades, you should keep in mind the general style of the room, the nature of the celebration, and the main color in the room.
Also for creativity you will need glue, tape, threads and a needle, wire, pins, tinsel, beads, ribbons and other additional decor.
Volume peony
This kind of work is more difficult. But it's worth it. The flower looks amazingly beautiful.
How to make such a peony. Cut a strip across the entire width of the paper roll. The width of such a strip is 15-18 cm.
Fold the strip in half. We round the edges, narrow the bottom.
Make small folds at the base. We fix these folds with glue.
We bend the middle of the workpiece inward.
Separate 2 leaves.
We will need 10 pieces of such blanks.
We will need a plate-shaped base to which we will glue our blanks.
We distribute 10 blanks along the edges of the base.
We make smaller petals in the same way. We will need 7 pieces of such blanks.
We fill the middle part with them, gluing them in a circle.
The middle of the base remains free. We fill it in 2 rows with yellow blanks.
The first row is petals, only very small.
Second row - fold a strip several times as wide as the previous petals. We cut the edges.
Straighten the strip, roll it into a roll and glue the edge.
On the side where the cuts are, fluff them up and bend them slightly with the palm of your hand. Glue it in the middle.
We bend the edges of each leaf in a wave-like manner.
Thanks to the durable base, the flower can be hung on a wall or door. You can choose the dimensions of your design yourself.
Author of the master class
Pictures of autumn leaves that you can cut out and print for decoration.
To decorate halls or entertainment events, various kinds of items are often required that would convey the entire atmosphere of the celebration. As you might have already guessed, they will be multi-colored colored leaves. Which you can easily print on a printer and cut with scissors. Use them to decorate groups, classrooms or even verandas, doors, walls.
Poppy
I’ll tell you step by step how to make this huge poppy. I'm sure you can make one so beautiful.
Make a ball from plain white paper. We will make 2 flowers at the same time, and therefore 2 balls.
We wrap each ball with yellow corrugated paper.
Crosswise tie the ball with black thread (several times). And we tie it crosswise again to make 8 rays. The centers of the poppies are ready.
We cut the edges of 8 rectangles on one side, without cutting to the end.
We glue these “rectangles” at the bottom of the balls so that the “fringe” looks up and frames the middle.
We cut out large petals from red paper - 8 pieces for one poppy.
We stretch the edges of the petals a little and give them a wavy shape.
We make folds at the base, bending the edges towards the middle.
This is what the petal should look like.
Glue the petals to the bottom of the ball in a circle in two rows. Shape the flower.
What do you think of this model? I love poppies, which is probably why I already wanted to make many, many of these poppies to decorate my home.
Adviсe
If you are preparing for a celebration, you need to start preparing decorations in advance. Firstly, you will not rush, and secondly, you will practice and get better at it. It is especially worth practicing if you want to make flowers using the origami technique or some complex model. It is better to start preparing for a serious celebration a couple of months in advance.
Make a sketch first. When you know what you want to get, it will be easier to choose paper and compose the entire composition.
Designers do not recommend making large letters and numbers yourself. As a rule, the result is far from ideal. If you can’t do without them, then letters made from paper flowers will look much better than ones simply cut out and painted.
Ranunculus
Remember, we already talked about how to make a large ranunculus flower. Then we used a different material, isolon. Today we will try to look at such a corrugated model step by step. True, this flower is not gigantic, but it has the potential to become big. Just increase the base of the ball and the size of the petals by 2-3 times.
Let's cut out the following details from paper:
- light pink and pink – 6 by 3.5 cm;
- green – 3 by 5;
- yellow or light green – 6 by 11.
We also need a paper ball on a leg.
We wrap the ball in yellow paper. To do this, twist the sheet in the middle. Apply it to the ball and straighten it. The sheet completely covers the ball; we twist the edge of the sheet from the bottom. Then green again. Fix the bottom with glue and curl the edge.
All other rectangles have corners rounded on both sides. To do this, you can fold the rectangle in half and then round it.
We give the green oval leaves a shape by arching the middle.
Lubricate the length of the lower part of the petal with glue and fix it to the ball base. So we form and glue all the petals in a circle.
Then we glue the light pink ones. And at the end - pink.
Fold the dark green strip 4 times. It turns out to be a rectangle. Cut off 2 corners of this rectangle on one side. On the other hand, we cut the strips at an angle so that they are sharp at the edge.
Straighten the workpiece. At the base of the “teeth” we stretch it a little.
We grease the corners of the green strip and glue it at the base of the ranunculus.
The size and splendor of the flower is up to you. You can make small flowers, or you can make huge ones. The splendor will depend on the number of petal blanks.
Author MK
Pros of paper flowers
This decor is an excellent alternative to, albeit beautiful, but familiar fresh flowers, balls and draperies.
- Paper compositions do not fade or crumble.
- Much cheaper than real bouquets bought at a flower shop.
- There is no need to spend money on a florist; you can create decorations yourself.
- The manufacturing process is simple, but interesting, you can involve children in it.
- Easy to attach - just need pins, glue or tape.
- It's easy to clean the room after the holiday.
- You can make inflorescences of any size and type, including the most exotic and fantastic.
Chrysanthemum
How to make such a lush chrysanthemum with its huge number of small petals? And how to choose a color scheme to make the model look like it’s alive? This detailed MK is about this.
We will need:
- 3 shades of blue crepe paper;
- Dark and light green for leaves and stems;
- Tube (from foil or paper towels);
- Scissors;
- Ruler;
- Glue gun;
- Circle made of cardboard, diameter 32-35cm;
How to do:
The outer leaves are the darkest. We cut strips 50-51cm wide along the entire length of the roll.
We cut each such strip into 25-25.5 cm. And then we cut the rectangles in half.
Fold each rectangle in half. Cut off the corner at the base of each petal. We cut the other side to make 3 parts with rounded edges. The middle part is slightly longer than the sides.
We stretch the petal a little along the edge, and then in the middle.
We glue all these petals along the edge of the cardboard circle, at a short distance from each other.
The next ball of petals is glued in a checkerboard pattern. Between the petals of the first circle.
We cut out similar petals from lighter paper and glue them to the base, alternating with dark petals.
From the next roll we cut rectangles 16 by 6 cm. Cut the corner from the bottom. On top – fold it in half and make a semicircle and a deep cut. As a result, we get an elongated heart.
We straighten the workpiece, stretch it and give it a shape; for this we stretch the edge of the petal and the middle. The petals seem to curl a little into a tube.
Glue between the petals, in a checkerboard pattern. We make 2-3 rows.
Cut a strip 13 cm wide into 3 cm pieces.
In each piece, cut off a corner from one edge. Stretch it in the middle, keeping the corner sharp.
And we make exactly the same blanks from light blue.
Glue the first row alternating these 2 colors.
The sharp corners of the petals should not lie down, they should stick up. This will provide volume and splendor to the structure.
The next row is only blue.
And the next one is only made of light paper.
Then a combined row of light and light green colors.
This is what our flower looks like.
For the middle we will need exclusively light green blanks measuring 13 cm by 3 cm and with a cut edge. And we will only stretch it in length. Using pressure, we draw across the workpiece with a ruler or scissors. Then the petal will curl a little, like a curl. But we only need the workpiece to take the shape of an arc.
We glue these blanks in several layers onto the edge of the cardboard tube (we cut off a part from the tube).
The last rows can alternate green petals with blue ones.
Cut out the empty center of the cardboard circle crosswise.
Fold the edges under and insert the pipe into the hole.
On the back side of the cardboard, glue the pipe to the bent edges and wrap it with tape.
Cut out 6 rectangles of 20 by 25 cm from dark green paper.
From each rectangle we cut out a leaf and stretch it a little along the edges and in the middle. These are sepals.
We glue them on the back side of the flower to the cardboard circle, overlapping each other.
Cut out a thin ribbon (3cm wide) from dark green paper. We stretch it a little in length.
We wrap the pipe with tape and place it on the glue.
We insert a PVC pipe into the tube. We also wrap it with tape.
To make a leaf, cut out a square. Cut it diagonally.
Glue it diagonally onto one half with wire. Cover the wire with the other half, gluing it on top.
Cut out a chrysanthemum leaf.
We bend and stretch the edges, forming the shape of a leaf.
We fix the edge of the leaf with glue and tape to the pipe.
Don't like blue chrysanthemums or want a lot of different chrysanthemums? Then take as a basis how such flowers are made and create something new, your own!
Author MK
How to position
Usually, the walls, curtains, and curtains are the first to be decorated. If there is a stage, then flowers are placed at the entrance and in the back. They are also attached along the ramp, simultaneously masking the equipment. You can place paper buds along the edges of the carpet.
The walls are decorated with voluminous or flat flowers of various shapes. You can create a composition from flowers of different sizes, leaves, ribbons, and add drapery. It is better, of course, to keep them in the same style or color scheme. Paper buds can resemble peonies, roses, daisies, poppies, or be of fantastic shapes. Sometimes large specimens have an island, and smaller ones are hung around. You can also cut out a flock of butterflies from paper of similar tones.
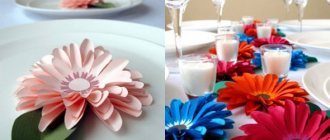
Above the festive table, with the help of flower arrangements, the places where the heroes of the occasion are sitting are highlighted. The photo shows how you can decorate the place of the bride and groom at the wedding table. For wedding decor, you can add paper butterflies or doves to the flowers.
Small flowers can be scattered on the floor. Garlands are used to decorate the ceiling and walls. You can decorate furniture with giant flowers or place them in the corners of the room.
The buds can be formed into letters and numbers, for example, to place them at the back of the stage. To do this, cut out bases of the desired shape from thick cardboard, and then glue flowers onto them. You can make them from colored paper napkins.
The ceiling is decorated with individual flowers or flower garlands. You can hang flowers on threads of different lengths. Such decorations look especially good under high ceilings. Suspended on thin threads or fishing lines, the inflorescences look floating and create a magical feeling. You can also hang them on ribbons. Such decor would be especially appropriate in a music or assembly hall.
Curtains or curtains can be decorated with flower arrangements, individual baskets or Hawaiian-type garlands. They also decorate a photo zone or screen background. At the same time, it is not necessary to fill the entire wall with flowers, although this is also possible - sometimes a few large ones and a scattering of small ones around are enough.
Aster
In this master class we will look at how to make flowers with very thin petals, for example, like those of an aster.
We will need:
- Lilac paper: 5 pcs. – 16 cm by 1 m, 3 pcs. – 20 cm by 1 m, 5 pcs. – 24 cm by 1 m.
- Pink: 10 cm by 1 m.
- Pliers;
- Wire;
- Glue gun;
- Scissors.
Making:
We bend a strip of 16x100 cm in half. We cut off the edge with sharp teeth.
Glue the wire inside along the fold line. And slightly gather the paper into a small fold.
We do everything exactly the same with strips 20 and 24 cm wide.
We cut the pink paper into strips (fringed), without cutting to the edge, and roll it into a roll.
We begin to assemble the structure from the middle. We twist the pink blank.
Glue this blank to the edge of lilac paper (16 cm wide).
Twist and glue the pink lilac blank around it. And so all 5 parts.
Then we twist the workpiece larger (3 parts).
And at the end we twist a large blank (5 parts), the width of which is 24 cm. Be sure to glue the base of the flower for better fixation.
Decorate the bottom with paper.
Where is such beauty? You can decorate a room for a holiday or a studio for a photo shoot. Due to double fixation: wire and glue, the flowers will retain their shape and attractive appearance for a long time.
Author MK
Wreath of autumn paper leaves with children
The next and last craft from paper leaves that we will make is an autumn wreath. Yes, yes, wreaths are not only for Christmas. Do you think where it might be appropriate? I suggest you watch this creative MK, and ideas, I’m sure, will come by themselves.
Materials:
- Scissors;
- PVA glue;
- Colored printer paper;
- Simple pencil;
- Cardboard;
- Yellow satin ribbon 30 cm long;
- Figured hole punch “Maple leaf”.
Subsequence:
Draw a circle on a sheet of cardboard. You can use a large plate as a stencil.
Inside it we make another smaller circle.
Cut out the resulting ring.
On the reverse side we glue a loop of satin ribbon to it.
Using a figured hole punch, we cut out maple leaves from multi-colored paper.
We glue the cardboard base.
This is such a cute autumn decoration for the interior. As you can see, nothing complicated.
Let's see what other leaf wreaths you can make.
A simple but stylish option. Do you agree?
Even children can handle creating such a wreath.
Felt leaves look even more natural than paper ones.
This is how you can decorate your home on the eve of Halloween!
If you want to surprise everyone, then take something as unusual as this type of craft into your collection. I suggest making a wreath like this. It looks bright and wonderful and will decorate any room or party room.
Simple but interesting petal shaping
Here I will show you how to shape the petals, giving them the shape of a real, living flower. It seems to me that this flower also looks like an aster.
Cut the roll in half widthwise.
Cut 20 cm. Fold in half 3 times to get 8 peony petals. Cut off the corners on top.
We cut the rectangles along the fold lines, but do not cut the paper completely, leaving 2-3 cm to the edge.
Without unfolding, we twist the paper (like we twist linen). One way and then the other.
Unfold once and scroll 4 more petals together.
Unfold and stretch the middle of each petal.
We glue 2 such strips to each other in a checkerboard pattern. It is necessary that the petals of one strip are located between the petals of the second strip.
And such blanks can already be twisted to make peonies.
More details on the author's video:
And the same method, but different design.
More options you can try to make. The first of them is according to the method described in this section. But here it’s a little more fluffy and we’ve chosen light and dark pink for the middle.
In the next photo, the lower aster contains petals of different lengths and due to this, a completely different interesting look is obtained.
Author
Process Features
To make artificial flowers, it is important to decide on several points. Namely:
- color spectrum;
- dimensions;
- material used.
Astra and the basis for it
There were some things I liked about this master class. How to make the basis for an aster from waste material, a simple bottle. Very interesting formation of petals and sepals. Similar to the previous master class, but there is a difference.
For example, the edges of the petals may remain curled. And this gives lightness to the design. It’s interesting how the craftswoman collects and fixes the petals to the base. And the base is a plastic bottle. The result was a fantastically beautiful, huge flower!
Stencils and leaf templates for cutting out different sizes
Well, now a couple more pictures of leaves. And by the way, give the kids a task, they will cheerfully and happily color such templates (coloring books). Or do this work yourself. Take a look, there are oak, birch, maple “cuties”, etc.
protruding leaves
The art of vytynanka involves the creation of openwork patterns and elements from black, white, and colored paper. Presumably, such art arose in ancient China, almost immediately after the invention and widespread distribution of paper. Such leaves are cut out according to templates, they are used to decorate walls, window glass, mirrors, and leaves hanging from the ceiling on thin threads also look beautiful. No less often, such items are used to make wreaths, including voluminous ones. For autumn vytynankas, mainly yellow, brown, red-orange paper is used. An ordinary hand-painted album sheet will also make an excellent protruding sheet.
With the help of soapy water and tape, the protrusions are easily glued to the window.
Tools, materials
To complete this craft you will need:
- stationery (layout) knife or nail scissors;
- template (draw yourself or download from the Internet, print);
- a simple pencil;
- colored paper;
- a board or special mat (so as not to damage the table);
- scotch.
Manufacturing technique
The leaf vytynanka is done like this:
- the template is transferred to paper - it is carefully drawn with a pencil, the lines should be as clear as possible;
- cutting is done with a very sharp stationery knife or nail scissors. When cutting with a knife, the template is secured to the board with tape so that it does not move;
- They start cutting out from the smallest details. Everything that is cut out is immediately removed;
- then the larger internal parts are cut out, then the outer contour;
- the finished product is attached to a thread, window glass, panel.
If you want to make a lot of objects of the same shape, but different in color, place several layers of paper under the template, cutting through them all at the same time.
Flower with brooch
We will need a lot of petals of different sizes, three corrugated paper baskets and a foam ball that will need to be covered with rhinestones, or just an old brooch without a pin.
Place the petals on top of each other in a circle. We glue the baskets and brooch in the center.